SpringBoot与Swagger2整合
一、Swagger简介与优势
相信各位在公司写API文档数量应该不少,当然如果你还处在自己一个人开发前后台的年代,当我没说,如今为了前后台更好的对接,还为了以后交接方便,都有要求写API文档。
Swagger是一款Restful接口的文档在线自动生成+功能测试的软件。
Swagger是一个规范和完整的框架。用于生成、描述、调用和可视化Restful风格的Web服务。总体目标是使客户端和文件系统
作为服务器以同样的速度来更新文件的方法、参数和模型紧密集成到服务器端的代码,允许API来始终保持同步。
手写Api文档的几个痛点:
- 文档需要更新的时候,需要再次发送一份给前端,也就是文档更新交流不及时。
- 接口返回结果不明确
- 不能直接在线测试接口,通常需要使用工具,比如postman
- 接口文档太多,不好管理
Swagger也就是为了解决这个问题,当然也不能说Swagger就一定是完美的,当然也有缺点,最明显的就是代码移入性比较强。
其他的不多说,想要了解Swagger的,可以去Swagger官网,可以直接使用Swagger editor编写接口文档,当然我们这里讲解的是SpringBoot整合Swagger2,直接生成接口文档的方式。
二、SpringBoot Swagger2整合 ,本项目环境springboot版本为 2.1.0,jdk1.8
第一步:jar包的引入:
        <dependency>

            <groupId>io.springfox</groupId>

            <artifactId>springfox-swagger2</artifactId>

            <version>2.7.0</version>

        </dependency>

        <dependency>

            <groupId>io.springfox</groupId>

            <artifactId>springfox-swagger-ui</artifactId>

            <version>2.7.0</version>

        </dependency>
第二步:controller层实现swagger接口类 ExternalVoucherAttachAPI
几个注意点,
1.由于本项目涉及到具体的业务类,initialize和setReqAndRes这两个方法可以不用看
2.用到的几个swagger注解
@ApiOperation 用在请求的方法上,说明方法的用户和作用
@ApiResponses  用在请求的方法上,表示一组响应。可以包含多个@ApiResponse()

@ApiResponse()  用于表示一个响应信息
@RequestBody swagger的post请求需要的参数是body类型,get请求用到的是 @ApiImplicitParams(),规范的接口文档都是这样要求的
@ApiImplicitParams 用在请求的方法上,表示一组参数说明,可以包含多个@ApiImplicitParam()
@ApiImplicitParam  指定一个请求参数的各个方面

ApiSuccess.class 这是我们自己的单独写的响应类,会在下面展示
实体类用到的注解:
@ApiModel  用在响应类上,表示一个返回响应数据的信息。

@ApiModelProperty 用在属性上,描述响应类的属性
①下面是ExternalVoucherAttachAPI类的代码:
package assp.evoucher.external.http;

import javax.servlet.http.HttpServletRequest;
import javax.servlet.http.HttpServletResponse;

import assp.evoucher.external.http.call.VoucherAttach;
import assp.evoucher.external.http.model.ApiSuccess;
import assp.evoucher.external.http.model.UploadAttach;
import io.swagger.annotations.*;
import org.slf4j.Logger;
import org.slf4j.LoggerFactory;
import org.springframework.stereotype.Controller;
import org.springframework.web.bind.annotation.ModelAttribute;
import org.springframework.web.bind.annotation.RequestBody;
import org.springframework.web.bind.annotation.RequestMapping;
import org.springframework.web.bind.annotation.RequestMethod;

import springfox.documentation.annotations.ApiIgnore;

import java.io.IOException;

@Controller
public class ExternalVoucherAttachAPI {

    private static Logger logger = LoggerFactory.getLogger(ExternalVoucherAttachAPI.class);
//项目具体的业务 可以不看 开始
    protected HttpContext httpContext;

    @ModelAttribute
    public void setReqAndRes(HttpServletRequest request,
                             HttpServletResponse response) {
        httpContext = new HttpContext();
        httpContext.setRequest(request);
        httpContext.setResponse(response);
        httpContext.setSession(request.getSession());
    }

    /**
     * 初始化
     * @return
     */
    private Object initialize(Class<?> className){
        Object queryCglib = null;
        try {
            HttpCallInterceptor cglib = new HttpCallInterceptor(httpContext);
            queryCglib = cglib.getInstance(className);
        } catch (Exception e) {
            logger.error("对象序列话失败, cause by:" + e.getMessage(), e);
        }
        return queryCglib;
    }
//项目具体的业务 可以不看 结束
    @ApiOperation(value = "上传附件")
    @ApiResponses({@ApiResponse(code = 200, message = "正确返回" ,response =ApiSuccess.class)})
    @RequestMapping(value = "/external/uploadAttach",method = RequestMethod.POST)
    public void uploadAttach(@RequestBody UploadAttach uploadAttach)  {
        VoucherAttach voucherAttach = (VoucherAttach)this.initialize(VoucherAttach.class);
        httpContext.setObiect(uploadAttach);
        voucherAttach.uploadAttachById(httpContext);
    }
    @ApiOperation(value = "根据附件ID获取附件")
    @ApiImplicitParams({
            @ApiImplicitParam(required = true, name = "certID", value = "证书ID", paramType = "query", dataType = "string"),
            @ApiImplicitParam(required = true, name = "attachId", value = "附件ID", paramType = "query", dataType = "string")
    })
    @ApiResponses({@ApiResponse(code = 200, message = "正确返回" ,response = ApiSuccess.class)})
    @RequestMapping(value = "/external/downloadAttachById",method = RequestMethod.GET)
    public void downloadAttachById(){
        VoucherAttach voucherAttach = (VoucherAttach)this.initialize(VoucherAttach.class);
        voucherAttach.downloadAttachById(httpContext);
    }

    @ApiOperation(value = "根据附件ID删除附件")
    @ApiImplicitParams({
            @ApiImplicitParam(required = true, name = "certID", value = "证书ID", paramType = "query", dataType = "string"),
            @ApiImplicitParam(required = true, name = "attachId", value = "附件ID", paramType = "query", dataType = "string")
    })
    @ApiResponses({@ApiResponse(code = 200, message = "正确返回" ,response = ApiSuccess.class)})
    @RequestMapping(value = "/external/deleteAttachById",method = RequestMethod.GET)
    public void deleteAttachById(){
        VoucherAttach voucherAttach = (VoucherAttach)this.initialize(VoucherAttach.class);
        voucherAttach.deleteAttachForID(httpContext);
    }
}

②下面是 post请求参数 实体类UploadAttach的代码:

CommonParameter类是公共参数,所有的post请求实体类继承该类
package assp.evoucher.external.http.model;

import io.swagger.annotations.ApiModel;

import io.swagger.annotations.ApiModelProperty;

@ApiModel(value="UploadAttach")

public class UploadAttach extends CommonParameter {

    @ApiModelProperty(value="机构证书ID",required=true)

    private String certID;

    @ApiModelProperty(value="附件类型",required=true)

    private String attachType;

    @ApiModelProperty(value="附件名称",required=true)

    private String attachName;

    @ApiModelProperty(value="附件分类",required=true)

    private String attachLab;

    @ApiModelProperty(value="data",required=true)

    private String data;

    public String getCertID() {

        return certID;

    }

    public void setCertID(String certID) {

        this.certID = certID;

    }

    public String getData() {

        return data;

    }

    public void setData(String data) {

        this.data = data;

    }

    public void setAttachType(String attachType) {

        this.attachType = attachType;

    }

    public String getAttachType() {

        return attachType;

    }

    public String getAttachName() {

        return attachName;

    }

    public void setAttachName(String attachName) {

        this.attachName = attachName;

    }

    public String getAttachLab() {

        return attachLab;

    }

    public void setAttachLab(String attachLab) {

        this.attachLab = attachLab;

    }

}
③下面是实体父类CommonParameter 的代码
package assp.evoucher.external.http.model;

import io.swagger.annotations.ApiModelProperty;

public class CommonParameter {

    @ApiModelProperty(value="应用ID",required=true)

    protected String appid;

    @ApiModelProperty(value="预算单位编码",required=true)

    protected String agencycode;

    @ApiModelProperty(value="当前系统时间戳",required=true)

    protected String timestamp;

    @ApiModelProperty(value="随机正整数",required=true)

    protected String random;

    @ApiModelProperty(value="签名结果",required=true)

    protected String signresult;

    public String getAppid() {

        return appid;

    }

    public void setAppid(String appid) {

        this.appid = appid;

    }

    public String getAgencycode() {

        return agencycode;

    }

    public void setAgencycode(String agencycode) {

        this.agencycode = agencycode;

    }

    public String getTimestamp() {

        return timestamp;

    }

    public void setTimestamp(String timestamp) {

        this.timestamp = timestamp;

    }

    public String getRandom() {

        return random;

    }

    public void setRandom(String random) {

        this.random = random;

    }

    public String getSignresult() {

        return signresult;

    }

    public void setSignresult(String signresult) {

        this.signresult = signresult;

    }

}
④ApiSuccess 这是我们自己的单独写的响应类
package assp.evoucher.external.http.model;

import io.swagger.annotations.ApiModel;

import io.swagger.annotations.ApiModelProperty;

@ApiModel(value="ApiResponse")

public class ApiSuccess {

    @ApiModelProperty(value="返回码 ",example="1成功,失败对应异常编码,格式EVS000 ")

    private int code;

    @ApiModelProperty(value="异常原因 ")

    private String reason;

    @ApiModelProperty(value="接口调用成功后的数据结果")

    private String data;

    public int getCode() {

        return code;

    }

    public void setCode(int code) {

        this.code = code;

    }

    public String getReason() {

        return reason;

    }

    public void setReason(String reason) {

        this.reason = reason;

    }

    public String getData() {

        return data;

    }

    public void setData(String data) {

        this.data = data;

    }

}
第三步:swagger的配置启动类编写:
关于几个注意点:
1.访问404的原因,首先Spring Boot自动配置本身不会自动把/swagger-ui.html这个路径映射到对应的目录META-INF/resources/下面。
所以我们需要动态的进行mvc资源文件的指定,所以会用到 addResourceHandlers 方法
2.本项目get请求和post请求分开,由于会用到一些公共参数
get请求采用了如下配置
也就是上面的该方法 customDocket_get() ,这样我们提供的接口方法 需要的参数不用在每个实体类上继成公共类
post请求采用了如下配置
也就是该方法 customDocket_post(),post请求采用的 接口需要的参数在每个实体类上继成公共类
3.在请求的方法上,表示一组响应
responseMessageList.add(new ResponseMessageBuilder().code(200)
                .message("正确返回").responseModel(new ModelRef("ApiSuccess"))

                .build());
4.需要swagger展示的接口需要指定包路径.apis(SwaggerApiSelectors.basePackageAndRequestMethod("assp.evoucher.external.http", RequestMethod.GET))
下面是SwaggerConfig的代码:
package assp.evoucher.sysmgr;

import org.springframework.beans.factory.annotation.Value;

import org.springframework.context.annotation.Bean;

import org.springframework.context.annotation.Configuration;

import org.springframework.context.annotation.PropertySource;

import org.springframework.web.bind.annotation.RequestMethod;

import org.springframework.web.servlet.config.annotation.EnableWebMvc;

import org.springframework.web.servlet.config.annotation.ResourceHandlerRegistry;

import org.springframework.web.servlet.config.annotation.WebMvcConfigurationSupport;

import org.springframework.web.servlet.config.annotation.WebMvcConfigurer;

import springfox.documentation.builders.*;

import springfox.documentation.schema.ModelRef;

import springfox.documentation.service.ApiInfo;

import springfox.documentation.service.Contact;

import springfox.documentation.service.Parameter;

import springfox.documentation.service.ResponseMessage;

import springfox.documentation.spi.DocumentationType;

import springfox.documentation.spring.web.plugins.Docket;

import springfox.documentation.swagger2.annotations.EnableSwagger2;

import java.util.ArrayList;

import java.util.List;

@Configuration

@EnableSwagger2

public class SwaggerConfig implements WebMvcConfigurer {

   //get请求配置

    @Bean

    public Docket customDocket_get() {
         //指定一组响应,本项目只指定响应200的描述

        List<ResponseMessage> responseMessageList = new ArrayList<ResponseMessage>();

        responseMessageList.add(new ResponseMessageBuilder().code(200)

                .message("正确返回").responseModel(new ModelRef("ApiSuccess"))

                .build());
       //所有的get请求加上公共参数

        ParameterBuilder parameterBuilder = new ParameterBuilder();

        List<Parameter> params = new ArrayList<>();

        parameterBuilder.name("appid").description("应用ID").modelRef(new ModelRef("string"))

                .parameterType("query").required(true);

        params.add(parameterBuilder.build());

        parameterBuilder.name("agencycode").description("预算单位编码").modelRef(new ModelRef("string"))

                .parameterType("query").required(true);

        params.add(parameterBuilder.build());

        parameterBuilder.name("timestamp").description("当前系统时间戳").modelRef(new ModelRef("string"))

                .parameterType("query").required(true);

        params.add(parameterBuilder.build());

        parameterBuilder.name("random").description("随机正整数").modelRef(new ModelRef("string"))

                .parameterType("query").required(true);

        params.add(parameterBuilder.build());

        parameterBuilder.name("signresult").description("签名结果").modelRef(new ModelRef("string"))

                .parameterType("query").required(true);

        params.add(parameterBuilder.build());

        /*

         * responseMessageList.add(new ResponseMessageBuilder().code(404)

         * .message("找不到资源").responseModel(new ModelRef("ApiError")) .build());

         * responseMessageList.add(new ResponseMessageBuilder().code(500)

         * .message("服务器内部错误").responseModel(new ModelRef("ApiError"))

         * .build()); responseMessageList.add(new

         * ResponseMessageBuilder().code(409)

         * .message("业务逻辑异常").responseModel(new ModelRef("ApiError")) .build());

         * responseMessageList.add(new ResponseMessageBuilder().code(422)

         * .message("参数校验异常").responseModel(new ModelRef("ApiError")) .build());

         * responseMessageList.add(new ResponseMessageBuilder().code(503)

         * .message("Hystrix异常").responseModel(new ModelRef("ApiError"))

         * .build());

         */

        return new Docket(DocumentationType.SWAGGER_2).groupName("get")

                .globalResponseMessage(RequestMethod.GET, responseMessageList)

                .globalResponseMessage(RequestMethod.POST, responseMessageList)

                .globalResponseMessage(RequestMethod.PUT, responseMessageList)

                .globalResponseMessage(RequestMethod.DELETE,

                        responseMessageList).apiInfo(apiInfo()).select()

                    .apis(SwaggerApiSelectors.basePackageAndRequestMethod("assp.evoucher.external.http", RequestMethod.GET))

                .paths(PathSelectors.any())

                .build().globalOperationParameters(params);

                //.pathMapping("/external");

                //.host(host); // 在这里可以设置请求的统一前缀

    }

//post请求配置

    @Bean

    public Docket customDocket_post() {

        List<ResponseMessage> responseMessageList = new ArrayList<ResponseMessage>();

        responseMessageList.add(new ResponseMessageBuilder().code(200)

                .message("正确返回").responseModel(new ModelRef("ApiSuccess"))

                .build());

        /*

         * responseMessageList.add(new ResponseMessageBuilder().code(404)

         * .message("找不到资源").responseModel(new ModelRef("ApiError")) .build());

         * responseMessageList.add(new ResponseMessageBuilder().code(500)

         * .message("服务器内部错误").responseModel(new ModelRef("ApiError"))

         * .build()); responseMessageList.add(new

         * ResponseMessageBuilder().code(409)

         * .message("业务逻辑异常").responseModel(new ModelRef("ApiError")) .build());

         * responseMessageList.add(new ResponseMessageBuilder().code(422)

         * .message("参数校验异常").responseModel(new ModelRef("ApiError")) .build());

         * responseMessageList.add(new ResponseMessageBuilder().code(503)

         * .message("Hystrix异常").responseModel(new ModelRef("ApiError"))

         * .build());

         */

        return new Docket(DocumentationType.SWAGGER_2).groupName("post")

                .globalResponseMessage(RequestMethod.GET, responseMessageList)

                .globalResponseMessage(RequestMethod.POST, responseMessageList)

                .globalResponseMessage(RequestMethod.PUT, responseMessageList)

                .globalResponseMessage(RequestMethod.DELETE,

                        responseMessageList).apiInfo(apiInfo()).select()

                .apis(SwaggerApiSelectors.basePackageAndRequestMethod("assp.evoucher.external.http", RequestMethod.POST))//指定需要用swagger展示的包路径

                .paths(PathSelectors.any())

                .build();

        //.pathMapping("/external");

        //.host(host); // 在这里可以设置请求的统一前缀

    }

  //swagger文档描述

    private ApiInfo apiInfo() {

        return new ApiInfoBuilder()

                //页面标题

                .title("服务端接口")

                //创建人

                .contact(new Contact("ctjsoft", "http://www.ctjsoft.com/", ""))

                //版本号

                .version("1.0")

                //描述

                .description("API 描述")

                .build();

    }

  //动态的进行mvc资源文件的指定,所以会用到 addResourceHandlers 方法,否则可能会出现404问题

    @Override

    public void addResourceHandlers(ResourceHandlerRegistry registry) {

    /*    registry.addResourceHandler("/**").addResourceLocations(

                "classpath:/static/");*/

        registry.addResourceHandler("swagger-ui.html").addResourceLocations(

                "classpath:/META-INF/resources/");

        registry.addResourceHandler("/webjars/**").addResourceLocations(

                "classpath:/META-INF/resources/webjars/");

    }

}
第四步:如果需要展示swagger接口的controller类跟项目启动类不在同一个包下,需要在启动类中用ComponentScan指定扫描路径
package assp.evoucher.sysmgr;

import org.apache.axis.transport.http.AxisServlet;

import org.springframework.boot.SpringApplication;

import org.springframework.boot.autoconfigure.SpringBootApplication;

import org.springframework.boot.autoconfigure.jdbc.DataSourceAutoConfiguration;

import org.springframework.boot.builder.SpringApplicationBuilder;

import org.springframework.boot.web.servlet.ServletRegistrationBean;

import org.springframework.boot.web.servlet.support.SpringBootServletInitializer;

import org.springframework.context.annotation.Bean;

import org.springframework.context.annotation.ComponentScan;

@SpringBootApplication

@ComponentScan(basePackages = {"assp.*"})//指定swagger接口所在路径

public class EvoucherApplication {

    public static void main(String[] args) {

        SpringApplication.run(EvoucherApplication.class, args);

    }

}

}
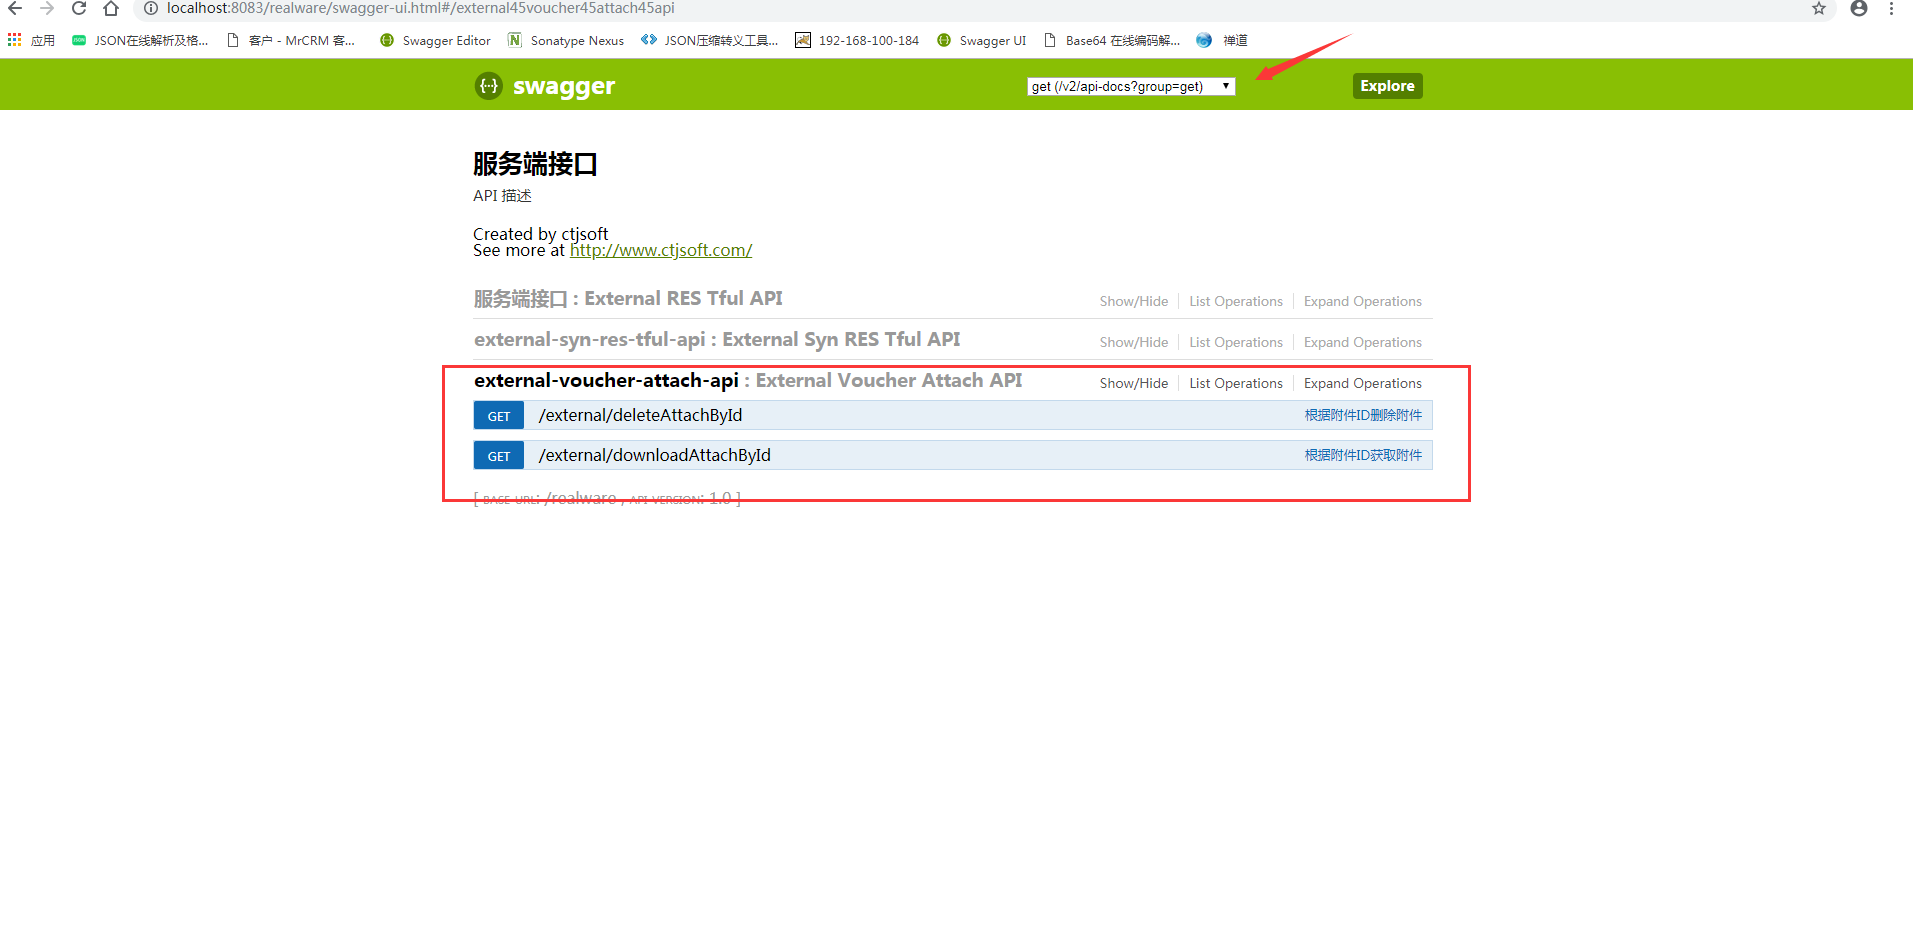
第五步:访问swagger路径 http://localhost:8083/realware/swagger-ui.html,SpringBoot Swagger2整合完毕
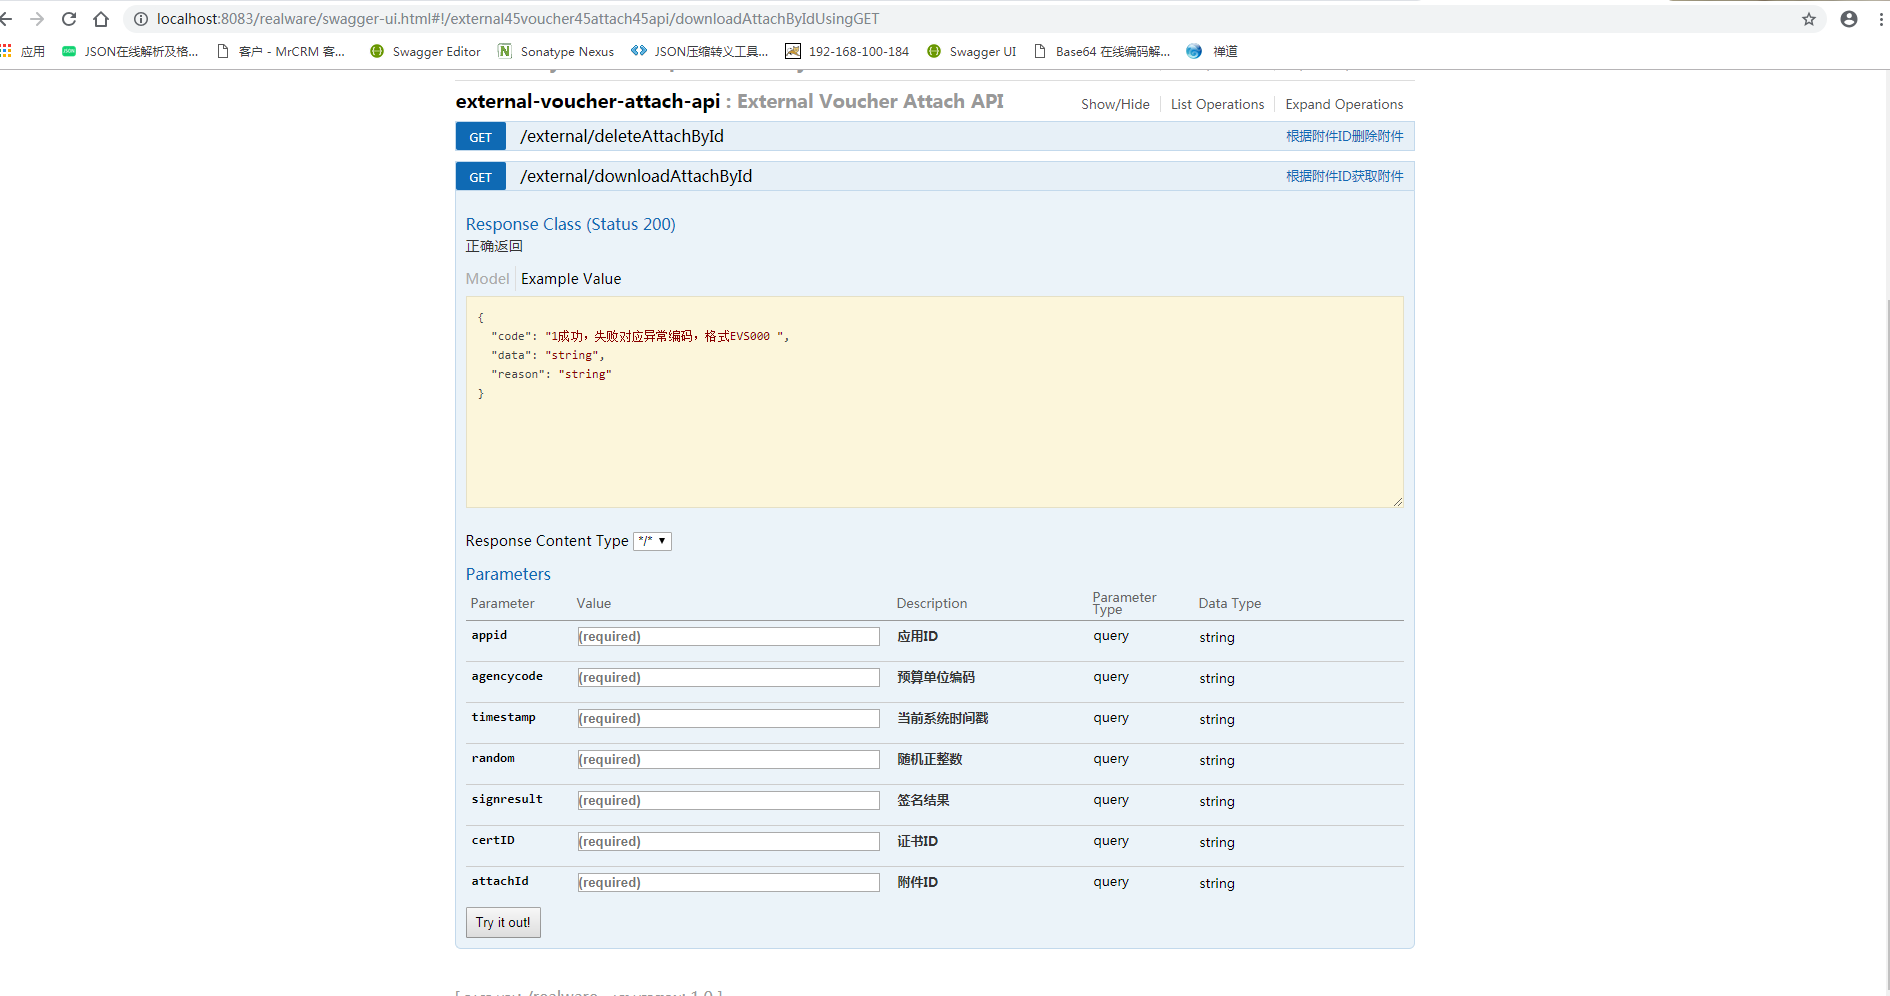
get请求与post请求分离(本项目get请求与post请求分开单独做一些业务处理,也可以不分开):
get请求:
具体参数:
post请求:
具体参数:
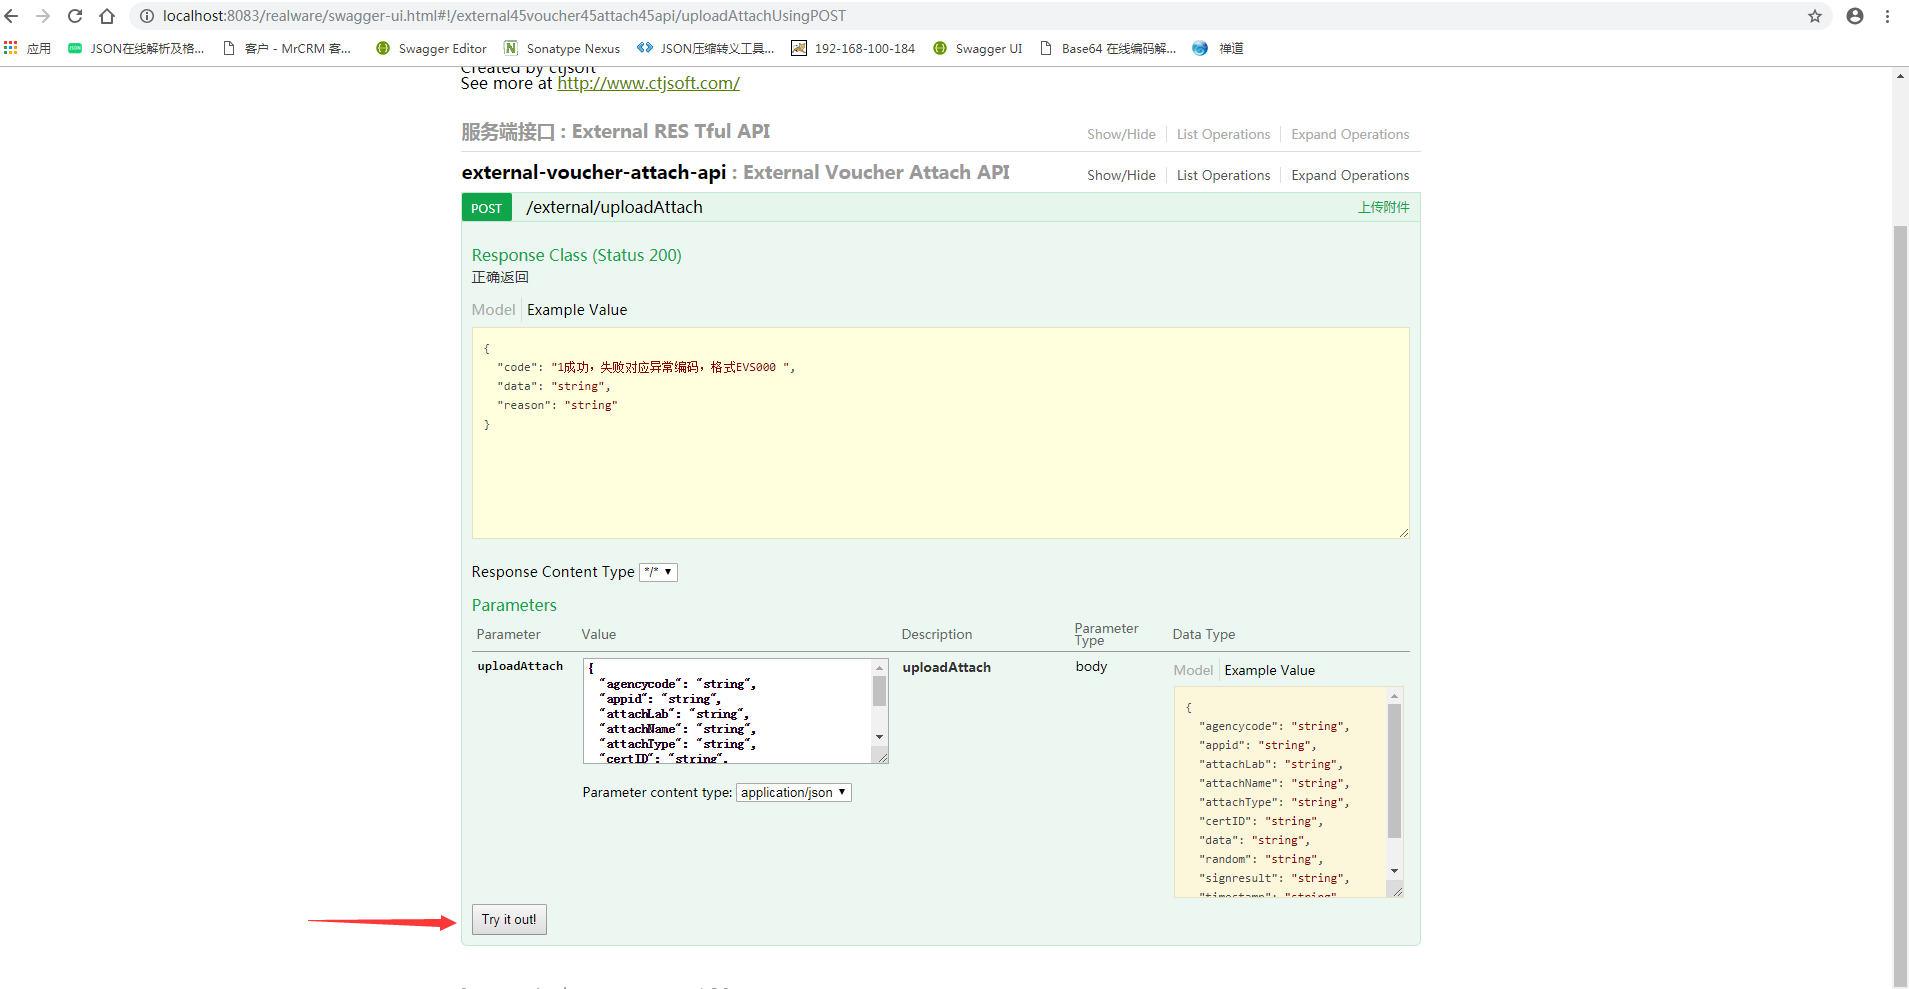
点击 Try it out! 开始测试接口
SpringBoot与Swagger2整合的更多相关文章
- springBoot与Swagger2的整合
1.在项目pom文件中引入swagger2的jar包 <!-- swagger2开始 --> <dependency> <groupId>io.springfox& ...
- SpringBoot使用Swagger2实现Restful API
很多时候,我们需要创建一个接口项目用来数据调转,其中不包含任何业务逻辑,比如我们公司.这时我们就需要实现一个具有Restful API的接口项目. 本文介绍springboot使用swagger2实现 ...
- SpringBoot与Swagger整合
1 SpringBoot与Swagger整合https://blog.csdn.net/jamieblue1/article/details/99847744 2 Swagger详解(SpringBo ...
- SpringBoot之Swagger2文档生成
SpringBoot之Swagger2文档生成 1.Swagger2介绍 编写和维护接口文档是每个程序员的职责,前面我们已经写好的接口现在需要提供一份文档,这样才能方便调用者使用.考虑到编写接口文档是 ...
- [转] spring-boot集成swagger2
经测,spring-boot版本使用1.5.2+时需使用springfox-swagger2版本2.5+(spring-boot 1.2 + springfox-swagger2 2.2 在未扫描ja ...
- 从零开始的SpringBoot项目 ( 六 ) 整合 MybatisPlus 实现代码自动生成
1.添加依赖 <!-- MySQL数据库 --> <dependency> <groupId>mysql</groupId> <artifactI ...
- SpringBoot集成Swagger2并配置多个包路径扫描
1. 简介 随着现在主流的前后端分离模式开发越来越成熟,接口文档的编写和规范是一件非常重要的事.简单的项目来说,对应的controller在一个包路径下,因此在Swagger配置参数时只需要配置一 ...
- SpringMVC中使用Swagger2整合
Swagger2是什么 Swagger 是一款RESTFUL接口的文档在线自动生成+功能测试功能软件. Swagger 是一个规范和完整的框架,用于生成.描述.调用和可视化 RESTful 风格的 W ...
- SpringBoot与Mybatis整合方式01(源码分析)
前言:入职新公司,SpringBoot和Mybatis都被封装了一次,光用而不知道原理实在受不了,于是开始恶补源码,由于刚开始比较浅,存属娱乐,大神勿喷. 就如网上的流传的SpringBoot与Myb ...
随机推荐
- Immutable.js 以及在 react+redux 项目中的实践
来自一位美团大牛的分享,相信可以帮助到你. 原文链接:https://juejin.im/post/5948985ea0bb9f006bed7472?utm_source=tuicool&ut ...
- MongoDB基础命令及操作
MongoDB:NoSQL数据库 MongoDB中的重要指示点 MongoDB中的三要素 数据库 集合 文档 MongoDB中的数据存储是以Bson的形式存储的,Bson是二进制的json,所以看上去 ...
- php图片上传存储源码,可实现预览
<?php header("content-Type: text/html; charset=gb2312"); $uptypes=array('image/jpg', // ...
- 深入浅出MFC学习笔记 第三章 MFC六大关键技术之仿真
0:MFC类层次结构 1:MFC程序的初始化过程CWinApp::InitApplication()CMyWinApp::InitInstance()CMyFrameWnd::CMyFrameWnd( ...
- Linux - iconv 使用 - 处理 curl 乱码问题
1. 概述 好久没有写博客了, 最近看了些东西, 但是不知道怎么输出 简单写点东西吧 2. 场景 最近发现一个网站, 时不时会更新电子书, 书还很好 网站有一个 排行榜, 会把近期更新的电子书, 都列 ...
- PHP base64转换成图片
获取base64文件 $image="data:image/png;base64,iVBORw0KGgoAAAANSUhEUgAAASIAAAEiCAYAAABdvt+2AAAgAElEQV ...
- 20155315 2016-2017-2 实验二《Java面向对象程序设计》实验报告
实验内容 1.初步掌握单元测试和TDD 2.理解并掌握面向对象三要素:封装.继承.多态 3.初步掌握UML建模 4.熟悉S.O.L.I.D原则 5.了解设计模式 实验知识点 1.参考Intellj I ...
- 20155320 2016-2017-2《Java程序设计》课程总结
20155320 2016-2017-2<Java程序设计>课程总结 (按顺序)每周作业链接汇总 预备作业1:第一次写随笔,回答了老师的一些问题,写下了期望和目标 预备作业2:总结了一下自 ...
- 20155329胡佩伦 《Java程序设计》第3周学习总结
学号 2016-2017-20155329胡佩伦 <Java程序设计>第3周学习总结 教材学习内容总结 本周复习巩固了运算符. 前缀自增自减法(++i,--i): 先进行自增或者自减运算, ...
- 20155333 2016-2017-2 《Java程序设计》第4周学习总结
20155333 2016-2017-2 <Java程序设计>第4周学习总结 教材学习内容总结 继承基本上就是避免多个类间重复定义的共同行为,在Java中,子类只能继承一个父类. priv ...