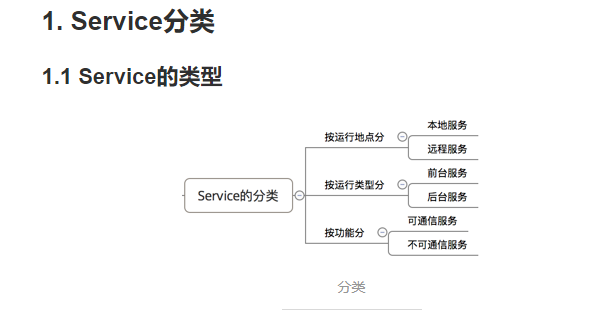
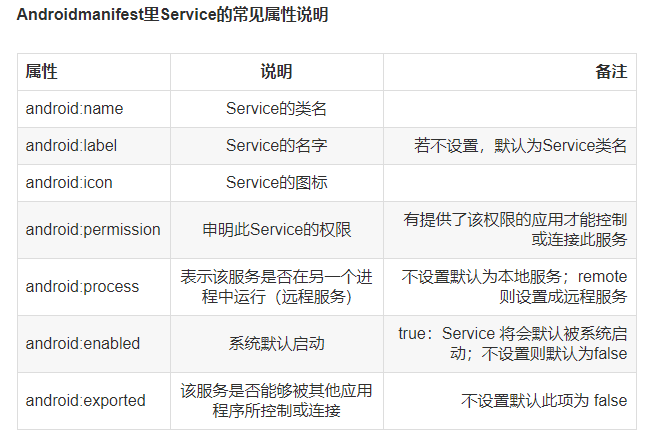
Android:(本地、可通信的、前台、远程)Service使用全面介绍
2.具体使用解析
2.1 本地Service
这是最普通、最常用的后台服务Service。
2.1.1 使用步骤
- 步骤1:新建子类继承Service类
需重写父类的onCreate()、onStartCommand()、onDestroy()和onBind()方法
- 步骤2:构建用于启动Service的Intent对象
- 步骤3:调用startService()启动Service、调用stopService()停止服务
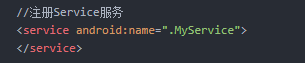
- 步骤4:在AndroidManifest.xml里注册Service
例子:
- 步骤1:新建子类继承Service类
需重写父类的onCreate()、onStartCommand()、onDestroy()和onBind()
public class MyService extends Service {

//启动Service之后,就可以在onCreate()或onStartCommand()方法里去执行一些具体的逻辑

//由于这里作Demo用,所以只打印一些语句

    @Override

    public void onCreate() {

        super.onCreate();

        System.out.println("执行了onCreat()");

    }

    @Override

    public int onStartCommand(Intent intent, int flags, int startId) {

        System.out.println("执行了onStartCommand()");

        return super.onStartCommand(intent, flags, startId);

    }

    @Override

    public void onDestroy() {

        super.onDestroy();

        System.out.println("执行了onDestory()");

    }

    @Nullable

    @Override

    public IBinder onBind(Intent intent) {

        return null;

    }

}
步骤2:在主布局文件设置两个Button分别用于启动和停止Service
activity_main.xml
<?xml version="1.0" encoding="utf-8"?>

<RelativeLayout xmlns:android="http://schemas.android.com/apk/res/android"

    xmlns:tools="http://schemas.android.com/tools"

    android:layout_width="match_parent"

    android:layout_height="match_parent"

    android:paddingBottom="@dimen/activity_vertical_margin"

    android:paddingLeft="@dimen/activity_horizontal_margin"

    android:paddingRight="@dimen/activity_horizontal_margin"

    android:paddingTop="@dimen/activity_vertical_margin"

    tools:context="scut.carson_ho.demo_service.MainActivity">

    <Button

        android:layout_centerInParent="true"

        android:id="@+id/startService"

        android:layout_width="wrap_content"

        android:layout_height="wrap_content"

        android:text="启动服务" />

    <Button

        android:layout_centerInParent="true"

        android:layout_below="@+id/startService"

        android:id="@+id/stopService"

        android:layout_width="wrap_content"

        android:layout_height="wrap_content"

        android:text="停止服务" />

</RelativeLayout>
步骤3:构建Intent对象,并调用startService()启动Service、stopService停止服务
public class MainActivity extends AppCompatActivity implements View.OnClickListener {

    private Button startService;

    private Button stopService;

    @Override

    protected void onCreate(Bundle savedInstanceState) {

        super.onCreate(savedInstanceState);

        setContentView(R.layout.activity_main);

        startService = (Button) findViewById(R.id.startService);

        stopService = (Button) findViewById(R.id.stopService);

        startService.setOnClickListener(this);

        startService.setOnClickListener(this);

    }

    @Override

    public void onClick(View v) {

        switch (v.getId()) {

            //点击启动Service Button

            case R.id.startService:

                //构建启动服务的Intent对象

                Intent startIntent = new Intent(this, MyService.class);

                //调用startService()方法-传入Intent对象,以此启动服务

                startService(startIntent);

            //点击停止Service Button

            case R.id.stopService:

                //构建停止服务的Intent对象

                Intent stopIntent = new Intent(this, MyService.class);

                //调用stopService()方法-传入Intent对象,以此停止服务

                stopService(stopIntent);

        }

    }

}
步骤4:在AndroidManifest.xml里注册Service
AndroidManifest.xml
2.2 可通信的服务Service
- 上面介绍的Service是最基础的,但只能单机使用,即无法与Activity通信
- 接下来将在上面的基础用法上,增设“与Activity通信”的功能,即使用绑定Service服务(Binder类、bindService()、onBind()、unbindService()、onUnbind())
2.2.1 实例Demo
接下来我将用一个实例Demo进行可通信的服务Service说明
- 步骤1:在新建子类继承Service类,并新建一个子类继承自Binder类、写入与Activity关联需要的方法、创建实例
public class MyService extends Service {

    private MyBinder mBinder = new MyBinder();

    @Override

    public void onCreate() {

        super.onCreate();

        System.out.println("执行了onCreat()");

    }

    @Override

    public int onStartCommand(Intent intent, int flags, int startId) {

        System.out.println("执行了onStartCommand()");

        return super.onStartCommand(intent, flags, startId);

    }

    @Override

    public void onDestroy() {

        super.onDestroy();

        System.out.println("执行了onDestory()");

    }

    @Nullable

    @Override

    public IBinder onBind(Intent intent) {

        System.out.println("执行了onBind()");

        //返回实例

        return mBinder;

    }

    @Override

    public boolean onUnbind(Intent intent) {

        System.out.println("执行了onUnbind()");

        return super.onUnbind(intent);

    }

    //新建一个子类继承自Binder类

    class MyBinder extends Binder {

        public void service_connect_Activity() {

            System.out.println("Service关联了Activity,并在Activity执行了Service的方法");

        }

    }

}
步骤2:在主布局文件再设置两个Button分别用于绑定和解绑Service
<?xml version="1.0" encoding="utf-8"?>

<RelativeLayout xmlns:android="http://schemas.android.com/apk/res/android"

    xmlns:tools="http://schemas.android.com/tools"

    android:layout_width="match_parent"

    android:layout_height="match_parent"

    android:paddingBottom="@dimen/activity_vertical_margin"

    android:paddingLeft="@dimen/activity_horizontal_margin"

    android:paddingRight="@dimen/activity_horizontal_margin"

    android:paddingTop="@dimen/activity_vertical_margin"

    tools:context="scut.carson_ho.demo_service.MainActivity">

    <Button

        android:layout_centerInParent="true"

        android:id="@+id/startService"

        android:layout_width="wrap_content"

        android:layout_height="wrap_content"

        android:text="启动服务" />

    <Button

        android:layout_centerInParent="true"

        android:layout_below="@+id/startService"

        android:id="@+id/stopService"

        android:layout_width="wrap_content"

        android:layout_height="wrap_content"

        android:text="停止服务" />

    <Button

        android:layout_centerInParent="true"

        android:layout_below="@id/stopService"

        android:id="@+id/bindService"

        android:layout_width="wrap_content"

        android:layout_height="wrap_content"

        android:text="绑定服务" />

    <Button

        android:layout_centerInParent="true"

        android:layout_below="@id/bindService"

        android:id="@+id/unbindService"

        android:layout_width="wrap_content"

        android:layout_height="wrap_content"

        android:text="解绑服务"

        />

</RelativeLayout>
步骤3:在Activity通过调用MyBinder类中的public方法来实现Activity与Service的联系
即实现了Activity指挥Service干什么Service就去干什么的功能
public class MainActivity extends AppCompatActivity implements View.OnClickListener {

    private Button startService;

    private Button stopService;

    private Button bindService;

    private Button unbindService;

    private MyService.MyBinder myBinder;

    //创建ServiceConnection的匿名类

    private ServiceConnection connection = new ServiceConnection() {

        //重写onServiceConnected()方法和onServiceDisconnected()方法

        //在Activity与Service建立关联和解除关联的时候调用

        @Override

        public void onServiceDisconnected(ComponentName name) {

        }

        //在Activity与Service解除关联的时候调用

        @Override

        public void onServiceConnected(ComponentName name, IBinder service) {

            //实例化Service的内部类myBinder

            //通过向下转型得到了MyBinder的实例

            myBinder = (MyService.MyBinder) service;

            //在Activity调用Service类的方法

            myBinder.service_connect_Activity();

        }

    };

    @Override

    protected void onCreate(Bundle savedInstanceState) {

        super.onCreate(savedInstanceState);

        setContentView(R.layout.activity_main);

        startService = (Button) findViewById(R.id.startService);

        stopService = (Button) findViewById(R.id.stopService);

        startService.setOnClickListener(this);

        stopService.setOnClickListener(this);

        bindService = (Button) findViewById(R.id.bindService);

        unbindService = (Button) findViewById(R.id.unbindService);

        bindService.setOnClickListener(this);

        unbindService.setOnClickListener(this);

    }

    @Override

    public void onClick(View v) {

        switch (v.getId()) {

            //点击启动Service

            case R.id.startService:

                //构建启动服务的Intent对象

                Intent startIntent = new Intent(this, MyService.class);

                //调用startService()方法-传入Intent对象,以此启动服务

                startService(startIntent);

                break;

            //点击停止Service

            case R.id.stopService:

                //构建停止服务的Intent对象

                Intent stopIntent = new Intent(this, MyService.class);

                //调用stopService()方法-传入Intent对象,以此停止服务

                stopService(stopIntent);

                break;

            //点击绑定Service

            case R.id.bindService:

                //构建绑定服务的Intent对象

                Intent bindIntent = new Intent(this, MyService.class);

                //调用bindService()方法,以此停止服务

                bindService(bindIntent,connection,BIND_AUTO_CREATE);

                //参数说明

                //第一个参数:Intent对象

                //第二个参数:上面创建的Serviceconnection实例

                //第三个参数:标志位

                //这里传入BIND_AUTO_CREATE表示在Activity和Service建立关联后自动创建Service

                //这会使得MyService中的onCreate()方法得到执行,但onStartCommand()方法不会执行

                break;

            //点击解绑Service

            case R.id.unbindService:

                //调用unbindService()解绑服务

                //参数是上面创建的Serviceconnection实例

                unbindService(connection);

                break;

                default:

                    break;

        }

    }

}
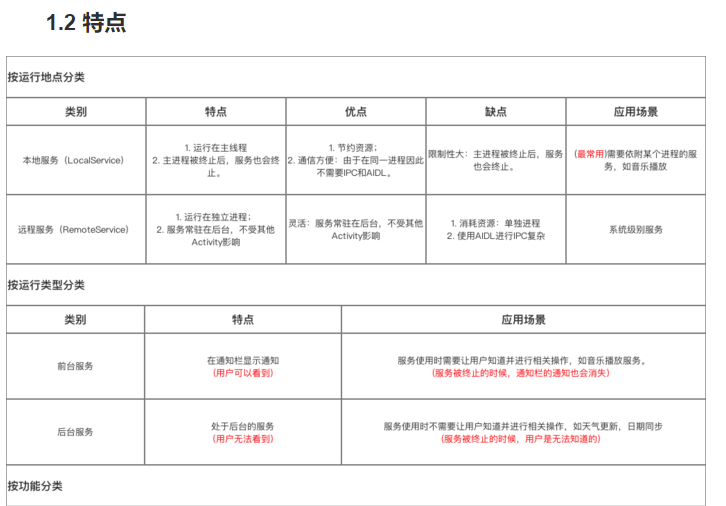
2.3 前台Service
前台Service和后台Service(普通)最大的区别就在于:
- 前台Service在下拉通知栏有显示通知(如下图),但后台Service没有;

- 前台Service优先级较高,不会由于系统内存不足而被回收;后台Service优先级较低,当系统出现内存不足情况时,很有可能会被回收
2.3.1 具体使用
用法很简单,只需要在原有的Service类对onCreate()方法进行稍微修改即可,如下图:
@Override

    public void onCreate() {

        super.onCreate();

        System.out.println("执行了onCreat()");

        //添加下列代码将后台Service变成前台Service

        //构建"点击通知后打开MainActivity"的Intent对象

        Intent notificationIntent = new Intent(this,MainActivity.class);

        PendingIntent pendingIntent = PendingIntent.getActivity(this,0,notificationIntent,0);

        //新建Builer对象

        Notification.Builder builer = new Notification.Builder(this);

        builer.setContentTitle("前台服务通知的标题");//设置通知的标题

        builer.setContentText("前台服务通知的内容");//设置通知的内容

        builer.setSmallIcon(R.mipmap.ic_launcher);//设置通知的图标

        builer.setContentIntent(pendingIntent);//设置点击通知后的操作

        Notification notification = builer.getNotification();//将Builder对象转变成普通的notification

        startForeground(1, notification);//让Service变成前台Service,并在系统的状态栏显示出来

    }
2.3.2 测试结果
运行后,当点击Start Service或Bind Service按钮,Service就会以前台Service的模式启动(通知栏上有通知),如下图

2.4 远程Service
具体请看我写的另外一篇文章:Android:远程服务Service(含AIDL & IPC讲解)
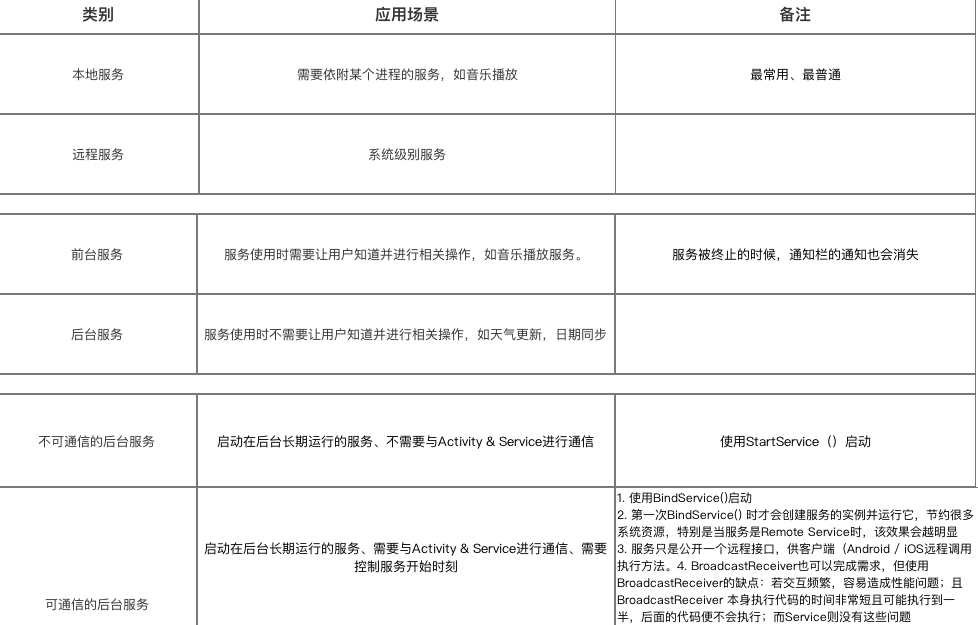
3. 使用场景
- 通过上述描述,你应该对Service类型及其使用非常了解;
- 那么,我们该什么时候用哪种类型的Service呢?
各种Service的使用场景请看下图:

Android:(本地、可通信的、前台、远程)Service使用全面介绍的更多相关文章
- Android 本地tomcat服务器接收处理手机上传的数据之案例演示
上一篇:Android 本地tomcat服务器接收处理手机上传的数据之环境搭建 本篇基于上一篇搭建的服务器端环境,具体介绍Android真机上传数据到tomcat服务器的交互过程 场景:A ...
- android 远程Service以及AIDL的跨进程通信
在Android中,Service是运行在主线程中的,如果在Service中处理一些耗时的操作,就会导致程序出现ANR. 但如果将本地的Service转换成一个远程的Service,就不会出现这样的问 ...
- Android Activity与远程Service的通信学习总结
当一个Service在androidManifest中被声明为 process=":remote", 或者是还有一个应用程序中的Service时,即为远程Service, 远程的意 ...
- 一个简单的demo学习Android远程Service(AIDL的使用)
这是milo很早之前写在论坛上的一个帖子,现在整理出来,milo也复习一下一般来说Android 的四大组件都是运行在同一个进程中的,但远程Service运行在不同的进程里.这进程间的通信是使用了An ...
- 本地/远程Service 和Activity 的交方式(转)
android SDK提供了Service,用于类似*nix守护进程或者windows的服务. Service有两种类型: 本地服务(Local Service):用于应用程序内部 远程服务(Remo ...
- 【起航计划 033】2015 起航计划 Android APIDemo的魔鬼步伐 32 App->Service->Foreground Service Controller service使用,共享service,前台服务,onStartCommand
Android系统也提供了一种称为“Service”的组件通常在后台运行.Activity 可以用来启动一个Service,Service启动后可以保持在后台一直运行,即使启动它的Activity退出 ...
- Android中AIDL通信机制分析
一.背景 ·1.AIDL出现的原因 在android系统中,每一个程序都是运行在自己的进程中,进程之间无法进行通讯,为了在Android平台,一个进程通常不能访问另一个进程的内存空间,所以要想对话,需 ...
- android学习笔记五。1、Service深入学习
一.Service,服务是没有界面而在后台长期运行的程序,可以看做是后台的Activity. 1.在Android中按返回键退出一个应用并不会(内存充足时)直接销毁一个进程,所以其中的子线程也可以在后 ...
- 【朝花夕拾】Android性能篇之(七)Android跨进程通信篇
前言 只要是面试高级工程师岗位,Android跨进程通信就是最受面试官青睐的知识点之一.Android系统的运行由大量相互独立的进程相互协助来完成的,所以Android进程间通信问题,是做好Andro ...
随机推荐
- Windows Server 脚本记录Apache、Mysql 每分钟并发数
打开windows server 计划任务管理器.定时执行如下的Bat脚本即可. 在D盘新建一个monitor文件夹,创建ApacheMysql.bat文件.内容如下: 在monitor文件夹中新建m ...
- 【BZOJ2227】[ZJOI2011]看电影(组合数学,高精度)
[BZOJ2227][ZJOI2011]看电影(组合数学,高精度) 题面 BZOJ 洛谷 题解 这题太神仙了. 首先\(K<N\)则必定无解,直接特判解决. 现在只考虑\(K\ge N\)的情况 ...
- 洛谷 P1121 环状最大两段子段和 解题报告
P1121 环状最大两段子段和 题目描述 给出一段环状序列,即认为\(A_1\)和\(A_N\)是相邻的,选出其中连续不重叠且非空的两段使得这两段和最大. 输入输出格式 输入格式: 第一行是一个正整数 ...
- windows安装redis的正确姿势
安装: 1,redis官方下载地址:https://redis.io/download,redis 64位下载地址:https://github.com/ServiceStack/redis-wind ...
- 【codeforces 175D】 Plane of Tanks: Duel
http://codeforces.com/problemset/problem/175/D (题目链接) 题意 A,B两人玩坦克大战,坦克有生命值,射击间隔,伤害范围,未命中的概率.问A赢的概率是多 ...
- Visualbox在UEFI模式下无法正常引导
引子 前几天VMware Workstation Pro 14发布了,从12更新到14之后,很多的虚拟机开启后都黑屏.实际并非黑屏,在控制台视图可以看到屏幕的缩略图是正常显示的.目前还没有找到解决方案 ...
- [luogu1655][小朋友的球]
luogu1665 思路 一道第二类斯特兰数的模板题.只不过需要写个高精. f[i][j]表示前i个球放到j个盒子里的方案数.第i个球可以单独一个盒子,所以f[i][j]+=f[i-1][j-1].还 ...
- 在Windows上部署dubbo-admin(监控中心)
在Windows上部署dubbo-admin(监控中心) 2018年11月12日 22:45:13 zzz_er 阅读数:1004 标签: dubbo 更多 个人分类: dubbo 版权声明:本文 ...
- 上传znbsite
1.将本地文件打包为zip: 2.备份服务器上的classes文件夹下面的配置文件: 3.上传zip,释放到tomcat下: 4.覆盖classes文件夹中的配置文件,启动tomcat:
- CPU温度问题
台式机和笔记本的CPU温度多少合适,过高会怎样, cpu温度跟环境温度有很大关系,夏天的时候会高一点的.一般CPU空闲的时候温度在50°以内,较忙时65°以内,全速工作时75°以内都是正常的,所以我们 ...