Ubuntu16.10下使用VSCode开发.netcore
按照通常的套路,首先创建一个空白的解决方案,需要用到.netcore sdk命令:
dotnet new sln -o dotnetcore_tutrorial
这个时候可以看到在目标目录下生成了一个同名的.sln文件,这个和使用vs是一样的,在我们实际开发过程中,通常要建立运行项目(web项目或者console项目),多个类库项目,以及单元测试项目。
首先建立一个类库项目,并将该项目加入到解决方案中:
dotnet new classlib -o DotNetTurorial.Common
dotnet sln add DotNetTurorial.Common/DotNetTurorial.Common.cspro
ps:最好把类库项目创建在dotnetcore_tutrorial目录下,这样可以保证.sln文件和项目文件在同一个目录下
通过同样的方式创建控制台项目和单元测试项目
dotnet new console -o DotNetTurorial.ConsoleApp

dotnet sln add DotNetTurorial.ConsoleApp/DotNetTurorial.ConsoleApp.csproj

dotnet new xunit -o DotNetTurorial.UnitTest

dotnet sln add DotNetTurorial.UnitTest/DotNetTurorial.UnitTest.csproj
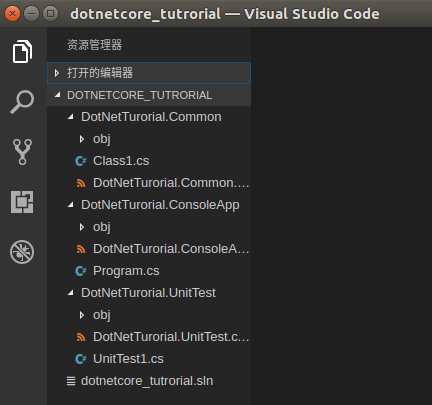
现在整个项目的结构已经建立完成,我们用vscode打开解决方案对应的文件夹,目录结构如下:
接下来需要添加项目引用,也就是console项目需要引用类库项目:
<Project Sdk="Microsoft.NET.Sdk">

  <PropertyGroup>

    <OutputType>Exe</OutputType>

    <TargetFramework>netcoreapp2.</TargetFramework>

  </PropertyGroup>

  <ItemGroup>

    <ProjectReference Include="..\DotNetTurorial.Common\DotNetTurorial.Common.csproj"/>

  </ItemGroup>

</Project>
同样的方法添加到测试项目:
<Project Sdk="Microsoft.NET.Sdk">

  <PropertyGroup>

    <TargetFramework>netcoreapp2.</TargetFramework>

    <IsPackable>false</IsPackable>

  </PropertyGroup>

  <ItemGroup>

    <PackageReference Include="Microsoft.NET.Test.Sdk" Version="15.3.0-preview-20170427-09" />

    <PackageReference Include="xunit" Version="2.2.0" />

    <PackageReference Include="xunit.runner.visualstudio" Version="2.2.0" />

  </ItemGroup>

  <ItemGroup>

    <ProjectReference Include="..\DotNetTurorial.Common\DotNetTurorial.Common.csproj"/>

  </ItemGroup>

</Project>
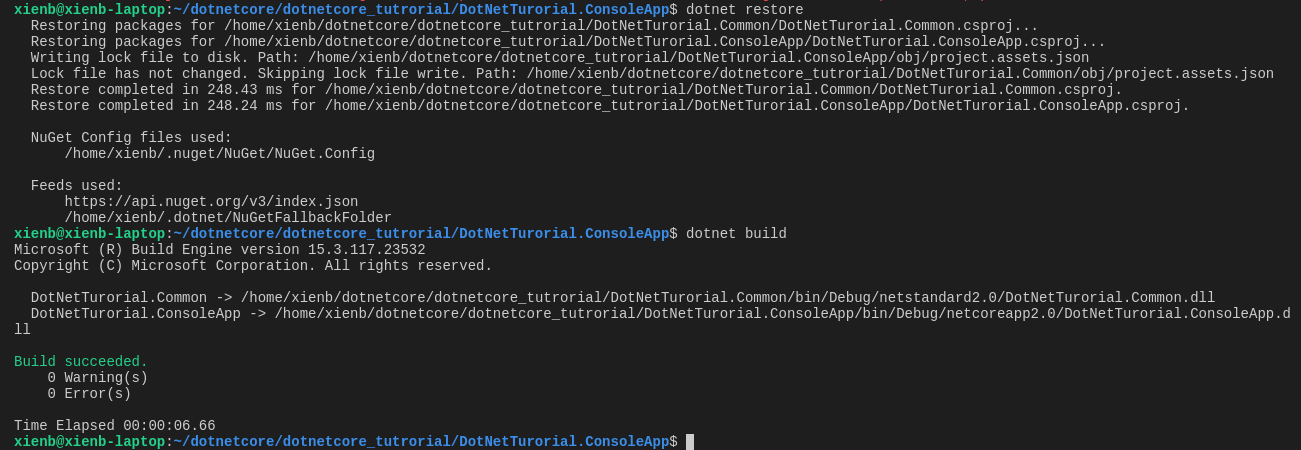
配置好以后,切换到Console项目所在目录,执行dotnet restore 初始化项目,执行dotnet build 编译项目
接下来实现一个简单的业务逻辑,通过console程序添加学生信息,并把数据存入mysql中:
操作数据需要用到几个nuget包,需要在项目文件中手动配置(dotnetcore2.0 不需要再引入NETStandard.Library)。
<?xml version="1.0" encoding="UTF-8" standalone="yes"?>

<Project Sdk="Microsoft.NET.Sdk">

  <PropertyGroup>

    <TargetFramework>netstandard2.</TargetFramework>

  </PropertyGroup>

  <ItemGroup>

    <PackageReference Include="Dapper" Version="1.50.2"/>

    <PackageReference Include="NETStandard.Library" Version="1.6.0"/>

    <PackageReference Include="SapientGuardian.MySql.Data" Version="6.9.813"/>

  </ItemGroup>

</Project>
这里建议安装一个vscode插件nuget package manager,可以通过该插件快速安装nuget包,安装完成以后在项目文件中右键,选择命令面板

在命令面板中输入nuget,可以根据包名搜索出该包的不同版本,添加以后使用dotnet resotore 命令还原nuget库到依赖
在common项目中增加一个数据库操作类:
using System;

using Dapper;

using MySql.Data.MySqlClient;

namespace DotNetTurorial.Common

{

    public class SQLHelper

    {

        public const string _conStr="server=127.0.0.1;port=3306;user id=root;password=123456;database=dotnetcore;pooling=false";

        public static int AddStudent(string name,int gender,string phone)

        {

            MySqlConnection connect=new MySqlConnection(_conStr);

            var ret = connect.Execute("insert into student(name,gender,phone) values(@name,@gender,@phone)",new {name=name,gender=gender,phone=phone});

            return ret;

        }

    }

}
在console项目中增加输入相关控制代码:
using System;

using DotNetTurorial.Common;

namespace DotNetTurorial.ConsoleApp

{

    class Program

    {

        static void Main(string[] args)

        {

            //Console.OutputEncoding = Encoding.UTF8; // 设置控制台编码

            AddUser();

            while(Console.ReadLine()!="exit"){

                AddUser();

            }

        }

        static void AddUser()

        {

            Console.WriteLine("please enter name:");

            var name=Console.ReadLine();

            Console.WriteLine("please enter gender,1 for male and 0 for female.");

            var gender = Console.ReadLine();

            Console.WriteLine("please enter phone:");

            var phone = Console.ReadLine();

            var ret = SQLHelper.AddStudent(name,Convert.ToInt32(gender),phone);

            if(ret>)

            {

                 Console.WriteLine("success");

            }

        }

    }

}
在终端中输入dotnet run 运行程序

如果需要调试,需要安装C#扩展:

如果调试有输入到console程序,需要修改下:launch.json,注释掉"Console":"internalConsole", 增加:"externalConsole":true, 否则无法数据
{

   // Use IntelliSense to find out which attributes exist for C# debugging

   // Use hover for the description of the existing attributes

   // For further information visit https://github.com/OmniSharp/omnisharp-vscode/blob/master/debugger-launchjson.md

   "version": "0.2.0",

   "configurations": [

        {

            "name": ".NET Core Launch (console)",

            "type": "coreclr",

            "request": "launch",

            "preLaunchTask": "build",

            // If you have changed target frameworks, make sure to update the program path.

            "program": "${workspaceRoot}/DotNetTurorial.ConsoleApp/bin/Debug/netcoreapp2.0/DotNetTurorial.ConsoleApp.dll",

            "args": [],

            "cwd": "${workspaceRoot}/DotNetTurorial.ConsoleApp",

            // For more information about the 'console' field, see https://github.com/OmniSharp/omnisharp-vscode/blob/master/debugger-launchjson.md#console-terminal-window

            //"console": "internalConsole",

            "externalConsole":true, //使用外置的控制台

            "stopAtEntry": false,

            "internalConsoleOptions": "openOnSessionStart"

        },

        {

            "name": ".NET Core Attach",

            "type": "coreclr",

            "request": "attach",

            "processId": "${command:pickProcess}"

        }

    ]

}
源码地址:https://github.com/xienb/DotNetCore_Turorial.git
Ubuntu16.10下使用VSCode开发.netcore的更多相关文章
- Ubuntu16.04下配置VScode的C/C++开发环境
博客转载:https://blog.csdn.net/weixin_43374723/article/details/84064644 Visual studio code是微软发布的一个运行于 Ma ...
- ubuntu16.10下安装erlang和RabbitMQ
Ubuntu系统下安装RabbitMQ(我选择的是Ubuntu Server 16.10) 1.首先必须要有Erlang环境支持 --安装之前要装一些必要的库(Erlang开发环境同样)(参考:duq ...
- ubuntu16.04 下 C# mono开发环境搭建
本文转自:https://www.cnblogs.com/2186009311CFF/p/9204031.html 前记 之前我一直不看好C#的前景,因为我认为它只能在windows下运行,不兼容,对 ...
- Ubuntu 14.10 下使用IDEA开发Spark应用
1 环境准备 1.1 下载IDEA,可在官网下载 1.2 IDEA与Eclipse有点不同,IDEA中的New Projects相当于Eclipse中的workspace,New Module才是新建 ...
- windows 10下的python开发环境
linux子系统 按照文档 https://www.jianshu.com/p/2bcf5eca5fbc 的前五步,完成 ubuntu子系统安装. 不需安装图形桌面,无使用价值. 在https://w ...
- Ubuntu16.04下部署golang开发环境
一.需要文件 golang http://www.golangtc.com/download liteide http://www.golangtc.com/download/liteide 二.安装 ...
- ubuntu16.04 下使用vscode备忘录
微软的vscode是为程序员做了非常大贡献,其强大的功能和各个平台的可移植性给vscode带来了非常大的火力.在程序员的世界中非常的流行,算是一线明星了. 我把使用过程中遇到的一些问题做个记录,方便自 ...
- 解决双系统(Window10+Ubuntu16.10)下ubuntu安装git时提示软件包git没有可安装候选问题
选择升级系统: sudo apt-get update 升级之后再输入: sudo apt-get install git 可成功安装.
- Ubuntu16.10下mysql5.7的安装及远程访问配置
如何安装mysql 1.sudo apt-get update,如果很慢或者失败,需要在软件和更新中选择最佳服务器,勾选所有互联网下载选项及去掉其他软件所有勾选项 2.sudo apt-get upg ...
随机推荐
- 【C#】采用OleDB读取Excel文件转DataTable
using System; using System.Data; using System.Data.OleDb; using System.IO; using System.Linq; using ...
- 能改变this各种情况下的总结,还有没有总结到的,请留言!!
1.. 在函数参数中的,回调函数的this ,指向window 如: promise中的回调函数, 可以在方法外,转存this 2..构造函数中,this指向,实例对象 , 在全局中this是win ...
- kbengine学习1 安装
KBengine一年前就知道了,但是没来得及学(只记得是C++ + python脚本),前一个项目unity3d+fkask+socketio+sqlite硬怼出来的.这半年也没来得及管.(好像当时看 ...
- Codeforces 1062 E - Company
E - Company 思路: 首先,求出每个点的dfs序 然后求一些点的公共lca, 就是求lca(u, v), 其中u是dfs序最大的点, v是dfs序最小的大点 证明: 假设o是这些点的公共lc ...
- Codeforces 1043 F - Make It One
F - Make It One 思路: dp + 容斥 首先, 答案不会超过7, 因为前7个质数的乘积大于3e5(最坏的情况是7个数, 每个数都缺少一个不同的因子) 所以从1到7依次考虑 dp[i][ ...
- 第 8 章 容器网络 - 052 - overlay 如何实现跨主机通信?
overlay 如何实现跨主机通信? 在 host2 中运行容器 bbox2: docker run -itd --name bbox2 --network ov_net1 busybox bbox2 ...
- log4j动态监听配置修改
一般情况下,log4j的配置文件是log4j.properties.但是每次我们修改了配置文件之后程序并不会自动去加载,而需要我们去重启程序.那么怎么样才能让程序不用重启就监听到变化呢.代码如下: p ...
- nginx如何处理请求
有必要了解一下nginx转发请求的方式,弄清它是如何转发请求的对我们理解nginx的server块的配置很有意义(虽然我也还不是很明白) 上一节说了配置文件中可以有多个server块,所以这里我配置2 ...
- PHP数组排序函数有哪些
PHP数组排序函数有哪些 一.总结 一句话总结:其实也就是是否保持索引,对键排序还是对值排序,除了sort,rsort.shuffle,usort外,都是保持索引的 是否保持索引 键排序 值排序 除了 ...
- office2016如何激活
office2016如何激活 一.总结 一句话总结:office2016没有激活成功,下了一个office2013破解版 office2013破解版 二.自己做法 三中的方法点赞蛮多的(100多个), ...