centos7安装zabbix4.2
附zabbixdocker镜像地址
https://hub.docker.com/u/zabbix/
zabbix官方文档
https://www.zabbix.com/cn/download
1、关闭防火墙和selinux
# systemctl stop firewalld
# vi /etc/selinux/config
SELINUX=permissive
# setenforce 0
[root@localhost ~]# systemctl is-active firewalld

active

[root@localhost ~]#

[root@localhost ~]# systemctl stop firewalld

[root@localhost ~]#

[root@localhost ~]# getenforce

Enforcing

[root@localhost ~]# setenforce

[root@localhost ~]#

[root@localhost ~]# vi /etc/selinux/config

# This file controls the state of SELinux on the system.

# SELINUX= can take one of these three values:

#     enforcing - SELinux security policy is enforced.

#     permissive - SELinux prints warnings instead of enforcing.

#     disabled - No SELinux policy is loaded.

SELINUX=permissive

# SELINUXTYPE= can take one of three two values:

#     targeted - Targeted processes are protected,

#     minimum - Modification of targeted policy. Only selected processes are protected.

#     mls - Multi Level Security protection.

SELINUXTYPE=targeted
2、添加zabbix存储库
# rpm -ivh https://repo.zabbix.com/zabbix/4.2/rhel/7/x86_64/zabbix-release-4.2-1.el7.noarch.rpm
[root@localhost ~]# rpm -ivh https://repo.zabbix.com/zabbix/4.2/rhel/7/x86_64/zabbix-release-4.2-1.el7.noarch.rpm

Retrieving https://repo.zabbix.com/zabbix/4.2/rhel/7/x86_64/zabbix-release-4.2-1.el7.noarch.rpm

warning: /var/tmp/rpm-tmp.fHl7KV: Header V4 RSA/SHA512 Signature, key ID a14fe591: NOKEY

Preparing...                          ################################# [%]

Updating / installing...

   :zabbix-release-4.2-.el7         ################################# [%]

[root@localhost ~]# ls /etc/yum.repos.d/

mylocal.repo  zabbix.repo
3、安装zabbix-server-mysql和zabbix-web-mysql
# yum install -y zabbix-server-mysql zabbix-web-mysql
要在 MySQL支持下安装Zabbix服务器
要在 MySQL支持下安装Zabbix前端
Installed:

  zabbix-server-mysql.x86_64 :3.0.-.el7                                      zabbix-web-mysql.noarch :3.0.-.el7

Dependency Installed:

  OpenIPMI-libs.x86_64 :2.0.-.el7              OpenIPMI-modalias.x86_64 :2.0.-.el7                dejavu-fonts-common.noarch :2.33-.el7

  dejavu-sans-fonts.noarch :2.33-.el7            fontpackages-filesystem.noarch :1.44-.el7            fping.x86_64 :3.10-.el7

  httpd.x86_64 :2.4.-.el7.centos               httpd-tools.x86_64 :2.4.-.el7.centos               iksemel.x86_64 :1.4-.el7.centos

  libX11.x86_64 :1.6.-.el7                      libX11-common.noarch :1.6.-.el7                     libXau.x86_64 :1.0.-2.1.el7

  libXpm.x86_64 :3.5.-.el7                     libjpeg-turbo.x86_64 :1.2.-.el7                    libtool-ltdl.x86_64 :2.4.-.el7_3

  libxcb.x86_64 :1.13-.el7                       libxslt.x86_64 :1.1.-.el7                          libzip.x86_64 :0.10.-.el7

  mailcap.noarch :2.1.-.el7                    net-snmp-libs.x86_64 :5.7.-.el7                    php.x86_64 :5.4.-.el7

  php-bcmath.x86_64 :5.4.-.el7                php-cli.x86_64 :5.4.-.el7                         php-common.x86_64 :5.4.-.el7

  php-gd.x86_64 :5.4.-.el7                    php-ldap.x86_64 :5.4.-.el7                        php-mbstring.x86_64 :5.4.-.el7

  php-mysql.x86_64 :5.4.-.el7                 php-pdo.x86_64 :5.4.-.el7                         php-xml.x86_64 :5.4.-.el7

  t1lib.x86_64 :5.1.-.el7                      unixODBC.x86_64 :2.3.-.el7                         zabbix-web.noarch :3.0.-.el7

Complete!
要使用MySQL支持安装Zabbix代理
# yum install zabbix-proxy-mysql -y
[root@localhost ~]# yum install zabbix-proxy-mysql -y

Installed:

  zabbix-proxy-mysql.x86_64 :4.2.-.el7

Complete!
对服务器进行自身监控
安装zabbix-agent客户端
# yum install zabbix-agent -y
设置开机自启动
# systemctl start zabbix-agent
# chkconfig zabbix-agent on
Installed:

  zabbix-agent.x86_64 :4.2.-.el7

Complete!

[root@localhost ~]#

[root@localhost ~]# chkconfig zabbix-agent on

Note: Forwarding request to 'systemctl enable zabbix-agent.service'.

Created symlink from /etc/systemd/system/multi-user.target.wants/zabbix-agent.service to /usr/lib/systemd/system/zabbix-agent.service.

[root@localhost ~]#
4、安装并且启动mysql5.6及初始化数据库信息
# rpm -ivh http://repo.mysql.com/yum/mysql-5.6-community/el/6/x86_64/mysql-community-release-el6-5.noarch.rpm
[root@localhost ~]# rpm -ivh http://repo.mysql.com/yum/mysql-5.6-community/el/6/x86_64/mysql-community-release-el6-5.noarch.rpm

Retrieving http://repo.mysql.com/yum/mysql-5.6-community/el/6/x86_64/mysql-community-release-el6-5.noarch.rpm

Preparing...                          ################################# [%]

Updating / installing...

   :mysql-community-release-el6-    ################################# [%]

[root@localhost ~]# cd /etc/yum.repos.d/

[root@localhost yum.repos.d]#

[root@localhost yum.repos.d]# ls

mylocal.repo  mysql-community.repo  mysql-community-source.repo  zabbix.repo

[root@localhost yum.repos.d]#
# yum install -y mysql-community-server
Installed:

  mysql-community-libs.x86_64 :5.6.-.el6                                   mysql-community-server.x86_64 :5.6.-.el6

Dependency Installed:

  mysql-community-client.x86_64 :5.6.-.el6        mysql-community-common.x86_64 :5.6.-.el6        perl-Compress-Raw-Bzip2.x86_64 :2.061-.el7

  perl-Compress-Raw-Zlib.x86_64 :2.061-.el7         perl-DBI.x86_64 :1.627-.el7                       perl-IO-Compress.noarch :2.061-.el7

  perl-Net-Daemon.noarch :0.48-.el7                 perl-PlRPC.noarch :0.2020-.el7

Replaced:

  mariadb-libs.x86_64 :5.5.-.el7_5

Complete!
启动mysqld服务
# systemctl start mysqld
设置开机自启动
# chkconfig mysqld on
[root@localhost ~]# systemctl start mysqld

[root@localhost ~]#

[root@localhost ~]# systemctl status mysqld

● mysqld.service - SYSV: MySQL database server.

   Loaded: loaded (/etc/rc.d/init.d/mysqld; bad; vendor preset: disabled)

   Active: active (running) since Wed -- :: CST; 12s ago

     Docs: man:systemd-sysv-generator()

  Process:  ExecStart=/etc/rc.d/init.d/mysqld start (code=exited, status=/SUCCESS)

 Main PID:  (mysqld)

   CGroup: /system.slice/mysqld.service

           ├─ /bin/sh /usr/bin/mysqld_safe --datadir=/var/lib/mysql --socket=/var/lib/mysql/mysql.sock --pid-file=/var/run/mysqld/mysqld.pid --basedi...

           └─ /usr/sbin/mysqld --basedir=/usr --datadir=/var/lib/mysql --plugin-dir=/usr/lib64/mysql/plugin --user=mysql --log-error=/var/log/mysqld....

Apr  :: localhost.localdomain mysqld[]: Note: new default config file not created.

Apr  :: localhost.localdomain mysqld[]: Please make sure your config file is current

Apr  :: localhost.localdomain mysqld[]: WARNING: Default config file /etc/my.cnf exists on the system

Apr  :: localhost.localdomain mysqld[]: This file will be read by default by the MySQL server

Apr  :: localhost.localdomain mysqld[]: If you do not want to use this, either remove it, or use the

Apr  :: localhost.localdomain mysqld[]: --defaults-file argument to mysqld_safe when starting the server

Apr  :: localhost.localdomain mysqld[]: [  OK  ]

Apr  :: localhost.localdomain mysqld[]: Starting mysqld:  [  OK  ]

Apr  :: localhost.localdomain systemd[]: mysqld.service: Supervising process  which is not our child. We'll most likely not notice w...t exits.

Apr  :: localhost.localdomain systemd[]: Started SYSV: MySQL database server..

Hint: Some lines were ellipsized, use -l to show in full.

[root@localhost ~]#

[root@localhost ~]# chkconfig mysqld on

[root@localhost ~]#
初始化数据库信息
# mysql_secure_installation
[root@localhost ~]# mysql_secure_installation

NOTE: RUNNING ALL PARTS OF THIS SCRIPT IS RECOMMENDED FOR ALL MySQL

      SERVERS IN PRODUCTION USE!  PLEASE READ EACH STEP CAREFULLY!

In order to log into MySQL to secure it, we'll need the current

password for the root user.  If you've just installed MySQL, and

you haven't set the root password yet, the password will be blank,

so you should just press enter here.

Enter current password for root (enter for none):    //回车

OK, successfully used password, moving on...

Setting the root password ensures that nobody can log into the MySQL

root user without the proper authorisation.

Set root password? [Y/n] y

New password:

Re-enter new password:

Password updated successfully!

Reloading privilege tables..

 ... Success!

By default, a MySQL installation has an anonymous user, allowing anyone

to log into MySQL without having to have a user account created for

them.  This is intended only for testing, and to make the installation

go a bit smoother.  You should remove them before moving into a

production environment.

Remove anonymous users? [Y/n] y

 ... Success!

Normally, root should only be allowed to connect from 'localhost'.  This

ensures that someone cannot guess at the root password from the network.

Disallow root login remotely? [Y/n] n

 ... skipping.

By default, MySQL comes with a database named 'test' that anyone can

access.  This is also intended only for testing, and should be removed

before moving into a production environment.

Remove test database and access to it? [Y/n] y

 - Dropping test database...

ERROR  (HY000) at line : Can't drop database 'test'; database doesn't exist

 ... Failed!  Not critical, keep moving...

 - Removing privileges on test database...

 ... Success!

Reloading the privilege tables will ensure that all changes made so far

will take effect immediately.

Reload privilege tables now? [Y/n] y

 ... Success!

All done!  If you've completed all of the above steps, your MySQL

installation should now be secure.

Thanks for using MySQL!

Cleaning up...
5、创建zabbix数据库,创建zabbix账号
# mysql -uroot -p
创建一个zabbix库并设置为utf8的字符编码格式
mysql> create database zabbix character set utf8 collate utf8_bin;
创建账户并且授权设置密码
给来自loclhost的用户zabbxi分配可对数据库zabbix所有表进行所有操作的权限,并且设定密码为zabbix
mysql> grant all privileges on zabbix.* to 'zabbix'@'localhost' identified by 'zabbix';
刷新
mysql> flush privileges;
[root@localhost ~]# mysql -uroot -p

Enter password:

Welcome to the MySQL monitor.  Commands end with ; or \g.

Your MySQL connection id is

Server version: 5.6. MySQL Community Server (GPL)

Copyright (c) , , Oracle and/or its affiliates. All rights reserved.

Oracle is a registered trademark of Oracle Corporation and/or its

affiliates. Other names may be trademarks of their respective

owners.

Type 'help;' or '\h' for help. Type '\c' to clear the current input statement.

mysql> create database zabbix character set utf8 collate utf8_bin;

Query OK,  row affected (0.00 sec)

mysql> grant all privileges on zabbix.* to 'zabbix'@'localhost' identified by 'zabbix';

Query OK,  rows affected (0.00 sec)

mysql> flush privileges;

Query OK,  rows affected (0.00 sec)

mysql> exit

Bye
6、导入默认的zabbix数据库信息
# zcat /usr/share/doc/zabbix-server-mysql-4.2.0/create.sql.gz | mysql zabbix -uzabbix -pzabbix
[root@localhost ~]# cd /usr/share/doc/zabbix-server-mysql-4.2./

[root@localhost zabbix-server-mysql-4.2.]#

[root@localhost zabbix-server-mysql-4.2.]# ls

AUTHORS  ChangeLog  COPYING  create.sql.gz  NEWS  README

[root@localhost zabbix-server-mysql-4.2.]#

[root@localhost zabbix-server-mysql-4.2.]# zcat /usr/share/doc/zabbix-server-mysql-4.2./create.sql.gz | mysql zabbix -uzabbix -pzabbix

Warning: Using a password on the command line interface can be insecure.

[root@localhost zabbix-server-mysql-4.2.]#
7、修改zabbix_server.conf的配置文件
# grep ^DB /etc/zabbix/zabbix_server.conf
[root@localhost ~]# grep ^DB /etc/zabbix/zabbix_server.conf

DBHost=localhost

DBName=zabbix

DBUser=zabbix

DBPassword=zabbix
# vi /etc/php.ini
在最后一行添加一下内容
php_value max_execution_time

php_value memory_limit 128M

php_value post_max_size 16M

php_value upload_max_filesize 2M

php_value max_input_time
8、修改系统时间
安装ntp服务
# yum install ntpdate -y
调整为亚洲上海时区
# ln -sf /usr/share/zoneinfo/Asia/Shanghai /etc/localtime
同步时间服务器
# ntpdate us.pool.ntp.org
[root@localhost ~]# yum install ntpdate -y

……………………

……………………

Installed:

  ntpdate.x86_64 :4.2.6p5-.el7.centos

Complete!

[root@localhost ~]# ntpdate us.pool.ntp.org

  Apr :: ntpdate[]: step time server 4.53.160.75 offset -32351.195618 sec

[root@localhost ~]# date

Thu Apr   :: CST

[root@localhost ~]#

[root@localhost ~]# ln -sf /usr/share/zoneinfo/Asia/Shanghai /etc/localtime

[root@localhost ~]#

[root@localhost ~]# ntpdate us.pool.ntp.org

  Apr :: ntpdate[]: step time server 72.30.35.89 offset -32392.501158 sec

[root@localhost ~]#

[root@localhost ~]# date

Thu Apr   :: CST

[root@localhost ~]#
9、修改配置文件/etc/httpd/conf.d/zabbix.conf,时区改成 Asia/Shanghai
# vi /etc/httpd/conf.d/zabbix.conf
[root@localhost ~]# vi /etc/httpd/conf.d/zabbix.conf

#

# Zabbix monitoring system php web frontend

#

Alias /zabbix /usr/share/zabbix

<Directory "/usr/share/zabbix">

    Options FollowSymLinks

    AllowOverride None

    Require all granted

    <IfModule mod_php5.c>

        php_value max_execution_time

        php_value memory_limit 128M

        php_value post_max_size 16M

        php_value upload_max_filesize 2M

        php_value max_input_time

        php_value max_input_vars

        php_value always_populate_raw_post_data -

        php_value date.timezone Asia/Shanghai

    </IfModule>

</Directory>

<Directory "/usr/share/zabbix/conf">

    Require all denied

</Directory>

<Directory "/usr/share/zabbix/app">

    Require all denied

</Directory>

<Directory "/usr/share/zabbix/include">

    Require all denied

</Directory>

<Directory "/usr/share/zabbix/local">

    Require all denied

</Directory>
10、启动apache/zabbix-server服务并设置为开机启动
启动apache
# systemctl start httpd
# systemctl enable httpd
[root@localhost ~]# systemctl start httpd

[root@localhost ~]# systemctl status httpd

● httpd.service - The Apache HTTP Server

   Loaded: loaded (/usr/lib/systemd/system/httpd.service; disabled; vendor preset: disabled)

   Active: active (running) since Wed -- :: CST; 19s ago

     Docs: man:httpd()

           man:apachectl()

 Main PID:  (httpd)

   Status: "Total requests: 0; Current requests/sec: 0; Current traffic:   0 B/sec"

   CGroup: /system.slice/httpd.service

           ├─ /usr/sbin/httpd -DFOREGROUND

           ├─ /usr/sbin/httpd -DFOREGROUND

           ├─ /usr/sbin/httpd -DFOREGROUND

           ├─ /usr/sbin/httpd -DFOREGROUND

           ├─ /usr/sbin/httpd -DFOREGROUND

           └─ /usr/sbin/httpd -DFOREGROUND

Apr  :: localhost.localdomain systemd[]: Starting The Apache HTTP Server...

Apr  :: localhost.localdomain httpd[]: AH00558: httpd: Could not reliably determine the server's fully qualified domain name, using l... message

Apr  :: localhost.localdomain systemd[]: Started The Apache HTTP Server.

Hint: Some lines were ellipsized, use -l to show in full.

[root@localhost ~]# systemctl enable httpd

Created symlink from /etc/systemd/system/multi-user.target.wants/httpd.service to /usr/lib/systemd/system/httpd.service.

[root@localhost ~]#
启动zabbix-server服务并设置为开机启动
# systemctl start zabbix-server
# systemctl enable zabbix-server
[root@localhost ~]# systemctl start zabbix-server

[root@localhost ~]#

[root@localhost ~]# systemctl enable zabbix-server

Created symlink from /etc/systemd/system/multi-user.target.wants/zabbix-server.service to /usr/lib/systemd/system/zabbix-server.service.

[root@localhost ~]#
查看zabbix-server日志
# tailf /var/log/zabbix/zabbix_server.log
[root@localhost ~]# tailf  /var/log/zabbix/zabbix_server.log

  ::164956.559 server # started [icmp pinger #]

  ::164956.560 server # started [preprocessing manager #]

  ::164956.560 server # started [preprocessing worker #]

  ::164956.561 server # started [lld worker #]

  ::164956.561 server # started [lld manager #]

  ::164956.561 server # started [lld worker #]

  ::164956.562 server # started [preprocessing worker #]

  ::164956.562 server # started [alert manager #]

  ::164956.562 server # started [preprocessing worker #]

  ::164958.602 enabling Zabbix agent checks on host "Zabbix server": host became available
zabbix-server的web目录
# ls /usr/share/zabbix
[root@localhost ~]# ls /usr/share/zabbix

actionconf.php                 audio               discoveryconf.php            image.php        map.import.php     slides.php

adm.gui.php                    auditacts.php       disc_prototypes.php          images           map.php            srv_status.php

adm.housekeeper.php            auditlogs.php       favicon.ico                  img              overview.php       styles

adm.iconmapping.php            browserwarning.php  fonts                        imgstore.php     profile.php        sysmap.php

adm.images.php                 chart2.php          graphs.php                   include          queue.php          sysmaps.php

adm.macros.php                 chart3.php          history.php                  index_http.php   report2.php        templates.php

adm.other.php                  chart4.php          host_discovery.php           index.php        report4.php        toptriggers.php

adm.regexps.php                chart5.php          hostgroups.php               items.php        robots.txt         tr_events.php

adm.triggerdisplayoptions.php  chart6.php          hostinventoriesoverview.php  js               screenconf.php     trigger_prototypes.php

adm.triggerseverities.php      chart7.php          hostinventories.php          jsLoader.php     screenedit.php     triggers.php

adm.valuemapping.php           chart.php           host_prototypes.php          jsrpc.php        screen.import.php  usergrps.php

adm.workingtime.php            charts.php          host_screen.php              latest.php       screens.php        users.php

api_jsonrpc.php                conf                hosts.php                    local            services.php       zabbix.php

app                            conf.import.php     httpconf.php                 locale           setup.php

applications.php               correlation.php     httpdetails.php              maintenance.php  slideconf.php
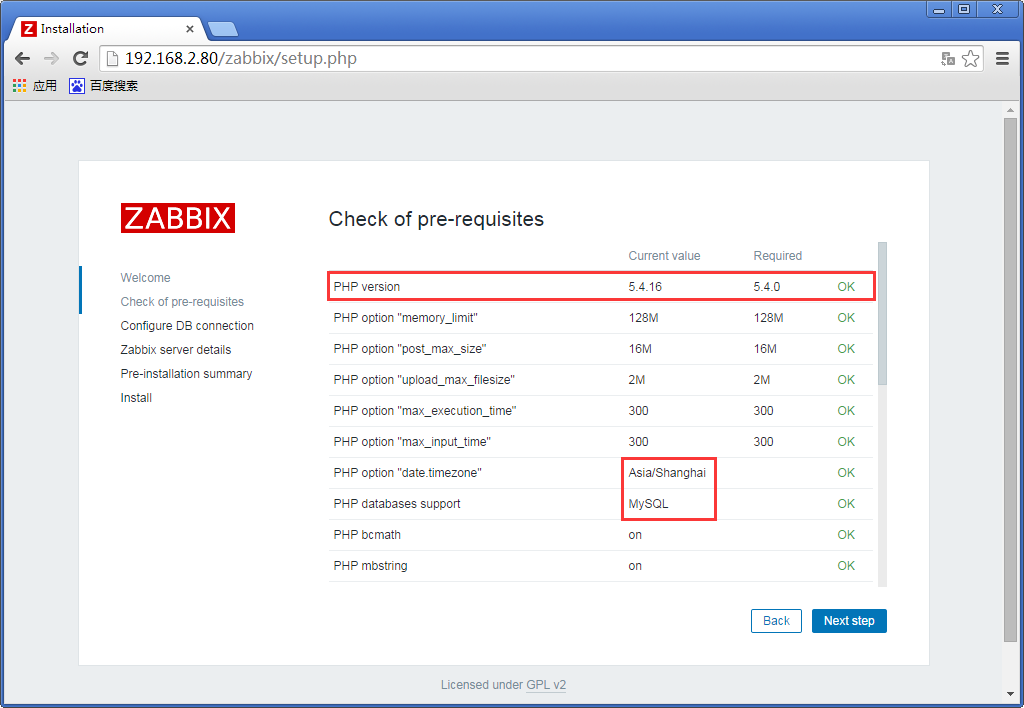
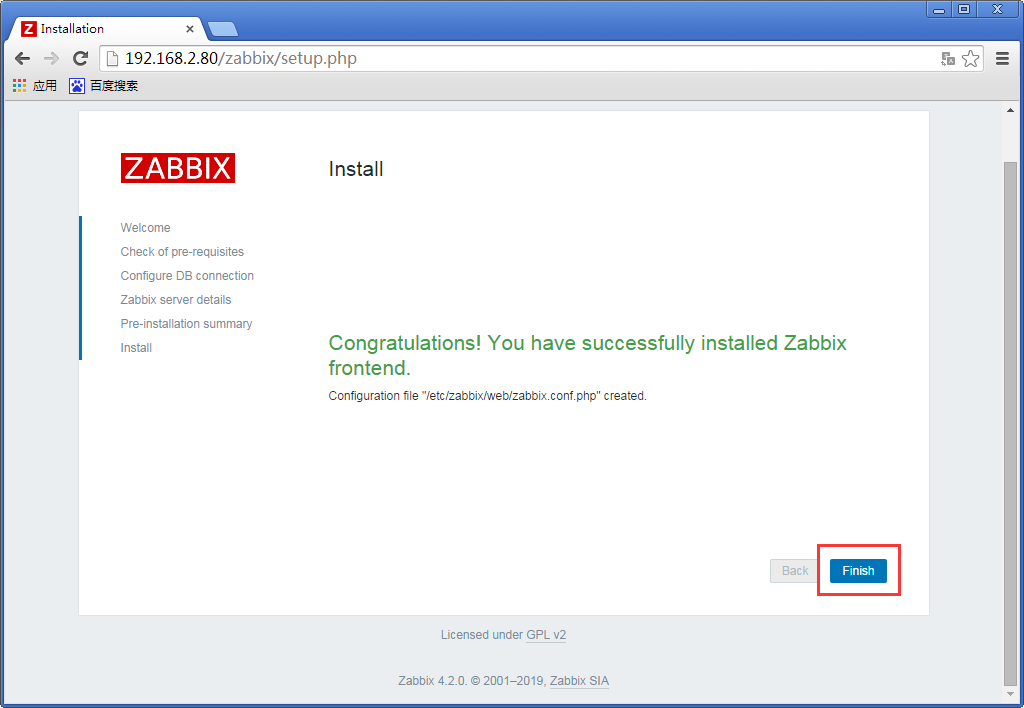
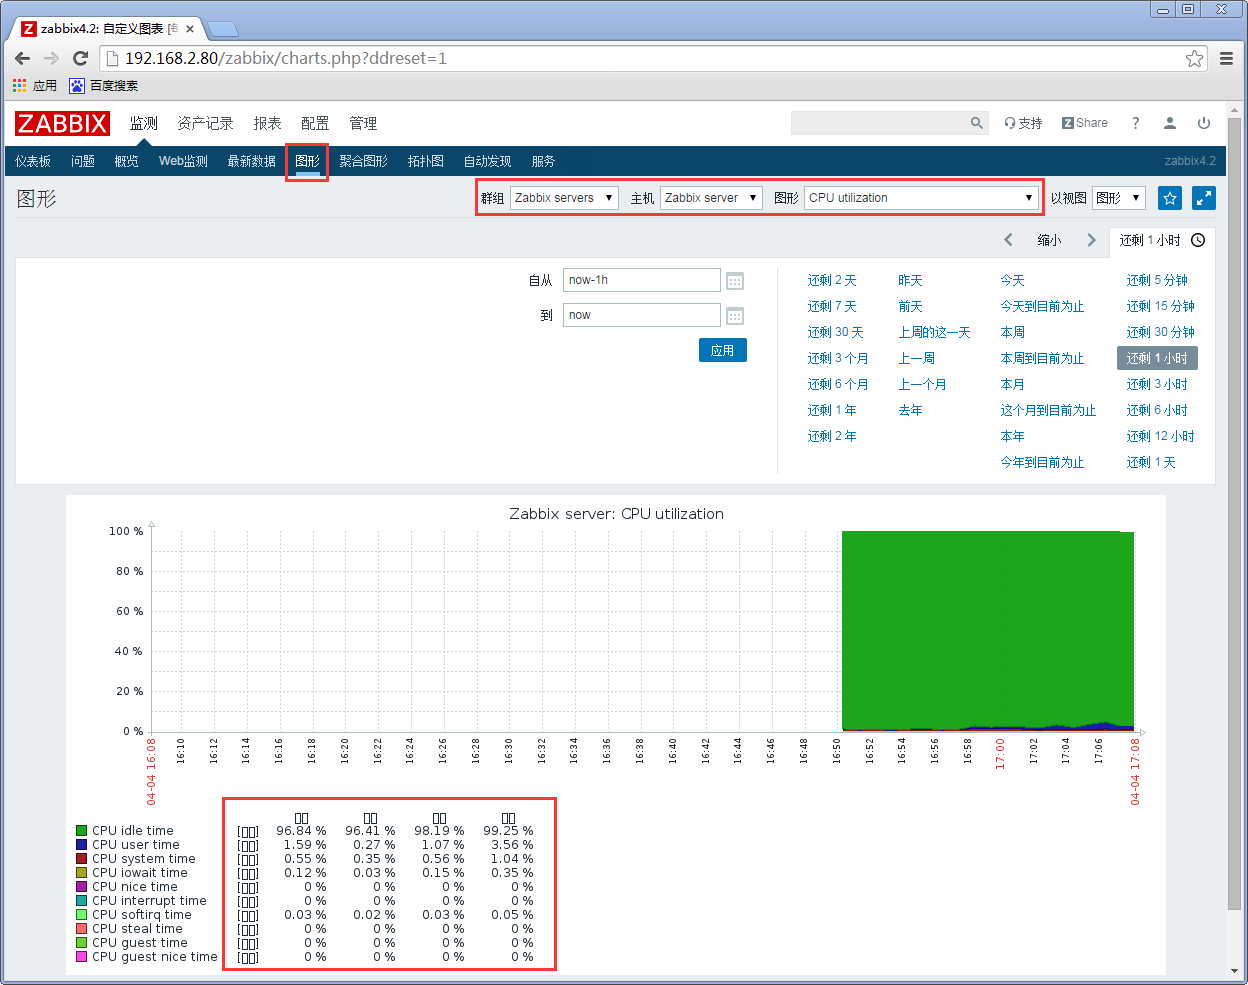
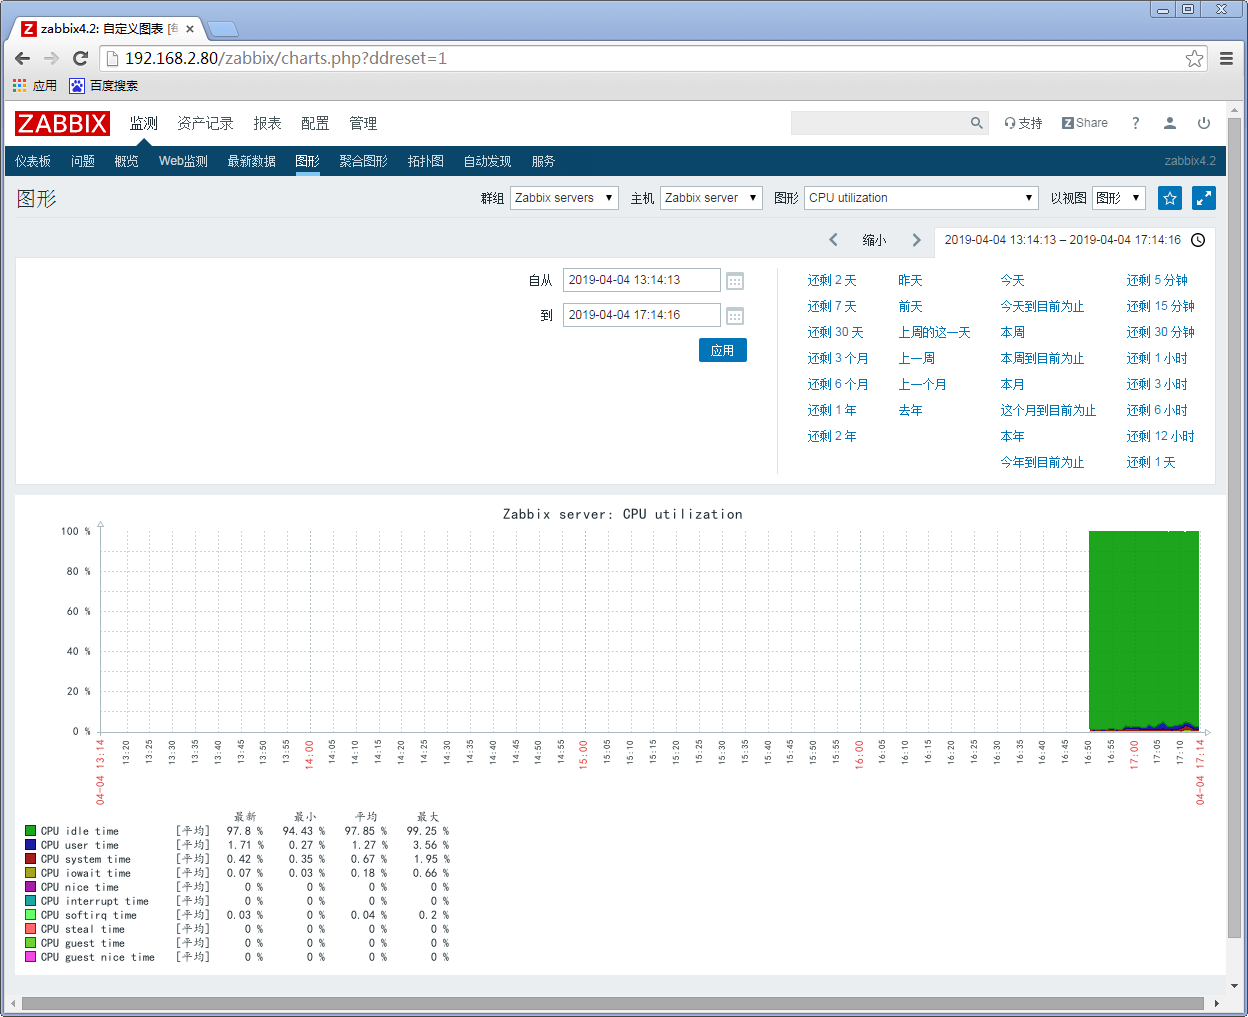
10、访问网站,例如:http://本机IP/zabbix,如下图所示:

PHP版本
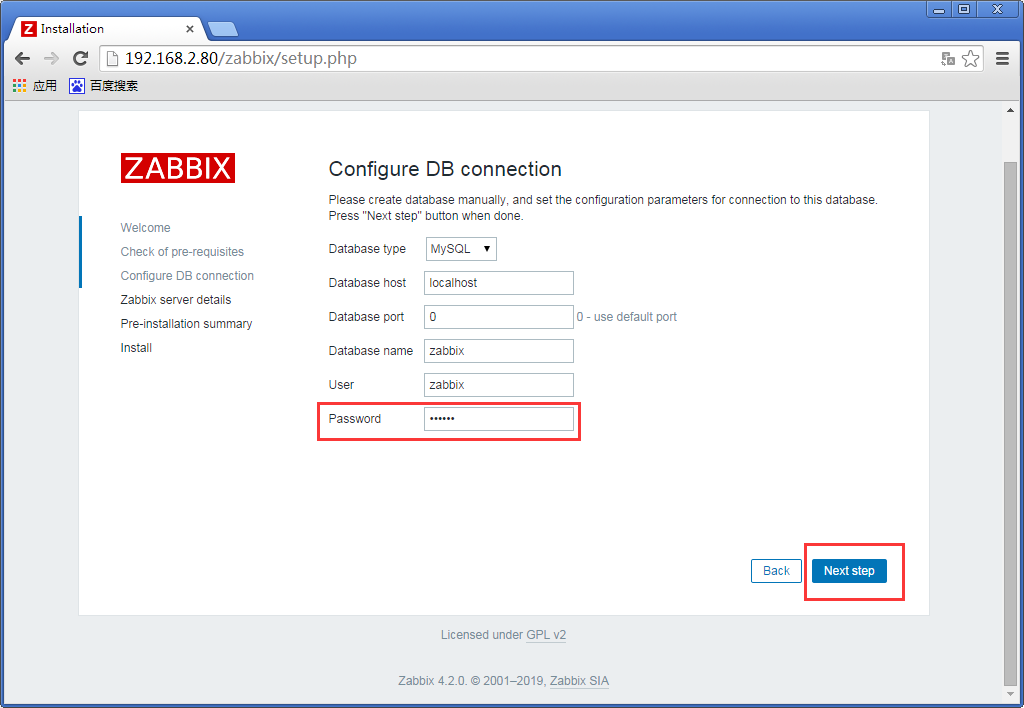
password是我们设置的数据库密码zabbix
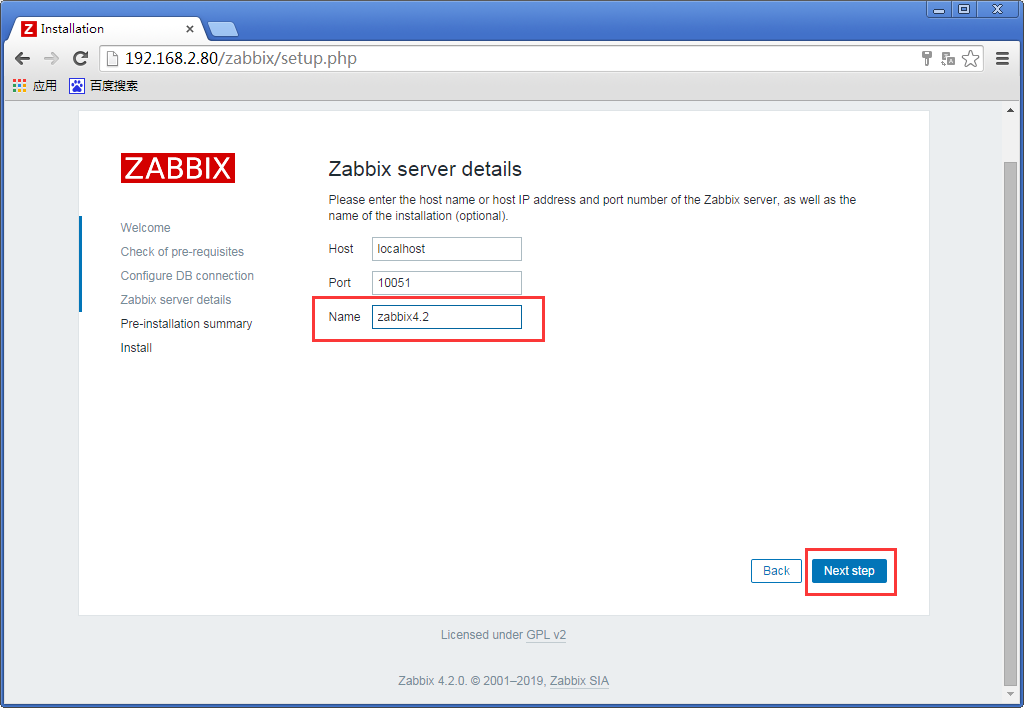
输入名字
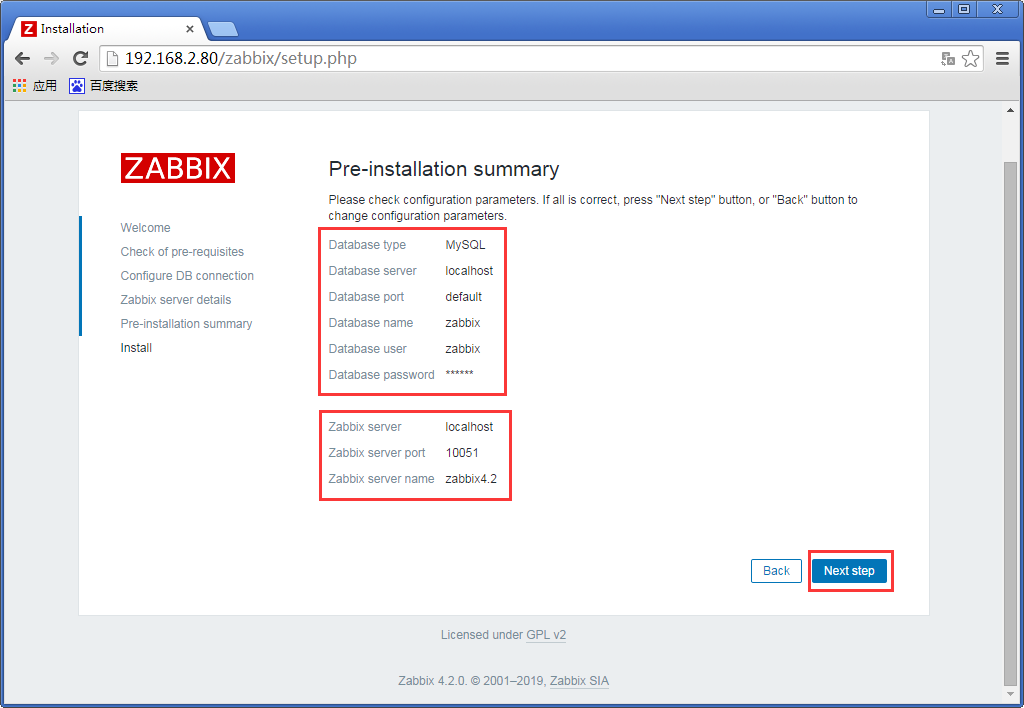
查看zabbix基础信息
finish
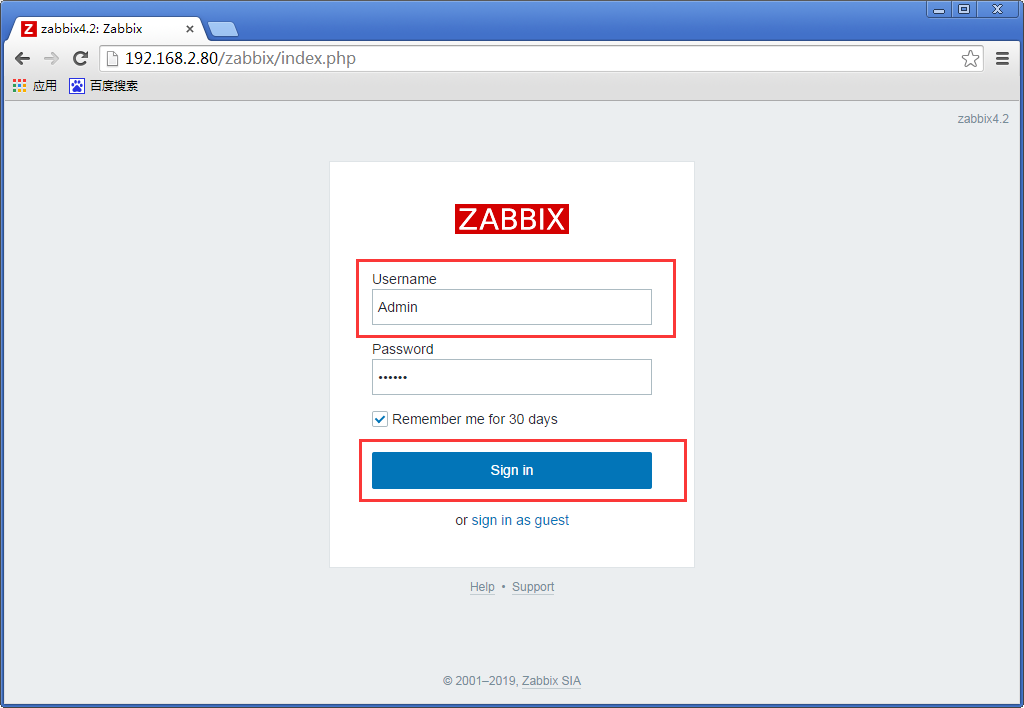
Zabbix·server的默认账号Admin 密码zabbix,如图所示:
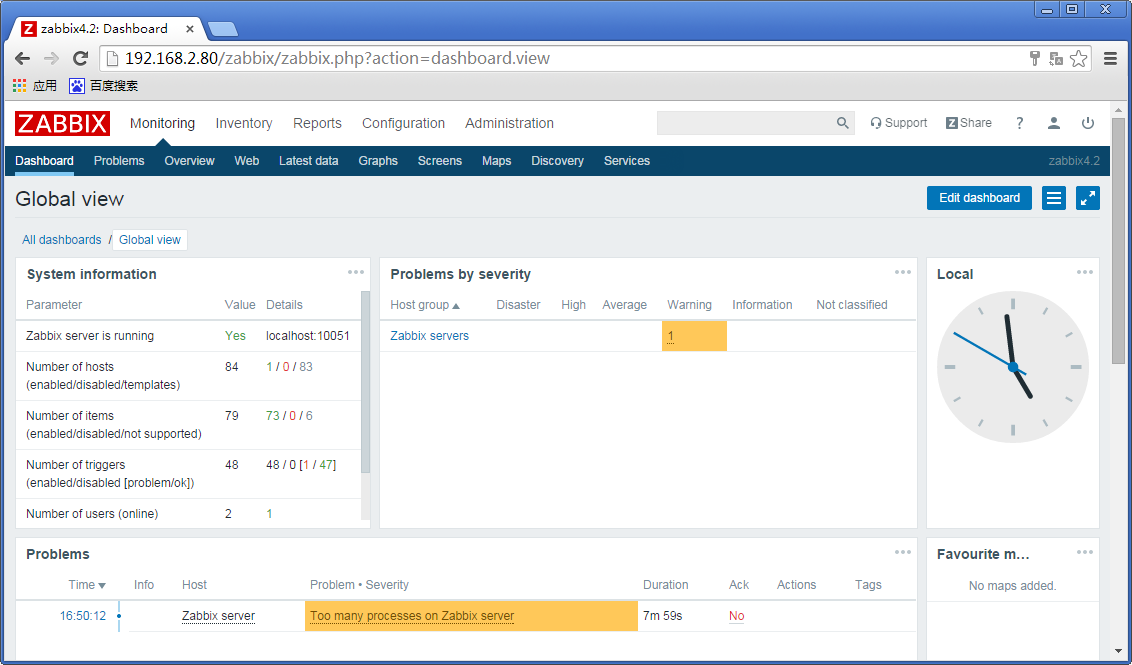
基础界面如下
根据提示可以看到上面图形界面的操作都写到一个配置文件中
# more /etc/zabbix/web/zabbix.conf.php
[root@localhost ~]# more /etc/zabbix/web/zabbix.conf.php

<?php

// Zabbix GUI configuration file.

global $DB;

$DB['TYPE']     = 'MYSQL';

$DB['SERVER']   = 'localhost';

$DB['PORT']     = '';

$DB['DATABASE'] = 'zabbix';

$DB['USER']     = 'zabbix';

$DB['PASSWORD'] = 'zabbix';

// Schema name. Used for IBM DB2 and PostgreSQL.

$DB['SCHEMA'] = '';

$ZBX_SERVER      = 'localhost';

$ZBX_SERVER_PORT = '';

$ZBX_SERVER_NAME = 'zabbix4.2';

$IMAGE_FORMAT_DEFAULT = IMAGE_FORMAT_PNG;

[root@localhost ~]#
移除或改名web目录下面的setup.php文件
# mv setup.php setup.php.bak
[root@localhost ~]# cd /usr/share/zabbix

[root@localhost zabbix]#

[root@localhost zabbix]# ls

actionconf.php                 audio               discoveryconf.php            image.php        map.import.php     slides.php

adm.gui.php                    auditacts.php       disc_prototypes.php          images           map.php            srv_status.php

adm.housekeeper.php            auditlogs.php       favicon.ico                  img              overview.php       styles

adm.iconmapping.php            browserwarning.php  fonts                        imgstore.php     profile.php        sysmap.php

adm.images.php                 chart2.php          graphs.php                   include          queue.php          sysmaps.php

adm.macros.php                 chart3.php          history.php                  index_http.php   report2.php        templates.php

adm.other.php                  chart4.php          host_discovery.php           index.php        report4.php        toptriggers.php

adm.regexps.php                chart5.php          hostgroups.php               items.php        robots.txt         tr_events.php

adm.triggerdisplayoptions.php  chart6.php          hostinventoriesoverview.php  js               screenconf.php     trigger_prototypes.php

adm.triggerseverities.php      chart7.php          hostinventories.php          jsLoader.php     screenedit.php     triggers.php

adm.valuemapping.php           chart.php           host_prototypes.php          jsrpc.php        screen.import.php  usergrps.php

adm.workingtime.php            charts.php          host_screen.php              latest.php       screens.php        users.php

api_jsonrpc.php                conf                hosts.php                    local            services.php       zabbix.php

app                            conf.import.php     httpconf.php                 locale           setup.php

applications.php               correlation.php     httpdetails.php              maintenance.php  slideconf.php

[root@localhost zabbix]#

[root@localhost zabbix]# mv setup.php setup.php.bak

[root@localhost zabbix]#
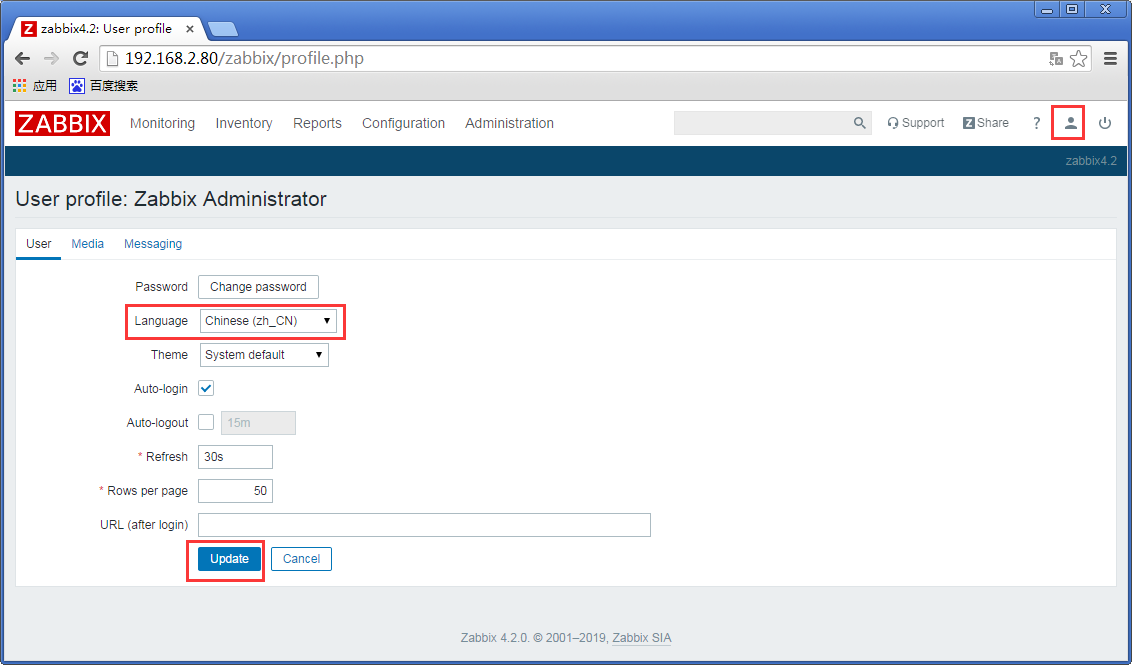
设置新的密码,界面的主题、语言和登陆后显示的默认界面等
解决中文乱码无法显示的问题
Windows字体目录地址
C:\Windows\Fonts
复制到zabbix服务器中
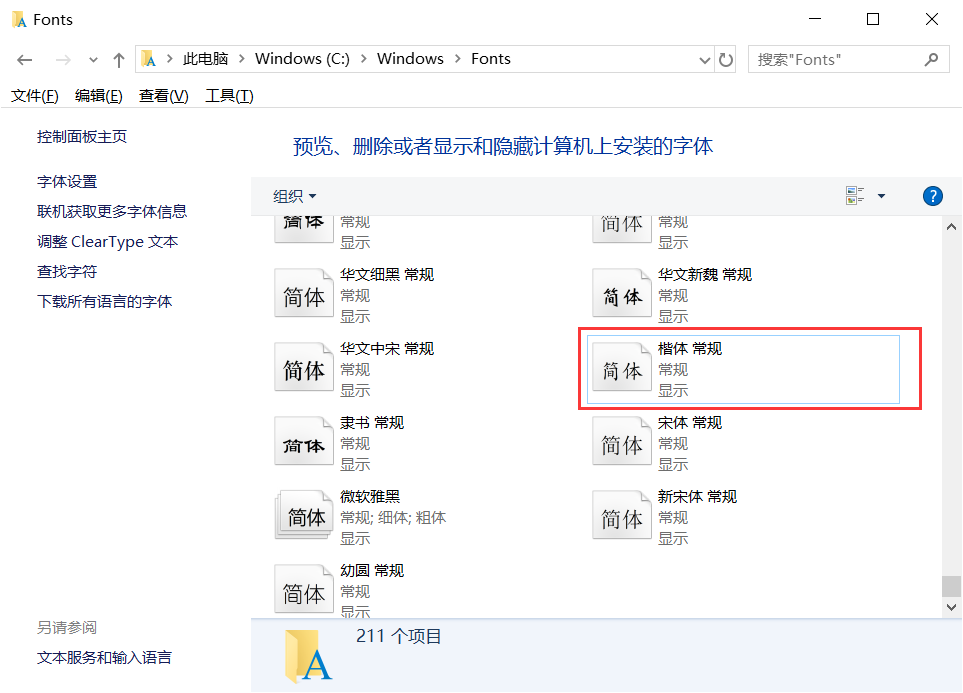
查找Zabbix所使用的语言包
# find / -name *font* -print | grep zabbix
# ll `find / -name *font* -print | grep zabbix`
[root@localhost ~]# find / -name *font* -print | grep zabbix

/etc/alternatives/zabbix-web-font

/var/lib/alternatives/zabbix-web-font

/usr/share/zabbix/fonts

/usr/share/zabbix/fonts/graphfont.ttf

[root@localhost ~]#

[root@localhost ~]# ll `find / -name *font* -print | grep zabbix`

lrwxrwxrwx.  root root  Apr   : /etc/alternatives/zabbix-web-font -> /usr/share/fonts/dejavu/DejaVuSans.ttf

lrwxrwxrwx.  root root  Apr   : /usr/share/zabbix/fonts/graphfont.ttf -> /etc/alternatives/zabbix-web-font

-rw-r--r--.  root root  Apr   : /var/lib/alternatives/zabbix-web-font

/usr/share/zabbix/fonts:

total

lrwxrwxrwx.  root root  Apr   : graphfont.ttf -> /etc/alternatives/zabbix-web-font

[root@localhost ~]#
备份本身语言包
# mv /usr/share/fonts/dejavu/DejaVuSans.ttf /usr/share/fonts/dejavu/DejaVuSans.ttf.bak
替换成Windows的语言包
# mv simkai.ttf /usr/share/fonts/dejavu/DejaVuSans.ttf
[root@localhost ~]# mv /usr/share/fonts/dejavu/DejaVuSans.ttf /usr/share/fonts/dejavu/DejaVuSans.ttf.bak

[root@localhost ~]#

[root@localhost ~]# ls

anaconda-ks.cfg  simkai.ttf

[root@localhost ~]#

[root@localhost ~]# mv simkai.ttf /usr/share/fonts/dejavu/DejaVuSans.ttf

[root@localhost ~]#
刷新页面已经恢复
参考博客:
https://www.cnblogs.com/Sungeek/p/9069999.html
http://www.cnblogs.com/xiewenming/p/7732144.html
zabbix4.2学习请参考这位博主
https://www.cnblogs.com/AutoSmart/p/10505090.html
centos7安装zabbix4.2的更多相关文章
- Centos7安装Zabbix4.0步骤
点击返回:自学Zabbix之路 点击返回:自学Zabbix4.0之路 点击返回:自学zabbix集锦 Centos7安装Zabbix4.0步骤 官方搭建zabbix4.0的环境要求: 1. 环境搭建L ...
- centos7上安装zabbix4.0
zabbix4.0已经推出有一段时间了,针对之前版本做了很多优化配置,易用性得到提高,特别lts(long team support)长技术支持版本,官方说提供5年的稳定技术支持,在商业化运用上,是比 ...
- Centos7一键编译安装zabbix-4.0.2
##只针对centos7的系统有效,centos6无效,mysql zabbix用户:zabbix,密码:zabbix;建议用全新的centos7服务器 软件版本: (nginx-1.14.2.php ...
- centos7.6下编译安装zabbix4.0.10长期支持版
一.安装数据库,这里使用的是percona-server5..24版本 配置如下 [root@zabbix4_clone:~]# cat /etc/my.cnf # Example MySQL con ...
- centos7.2下快速安装zabbix4.0
本笔记是基于CentOS 7.2下最小化安装的操作系统搭建的Zabbix4.0环境,主要用于做一些企业路由器和交换机等设备的运行状态监控. 1.安装epel源 yum -y install epel- ...
- HP服务器 hp 360g5 centos7安装问题
HP服务器 hp 360g5 centos7安装问题 一 :启动盘无法识别硬盘 1.进入安装光盘,用上下键选择安装centos--Install Centos7(注意不可按Enter键),如图: 2 ...
- CentOS7 安装Mono及Jexus
CentOS7安装Mono及Juxes 1 安装Mono 1.1 安装yum-utils 因为安装要用到yum-config-manager,默认是没有安装的,所以要先安装yum-utils包.命令如 ...
- CentOS7安装mysql提示“No package mysql-server available.”
针对centos7安装mysql,提示"No package mysql-server available."错误,解决方法如下: Centos 7 comes with Mari ...
- CentOS7安装Oracle 11gR2 安装
概述 Oracle 在Linux和window上的安装不太一样,公司又是Linux系统上的Oracle,实在没辙,研究下Linux下Oracle的使用,oracle默认不支持CentOS系统安装,所以 ...
随机推荐
- mysql中不直接通过密码连接 还要指定ip地址进行连接----------DCL数据库控制语言
线上如果用root超级用户连接数据库,非常容易造成隐私泄漏.一般线上不用root数据控制. 今天和大家分享的是 输入密码还不可以连接数据库,必须要输入ip地址以后,才可以连接. 正常的访问数据库都是 ...
- 在java中(==)的用法
- POJ3904 Sky Code
题意 Language:Default Sky Code Time Limit: 1000MS Memory Limit: 65536K Total Submissions: 3980 Accepte ...
- POJ2480 Longge's problem
题意 Language:Default Longge's problem Time Limit: 1000MS Memory Limit: 65536K Total Submissions: 1064 ...
- day4 java消息中间件服务
PS: 讲个故事,老王要给他的两个女儿讲故事,他要一个一个讲很费劲,后来他使用了微信公众号,让订阅微信公众号的人关注就减轻了负担. PS: 传统的如果一个用户进行登录,会调用分多的服务,如果没有消息中 ...
- 比较器(TreeSet和优先队列,可以对里面的元素按照自己的意愿进行排序)
class MyComparator implements Comparator<Integer>{ public int compare(Integer o1, Integer o2) ...
- Nginx可以做什么?看完这篇你就懂了
本文只针对Nginx在不加载第三方模块的情况能处理哪些事情,由于第三方模块太多所以也介绍不完,当然本文本身也可能介绍的不完整,毕竟只是我个人使用过和了解到过得,欢迎留言交流. Nginx能做什么 —— ...
- 关于margin padding
margin padding设置百分比是以父元素的宽度作参考. 定位的left,top等取百分比 则以参照定位元素的padding+width做参考 margin 四个同时设定 以margin-lef ...
- adb command
- mysql全备和增量备份以及恢复过程(percona工具)
实验环境 系统环境,内核版本和xtrabackup工具版本 [root@linux-node1 mysql]# cat /etc/redhat-release CentOS Linux release ...