
吴裕雄 实战PYTHON编程(4)
import hashlib
md5 = hashlib.md5()
md5.update(b'Test String')
print(md5.hexdigest())

import hashlib
md5 = hashlib.md5(b'Test String').hexdigest()
print(md5)

import os
import hashlib
import requests
# url = "http://opendata.epa.gov.tw/ws/Data/REWXQA/?$orderby=SiteName&$skip=0&$top=1000&format=json"
url = "https://www.baidu.com"
# 读取网页原始码
html=requests.get(url).text.encode('utf-8-sig')
# 判断网页是否更新
md5 = hashlib.md5(html).hexdigest()
if os.path.exists('F:\\pythonBase\\pythonex\\ch06\\old_md5.txt'):
with open('F:\\pythonBase\\pythonex\\ch06\\old_md5.txt', 'r') as f:
old_md5 = f.read()
with open('F:\\pythonBase\\pythonex\\ch06\\old_md5.txt', 'w') as f:
f.write(md5)
else:
with open('F:\\pythonBase\\pythonex\\ch06\\old_md5.txt', 'w') as f:
f.write(md5)
if md5 != old_md5:
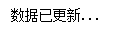
print('数据已更新...')
else:
print('数据未更新,从数据库读取...')
import os
import ast
import hashlib
import sqlite3
import requests
from bs4 import BeautifulSoup
conn = sqlite3.connect('F:\\pythonBase\\pythonex\\DataBasePM25.sqlite') # 建立数据库连接
cursor = conn.cursor() # 建立 cursor 对象
# 建立一个数据表
sqlstr='''
CREATE TABLE IF NOT EXISTS TablePM25 ("no" INTEGER PRIMARY KEY AUTOINCREMENT
NOT NULL UNIQUE ,"SiteName" TEXT NOT NULL ,"PM25" INTEGER)
'''
cursor.execute(sqlstr)
url = "http://api.help.bj.cn/apis/aqilist/"
#html=requests.get(url).text.encode('utf-8-sig') # 读取网页原始码
html=requests.get(url).text.encode('iso-8859-1').decode('utf-8-sig')
# print(html)
html = html.encode('utf-8-sig')
# 判断网页是否更新
md5 = hashlib.md5(html).hexdigest()
old_md5 = ""
if os.path.exists('F:\\pythonBase\\pythonex\\ch06\\old_md5-.txt'):
with open('F:\\pythonBase\\pythonex\ch06\\old_md5-.txt', 'r') as f:
old_md5 = f.read()
with open('F:\\pythonBase\\pythonex\ch06\\old_md5-.txt', 'w') as f:
f.write(md5)
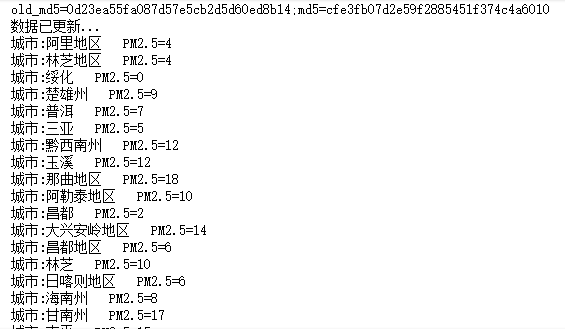
print("old_md5="+old_md5+";"+"md5="+md5) #显示新老md5码进行观察
if md5 != old_md5:
print('数据已更新...')
sp=BeautifulSoup(html,'html.parser') #解析网页内容
jsondata = ast.literal_eval(sp.text) #此时jscondata取到的是字典类型数据
# 删除数据表内容
js1=jsondata.get("aqidata") #取出字典数据中的aqidata项的值(值是列表)
conn.execute("delete from TablePM25")
conn.commit()
n=1
for city in js1: #city此时是列表js1中的第一条字典数据
CityName=city["city"] #取出city字典数据中的值为"city"的key
if(city["pm2_5"] == ""):
PM25=0
else: #如果city字典中的key对应的value为空,则PM25=0,否则,把PM25=value
PM25=int(city["pm2_5"])
print("城市:{} PM2.5={}".format(CityName,PM25)) #显示城市对应的名称与PM2.5值
# 新增一笔记录
sqlstr="insert into TablePM25 values({},'{}',{})" .format(n,CityName,PM25)
cursor.execute(sqlstr)
n+=1
conn.commit() # 主动更新
else:
print('数据未更新,从数据库读取...')
cursor=conn.execute("select * from TablePM25")
rows=cursor.fetchall()
for row in rows:
print("城市:{} PM2.5={}".format(row[1],row[2]))
conn.close() # 关闭数据库连
import os
import ast
import hashlib
import sqlite3
import requests
from bs4 import BeautifulSoup
# cur_path=os.path.dirname(__file__) # 取得目前路径
# print(cur_path)
conn = sqlite3.connect('F:\\pythonBase\\pythonex\\' + 'DataBasePM25.sqlite') # 建立数据库连接
cursor = conn.cursor() # 建立 cursor 对象
# 建立一个数据表
sqlstr='''
CREATE TABLE IF NOT EXISTS TablePM25 ("no" INTEGER PRIMARY KEY AUTOINCREMENT
NOT NULL UNIQUE ,"SiteName" TEXT NOT NULL ,"PM25" INTEGER)
'''
cursor.execute(sqlstr)
url = "http://api.help.bj.cn/apis/aqilist/"
# 读取网页原始码
# html=requests.get(url).text.encode('utf-8-sig')
html=requests.get(url).text.encode('iso-8859-1').decode('utf-8-sig')
# print(html)
html = html.encode('utf-8-sig')
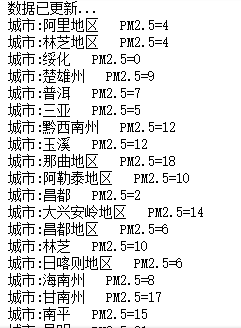
print('数据已更新...')
sp=BeautifulSoup(html,'html.parser') #sp是bs4.Beautifulsoup类
# 将网页内转换为 list,list 中的元素是 dict
jsondata = ast.literal_eval(sp.text) #把sp.text字符串转为dict类型
js=jsondata.get("aqidata") #从jasondata中取出值为"aqidata"的key对应的value的列表
# 删除数据表内容
conn.execute("delete from TablePM25")
conn.commit()
#把抓到的数据逐条存到数据库
n=1
for city in js:
CityName=city["city"]
PM25=0 if city["pm2_5"] == "" else int(city["pm2_5"])
print("城市:{} PM2.5={}".format(CityName,PM25))
# 新增一条记录
sqlstr="insert into TablePM25 values({},'{}',{})" .format(n,CityName,PM25)
cursor.execute(sqlstr)
n+=1
conn.commit() # 主动更新
conn.close() # 关闭数据库连
from time import sleep
from selenium import webdriver
urls = ['http://www.baidu.com','http://www.wsbookshow.com','http://news.sina.com.cn/']
browser = webdriver.Chrome()
browser.maximize_window
for url in urls:
browser.get(url)
sleep(3)
browser.quit()
from selenium import webdriver #导入webdriver
url='http://www.wsbookshow.com/bookshow/jc/bk/cxsj/12442.html' #以此链接为例
browser=webdriver.Chrome() #生成Chrome浏览器对象(结果是打开Chrome浏览器)
browser.get(url) #在浏览器中打开url
login_form=browser.find_element_by_id("menu_1") ##查找id="menu_1"的元素
print(login_form.text) #显示元素内容
#browser.quit() #退出浏览器,退出驱动程序
username=browser.find_element_by_name("username") #查找name="username"的元素
print(username)
password=browser.find_element_by_name("pwd") #查找name="pwd"的元素
print(password)
login_form=browser.find_element_by_xpath("//input[@name='arcID']")
print(login_form)
login_form=browser.find_element_by_xpath("//div[@id='feedback_userbox']")
print(login_form)
continue_link=browser.find_element_by_link_text('新概念美语')
print(continue_link)
continue_link=browser.find_element_by_link_text('英语')
print(continue_link)
heading1=browser.find_element_by_tag_name('h1')
print(heading1)
content=browser.find_elements_by_class_name('topbanner')
print(content)
content=browser.find_elements_by_css_selector('.topsearch')
print(content)
# print(content.get_property)
print()
browser.quit() #退出浏览器,退出驱动程序

from selenium import webdriver
from time import sleep
url = 'http://www.51cto.com/'
browser = webdriver.Chrome()
browser.maximize_window
browser.get(url)
browser.find_element_by_xpath('//*[@id="login_status"]/a[1]').click() #获取“登录”元素
browser.find_element_by_xpath('//*[@id="loginform-username"]').clear()#清空输入框
browser.find_element_by_xpath('//*[@id="loginform-username"]').send_keys('oomms') #填写用户名
browser.find_element_by_xpath('//*[@id="loginform-password"]').clear() #清空输入框
browser.find_element_by_xpath('//*[@id="loginform-password"]').send_keys('abc123') #填写密码
sleep(3) #加入等待
browser.find_element_by_xpath('//*[@id="login-form"]/div[3]/input').click() #单击“登录”按钮
吴裕雄 实战PYTHON编程(4)的更多相关文章
- 吴裕雄 实战PYTHON编程(10)
import cv2 cv2.namedWindow("frame")cap = cv2.VideoCapture(0)while(cap.isOpened()): ret, im ...
- 吴裕雄 实战PYTHON编程(9)
import cv2 cv2.namedWindow("ShowImage1")cv2.namedWindow("ShowImage2")image1 = cv ...
- 吴裕雄 实战PYTHON编程(8)
import pandas as pd df = pd.DataFrame( {"林大明":[65,92,78,83,70], "陈聪明":[90,72,76, ...
- 吴裕雄 实战PYTHON编程(7)
import os from win32com import client word = client.gencache.EnsureDispatch('Word.Application')word. ...
- 吴裕雄 实战PYTHON编程(6)
import matplotlib.pyplot as plt plt.rcParams['font.sans-serif']=['Simhei']plt.rcParams['axes.unicode ...
- 吴裕雄 实战PYTHON编程(5)
text = '中华'print(type(text))#<class 'str'>text1 = text.encode('gbk')print(type(text1))#<cla ...
- 吴裕雄 实战python编程(3)
import requests from bs4 import BeautifulSoup url = 'http://www.baidu.com'html = requests.get(url)sp ...
- 吴裕雄 实战python编程(2)
from urllib.parse import urlparse url = 'http://www.pm25x.com/city/beijing.htm'o = urlparse(url)prin ...
- 吴裕雄 实战python编程(1)
import sqlite3 conn = sqlite3.connect('E:\\test.sqlite') # 建立数据库联接cursor = conn.cursor() # 建立 cursor ...
随机推荐
- 在doc下面执行zpl语言 Copy 文件名 lpt1
在doc下面执行zpl语言 Copy 文件名 lpt1 测试斑马条码打印机并口是否能正常通讯: 1.Zebra打印机安装好标签和碳带,且打印机进入Ready状态.2.电脑端用Notepad编写输入如下 ...
- GRUB 启动 WIN PE 镜像(ISO)
我用的这个WIN PE ISO只有 46M. 再大些的就没试过了. PE ISO 命名为 minipe.iso. 放在第一块硬盘的第二个分区. MENU.LST的内容. title WinPemap ...
- Python数据结构算法
Python内置了许多非常有用的数据结构,比如列表(list),集合(set)以及字典(dictionary).就绝大部分情况而言,我们可以直接使用这些数据结构.但是,我们通常还要考虑比如搜索,排序, ...
- python 使用selenium和requests爬取页面数据
目的:获取某网站某用户下市场大于1000秒的视频信息 1.本想通过接口获得结果,但是使用post发送信息到接口,提示服务端错误. 2.通过requests获取页面结果,使用html解析工具,发现麻烦而 ...
- 深入浅出 JIT 编译器
转载 https://www.ibm.com/developerworks/cn/java/j-lo-just-in-time/ JIT 编译器在运行程序时有两种编译模式可以选择,并且其会在运行时决定 ...
- pyplot 绘图与可视化
1. 基本使用 #!/usr/bin/env python # coding=utf-8 import matplotlib.pyplot as plt from numpy.random impor ...
- oracle共享与专用模式的动态转换及区别(转载)
一直没对专用于共享的互换搞清楚,找到了这篇文章 http://blog.csdn.net/tianlesoftware/archive/2010/06/26/5695784.aspx ,让我实践了一把 ...
- html基础代码示例
文档结构 <!-- 声明文档的类型 标记该文档为HTML5的文件 --> <!DOCTYPE html> <!-- 页面的根节点 --> <!-- html中 ...
- 深度学习中的Normalization模型
Batch Normalization(简称 BN)自从提出之后,因为效果特别好,很快被作为深度学习的标准工具应用在了各种场合.BN 大法虽然好,但是也存在一些局限和问题,诸如当 BatchSize ...
- 通过yum升级gcc/g++至版本4.8.2
最近在坐一个日期处理的问题,需要安装sxtwl模块,但是gcc版本4.7死活也安装不上,最后测试到只能升级gcc版本到4.8才得以解决 [root@123 bin]# gcc -vUsing buil ...