路由器逆向分析------MIPS交叉编译环境的搭建(Buildroot)
本文博客地址:http://blog.csdn.net/qq1084283172/article/details/68950682
为了能在我们熟悉的windows或者ubuntu下开发mips架构的程序,需要搭建mips程序的交叉编译环境。mips程序的交叉编译环境的构建需要用编译Buildroot,Buildroot在编译的过程中,会下载一些依赖包,所以在Buildroot的编译安装过程中必须确保网络畅通。
(1) what is Buildroot ?
(2) Buildroot 源码工程下载和编译
Buildroot工程的官方下载地址:https://buildroot.org/download
Buildroot工程github下载地址:https://github.com/buildroot/buildroot
Buildroot各版本的源码下载地址:https://buildroot.org/downloads/
Buildroot工程的官方帮助指南:https://buildroot.org/docs.html
Buildroot工程的官方博客地址:http://free-electrons.com/blog/
Buildroot工程的详细介绍和使用说明的buildroot-labs:http://free-electrons.com/doc/training/buildroot/buildroot-labs.pdf
Buildroot工程的详细介绍和使用说明的buildroot-slides:http://free-electrons.com/doc/training/buildroot/buildroot-slides.pdf
Buildroot工程的详细介绍和使用说明的user manual:https://buildroot.org/downloads/manual/manual.pdf
Buildroot工程的详细介绍和使用说明的html版user manual:https://buildroot.org/downloads/manual/manual.html
Buildroot工程源码的下载,官方提供了两种方法。
1.通过github的方式获取:
The buildroot repository can be browsed online through cgit at http://git.buildroot.net/buildroot.
To grab a copy of the repository use
git clone git://git.buildroot.net/buildrootOr if you're behind a firewall blocking git:
git clone https://git.buildroot.net/buildrootPlease use the native git protocol if at all possible, as it's a lot more efficient than HTTP.
If you are not already familiar with using Git, we recommend you visit the
Git website.
Once you've checked out a copy of the source tree, you can update your source tree at any time so it is in sync with the latest and greatest by entering your buildroot directory and running
the command:
git pull
Because you've only been granted anonymous access to the tree, you won't be able to push your changes to the repo. Changes can instead be submitted for inclusion by posting them to the buildroot mailing list.
2.直接下载的方式
- You can download the latest
snapshotor view recent daily snapshots. - You can also browse
the source tree online.
Older versions can be downloaded from the
release archive.
Buildroot工程源码的简单编译说明,参考Buildroot的github说明:https://github.com/shuixi2013/buildroot/blob/master/README。
Buildroot工程源码的下载和编译配置:
1.github的方式
# 安装依赖库

$ sudo apt-get update

$ sudo apt-get install libncurses5-dev patch

# 下载源码

$ git clone https://github.com/buildroot/buildroot.git

# 进行编译的配置

$ cd buildroot

$ make clean

$ make menuconfig
2.直接下载解压
# 安装依赖库
$ sudo apt-get update
$ sudo apt-get install libncurses5-dev patch
# 下载源码
$ wget https://buildroot.org/downloads/snapshots/buildroot-snapshot.tar.bz2
$ tar -jxvf buildroot-snapshot.tar.bz2
# 进行编译的配置
$ cd buildroot
$ make clean
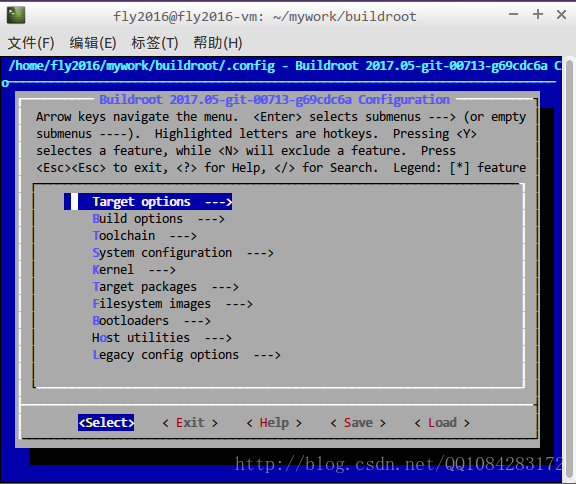
$ make menuconfig执行make menuconfig命令以后会出现Buildroot的编译配置界面,截图如下:
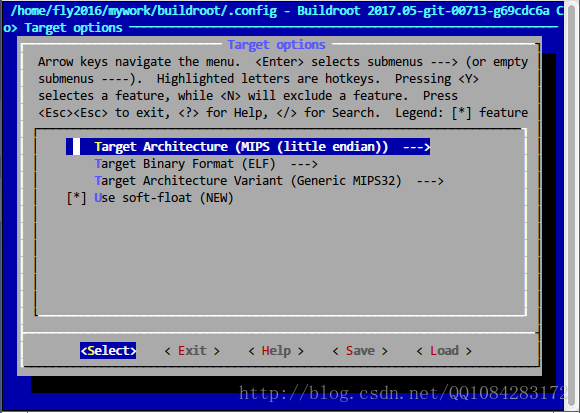
选择 Target options--->Target Architecture (MIPS (little endian)),配置 Target Architecture 为 MIPS (little endian),Target Architecture Variant 自动配置为 (Generic MIPS32) ,不需要修改。其实,最后生成的编译器在编译程序的时,可以添加选项供用户进行大端或者小端的设置。
选择 “Toolchain”, 将 “kernel headers” 改成 机器环境的Kernel版本(即改为编译当前Buildroot的主机内核版本)。可以在主机上通过uname -r 或者cat /proc/version 查看当前主机的内核版本。
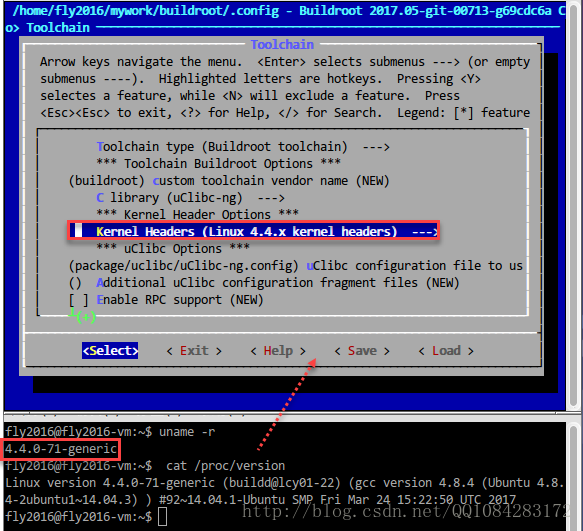
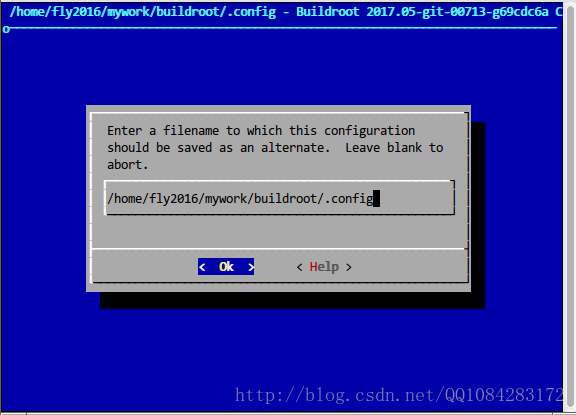
上面操作完成以后,保存、退出Buildroot的编译配置界面。
执行 ./configure 命令根据设置的配置参数生成编译需要的Makefile文件。
$ ./configure根据自己的具体需求配置好Buildroot的编译配置参数之后,执行make进行编译。在进行Buildroot编译的过程中,一定要保持网络的畅通,因为在Buildroot的编译过程中,会下载一些依赖包参与编译。
$ make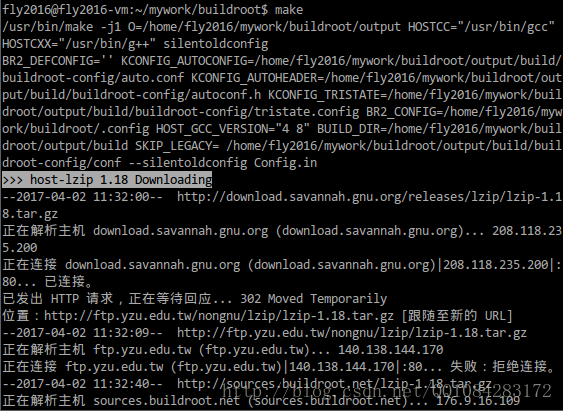
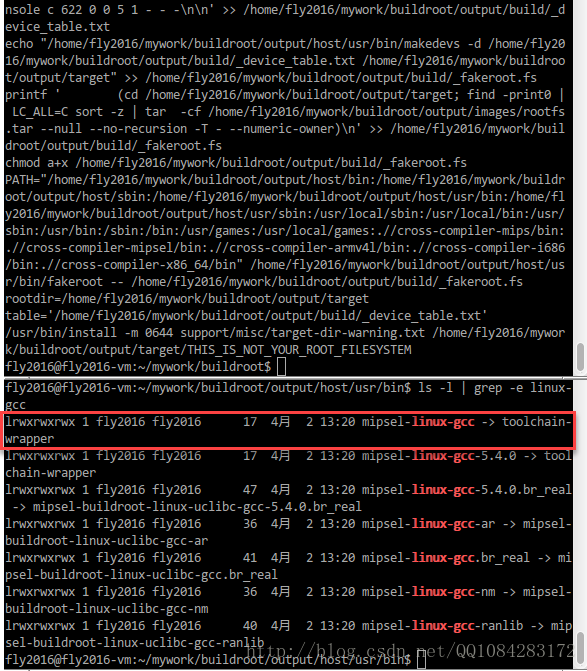
经过一段时间的编译完成以后,在Buildroot的根目录下会增加一个output文件,其中包含已经编译好的文件。可以在 buildroot/output/host/usr/bin目录下找到生成的交叉编译工具,mips的编译器就是该目录下的mipsel-linux-gcc。
通过如下的命令,查看一下 mipsel-linux-gcc的版本信息。
$ ./mipsel-linux-gcc --version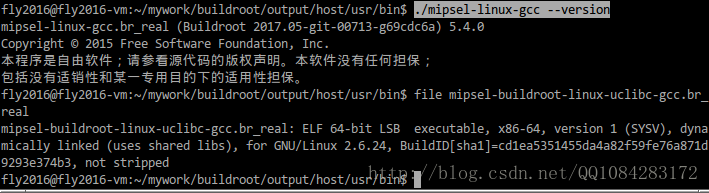
有关mipsel-linux-gcc的命令使用帮助:
fly2016@fly2016-vm:~/mywork/buildroot/output/host/usr/bin$ ./mipsel-linux-gcc --h

用法:mipsel-linux-gcc.br_real [选项] 文件...

选项:

  -pass-exit-codes         在某一阶段退出时返回最高的错误码

  --help                   显示此帮助说明

  --target-help            显示目标机器特定的命令行选项

  --help={common|optimizers|params|target|warnings|[^]{joined|separate|undocumented}}[,...]

                           显示特定类型的命令行选项

  (使用‘-v --help’显示子进程的命令行参数)

  --version                显示编译器版本信息

  -dumpspecs               显示所有内建 spec 字符串

  -dumpversion             显示编译器的版本号

  -dumpmachine             显示编译器的目标处理器

  -print-search-dirs       显示编译器的搜索路径

  -print-libgcc-file-name  显示编译器伴随库的名称

  -print-file-name=<库>    显示 <库> 的完整路径

  -print-prog-name=<程序>  显示编译器组件 <程序> 的完整路径

  -print-multiarch         显示目标的标准化 GNU 三元组(被用于库路径的一部分)

  -print-multi-directory   显示不同版本 libgcc 的根目录

  -print-multi-lib         显示命令行选项和多个版本库搜索路径间的映射

  -print-multi-os-directory 显示操作系统库的相对路径

  -print-sysroot           显示目标库目录

  -print-sysroot-headers-suffix 显示用于寻找头文件的 sysroot 后缀

  -Wa,<选项>               将逗号分隔的 <选项> 传递给汇编器

  -Wp,<选项>               将逗号分隔的 <选项> 传递给预处理器

  -Wl,<选项>               将逗号分隔的 <选项> 传递给链接器

  -Xassembler <参数>       将 <参数> 传递给汇编器

  -Xpreprocessor <参数>    将 <参数> 传递给预处理器

  -Xlinker <参数>          将 <参数> 传递给链接器

  -save-temps              不删除中间文件

  -save-temps=<arg>        不删除中间文件

  -no-canonical-prefixes   生成其他 gcc 组件的相对路径时不生成规范化的

                           前缀

  -pipe                    使用管道代替临时文件

  -time                    为每个子进程计时

  -specs=<文件>            用 <文件> 的内容覆盖内建的 specs 文件

  -std=<标准>              指定输入源文件遵循的标准

  --sysroot=<目录>         将 <目录> 作为头文件和库文件的根目录

  -B <目录>                将 <目录> 添加到编译器的搜索路径中

  -v                       显示编译器调用的程序

  -###                     与 -v 类似,但选项被引号括住,并且不执行命令

  -E                       仅作预处理,不进行编译、汇编和链接

  -S                       编译到汇编语言,不进行汇编和链接

  -c                       编译、汇编到目标代码,不进行链接

  -o <文件>                输出到 <文件>

  -pie                     生成位置无关可执行文件

  -shared                  生成一个共享库

  -x <语言>                指定其后输入文件的语言

                           允许的语言包括:c c++ assembler none

                           ‘none’意味着恢复默认行为,即根据文件的扩展名猜测

                           源文件的语言

以 -g、-f、-m、-O、-W 或 --param 开头的选项将由 mipsel-linux-gcc.br_real 自动传递给其调用的

 不同子进程。若要向这些进程传递其他选项,必须使用 -W<字母> 选项。

报告程序缺陷的步骤请参见:

<http://bugs.buildroot.net/>.mipsel-linux-gcc其实是一个软连接,mipsel-linux-gcc真实连接到的是mipsel-buildroot-linux-uclibc-cc.br_real程序。使用mipsel-linux-gcc交叉编译工具进行mips程序的编译测试,下面是测试的代码 hello.c:
#include <stdio.h>
#include <string.h>
int vul(char *src)
{
char output[20] = {0};
strcpy(output, src);
printf("%s\n", output);
return 0;
}
int main(int argc, char *argv[])
{
if (argc < 2)
{
printf("need more arguments\n");
return 1;
}
vul(argv[1]);
return 0;
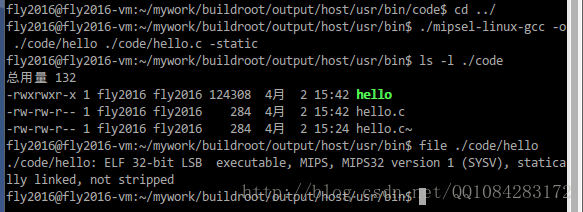
}运行编译命令,为了让生成的二进制程序 hello 不依赖动态库,在编译选项中加入 "-static",示例如下:
# 静态-static 编译

$ ./mipsel-linux-gcc -o ./code/hello ./code/hello.c -static

# 查看编译后生成的程序

$ ls -l ./code

# 查看编译后生成的程序的格式

$ file ./code/hello
结果截图:
参考资料:
《解密家用路由器0day漏洞挖掘技术》小错误不少,感觉有些都是不该犯的低级错误。
(3) 直接下载MIPS程序的交叉编译工具链
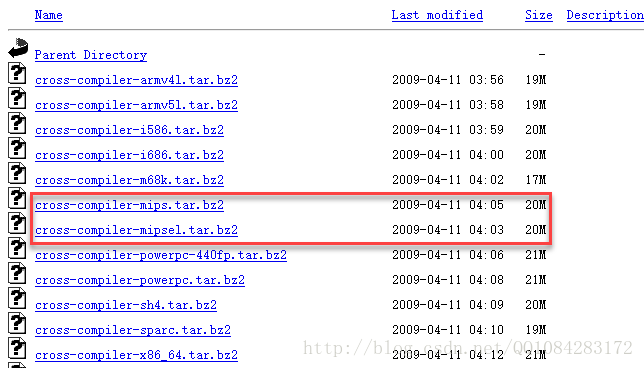
其实MIPS程序的交叉编译工具gcc不必非得自己编译得到,网站https://uclibc.org/上已经有编译后的mips程序的交叉编译工具提供给我们下载,在ubuntu系统上,可以使用脚本 config.sh进行下载,脚本文件的内容如下:
#!/bin/bash

#this file aim to download xcompiler and install it

download_url="https://www.uclibc.org/downloads/binaries/0.9.30.1/cross-compiler-"

function download_bins {

    echo "ready to download: $1.tar.bz2"

    wget "${download_url}$1.tar.bz2" "--no-check-certificate"

    echo "ready to tar: $1.tar.bz2"

    tar -jxf $install_path/cross-compiler-$1.tar.bz2

    sed -i '$a\export PATH=$PATH:'$install_path'/cross-compiler-'$1'/bin' /etc/profile

}

if [ $# == 0 ]

then

    echo "Usage: $0  intall_path"

    exit -1

elif [ $# == 1 ]

then

    install_path=$1

fi

cd $install_path

download_bins mips

download_bins mipsel

download_bins armv4l

download_bins i686

download_bins x86_64

source /etc/profile

echo "Done"
结果截图:

脚本中交叉编译工具链的下载地址为:https://www.uclibc.org/downloads/binaries/0.9.30.1/。
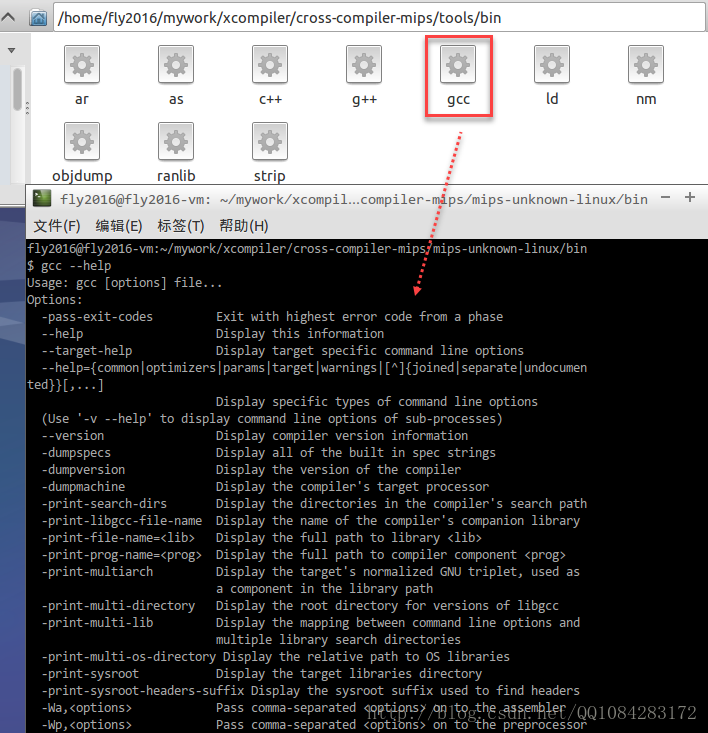
这个config.sh脚本来自于《IoT设备程序开发及编译环境搭建初体验》的作者scu-igroup的github上 IoT_bot工程 代码的脚本。config.sh脚本执行完成以后,各种平台的交叉编译链的工具都下载下来了,在 /cross-compiler-mips/tools/bin
目录和 /cross-compiler-mipsel/tools/bin目录下有mips程序的交叉编译工具链,直接拿来使用就可以。IoT_bot工程 的github下载地址为:https://github.com/scu-igroup/IoT_bot。
路由器逆向分析------MIPS交叉编译环境的搭建(Buildroot)的更多相关文章
- 路由器逆向分析------MIPS系统网络的配置(QEMU)
本文博客地址:http://blog.csdn.net/qq1084283172/article/details/69378333 MIPS系统网络的配置 使用QEMU 模拟正在运行的MIPS系统并 ...
- 路由器逆向分析------在QEMU MIPS虚拟机上运行MIPS程序(ssh方式)
本文博客地址:http://blog.csdn.net/qq1084283172/article/details/69652258 在QEMU MIPS虚拟机上运行MIPS程序--SSH方式 有关在u ...
- 路由器逆向分析------Running Debian MIPS Linux in QEMU
本文博客地址:http://blog.csdn.net/qq1084283172/article/details/70176583 下面的文章内容主要参考英文博客<Running Debian ...
- 【Linux学习】Ubuntu下嵌入式交叉编译环境arm-linux-gcc搭建
(1)首先选择一个路径用来存放arm-linux-gcc.我选用的是/home/book,并在以下建立一个目录arm-linux-gcc. (2)利用cp EABI-4.3.3_Emdedsky_20 ...
- ubuntu12.10下arm-linux-gcc交叉编译环境的搭建
交叉编译环境搭建的原因:通俗上讲,因为嵌入式系统可用资源比较少:几十M的ARM 二三百M的flash相对我们的pc机来说资源真的没法比.所以,为了解决这种局面就将PC机等作为主机,搭建开发环境,进行编 ...
- Ubuntu12.04嵌入式交叉编译环境arm-linu-gcc搭建过程,图解
转载:王文松的博客Ubuntu12.04嵌入式交叉编译环境arm-linu-gcc搭建过程,图解 安装环境 Linux版本:Ubuntu 12.04 内核版本:Linux 3.5.0 ...
- Ubuntu 12.04嵌入式交叉编译环境arm-linux-gcc搭建过程
Ubuntu 12.04嵌入式交叉编译环境arm-linux-gcc搭建过程Linux版本:Ubuntu 12.04 内核版本:Linux 3.5.0 交叉编译器版本:arm-linux-gcc-4. ...
- Ubuntu 上 hi3531 交叉编译环境 arm-hisiv100nptl-linux 搭建过程
安装SDK 1.Hi3531 SDK包位置 在"Hi3531_V100R001***/01.software/board"目录下,您可以看到一个 Hi3531_SDK_Vx ...
- Hi3516开发笔记(三):Hi3516虚拟机基础环境搭建之交叉编译环境境搭建以及开机启动脚本分析
前言 前面进行了可以传输,那么写一个简单的C程序来交叉编译并传入运行. 虚拟机 上一篇搭建的虚拟机环境,包含了sftp传递文件,网络能ping通,基于上一篇的虚拟机继续搭建. 海思交叉 ...
随机推荐
- Linux速通02 命令格式
命令的格式 # 格式:命令 [选项][参数] * 命令:告诉 Linux操作系统执行什么 * 选项:说明命令运行的方式(可以改变命令的功能).以 "-"字符开始 * 参数:说明命令 ...
- Elasticsearch 为了搜索
前言 Elasticsearch 是一个开源的搜索引擎,建立在一个全文搜索引擎库 Apache Lucene 基础之上. Lucene 可以说是当下最先进.高性能.全功能的搜索引擎库--无论是开源还是 ...
- rest framework Response
回应 不同于基本的HttpResponse对象,TemplateResponse对象保留先前由视图提供给计算响应上下文的细节.该响应的最终输出,不计算直到需要它,以后在响应过程. - Django文档 ...
- WPF 应用 - 图表 LiveCharts
引用:LiveCharts,LiveCharts.Wpf 1. 示例 折线图 <Window ... xmlns:lvc="clr-namespace:LiveCharts.Wpf;a ...
- WPF 应用 - 通过 js 缩放 System.Windows.Controls.WebBrowser 的内容
1. 前提 原本是在大屏上展示系统,系统有个功能是加载第三方的网站,第三方网站按照大屏的分辨率写死了宽高: 现需要改到小屏展示系统,而这个第三方的网站不能随着 WebBrowser 窗口的尺寸调整网站 ...
- golang 实现两数组对应元素相除
func ArrayDivision(arr1 []float64,arr2 []float64) (arr3 []float64) { //两数组对应元素相除 for p:=0;p< len( ...
- 如何动态生成EasyUI的表头
需求 前几天遇到了这样一个需求,在页面上展示一组数据,但是表头不固定,需要动态加载出来.比如这次查询表头有[姓名][年龄],可能下次查询表头就变成了[姓名][年龄][性别]. 思路简介 我刚刚接手这个 ...
- C++11多线程编程(常见面试题)
[题目1] 子线程循环 10 次,接着主线程循环 100 次,接着又回到子线程循环 10 次,接着再回到主线程又循环 100 次,如此循环50次,试写出代码 [题解] 首先我们来分析一下这道题...( ...
- c++ 反汇编 继承
单继承,父类中没有虚函数 单继承,父类存在虚函数,子类重写虚函数 单继承,父类存在虚函数,子类不新定义虚函数 单继承,父类存在虚函数,子类新定义虚函数 单继承,父类不存在虚函数,子类定义虚函数 多继承 ...
- k8s:py项目发布完整流程
k8s:py项目发布流程 1. 编写Dockerfile # cat Dockerfile FROM python:3.6-slim USER root RUN apt-get update & ...