[转]UiPath State Machines
本文转自:https://docs.uipath.com/studio/docs/state-machines
A state machine is a type of automation that uses a finite number of states in its execution. It can go into a state when it is triggered by an activity, and it exits that state when another activity is triggered.
Another important aspect of state machines are transitions, as they also enable you to add conditions based on which to jump from one state to another. These are represented by arrows or branches between states.
There are two activities that are specific to state machines, namely State and Final State, found under Workflow > State Machine.
Note:
You can only create one initial state, yet it is possible to have more than one Final State.
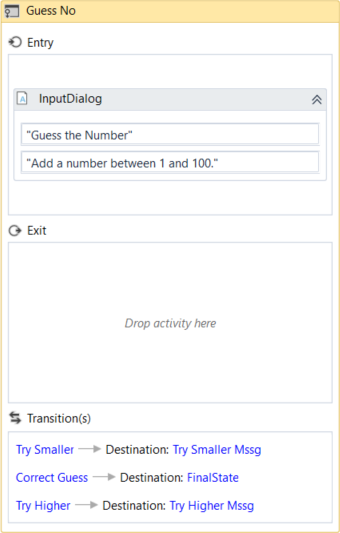
The State activity contains three sections, Entry, Exit and Transition(s), while the Final State only contains one section, Entry. Both of these activities can be expanded by double-clicking them, to view more information and edit them.
The Entry and Exit sections enable you to add entry and exit triggers for the selected state, while the Transition(s) section displays all the transitions linked to the selected state.

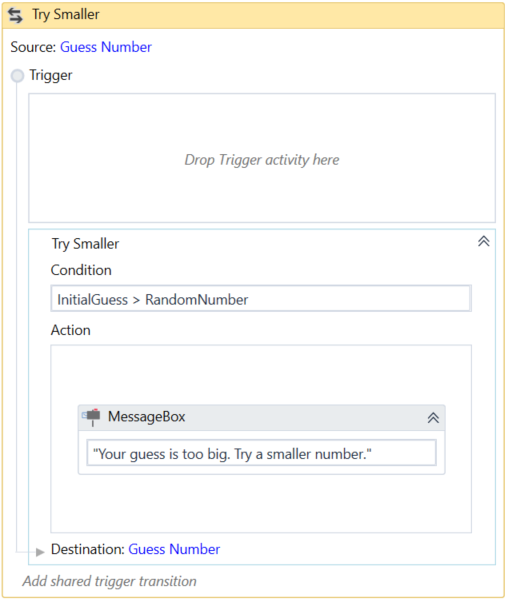
Transitions are expanded when you double-click them, just like the State activity. They contain three sections, Trigger, Condition and Action, that enable you to add a trigger for the next state, or add a condition under which an activity or sequence is to be executed.
Example of How to Use a State Machine
To exemplify how to use a state machine, we are going to build the guessing game we did in the previous chapter, the only difference being that we will try to guess a number between 1 and 100.
- Create a blank process and, on the Design tab, in the File group, select New > State Machine. The New State Machine window is displayed.
Note:
You can also add a State Machine activity to the Designer panel to create a new state machine automation.
- In the Name field type a name for the automation, such as "First State Machine", and leave the default project location or add a subfolder. Click Create. The Designer panel is updated accordingly.
- Create two integer variables,
InitialGuessandRandomNumber. The first variable stores your guess, while the second stores the random number. - Add a State activity to the Designer panel and connect it to the Start node. This is the initial state, and it is used to generate a random number.
- Double-click the activity. This State activity is displayed expanded in the Designer panel.
- In the Properties panel, in the DisplayName field, type Initializing Random Number. This enables you to easily tell states apart.
- In the Entry section, add an Assign activity.
- In the To field, add the
RandomNumbervariable. - In the Value field, type
new Random().Next(1,100). This expression generates a random number. - Return to the main project view and add a new State activity.
- Connect it to the previously added activity.
- Double-click the last added State activity. This activity is displayed expanded in the Designer panel.
- In the Properties panel, in the DisplayName field, type Guess Number. This state is used to prompt the user to guess a number.
- In the Entry section, add an Input Dialog activity.
- Select the Input Dialog, and in the Properties panel, add an appropriate Label and Title to prompt the user to guess a number between 1 and 100.
- In the Result field, add the
InitialGuessvariable. This variable stores the user’s guess. - Return to the main project view and create a transition that points from the Guess Number state to itself.
- Double-click the transition. The transition is displayed expanded in the Designer panel.
- In the Properties panel, in the DisplayName field, type Try Smaller. This message is displayed on the arrow, enabling you to run through your automation easier.
- In the Condition section, type
InitialGuess>RandomNumber. This verifies if the user’s guess is bigger than the random number. - In the Action section, add a Message Box activity.
- In the Text field, type something similar to "Your guess is too big. Try a smaller number." This message is displayed when the user’s guess is bigger than the random number.
- Return to the main project view and create a new transition that points from the Guess Number state to itself.
- Double-click the transition. The transition is displayed expanded in the Designer panel.
- In the Properties panel, in the DisplayName field, type "Try Bigger". This message is displayed on the arrow, enabling you to run through your automation easier.
- In the Condition section, type
InitialGuess<RandomNumber. This verifies if the guess is smaller than the random number. - In the Action section, add a Message Box activity.
- In the Text field, type something similar to "Your guess is too small. Try a bigger number." This message is displayed when the users guess is smaller than the random number.
- Return to main project view and add a Final State activity to the Designer panel.
- Connect a transition from the Guess Number activity to the Final State.
- In the Properties panel, in the DisplayName field, type "Correct Guess".
- In the Condition field, type
InitialGuess=RandomNumber. This is the condition on which this automation steps to the final state and end. - Double-click the Final State activity. It is displayed expanded in the Designer panel.
- In the Entry section, add a Message Box activity.
- In the Text field, type something similar to "Congratulations. You guessed correctly! The number was " +
RandomNumber.ToString+ "." This is the final message that is to be displayed, when the user correctly guesses the number.
The final project should look as in the following screenshot.
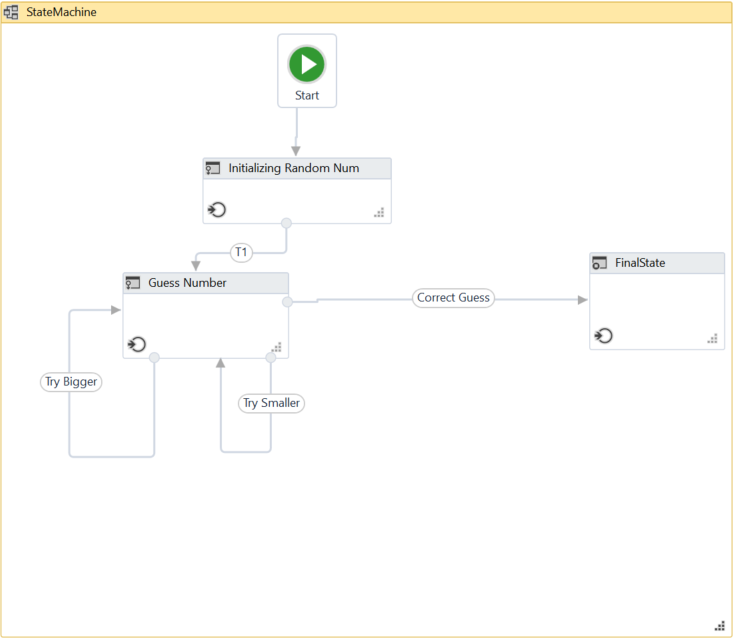
- Press F5. The automation is executed correctly.

另:
https://www.jianshu.com/p/8d77459c69d2?from=timeline&isappinstalled=0
【UiPath Studio 中文文档】10 项目类型 - 状态机 (State Machine)
[转]UiPath State Machines的更多相关文章
- Important Programming Concepts (Even on Embedded Systems) Part V: State Machines
Earlier articles in this series: Part I: Idempotence Part II: Immutability Part III: Volatility Part ...
- [翻译]:Artificial Intelligence for games 5.3 STATE MACHINES:状态机
目录 Chapter 5 Decision Making 5.3 STATE MACHINES:状态机 Chapter 5 Decision Making 5.3 STATE MACHINES:状态机 ...
- UIPath RPA 自动化脚本 机器人从入门到精通
本文链接:https://blog.csdn.net/qq_27256783/article/details/93619818 一.UiPath介绍 UiPath 是RPA(Robotic Proce ...
- State Machine.(状态机)
What is a State Machine? Any device that changes its state from one to another due to some actions a ...
- reactjs入门到实战(四)---- state详解
this.props 表示那些一旦定义,就不再改变的特性,而 this.state 是会随着用户互动而产生变化的特性. 组件免不了要与用户互动,React 的一大创新,就是将组件看成是一个状态机,一开 ...
- Qt: The State Machine Framework 学习
State Machine,即为状态机,是Qt中一项非常好的框架.State Machine包括State以及State间的Transition,构成状态和状态转移.通过状态机,我们可以很方便地实现很 ...
- 【翻译】What is State Machine Diagram(什么是状态机图)?
[翻译]What is State Machine Diagram(什么是状态机图)? 写在前面 在上一篇学习类图的时候将这个网站上的类图的一篇文章翻译了出来,感觉受益良多,今天来学习UML状态机图, ...
- React基础篇(2) -- state&props&refs
内容简介 state props refs 行内样式及动态类名 state 基本介绍 React 把组件看成是一个状态机(State Machines).通过与用户的交互,实现不同状态,然后渲染 UI ...
- 创建组件的方法,组件的props属性、state属性的用法和特点,父子组件传值,兄弟组件传值
1.创建组件的方法 函数组件 class组件 1.1 函数组 无状态函数式组件形式上表现为一个只带有一个 `render()` 方法的组件类,通过函数形式或者 `ES6` 箭头 `functi ...
随机推荐
- Python 报错集合
1.django_error:HINT: Add or change a related_name argument to the definition for...报错, 详情见: https:// ...
- 使用正则表达式实现(加减乘除)计算器(C#实现)
起因:公司领导要求做一款基于行业规范的计算器, 然后需要用户输入一些数据,然后根据用户输入的数据满足某些条件后,再根据用户输入的条件二进行加减乘除运算.;-) 期间因为查找规范等形成数据表的某一列是带 ...
- HDU-6115
我们将A省简化为由N个城市组成,某些城市之间存在双向道路,而且A省的交通有一个特点就是任意两个城市之间都能通过道路相互到达,且在不重复经过城市的情况下任意两个城市之间的到达方案都是唯一的.聪明的你一定 ...
- python数学工具(一)
python 数学工具包括: 1.函数的逼近 1.1.回归 1.2.插值 2.凸优化3.积分4.符号数学 本文介绍函数的逼近的回归方法 1.作为基函数的单项式 对函数 的拟合 首先定义函数并且可视化 ...
- 初次接触tensorflow
要确保已经明白神经网络和卷积神经网络的原理.如果不明白,先学习参考资料1.tensorflow中有很多api,可以分成2大类.1类是比较低层的api(tf.train),叫TensorFlow Cor ...
- 【JS】403- JavaScript 工具函数大全(新)
前言 一线大厂笔试题灵感来源 目录: 第一部分:数组 第二部分:函数 第三部分:字符串 第四部分:对象 第五部分:数字 第六部分:浏览器操作及其它 筛选自以下两篇文章: <127 Helpful ...
- 【Java Web开发学习】Spring4整合thymeleaf视图解析
[Java Web开发学习]Spring4整合thymeleaf视图解析 目录 1.简单介绍2.简单例子 转载:https://www.cnblogs.com/yangchongxing/p/9111 ...
- [ASP.NET Core 3框架揭秘] 配置[5]:配置数据与数据源的实时同步
在<配置模型总体设计>介绍配置模型核心对象的时候,我们刻意回避了与配置同步相关的API,现在我们利用一个独立文章来专门讨论这个话题.配置的同步涉及到两个方面:第一,对原始的配置源实施监控并 ...
- C#总结(七)动态加载C++动态链接库
C#调用C++ 链接库的方式分为静态调用和动态调用这两种方式.静态调用之前的文章里面都有介绍,使用.net 提供的DllImport 导入相关的C++ 库即可.请看之前的文章,https://www. ...
- idea创建Maven版的ssm项目
要使用idea创建一个maven项目,首先电脑安装maven,maven下载地址:http://maven.apache.org/download.cgi 1.打开idea,选择创建一个新项目,选择m ...