[转]UiPath State Machines
本文转自:https://docs.uipath.com/studio/docs/state-machines
A state machine is a type of automation that uses a finite number of states in its execution. It can go into a state when it is triggered by an activity, and it exits that state when another activity is triggered.
Another important aspect of state machines are transitions, as they also enable you to add conditions based on which to jump from one state to another. These are represented by arrows or branches between states.
There are two activities that are specific to state machines, namely State and Final State, found under Workflow > State Machine.
Note:
You can only create one initial state, yet it is possible to have more than one Final State.
The State activity contains three sections, Entry, Exit and Transition(s), while the Final State only contains one section, Entry. Both of these activities can be expanded by double-clicking them, to view more information and edit them.
The Entry and Exit sections enable you to add entry and exit triggers for the selected state, while the Transition(s) section displays all the transitions linked to the selected state.

Transitions are expanded when you double-click them, just like the State activity. They contain three sections, Trigger, Condition and Action, that enable you to add a trigger for the next state, or add a condition under which an activity or sequence is to be executed.
Example of How to Use a State Machine
To exemplify how to use a state machine, we are going to build the guessing game we did in the previous chapter, the only difference being that we will try to guess a number between 1 and 100.
- Create a blank process and, on the Design tab, in the File group, select New > State Machine. The New State Machine window is displayed.
Note:
You can also add a State Machine activity to the Designer panel to create a new state machine automation.
- In the Name field type a name for the automation, such as "First State Machine", and leave the default project location or add a subfolder. Click Create. The Designer panel is updated accordingly.
- Create two integer variables,
InitialGuessandRandomNumber. The first variable stores your guess, while the second stores the random number. - Add a State activity to the Designer panel and connect it to the Start node. This is the initial state, and it is used to generate a random number.
- Double-click the activity. This State activity is displayed expanded in the Designer panel.
- In the Properties panel, in the DisplayName field, type Initializing Random Number. This enables you to easily tell states apart.
- In the Entry section, add an Assign activity.
- In the To field, add the
RandomNumbervariable. - In the Value field, type
new Random().Next(1,100). This expression generates a random number. - Return to the main project view and add a new State activity.
- Connect it to the previously added activity.
- Double-click the last added State activity. This activity is displayed expanded in the Designer panel.
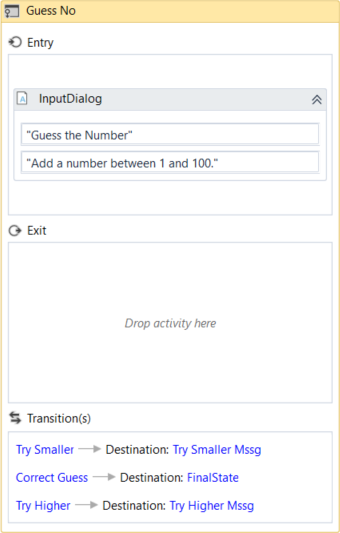
- In the Properties panel, in the DisplayName field, type Guess Number. This state is used to prompt the user to guess a number.
- In the Entry section, add an Input Dialog activity.
- Select the Input Dialog, and in the Properties panel, add an appropriate Label and Title to prompt the user to guess a number between 1 and 100.
- In the Result field, add the
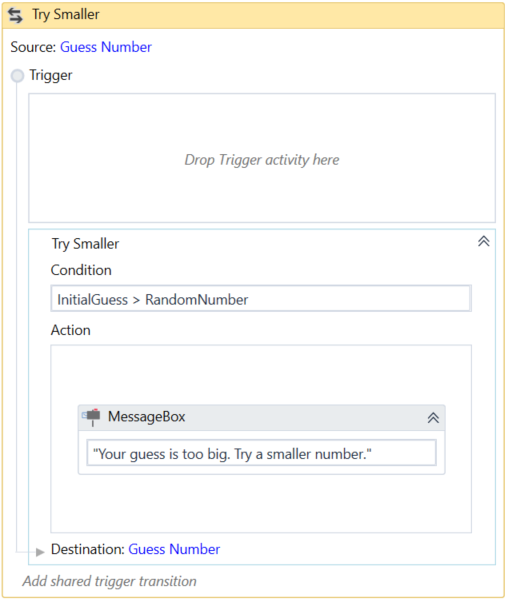
InitialGuessvariable. This variable stores the user’s guess. - Return to the main project view and create a transition that points from the Guess Number state to itself.
- Double-click the transition. The transition is displayed expanded in the Designer panel.
- In the Properties panel, in the DisplayName field, type Try Smaller. This message is displayed on the arrow, enabling you to run through your automation easier.
- In the Condition section, type
InitialGuess>RandomNumber. This verifies if the user’s guess is bigger than the random number. - In the Action section, add a Message Box activity.
- In the Text field, type something similar to "Your guess is too big. Try a smaller number." This message is displayed when the user’s guess is bigger than the random number.
- Return to the main project view and create a new transition that points from the Guess Number state to itself.
- Double-click the transition. The transition is displayed expanded in the Designer panel.
- In the Properties panel, in the DisplayName field, type "Try Bigger". This message is displayed on the arrow, enabling you to run through your automation easier.
- In the Condition section, type
InitialGuess<RandomNumber. This verifies if the guess is smaller than the random number. - In the Action section, add a Message Box activity.
- In the Text field, type something similar to "Your guess is too small. Try a bigger number." This message is displayed when the users guess is smaller than the random number.
- Return to main project view and add a Final State activity to the Designer panel.
- Connect a transition from the Guess Number activity to the Final State.
- In the Properties panel, in the DisplayName field, type "Correct Guess".
- In the Condition field, type
InitialGuess=RandomNumber. This is the condition on which this automation steps to the final state and end. - Double-click the Final State activity. It is displayed expanded in the Designer panel.
- In the Entry section, add a Message Box activity.
- In the Text field, type something similar to "Congratulations. You guessed correctly! The number was " +
RandomNumber.ToString+ "." This is the final message that is to be displayed, when the user correctly guesses the number.
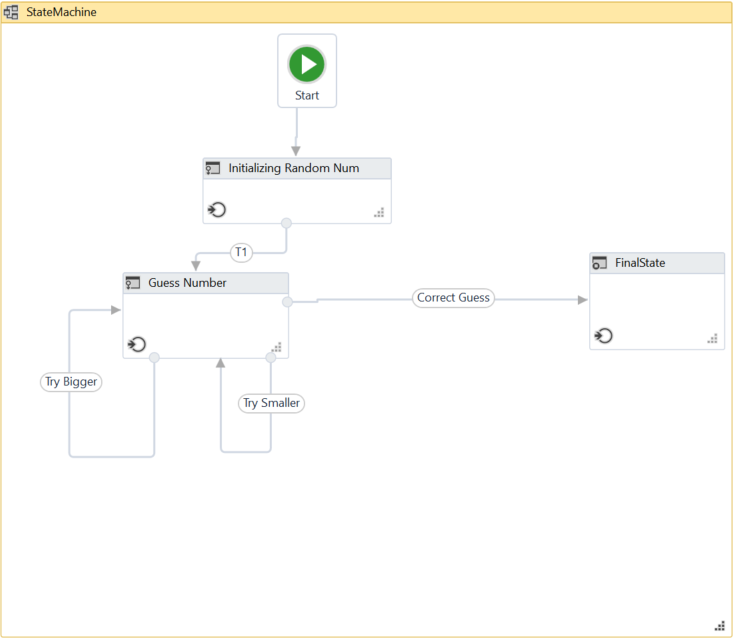
The final project should look as in the following screenshot.
- Press F5. The automation is executed correctly.

另:
https://www.jianshu.com/p/8d77459c69d2?from=timeline&isappinstalled=0
【UiPath Studio 中文文档】10 项目类型 - 状态机 (State Machine)
[转]UiPath State Machines的更多相关文章
- Important Programming Concepts (Even on Embedded Systems) Part V: State Machines
Earlier articles in this series: Part I: Idempotence Part II: Immutability Part III: Volatility Part ...
- [翻译]:Artificial Intelligence for games 5.3 STATE MACHINES:状态机
目录 Chapter 5 Decision Making 5.3 STATE MACHINES:状态机 Chapter 5 Decision Making 5.3 STATE MACHINES:状态机 ...
- UIPath RPA 自动化脚本 机器人从入门到精通
本文链接:https://blog.csdn.net/qq_27256783/article/details/93619818 一.UiPath介绍 UiPath 是RPA(Robotic Proce ...
- State Machine.(状态机)
What is a State Machine? Any device that changes its state from one to another due to some actions a ...
- reactjs入门到实战(四)---- state详解
this.props 表示那些一旦定义,就不再改变的特性,而 this.state 是会随着用户互动而产生变化的特性. 组件免不了要与用户互动,React 的一大创新,就是将组件看成是一个状态机,一开 ...
- Qt: The State Machine Framework 学习
State Machine,即为状态机,是Qt中一项非常好的框架.State Machine包括State以及State间的Transition,构成状态和状态转移.通过状态机,我们可以很方便地实现很 ...
- 【翻译】What is State Machine Diagram(什么是状态机图)?
[翻译]What is State Machine Diagram(什么是状态机图)? 写在前面 在上一篇学习类图的时候将这个网站上的类图的一篇文章翻译了出来,感觉受益良多,今天来学习UML状态机图, ...
- React基础篇(2) -- state&props&refs
内容简介 state props refs 行内样式及动态类名 state 基本介绍 React 把组件看成是一个状态机(State Machines).通过与用户的交互,实现不同状态,然后渲染 UI ...
- 创建组件的方法,组件的props属性、state属性的用法和特点,父子组件传值,兄弟组件传值
1.创建组件的方法 函数组件 class组件 1.1 函数组 无状态函数式组件形式上表现为一个只带有一个 `render()` 方法的组件类,通过函数形式或者 `ES6` 箭头 `functi ...
随机推荐
- js之观察者模式和发布订阅模式区别
观察者模式(Observer) 观察者模式指的是一个对象(Subject)维持一系列依赖于它的对象(Observer),当有关状态发生变更时 Subject 对象则通知一系列 Observer 对象进 ...
- FIve in a row
Alice and Bob play 5-in-a-row game. They have a playing field of size 10 × 10. In turns they put eit ...
- 地兵布阵 -----------HDU-1166
C国的死对头A国这段时间正在进行军事演习,所以C国间谍头子Derek和他手下Tidy又开始忙乎了.A国在海岸线沿直线布置了N个工兵营地,Derek和Tidy的任务就是要监视这些工兵营地的活动情况.由于 ...
- 洛谷 题解 P1025 【数的划分】
将n个小球放到k个盒子中的情况总数 = (a)至少有一个盒子只有一个小球的情况数 + (b)没有一个盒子只有一个小球的情况数 这样写出表达式: a.因为盒子不加区分,那么=情况数与"将n-1 ...
- 前端flex布局学习笔记
flex布局,即为弹性布局,其为盒模型提供最大的灵活性,任何一个容器都可以指定为flex布局. eg:.box{ display:flex: } 行内元素也可以使用flex布局. 注意:设置flex布 ...
- 分布式监控数据采集系统Ganglia实战
一.什么是Ganglia 对于这个工具,大家可能比较陌生,但是它功能非常强大,如果我们想收集所有服务器.网络设备的数据,那么ganglia绝对是首选,在深入学习之前,还是先从基础概念了解起吧! Gan ...
- 笔记||Python3之字符串格式化输出
字符串的格式化输出方法一: 常用的字符串格式化符号:%s --- 用str()函数进行字符串转换 %d --- 转成有符号十进制数 %f --- 转成浮点数(小数部分自然截断 ...
- Java并发:线程限制
最近又学到了很多新知识,感谢优锐课老师细致地讲解,这篇博客记录下自己所学所想,也和大家分享.了解有关Java中的并发问题和线程限制的更多信息. 在此文中,我们将探讨线程限制,它的含义以及如何实现.因此 ...
- eclipse右下角一直在loading jar文件,如何关闭?
通常导入项目的时候,右下角会显示download一些jar包或者其它内容,速度非常慢,如果你长得很帅很美可能更拖网速,最后可能会超时报错. 大招来了!!! 首先,打开windows->pre ...
- 【MyBatis】配置文件提示
[MyBatis]配置文件提示 官方帮助文档:http://www.mybatis.org/mybatis-3/zh/index.html config配置 http://mybatis.org/dt ...