
SectionList的使用
这个是效果:
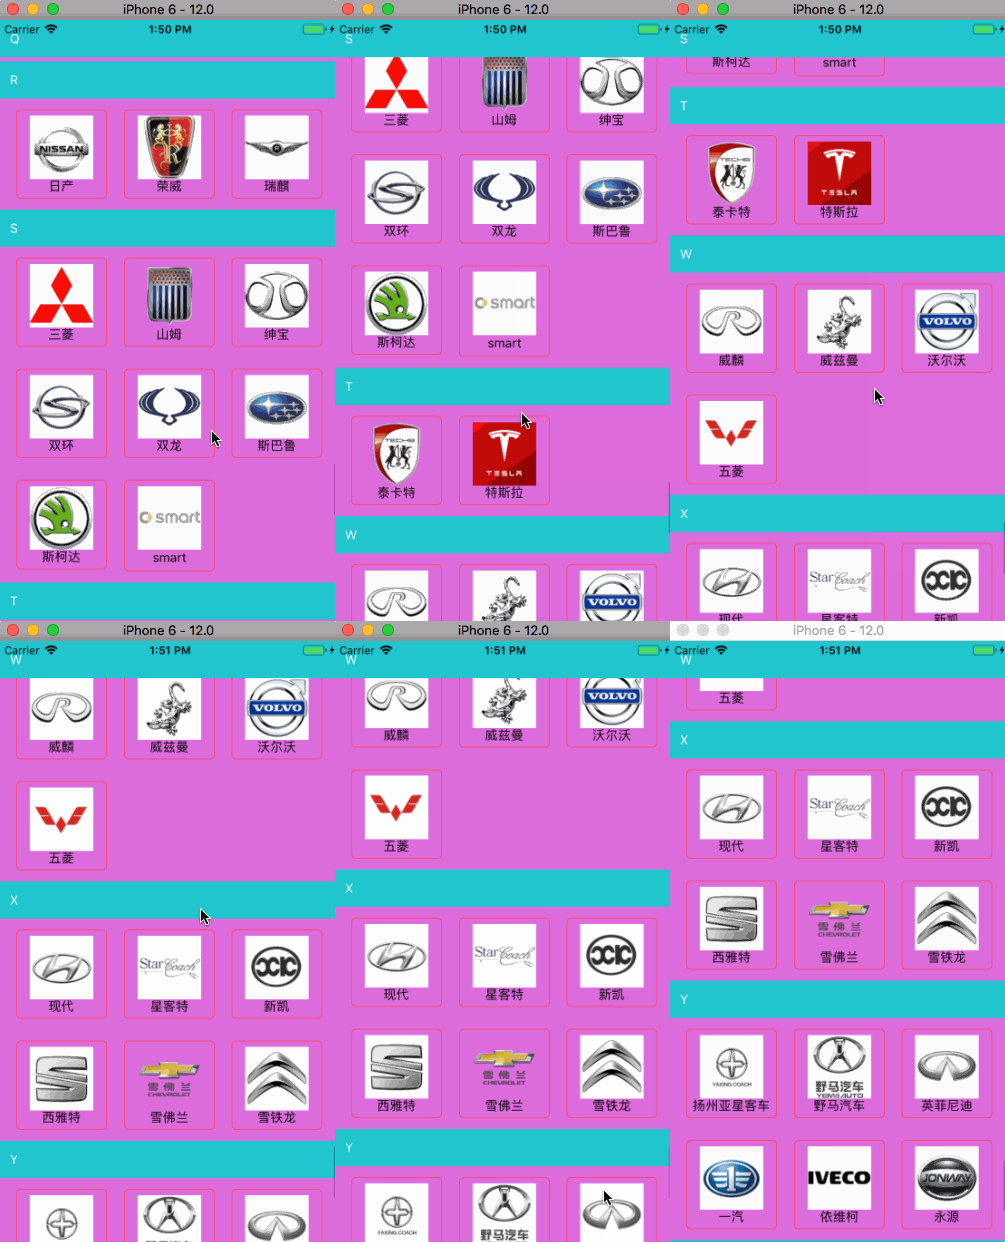
第一步:准备数据源:Car.json
{"data": [

    {

      "cars": [

        {

          "icon": "m_180_100.png",

          "name": "AC Schnitzer"

        },

        {

          "icon": "m_92_100.png",

          "name": "阿尔法·罗密欧"

        },

        {

          "icon": "m_9_100.png",

          "name": "奥迪"

        },

        {

          "icon": "m_97_100.png",

          "name": "阿斯顿·马丁"

        }

      ],

      "title": "A"

    }........

}
第二步:
import React, {Component} from 'react';

import {

    AppRegistry,

    StyleSheet,

    Text,

    View,

    SectionList,

    Dimensions,

    Image

} from 'react-native';

const dimension = Dimensions.get('window')

var Car = require('./Car.json');

var itemWidth = 100;

var cols = 3;

var cMargin = (dimension.width - (itemWidth * cols)) / 4.0;

var rMargin = 12;

export default class SectionListView1 extends Component {

    componentDidMount() {

    }

    _renderSectionHeader(info) {

        return (

            <View>

                <Text key={info.section.key} style={styles.sectionStyle}>

                    {info.section.title}

                </Text>

            </View>

        )

    }

    _renderItem(info) {

        return (

            <View style={styles.cellStyle}>

                <Image source={{uri: info.item.icon}} style={styles.imageStyle}/>

                <Text>

                    {info.item.name}

                </Text>

            </View>

        )

    }

    _separatorCom() {

        return (

            <View style={{height: 4, width: 500, backgroundColor: 'orange'}}>

            </View>

        )

    }

    render() {

        var dataSource = [];

        for (var i = 0; i < Car.data.length; i++) {

            let datas = [];

            for (var j = 0; j < Car.data[i].cars.length; j++) {

                datas.push(Car.data[i].cars[j]);

            }

            dataSource.push({key: i, data: datas, title: Car.data[i].title});

        }

        return (

            <View style={styles.container}>

                <SectionList

                    renderSectionHeader={this._renderSectionHeader}

                    renderItem={this._renderItem}

                    sections={dataSource}

                    // refreshing={false}

                    // onRefresh={()=>{alert("刷新")}}

                    // ItemSeparatorComponent={this._separatorCom}

                    // SectionSeparatorComponent={() => <View style={{height: 20, backgroundColor: 'blue'}}></View>}

                    keyExtractor={(item, index) => ("index" + index + item)}

                    // onEndReached={(info)=>{alert("到达底部")}}

                    // onEndReachedThreshold={0}

                    // stickySectionHeadersEnabled={true}

                    ListHeaderComponent={() => <View

                        style={{backgroundColor: 'yellow', alignItems: 'center',justifyContent: 'center',width:dimension.width,height:50}}><Text>这个是我的表头</Text></View>}

                    ListFooterComponent={() => <View

                        style={{backgroundColor: 'red', alignItems: 'center',width:dimension.width}}><Text>这个是我的表尾</Text></View>}

                    contentContainerStyle={styles.sectionListStyle}//设置cell的样式

                    pageSize={4}

                />

            </View>

        );

    }

}

const styles = StyleSheet.create({

        sectionListStyle: {

            flexDirection: 'row',

            flexWrap: 'wrap',

            alignItems: 'flex-start',

            backgroundColor: '#dd6ddd',

        },

        sectionStyle: {

            width: dimension.width,

            padding: 12,

            backgroundColor: '#21c6cd',

            color: '#fff'

        },

        cellStyle: {

            alignItems: 'center',

            borderRadius: 5,

            borderWidth: 1,

            borderColor: '#ff496b',

            marginLeft: cMargin,

            marginTop:rMargin,

            marginBottom:rMargin,

            padding: 6,

            width:itemWidth

        },

        imageStyle: {

            width: 70,

            height: 70

        }

    })

;

module.exports = SectionListView1;
如果大家把上面描述的的SectionList的下面两句代码删除,则会出现单行情况,如果有兴趣,自行调试
contentContainerStyle={styles.sectionListStyle}//设置cell的样式

                    pageSize={4}
renderItem:定义每个元素组件的渲染方式,默认传入参数rowData,要访问其中的"title"可以通过rowData.item.title访问到。
ItemSeparatorComponent:定义每个元素之间分割组件
ListHeaderComponent:定义头部组件
ListFooterComponent:定义底部组件
ListEmptyComponent:data为空时显示的组件
columnWrapperStyle:定义每个组件栏的包裹样式,不支持单行组件
numColumns:number,定义每行显示的元素个数
refreshControl:定义头部刷新组件,例如:
refreshControl={ //下拉刷新组件
<RefreshControl
refreshing={this.state.refreshing} //通过bool值refreshing控制是否刷新
onRefresh={this._onRefresh.bind(this)} //刷新时需要执行的函数
/>
}
onEndReached:在列表滚动到底部一定距离时调用这个函数,一般在此定义滚动到底部时加载新的数据。
onEndReachedThreshold:决定当距离内容最底部还有多远时触发onEndReached回调。注意此参数是一个比值而非像素单位。比如,0.5表示距离内容最底部的距离为当前列表可见长度的一半时触发。
SectionList的使用的更多相关文章
- 史上最易懂——ReactNative分组列表SectionList使用详情及示例详解
React Native系列 <逻辑性最强的React Native环境搭建与调试> <ReactNative开发工具有这一篇足矣> <解决React Native un ...
- React native 中 SectionList用法
一.代码 import React, { Component } from 'react'; import { AppRegistry, View, Text, SectionList, } from ...
- React-Native新列表组件FlatList和SectionList学习 | | 联动列表实现
React-Native在0.43推出了两款新的列表组件:FlatList(高性能的简单列表组件)和SectionList(高性能的分组列表组件). 从官方上它们都支持常用的以下功能: 完全跨平台. ...
- react native 踩坑之 SectionList state更新 不执行render重新渲染页面
官方文档中指出 SectionList 本组件继承自PureComponent而非通常的Component,这意味着如果其props在浅比较中是相等的,则不会重新渲染.所以请先检查你的renderIt ...
- [RN] React Native 下列表 FlatList 和 SectionList
1.FlatList FlatList组件用于显示一个垂直的滚动列表,其中的元素之间结构近似而仅数据不同. FlatList更适于长列表数据,且元素个数可以增删.和ScrollView不同的是,Fla ...
- React Native 之SectionList
接上一篇: /pages/SectionListDemo.js import React, {Fragment,Component} from 'react'; import { SafeAreaVi ...
- SectionIndexer示例
This small tutorial will show you how to create a ListView, enable fast scrolling, and create a alph ...
- Rafy 中的 Linq 查询支持(根据聚合子条件查询聚合父)
为了提高开发者的易用性,Rafy 领域实体框架在很早开始就已经支持使用 Linq 语法来查询实体了.但是只支持了一些简单的.常用的条件查询,支持的力度很有限.特别是遇到对聚合对象的查询时,就不能再使用 ...
- C#读取ini文件的方法
最近项目用到ini文件,读取ini文件,方法如下: using System; using System.Collections.Generic; using System.Linq; using S ...
随机推荐
- [Tensorflow] Object Detection API - retrain mobileNet
前言 一.专注话题 重点话题 Retrain mobileNet (transfer learning). Train your own Object Detector. 这部分讲理论,下一篇讲实践. ...
- [Python] 06 - Modules --> Packages
故事背景 一.阶级关系 1. Programs are composed of modules.2. Modules contain statements.3. Statements contain ...
- Flv的结构分析
Flv是网络上流行的非常广的一种媒体格式,很多大型媒体网站都在使用这种格式承载音视频信息,比如优酷等网站. Flv文件格式相对而言还是比较简单的,主要是由两部分组成 FLV header FLV bo ...
- iOS开发-- TFHpple抓取GB-2312编码的html页面,页面返回编码错误
今天用TFHpple解析html,发现老报错encoding error : input conversion failed due to input error, bytes I/O error ...
- Android进阶:ListView性能优化异步加载图片 使滑动效果流畅
ListView 是一种可以显示一系列项目并能进行滚动显示的 View,每一行的Item可能包含复杂的结构,可能会从网络上获取icon等的一些图标信息,就现在的网络速度要想保持ListView运行的很 ...
- php实现多域名共享session会话
php会话机制参考:我的随笔 缘起 网站,通常会有多个服务器,多个子域名,每个节点运行着不同模块.有时为了整体体验,用户用同一个用户名.密码浏览整站,不用重复登录.这时候就需要多服务器共享sessio ...
- LeetCode - 386. Lexicographical Numbers
Given an integer n, return 1 - n in lexicographical order. For example, given 13, return: [1,10,11,1 ...
- solus 系统 - 更新软件源
清华稳定源sudo eopkg ar Tuna https://mirrors.tuna.tsinghua.edu.cn/solus/shannon/eopkg-index.xml 清华不稳定源sud ...
- ubuntu部署git
先更新本机内置的程序. sudo apt-get updatesudo apt-get upgrade再判断系统是否内置了add-apt-repository命令,如果没有执行下列命令安装 sudo ...
- C和C指针小记(七)-整型变量范围
1.变量范围 limits.h 头文件中定义来C 语言的变量范围. 变量范围的限制 //char 的范围 printf("CHAR_BIT:%d CHAR_MIN:%d CHAR_MAX:% ...