activemq学习总结 (转)Java消息队列--ActiveMq 实战
转:https://www.cnblogs.com/jaycekon/p/6225058.html 感谢作者
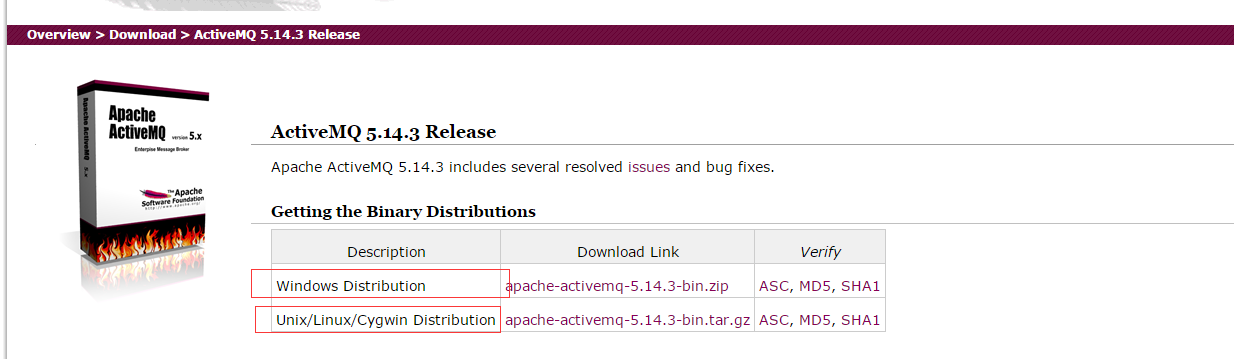
ActiveMQ官网下载地址:http://activemq.apache.org/download.html
ActiveMQ 提供了Windows 和Linux、Unix 等几个版本,楼主这里选择了Linux 版本下进行开发。
下载完安装包,解压之后的目录:

从它的目录来说,还是很简单的:
- bin存放的是脚本文件
- conf存放的是基本配置文件
- data存放的是日志文件
- docs存放的是说明文档
- examples存放的是简单的实例
- lib存放的是activemq所需jar包
- webapps用于存放项目的目录
2、启动ActiveMQ
进入到ActiveMQ 安装目录的Bin 目录,linux 下输入 ./activemq start 启动activeMQ 服务。
输入命令之后,会提示我们创建了一个进程IP 号,这时候说明服务已经成功启动了。

ActiveMQ默认启动时,启动了内置的jetty服务器,提供一个用于监控ActiveMQ的admin应用。
admin:http://127.0.0.1:8161/admin/
我们在浏览器打开链接之后输入账号密码(这里和tomcat 服务器类似)
默认账号:admin
密码:admin
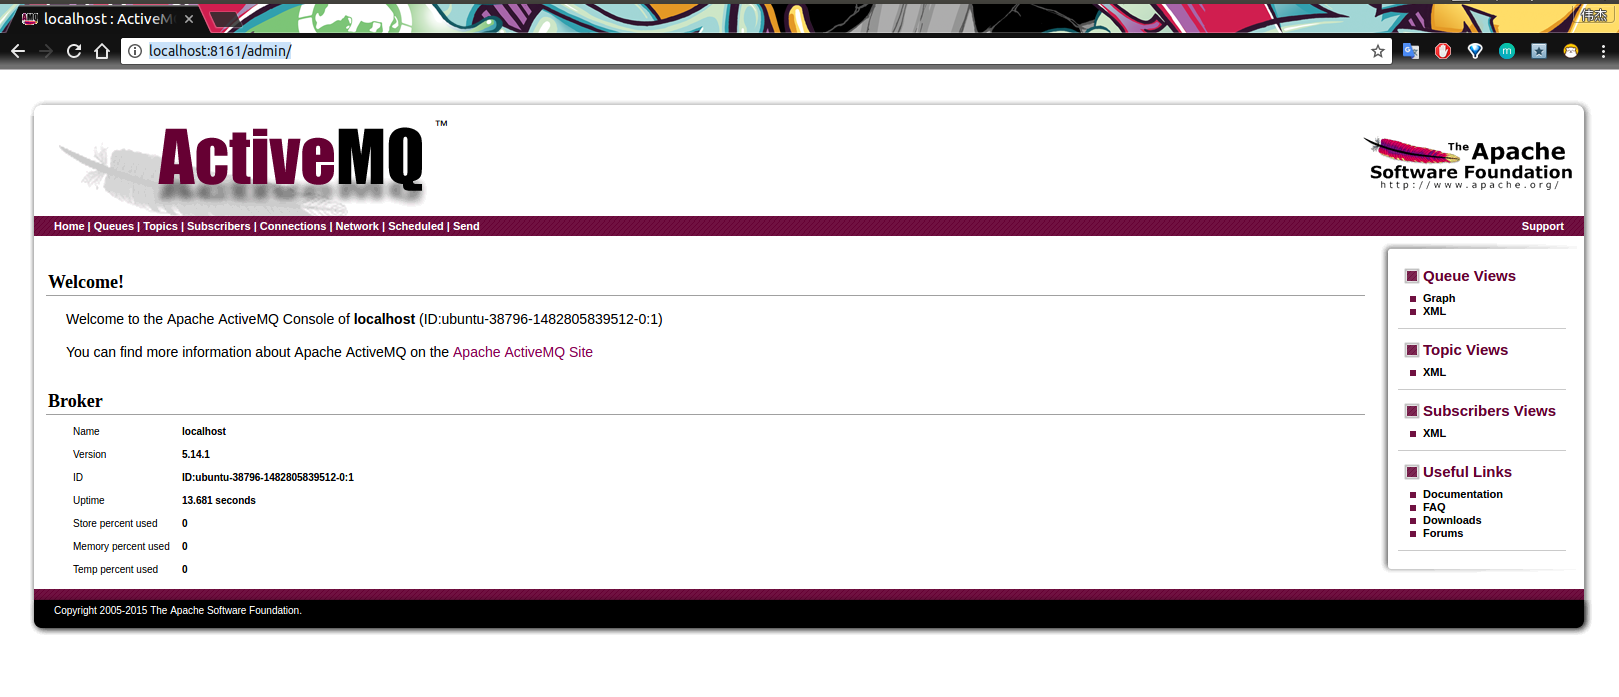
到这里为止,ActiveMQ 服务端就启动完毕了。
ActiveMQ 在linux 下的终止命令是 ./activemq stop
3、创建一个ActiveMQ工程
项目目录结构:
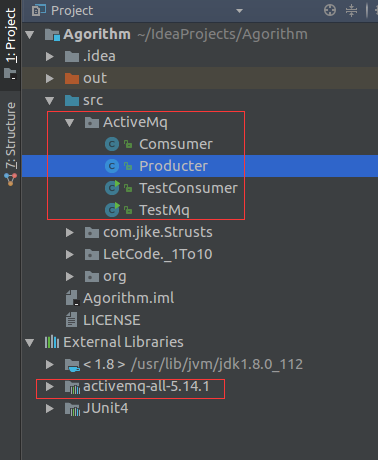
上述在官网下载ActiveMq 的时候,我们可以在目录下看到一个jar包:

这个jar 包就是我们需要在项目中进行开发中使用到的相关依赖。
3.1 创建生产者

public class Producter {

    //ActiveMq 的默认用户名

    private static final String USERNAME = ActiveMQConnection.DEFAULT_USER;

    //ActiveMq 的默认登录密码

    private static final String PASSWORD = ActiveMQConnection.DEFAULT_PASSWORD;

    //ActiveMQ 的链接地址

    private static final String BROKEN_URL = ActiveMQConnection.DEFAULT_BROKER_URL;

    AtomicInteger count = new AtomicInteger(0);

    //链接工厂

    ConnectionFactory connectionFactory;

    //链接对象

    Connection connection;

    //事务管理

    Session session;

    ThreadLocal<MessageProducer> threadLocal = new ThreadLocal<>();

    public void init(){

        try {

            //创建一个链接工厂

            connectionFactory = new ActiveMQConnectionFactory(USERNAME,PASSWORD,BROKEN_URL);

            //从工厂中创建一个链接

            connection  = connectionFactory.createConnection();

            //开启链接

            connection.start();

            //创建一个事务(这里通过参数可以设置事务的级别)

            session = connection.createSession(true,Session.SESSION_TRANSACTED);

        } catch (JMSException e) {

            e.printStackTrace();

        }

    }

    public void sendMessage(String disname){

        try {

            //创建一个消息队列

            Queue queue = session.createQueue(disname);

            //消息生产者

            MessageProducer messageProducer = null;

            if(threadLocal.get()!=null){

                messageProducer = threadLocal.get();

            }else{

                messageProducer = session.createProducer(queue);

                threadLocal.set(messageProducer);

            }

           while(true){

                Thread.sleep(1000);

                int num = count.getAndIncrement();

                //创建一条消息

                TextMessage msg = session.createTextMessage(Thread.currentThread().getName()+

                        "productor:我是大帅哥,我现在正在生产东西!,count:"+num);

                System.out.println(Thread.currentThread().getName()+

                        "productor:我是大帅哥,我现在正在生产东西!,count:"+num);

                //发送消息

                messageProducer.send(msg);

                //提交事务

                session.commit();

            }

        } catch (JMSException e) {

            e.printStackTrace();

        } catch (InterruptedException e) {

            e.printStackTrace();

        }

    }

}
3.2 创建消费者
public class Comsumer {

    private static final String USERNAME = ActiveMQConnection.DEFAULT_USER;

    private static final String PASSWORD = ActiveMQConnection.DEFAULT_PASSWORD;

    private static final String BROKEN_URL = ActiveMQConnection.DEFAULT_BROKER_URL;

    ConnectionFactory connectionFactory;

    Connection connection;

    Session session;

    ThreadLocal<MessageConsumer> threadLocal = new ThreadLocal<>();

    AtomicInteger count = new AtomicInteger();

    public void init(){

        try {

            connectionFactory = new ActiveMQConnectionFactory(USERNAME,PASSWORD,BROKEN_URL);

            connection  = connectionFactory.createConnection();

            connection.start();

            session = connection.createSession(false,Session.AUTO_ACKNOWLEDGE);

        } catch (JMSException e) {

            e.printStackTrace();

        }

    }

    public void getMessage(String disname){

        try {

            Queue queue = session.createQueue(disname);

            MessageConsumer consumer = null;

            if(threadLocal.get()!=null){

                consumer = threadLocal.get();

            }else{

                consumer = session.createConsumer(queue);

                threadLocal.set(consumer);

            }

            while(true){

                Thread.sleep(1000);

                TextMessage msg = (TextMessage) consumer.receive();

                if(msg!=null) {

                    msg.acknowledge();

                    System.out.println(Thread.currentThread().getName()+": Consumer:我是消费者,我正在消费Msg"+msg.getText()+"--->"+count.getAndIncrement());

                }else {

                    break;

                }

            }

        } catch (JMSException e) {

            e.printStackTrace();

        } catch (InterruptedException e) {

            e.printStackTrace();

        }

    }

}
4、运行ActiveMQ项目
4.1 生产者开始生产消息
public class TestMq {

    public static void main(String[] args){

        Producter producter = new Producter();

        producter.init();

        TestMq testMq = new TestMq();

        try {

            Thread.sleep(1000);

        } catch (InterruptedException e) {

            e.printStackTrace();

        }

        //Thread 1

        new Thread(testMq.new ProductorMq(producter)).start();

        //Thread 2

        new Thread(testMq.new ProductorMq(producter)).start();

        //Thread 3

        new Thread(testMq.new ProductorMq(producter)).start();

        //Thread 4

        new Thread(testMq.new ProductorMq(producter)).start();

        //Thread 5

        new Thread(testMq.new ProductorMq(producter)).start();

    }

    private class ProductorMq implements Runnable{

        Producter producter;

        public ProductorMq(Producter producter){

            this.producter = producter;

        }

        @Override

        public void run() {

            while(true){

                try {

                    producter.sendMessage("Jaycekon-MQ");

                    Thread.sleep(10000);

                } catch (InterruptedException e) {

                    e.printStackTrace();

                }

            }

        }

    }

}
运行结果:
 INFO | Successfully connected to tcp://localhost:61616

Thread-6productor:我是大帅哥,我现在正在生产东西!,count:0

Thread-4productor:我是大帅哥,我现在正在生产东西!,count:1

Thread-2productor:我是大帅哥,我现在正在生产东西!,count:3

Thread-5productor:我是大帅哥,我现在正在生产东西!,count:2

Thread-3productor:我是大帅哥,我现在正在生产东西!,count:4

Thread-6productor:我是大帅哥,我现在正在生产东西!,count:5

Thread-3productor:我是大帅哥,我现在正在生产东西!,count:6

Thread-5productor:我是大帅哥,我现在正在生产东西!,count:7

Thread-2productor:我是大帅哥,我现在正在生产东西!,count:8

Thread-4productor:我是大帅哥,我现在正在生产东西!,count:9

Thread-6productor:我是大帅哥,我现在正在生产东西!,count:10

Thread-3productor:我是大帅哥,我现在正在生产东西!,count:11

Thread-5productor:我是大帅哥,我现在正在生产东西!,count:12

Thread-2productor:我是大帅哥,我现在正在生产东西!,count:13

Thread-4productor:我是大帅哥,我现在正在生产东西!,count:14

Thread-6productor:我是大帅哥,我现在正在生产东西!,count:15

Thread-3productor:我是大帅哥,我现在正在生产东西!,count:16

Thread-5productor:我是大帅哥,我现在正在生产东西!,count:17

Thread-2productor:我是大帅哥,我现在正在生产东西!,count:18

Thread-4productor:我是大帅哥,我现在正在生产东西!,count:19

4.2 消费者开始消费消息
public class TestConsumer {

    public static void main(String[] args){

        Comsumer comsumer = new Comsumer();

        comsumer.init();

        TestConsumer testConsumer = new TestConsumer();

        new Thread(testConsumer.new ConsumerMq(comsumer)).start();

        new Thread(testConsumer.new ConsumerMq(comsumer)).start();

        new Thread(testConsumer.new ConsumerMq(comsumer)).start();

        new Thread(testConsumer.new ConsumerMq(comsumer)).start();

    }

    private class ConsumerMq implements Runnable{

        Comsumer comsumer;

        public ConsumerMq(Comsumer comsumer){

            this.comsumer = comsumer;

        }

        @Override

        public void run() {

            while(true){

                try {

                    comsumer.getMessage("Jaycekon-MQ");

                    Thread.sleep(10000);

                } catch (InterruptedException e) {

                    e.printStackTrace();

                }

            }

        }

    }

}
运行结果:
|
1
2
3
4
5
6
7
8
9
10
11
12
13
14
15
16
17
18
19
20
21
22
|
INFO | Successfully connected to tcp://localhost:61616Thread-2: Consumer:我是消费者,我正在消费MsgThread-5productor:我是大帅哥,我现在正在生产东西!,count:4--->0Thread-3: Consumer:我是消费者,我正在消费MsgThread-4productor:我是大帅哥,我现在正在生产东西!,count:36--->1Thread-4: Consumer:我是消费者,我正在消费MsgThread-3productor:我是大帅哥,我现在正在生产东西!,count:38--->2Thread-5: Consumer:我是消费者,我正在消费MsgThread-6productor:我是大帅哥,我现在正在生产东西!,count:37--->3Thread-2: Consumer:我是消费者,我正在消费MsgThread-6productor:我是大帅哥,我现在正在生产东西!,count:2--->4Thread-3: Consumer:我是消费者,我正在消费MsgThread-5productor:我是大帅哥,我现在正在生产东西!,count:40--->5Thread-4: Consumer:我是消费者,我正在消费MsgThread-6productor:我是大帅哥,我现在正在生产东西!,count:42--->6Thread-5: Consumer:我是消费者,我正在消费MsgThread-4productor:我是大帅哥,我现在正在生产东西!,count:41--->7Thread-2: Consumer:我是消费者,我正在消费MsgThread-3productor:我是大帅哥,我现在正在生产东西!,count:1--->8Thread-3: Consumer:我是消费者,我正在消费MsgThread-2productor:我是大帅哥,我现在正在生产东西!,count:44--->9Thread-4: Consumer:我是消费者,我正在消费MsgThread-4productor:我是大帅哥,我现在正在生产东西!,count:46--->10Thread-5: Consumer:我是消费者,我正在消费MsgThread-5productor:我是大帅哥,我现在正在生产东西!,count:45--->11Thread-2: Consumer:我是消费者,我正在消费MsgThread-2productor:我是大帅哥,我现在正在生产东西!,count:3--->12Thread-3: Consumer:我是消费者,我正在消费MsgThread-3productor:我是大帅哥,我现在正在生产东西!,count:48--->13Thread-4: Consumer:我是消费者,我正在消费MsgThread-5productor:我是大帅哥,我现在正在生产东西!,count:50--->14Thread-5: Consumer:我是消费者,我正在消费MsgThread-2productor:我是大帅哥,我现在正在生产东西!,count:49--->15Thread-4: Consumer:我是消费者,我正在消费MsgThread-2productor:我是大帅哥,我现在正在生产东西!,count:54--->16Thread-2: Consumer:我是消费者,我正在消费MsgThread-5productor:我是大帅哥,我现在正在生产东西!,count:6--->17Thread-3: Consumer:我是消费者,我正在消费MsgThread-6productor:我是大帅哥,我现在正在生产东西!,count:52--->18Thread-5: Consumer:我是消费者,我正在消费MsgThread-3productor:我是大帅哥,我现在正在生产东西!,count:53--->19Thread-4: Consumer:我是消费者,我正在消费MsgThread-3productor:我是大帅哥,我现在正在生产东西!,count:58--->20 |
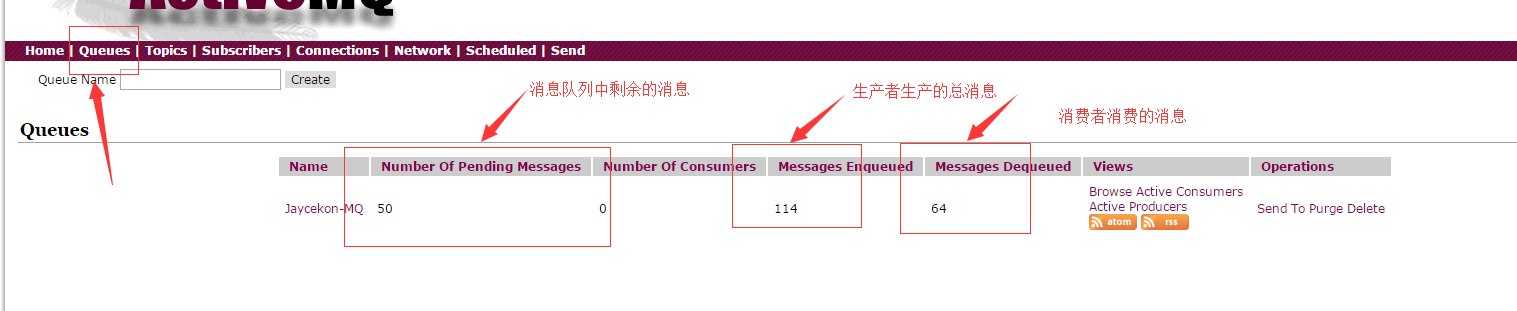
查看运行结果,我们可以做ActiveMQ 服务端:http://127.0.0.1:8161/admin/ 里面的Queues 中查看我们生产的消息。
5、ActiveMQ的特性
5.1 ActiveMq 的特性
- 多种语言和协议编写客户端。语言: Java, C, C++, C#, Ruby, Perl, Python, PHP。应用协议: OpenWire,Stomp REST,WS Notification,XMPP,AMQP
- 完全支持JMS1.1和J2EE 1.4规范 (持久化,XA消息,事务)
- 对Spring的支持,ActiveMQ可以很容易内嵌到使用Spring的系统里面去,而且也支持Spring2.0的特性
- 通过了常见J2EE服务器(如 Geronimo,JBoss 4, GlassFish,WebLogic)的测试,其中通过JCA 1.5 resource adaptors的配置,可以让ActiveMQ可以自动的部署到任何兼容J2EE 1.4 商业服务器上
- 支持多种传送协议:in-VM,TCP,SSL,NIO,UDP,JGroups,JXTA
- 支持通过JDBC和journal提供高速的消息持久化
- 从设计上保证了高性能的集群,客户端-服务器,点对点
- 支持Ajax
- 支持与Axis的整合
- 可以很容易得调用内嵌JMS provider,进行测试
5.2 什么情况下使用ActiveMQ?
- 多个项目之间集成
(1) 跨平台
(2) 多语言
(3) 多项目 - 降低系统间模块的耦合度,解耦
(1) 软件扩展性 - 系统前后端隔离
(1) 前后端隔离,屏蔽高安全区
activemq学习总结 (转)Java消息队列--ActiveMq 实战的更多相关文章
- Java消息队列--ActiveMq 实战
1.下载安装ActiveMQ ActiveMQ官网下载地址:http://activemq.apache.org/download.html ActiveMQ 提供了Windows 和Linux.Un ...
- Java消息队列--ActiveMq 初体验
1.下载安装ActiveMQ ActiveMQ官网下载地址:http://activemq.apache.org/download.html ActiveMQ 提供了Windows 和Linux.Un ...
- java消息队列--ActiveMQ
1.下载安装ActiveMQ ActiveMQ官网下载地址:http://activemq.apache.org/download.html ActiveMQ 提供了Windows 和Linux.Un ...
- Java消息队列ActiveMQ (一)--JMS基本概念
摘要:The Java Message Service (JMS) API is a messaging standard that allows application components bas ...
- Java消息队列-Spring整合ActiveMq
1.概述 首先和大家一起回顾一下Java 消息服务,在我之前的博客<Java消息队列-JMS概述>中,我为大家分析了: 消息服务:一个中间件,用于解决两个活多个程序之间的耦合,底层由Jav ...
- 消息队列ActiveMQ的使用详解
通过上一篇文章 <消息队列深入解析>,我们已经消息队列是什么.使用消息队列的好处以及常见消息队列的简单介绍. 这一篇文章,主要带大家详细了解一下消息队列ActiveMQ的使用. 学习消息队 ...
- 【框架学习与探究之消息队列--EasyNetQ(2)】
声明 本文欢迎转载,系博主原创,本文原始链接地址:http://www.cnblogs.com/DjlNet/p/7654902.html 前言 此文章,是承接上篇:[框架学习与探究之消息队列--Ea ...
- JMS(Java消息服务)与消息队列ActiveMQ基本使用(一)
最近的项目中用到了mq,之前自己一直在码农一样的照葫芦画瓢.最近几天研究了下,把自己所有看下来的文档和了解总结一下. 一. 认识JMS 1.概述 对于JMS,百度百科,是这样介绍的:JMS即Java消 ...
- java之消息队列ActiveMQ实践
原创论文:https://www.cnblogs.com/goujh/p/8510239.html 消息队列的应用场景: 消息队列应用场景 异步处理,应用解耦,流量削锋和消息通讯四个场景 异步处理: ...
随机推荐
- [codeforces 508E]Maximum Matching
题目:Maximum Matching 传送门:http://codeforces.com/contest/1038/problem/E 分析: 一个块拥有{color1,val,color2},两个 ...
- NOIp 数据结构专题总结 (2):分块、树状数组、线段树
系列索引: NOIp 数据结构专题总结 (1) NOIp 数据结构专题总结 (2) 分块 阅:<「分块」数列分块入门 1-9 by hzwer> 树状数组 Binary Indexed T ...
- python的map、reduce和filter(过滤器)函数(廖雪峰老师python基础)
1.map 语法: map(func,Iterable) map()函数接收两个参数,一个是函数,一个是Iterable,map将传入的函数依次作用到序列的每个元素,并把结果作为新的Iterator返 ...
- Toposort(拓扑排序)dfs递归模板
最近刷了几题拓扑排序的题,记录一下拓扑排序 在有向图中,并且按照一定的规则(题目所给的规则)排序.如果图中出现了有向环的话就无法排序了. int gap[maxn][maxn];//记录下有向边 in ...
- Apache + Tomcat 集群的配置
公司最近新接了一个项目,客户要求WEB SERVER 必须是APACHE,,由于之前的项目一直都是NGINX,,无奈啊,,由于对方的IT又是在三哥的过度,经过一番的争执只能顺应三哥三姐的要求..
- mysql 查询结果增加自动递增的一列,排名,排序
mysql中有时候需要对查询的结果排序,比如根据成绩获取排名信息等,需要增加一个自增的列,也就是排名信息 ; as sortid FROM a; 如果不支持写两条sql,可以用以下写法合成一条sq ...
- (2).net体系
一.C# 和CLR 和.Net Framework 的历史版本对照表 C#版本 CLR版本 Framework版本 1.0 1.0 1.0 1.2 1.1 1.1 2.0 2.0 2 ...
- Python 进阶_OOP 面向对象编程_实例属性和方法
目录 目录 构造器和解构器 构造器 __init__ 真构造器 __new__ 解构器 __del__ 实例方法 Python 中的 抽象方法 实例属性 查看实例属性 实例属性和类属性的区别 访问不可 ...
- appium常见问题06_如何解决uiaotomator定位工具报错
在使用uiaotomator工具定位元素过程中,经常会弹出报错,截图失败,导致无法定位元素,当遇到该问题时,解决办法如下: 方法一:拔掉手机usb连接,重新连接手机 方法二:adb杀掉手机服务,重起服 ...
- LeetCode 数组中两个数的最大异或值
题目链接:https://leetcode-cn.com/problems/maximum-xor-of-two-numbers-in-an-array/ 题目大意: 略. 分析: 字典树 + 贪心. ...