
springboot+swagger2案例
1.pom.xml
<project xmlns="http://maven.apache.org/POM/4.0.0" xmlns:xsi="http://www.w3.org/2001/XMLSchema-instance" xsi:schemaLocation="http://maven.apache.org/POM/4.0.0 http://maven.apache.org/xsd/maven-4.0.0.xsd">

  <modelVersion>4.0.0</modelVersion>

  <groupId>swagger</groupId>

  <artifactId>swagger</artifactId>

  <version>0.0.1-SNAPSHOT</version>

    <parent>

        <groupId>org.springframework.boot</groupId>

        <artifactId>spring-boot-starter-parent</artifactId>

        <version>1.4.3.RELEASE</version>

        <relativePath/> <!-- lookup parent from repository -->

    </parent>

    <properties>

        <project.build.sourceEncoding>UTF-8</project.build.sourceEncoding>

        <project.reporting.outputEncoding>UTF-8</project.reporting.outputEncoding>

        <java.version>1.8</java.version>

    </properties>

    <dependencies>

    		<dependency>

  		 <groupId>org.springframework.boot</groupId>

  		 <artifactId>spring-boot-starter-web</artifactId>

		</dependency>

		<dependency>

      		 <groupId>io.springfox</groupId>

    				<artifactId>springfox-swagger2</artifactId>

   			 <version>2.6.0</version>

		</dependency>

		<dependency>

   			 <groupId>io.springfox</groupId>

    			<artifactId>springfox-swagger-ui</artifactId>

    			<version>2.6.0</version>

		</dependency>

	</dependencies>

</project>
swagger2配置文件
package com.newtouch.swagger.config;

import org.springframework.context.annotation.Bean;

import org.springframework.context.annotation.Configuration;

import springfox.documentation.builders.ApiInfoBuilder;

import springfox.documentation.builders.PathSelectors;

import springfox.documentation.builders.RequestHandlerSelectors;

import springfox.documentation.service.ApiInfo;

import springfox.documentation.spi.DocumentationType;

import springfox.documentation.spring.web.plugins.Docket;

import springfox.documentation.swagger2.annotations.EnableSwagger2;

@Configuration

@EnableSwagger2

public class SwaggerConfiguration {

	@Bean

    public Docket createRestApi() {

        return new Docket(DocumentationType.SWAGGER_2)

                .apiInfo(apiInfo())

                .select()

                .apis(RequestHandlerSelectors.basePackage("com.newtouch.swagger.controller"))

                .paths(PathSelectors.any())

                .build();

    }

    private ApiInfo apiInfo() {

        return new ApiInfoBuilder()

                .title("SpringBoot中使用Swagger2构建RESTfulAPIs")

                .description("SpringBoot中使用Swagger2构建RESTfulAPIs")

                .termsOfServiceUrl("http://blog.didispace.com/")

                .contact("程序猿DD")

                .version("1.0")

                .build();

    }

}
请求bean
package com.newtouch.swagger.controller.bean;

import io.swagger.annotations.ApiModel;

import io.swagger.annotations.ApiModelProperty;

@ApiModel("用户")

public class UserRequest {

	@ApiModelProperty(value="用户id",name="id",required=false)

	private int id;

	@ApiModelProperty(value="用户name",name="name",required=false)

	private String name;

	public int getId() {

		return id;

	}

	public void setId(int id) {

		this.id = id;

	}

	public String getName() {

		return name;

	}

	public void setName(String name) {

		this.name = name;

	}

}
controller
package com.newtouch.swagger.controller;

import java.util.HashMap;

import java.util.Map;

import org.springframework.web.bind.annotation.RequestBody;

import org.springframework.web.bind.annotation.RequestMapping;

import org.springframework.web.bind.annotation.RestController;

import com.newtouch.swagger.controller.bean.UserRequest;

import io.swagger.annotations.Api;

import io.swagger.annotations.ApiOperation;

import io.swagger.annotations.ApiParam;

@Api("用户操作类")

@RestController

public class UserController {

	@RequestMapping(value="/getName")

	@ApiOperation("用户对象")

	public Map getName(@RequestBody @ApiParam(name="用户对象",value="传入json格式",required=true) UserRequest u) {

		Map<String, Object> resultMap = new HashMap<>();

		resultMap.put("id", u.getId());

		resultMap.put("name", u.getName());

		return resultMap;

	}

}
效果展示
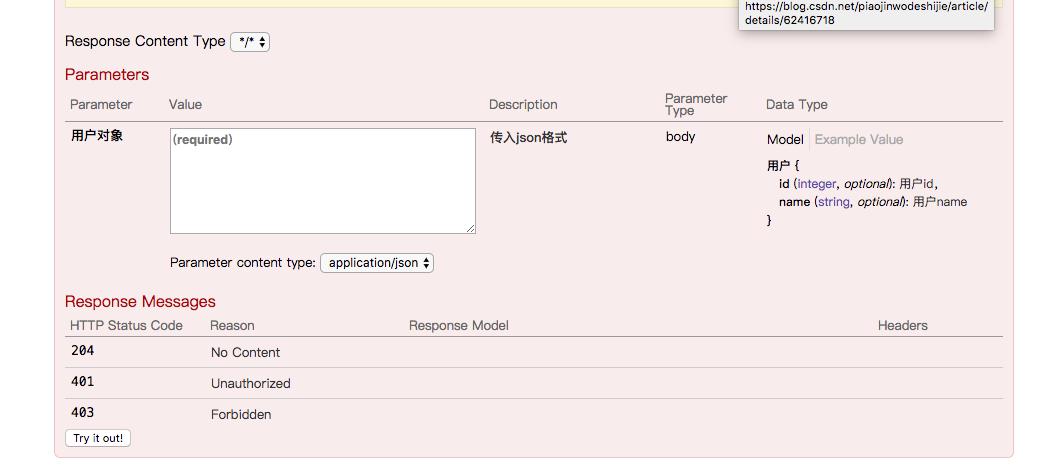
swagger注解详解:https://blog.csdn.net/u014231523/article/details/76522486
springboot+swagger2案例的更多相关文章
- SpringBoot整合Swagger2案例,以及报错:java.lang.NumberFormatException: For input string: ""原因和解决办法
原文链接:https://blog.csdn.net/weixin_43724369/article/details/89341949 SpringBoot整合Swagger2案例 先说SpringB ...
- springboot+swagger2
springboot+swagger2 小序 新公司的第二个项目,是一个配置管理终端机(比如:自动售卖机,银行取款机)的web项目,之前写过一个分模块的springboot框架,就在那个框架基础上进行 ...
- SpringBoot开发案例之多任务并行+线程池处理
前言 前几篇文章着重介绍了后端服务数据库和多线程并行处理优化,并示例了改造前后的伪代码逻辑.当然了,优化是无止境的,前人栽树后人乘凉.作为我们开发者来说,既然站在了巨人的肩膀上,就要写出更加优化的程序 ...
- SpringBoot开发案例从0到1构建分布式秒杀系统
前言 最近,被推送了不少秒杀架构的文章,忙里偷闲自己也总结了一下互联网平台秒杀架构设计,当然也借鉴了不少同学的思路.俗话说,脱离案例讲架构都是耍流氓,最终使用SpringBoot模拟实现了部分秒杀场 ...
- SpringBoot+Swagger2 整合
SpringBoot+Swagger2四步整合 第一步:添加相关依赖 <parent> <groupId>org.springframework.boot</groupI ...
- Spring-boot官方案例分析之data-jpa
Spring-boot官方案例分析之data-jpa package sample.data.jpa; import org.junit.Before; import org.junit.Test; ...
- Spring-boot官方案例分析之log4j
Spring-boot官方案例分析之log4j 运行单元测试分析: @RunWith(SpringJUnit4ClassRunner.class) @SpringApplicationConfigur ...
- Xmemcached与SpringBoot实际案例
在本人的这篇文章<Xmemcached集群与SpringBoot整合>基础上,进行XMemcached与SpringBoot实际案例的结合. 有以下这张表,将这张表的增删改查操作都添加到X ...
- Springboot+swagger2.7集成开发
Springboot+swagger2.7集成开发 本篇文章是介绍最新的springboot和swagger2.7集成开发和2.0稍微有一些出入: Springboot集成环境配置 Swagger2. ...
随机推荐
- Git做代码增量发布的重要用法 - --diff-filter
你以为有 bash git diff --name-only 就够了,NO! 对于PHP开发的系统来说,增量发布,一般只需部署新增的文件和有变动的文件,但很多时候,文件是删除的或重构成其它文件名或重构 ...
- [培训]keysight培训
DDR DDR->DDR2->DDR3->DDR4->DDR5->HBM, LPDDR(low power DDR)
- Android——黑名单管理
DBHelper.java package com.example.chenshuai.test; import android.content.Context; import android.dat ...
- mosquitto简单应用
1. 简述 一款实现了消息推送协议 MQTT v3.1 的开源消息代理软件,提供轻量级的,支持可发布/可订阅的的消息推送模式,使设备对设备之间的短消息通信变得简单,比如现在应用广泛的低功耗传感器,手机 ...
- 2012Hulu校园招聘笔试题
一.填空 侧重逻辑思维,没有语言.具体技术考察,大部分属于组合数学.算法.比较基本的知识点有二元树节点树.最小生成树.Hash函数常用方法等. 二.编程题 1.正整数剖分 2.AOE关键路径 3.二元 ...
- php 超时 解决办法 (Maximum execution time of 30 seconds exceeded)这个问题?
1. 修改是APACHE设置,在PHP.INI中找到一个参数: max_execution_time 将后面的值调大,然后重新启动APACHE服务(centos: service httpd rest ...
- Tomcat数据源总结
一.数据源的由来 JDBC操作主要由以下几步组成: (1)Class.forName(); (2)Connection con = DriverManager.getConnection(); ...
- CSS3圆角,阴影,透明
CSS实现圆角,阴影,透明的方法很多,传统的方法都比较复杂,用CSS3就方便很多了,虽然现在各浏览器对CSS3的支持还不是很好,但不久的将来CSS3就会普及. 1.圆角 CSS3实现圆角有两种方法. ...
- Oracle 11g 数据库 shutdown 后立即执行 startup mount 报错的解决办法
最新文章:Virson's Blog 今天在配置Goldengate时Capture进程提示未开启归档日志,然后立即用sys用户登录orcl数据库,然后执行了“shutdown immediate”命 ...
- 《FPGA全程进阶---实战演练》第九章 计数器要注意
本小节我们来做一个好玩的事情,就是计数器,还记得在做LED自加实验时我们就曾经提到过关于计数器的相关议题,那么这节我们就来讨论讨论. 探讨一下如下的问题:请用verilog记八个数的写法,分析这个可以 ...