HTML5 2D平台游戏开发#7Camera
在庞大的游戏世界中,玩家不能一览地图全貌,而是只能看到其中一部分,并一步步探索,这时就要用到一种技术来显示局部的地图,游戏术语称为摄像机(Camera)。下面两张图中的白色矩形框表示了Camera的作用,玩家控制的角色总是在该矩形内。
可以想像成一个200X100宽高的相框固定在坐标(0,0)处,然后移动下面的蓝纸,蓝纸的不同位置就会显示在相框中。
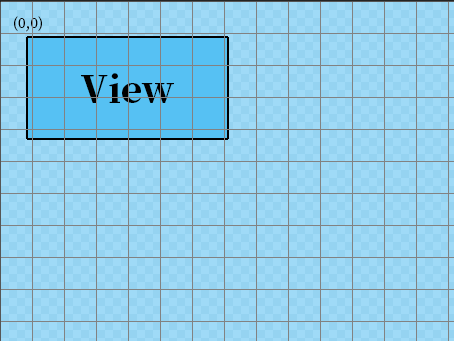
同时,也只需绘制出现在相框中的地图即可,这样可以提升一部分程序的性能。为实现Camera功能,需要添加一些辅助方法。
改造一下原来的AABB函数:
class AABB {

    /**

     * 碰撞盒子

     * @param x    {number} 盒子x坐标

     * @param y    {number} 盒子y坐标

     * @param w    {number} 盒子宽度

     * @param h    {number} 盒子高度

     */

    constructor(x,y,w,h) {

        this.pos = new Vector(x,y);

        this.size = new Vector(w,h);

        this.center = new Vector(this.pos.x + w / 2,this.pos.y + h / 2);

        this.halfSize = new Vector(this.size.x / 2,this.size.y / 2);

        this.init();

    }

    set(x, y, /*optional*/w, /*optional*/h) {

        this.pos = new Vector(x, y);

        this.size = new Vector(w || this.width, h || this.height);

        this.init();

    }

    init() {

        this.left = this.pos.x;

        this.top = this.pos.y;

        this.width = this.size.x;

        this.height = this.size.y;

        this.right = this.left + this.width;

        this.bottom = this.top + this.height;

    }

    within(r) {

        return r.left <= this.left &&

            r.right >= this.right &&

            r.top <= this.top &&

            r.bottom >= this.bottom;

    }

}
同时新增Camera构造函数:
let AXIS = {};

Object.defineProperties(AXIS,{

    'NONE':{

        value:"none"

    },

    'HORIZONTAL':{

        value:"horizontal"

    },

    'VERTICAL':{

        value:"vertical"

    },

    'BOTH':{

        value:"both"

    }

});

class Camera {

    /**

     * 摄像机构造函数

     * @param level {map} 地图

     * @param x {Number} camera的x坐标

     * @param y {Number} camera的y坐标

     * @param canvasWidth {Number} camera视口宽度

     * @param canvasHeight {Number} camera视口高度

     * @param maxX {Number} camera的最大x坐标

     * @param maxY {Number} camera的最大y坐标

     */

    constructor(level,x,y,canvasWidth,canvasHeight,maxX,maxY) {

        //摄像机左上角的x,y坐标

        this.x = x;

        this.y = y;

        //摄像机的大小

        this.w = canvasWidth;

        this.h = canvasHeight;

        //摄像机开始移动的临界点

        //跟踪对象到摄像机边界的距离

        this.xDeadZone = 0; //距离水平边界的距离

        this.yDeadZone = 0; //距离垂直边界的距离

        //摄像机能够移动的最大范围

        this.maxX = maxX || level.cols - this.w;

        this.maxY = maxY || level.rows - this.h;

        //摄像机移动的方向

        this.axis = AXIS.BOTH;

        //镜头跟随的对象

        this.followed = null;

        //表示camera视口

        this.viewportRect = new AABB(this.x,this.y,this.w,this.h);

        //表示整个地图范围

        this.worldRect = new AABB(0,0,level.cols,level.rows);

    }

    follow(gameObject,xDeadZone,yDeadZone) {

        this.followed = gameObject;

        this.xDeadZone = xDeadZone;

        this.yDeadZone = yDeadZone;

    }

    update() {

        //仅在有跟随对象时更新摄像机位置

        if(this.followed !== null) {

            if(this.axis === AXIS.HORIZONTAL || this.axis === AXIS.BOTH) {

                //根据跟随对象位置更新摄像机的x坐标

                if(this.followed.pos.x - this.x + this.xDeadZone > this.w) {

                    this.x = this.followed.pos.x - (this.w - this.xDeadZone);

                } else if(this.followed.pos.x - this.xDeadZone < this.x) {

                    this.x = this.followed.pos.x - this.xDeadZone;

                }

            }

            if(this.axis === AXIS.VERTICAL || this.axis === AXIS.BOTH) {

                //根据跟随对象位置更新摄像机的y坐标

                if(this.followed.pos.y - this.y + this.yDeadZone > this.h) {

                    this.y = this.followed.pos.y - (this.h - this.yDeadZone);

                } else if(this.followed.pos.y - this.yDeadZone < this.y) {

                    this.y = this.followed.pos.y - this.yDeadZone;

                }

            }

        }

        //重新设置camera视口的x坐标和y坐标

        this.viewportRect.set(this.x,this.y);

        //保证camera不会超出地图范围

        if(!this.viewportRect.within(this.worldRect)) {

            if(this.viewportRect.left < this.worldRect.left) this.x = this.worldRect.left;

            if(this.viewportRect.top < this.worldRect.top) this.y = this.worldRect.top;

            if(this.viewportRect.right > this.worldRect.right) this.x = this.worldRect.right - this.w;

            if(this.viewportRect.bottom > this.worldRect.bottom) this.y = this.worldRect.bottom - this.h;

        }

    }

}
在游戏开始时初始化Camera:
camera = new Camera(levels,0,0,c.width / MAPCONFIG.TILESIZE,c.height / MAPCONFIG.TILESIZE);

camera.follow(player,c.width / 2 / MAPCONFIG.TILESIZE,c.height / 2 / MAPCONFIG.TILESIZE);
渲染地图时只绘制Camera部分:
_drawLayer(layerIndex) {

        let tileSize = MAPCONFIG.TILESIZE,

            startCol = camera.x >> 0,   //起始列

            endCol = Math.floor(startCol + camera.w) + 1,    //结束列

            startRow = camera.y >> 0,   //开始行

            endRow = Math.floor(startRow + camera.h) + 1,    //结束行

            offsetX = -camera.x + startCol,

            offsetY = -camera.y + startRow;

        for (let r = startRow; r < endRow; r++) {

            for (let c = startCol; c < endCol; c++) {

                let tile = this.getTile(layerIndex, c, r),

                    x = (c - startCol + offsetX) * tileSize,  //瓦片的x坐标

                    y = (r - startRow + offsetY) * tileSize;  //瓦片的y坐标

                if (tile !== -1) {

                    this.ctx.drawImage(

                        this.spriteSheet,

                        tile * tileSize % this.dimensions.w,    //瓦片精灵图上的x坐标

                        Math.floor(tile * tileSize / this.dimensions.w) * tileSize, //瓦片精灵图上的y坐标

                        tileSize,

                        tileSize,

                        Math.round(x),

                        Math.round(y),

                        tileSize,

                        tileSize

                    );

                }

            }

        }

    }
以下是演示效果:
input{
position: relative;
z-index: 2;
}
#debugTools ul{
transition: all .3s;
opacity: 1;
left: 70px;
top: 0;
position: absolute;
}
#debugTools ul li{
float: left;
margin-right: 15px;
}
#debugTools.active ul {
left: 0;
opacity: 0;
}
-->
- 网格
- 精灵框
- 碰撞框
- 坐标
// {
let loadBatch = {
count: 0,
total: assetList.length,
cb: callback
},next;
(function loadAsset(src) {
if(gCachedAssets[src] === undefined) {
let assetType = getAssetTypeFromExtension(src);
if(assetType === 0) {
let img = new Image();
img.onload = () => {
onLoadedCallback(img,loadBatch);
next = assetList.shift();
if(next) {
loadAsset(next);
}
};
img.src = src;
gCachedAssets[src] = img;
} else if(assetType === 1) {
let script = document.createElement('script');
script.addEventListener('load', () => {
onLoadedCallback(script, loadBatch);
next = assetList.shift();
if(next) {
loadAsset(next);
}
});
script.src = src;
gCachedAssets[src] = script;
document.getElementsByTagName('head')[0].appendChild(script);
}
} else {
onLoadedCallback(gCachedAssets[src], loadBatch);
}
})(assetList.shift());
},
onLoadedCallback = (asset, batch) => {
batch.count++;
if (batch.count === batch.total) {
batch.cb(asset);
}
},
getAssetTypeFromExtension = (assetName) => {
if(assetName.indexOf('.jpg') !== -1 || assetName.indexOf('.jpeg') !== -1 || assetName.indexOf('.png') !== -1) {
return 0;
}
if(assetName.indexOf('.js') !== -1 || assetName.indexOf('.json') !== -1) {
return 1;
}
return -1;
};
(function() {
var canvas = document.createElement('canvas'),
a = document.getElementById('a');
canvas.id = 'c1';
canvas.width = 640;
canvas.height = 506;
a.appendChild(canvas);
var c = document.getElementById('c1'),
ctx = c.getContext('2d'),
lastTime = 0,
elapsed,
paused = false,
raqId,
playerSpriteSheet = new Image(),
levelAssets = new Image(),
canvasBG = new Image(),
now;
let camera;
loadAssets(['https://files.cnblogs.com/files/undefined000/game.min-v2.js?v=10'],function() {
playerSpriteSheet.src = imageData;
levelAssets.src = levelSpriteSheet;
canvasBG.src = background;
camera = new Camera(levels.stage1,0,0,c.width / MAPCONFIG.TILESIZE,c.height / MAPCONFIG.TILESIZE);
let level = new MapManager(levels.stage1,ctx,{
image:levelAssets,
w:416,
h:96
},camera);
let player = new Player(new Vector(5,2),ctx,level,playerSpriteSheet,camera);
camera.follow(player,c.width / 2 / MAPCONFIG.TILESIZE,c.height / 2 / MAPCONFIG.TILESIZE);
function loop() {
draw();
}
function stop() {
cancelAnimationFrame(raqId)
}
function draw() {
ctx.clearRect(0,0,c.width,c.height);
now = +new Date;
if(lastTime !== 0) {
elapsed = Math.min(now - lastTime,16);
} else elapsed = 16;
level.render();
player.update(elapsed);
camera.update();
lastTime = now;
raqId = requestAnimationFrame(draw);
}
loop();
window.addEventListener('keyup',(e) => {
if(e.keyCode === 80) {
paused = !paused;
if(paused) {
stop();
let txt = 'Pause';
ctx.font = '50px Source Han Serif';
ctx.fillStyle = '#f00';
ctx.fillText(txt, (c.width - ctx.measureText(txt).width) / 2, c.height / 2);
} else {
loop();
}
}
});
});
})();
// ]]>
更新日志
2017/04/09 更新角色跳跃
2017/04/21 更新角色冲刺
2017/05/01 更新角色状态机
2017/05/16 更新角色攻击动画
2017/05/22 更新角色移动攻击动画
2017/05/24 更新角色跳跃攻击动画
2017/06/04 更新地图绘制
2017/06/22 更新摄像机、长距离冲刺
HTML5 2D平台游戏开发#7Camera的更多相关文章
- HTML5 2D平台游戏开发#4状态机
在实现了<HTML5 2D平台游戏开发——角色动作篇之冲刺>之后,我发现随着角色动作的增加,代码中的逻辑判断越来越多,铺天盖地的if() else()语句实在让我捉襟见肘: 这还仅仅是角色 ...
- HTML5 2D平台游戏开发#6地图绘制
此前已经完成了一部分角色的动作,现在还缺少可以交互的地图让游戏看起来能玩.不过在开始之前应当考虑清楚使用什么类型的地图,就2D平台游戏来说,一般有两种类型的地图,Tile-based和Art-base ...
- HTML5 2D平台游戏开发#11斜坡物理
在游戏中会经常遇到斜坡地形,比如众所周知的魂斗罗,角色可以在坡上移动和跳跃: 斜坡在2D游戏中很常见,处理起来也较为棘手.最初我打算用分离轴定律来实现,在建立了一个物理模型之后: 发现上坡时没什么问题 ...
- HTML5 2D平台游戏开发#8指令技
一般在动作游戏中,玩家可以通过对输入设备输入一系列的指令让角色完成某个或多个特定的动作.以格斗游戏<拳皇>为例,键入↓↘→↘↓↙← + A or C可以触发IORI的必杀技八稚女: 通过一 ...
- HTML5 2D平台游戏开发#5攻击
目前为止,角色除了基本的移动外还什么都不能做,于是我打算先实现角色的攻击动画.角色的普通攻击一共可以分为三个阶段: 一段斩 二段斩 三段斩 移动攻击 跳跃攻击 触发方式为角色站立时按下J(攻击)键,角 ...
- HTML5 2D平台游戏开发#10Wall Jump
这个术语不知道怎么翻译比较贴切,但并不妨碍对字面意思的理解,大概就是飞檐走壁.比如: 这是游戏<忍者龙剑传>中的场景,玩家可以通过操纵角色在墙面上移动并跳跃. 首先需要实现角色抓墙这一动作 ...
- HTML5 2D平台游戏开发#9蓄力技
在很多动作游戏中,玩家操控的角色可以施放出比普通攻击更强力的蓄力技,一般操作为按住攻击键一段时间然后松开,具体效果像下面这张图: 要实现这个操作首先要记录下按键被按住的时间,初始是0: this.sa ...
- HTML5 2D平台游戏开发#2跳跃与二段跳
在上一篇<Canvas制作时间与行为可控的sprite动画>中已经实现了角色的左右移动,本篇继续实现角色的一系列动作之一:跳跃.先来看看最终效果: 要实现跳跃,必须模拟垂直方向的速度和重力 ...
- HTML5 2D平台游戏开发#1
在Web领域通常会用到一组sprite来展示动画,这类动画从开始到结束往往不会有用户参与,即用户很少会用控制器(例如鼠标.键盘.手柄.操作杆等输入设备)进行操作.但在游戏领域,sprite动画与控制器 ...
随机推荐
- ZOJ 3940 Modulo Query (2016年浙江省赛E题,区间折叠 + map运用)
题目链接 2016 ZJCPC Problem E 考虑一个开区间$[0, x)$对$a_{i}$取模的过程. $[0, x)$中小于$a_{i}$的部分不变,大于等于$a_{i}$的部分被切下来变 ...
- HDU 4815 Little Tiger vs. Deep Monkey 2013 长春现场赛C题
链接:http://acm.hdu.edu.cn/showproblem.php?pid=4815 [题意] n个题目,每题有各自的分数,A有50%的概率答对一道题目得到相应分数,B想要在至少P的概率 ...
- Ubuntu 16.04通过网络配置工具NetworkManager设置IP、网关、DNS和查看IP、网关、DNS
说明: 1.NetworkManager工具是Ubuntu桌面版的GUI设置工具. 2.这个工具推荐直接在GUI上操作,不建议用命令行进行管理,比如Wifi这些配置等. 3.当然,这个工具能带有命令行 ...
- ubuntu-kvm上面deploy qcow2格式虚拟机
ubuntu-kvm完成后,将xxx.qcow2格式的镜像拷贝到ubuntu-kvm这个虚拟机上面去. 1. 若是ubuntu server没有图形界面,可以先安装desktop,参考http://w ...
- mtd-utils 及 ubi-utils 交叉编译
参考: http://blog.csdn.net/zjjyliuweijie/article/details/7205374 NAND是嵌入式系统一个很重要的部件,而mtd-utilts中包含了很多针 ...
- flask的session研究和flask-login的session研究
1.httpie的安装:https://github.com/jakubroztocil/httpie#macos 2.http://python.jobbole.com/87450/ 3.http: ...
- IT开发者对Mac钟爱
由于Mac的操作系统OSX相比Windows win7/8/10来说,比較适合开发者使用.个人的体会例如以下: 首先.OSX的多窗体多应用程序切换功能非常强大,对开发者来说非常实用.开发者一般都须要开 ...
- 彻底解决DZ大附件上传问题
个. 注意:很多人遇到修改php.ini后重应WEB服务后仍然不能生效.这种情况应该先确认一下所改的php.ini是不是当前PHP所使用的.您可以在WEB目录下建立一个php文件,内容很简单就一句话& ...
- depth linear
float ConvertDepth( float depthFromTex, float4 cameraParams ){ const float near = cameraParams.z; co ...
- YOLO 测试出错:段错误 (核心已转储)
段错误 (核心已转储): data/voc.names中文标签改成英文