【转】Setting up SDL 2 on Visual Studio 2019 Community
FROM: http://lazyfoo.net/tutorials/SDL/01_hello_SDL/windows/msvc2019/index.php
Setting up SDL 2 on Visual Studio 2019 Community
Last Updated 7/20/20
You'll want to download the Visual C++ development libraries.
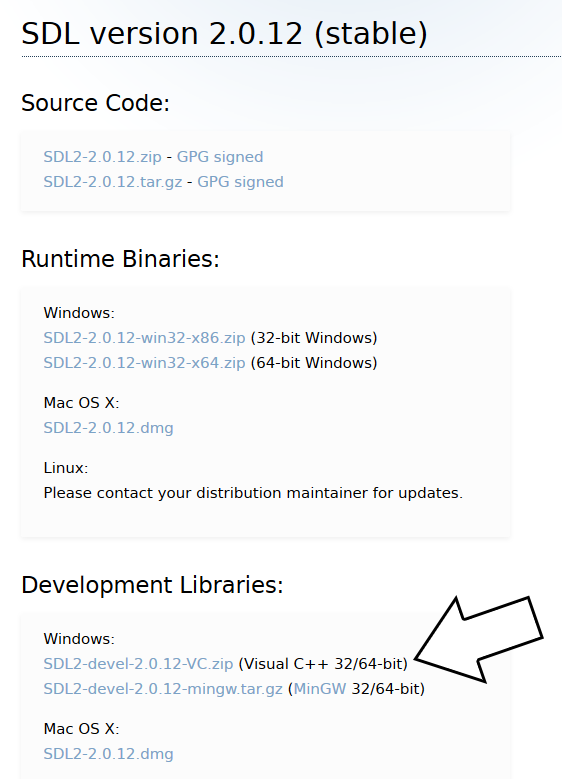
Open the zip archive and there should be a folder called SDL2-2.something.something. Copy the contents of the folder and put it anywhere you'd like. I recommend putting it in a folder that you dedicate to holding all your development libraries for Visual C++. For these tutorials I'm putting them in a directory I created called C:\vclib
2)Start up Visual Studio and create a new empty C++ project.

Give your project/solution whatever name you'd like and place it where ever you'd like.
3)Go download the source for lesson 01 and extract the source file. Right click on the source files folder in your solution, and then add the source file you downloaded.

4)Now, if your default build setting is Debug x86, you may need to change it:
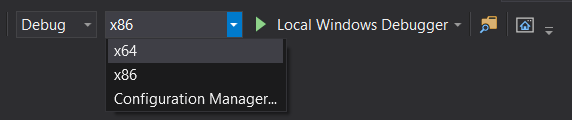
For the rest of this tutorial, we will be assuming you are building for Debug x64 so make sure your configuation is set to Debug x64. Because libraries are different per configuation, you will need to add SDL to every configuation you plan on using. So if you want to build for Release x64 or Debug x86, you will need to add SDL2 to each configuation.
5)Build your solution and you should get the following error:
Cannot open include file: 'SDL.h': No such file or directory
This means Visual C++ cannot find the SDL header files and you need to add the SDL include folder to the Visual C++ include directories.
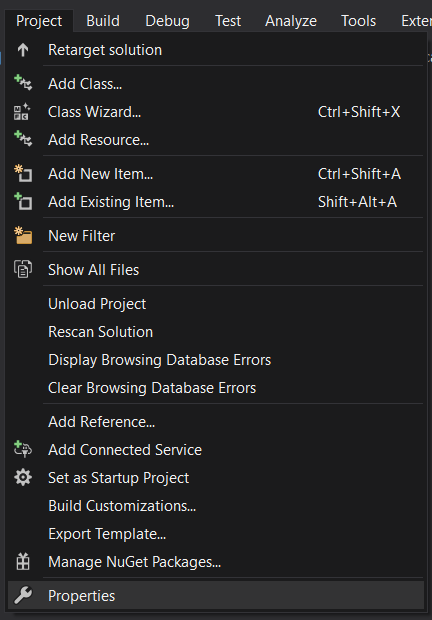
Go to project properties:
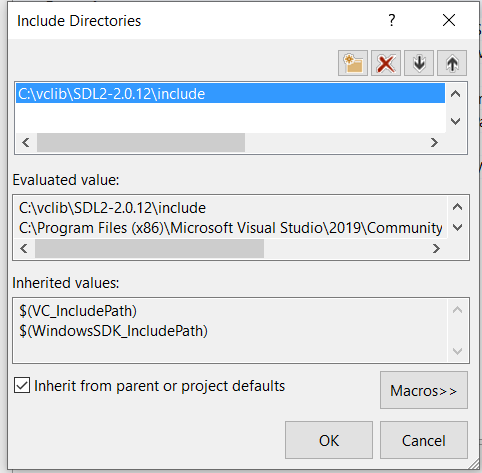
Go to Configuration Properties -> VC++ Directories -> Include Directories -> Edit.
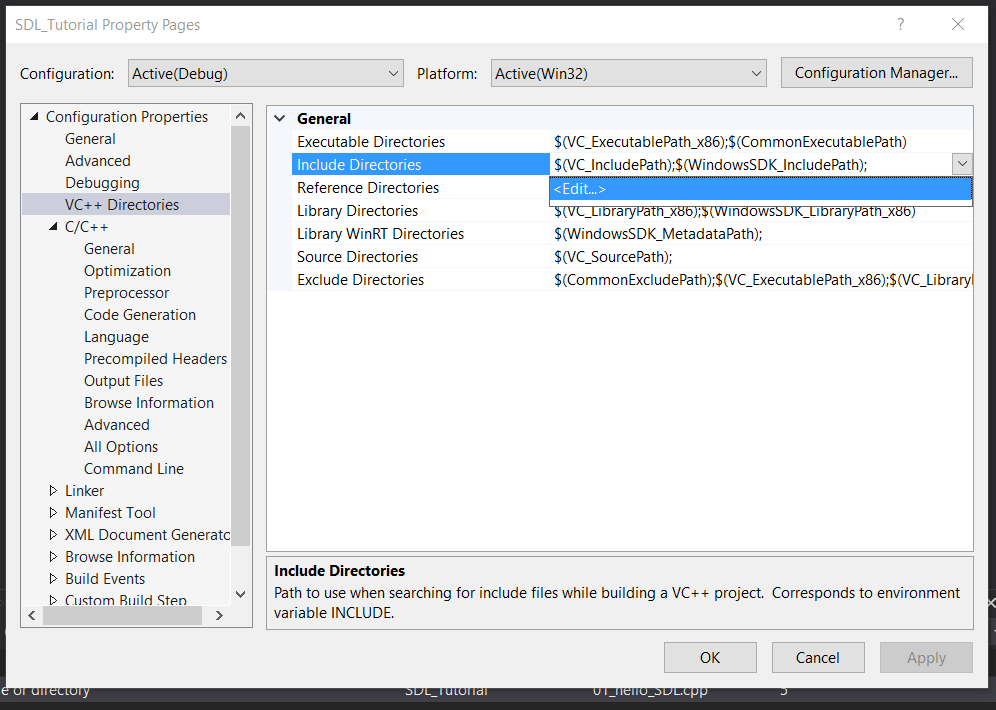
And then add the include directory from the SDL development folder we extracted.
6)Try to build your solution again and you should get a bunch of errors including:
unresolved external symbol SDL_GetError referenced in function SDL_main
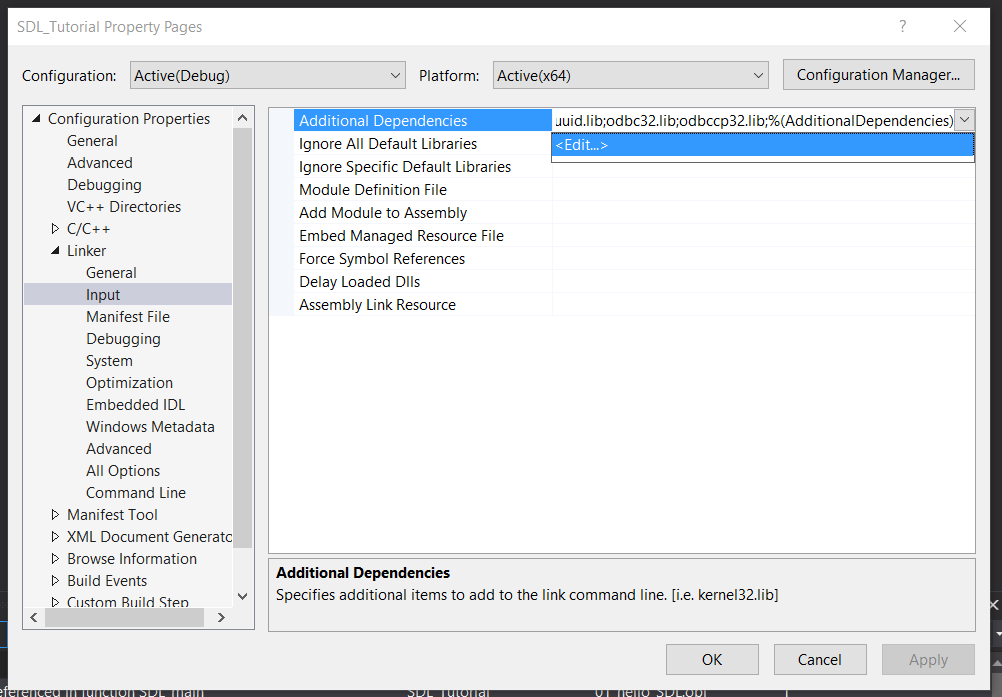
The header file tells the compiler what the SDL functions are, not where to find them. The library file tells the compiler where they are and we need to tell it to use the SDL library file. Go to Configuration Properties -> Linker -> Additional Dependencies -> Edit.
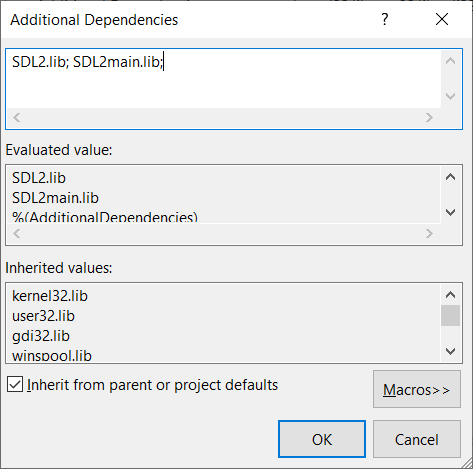
Now add
SDL2.lib; SDL2main.lib;
7)Try to build your solution again and you should get a new error:
cannot open file 'SDL2.lib'
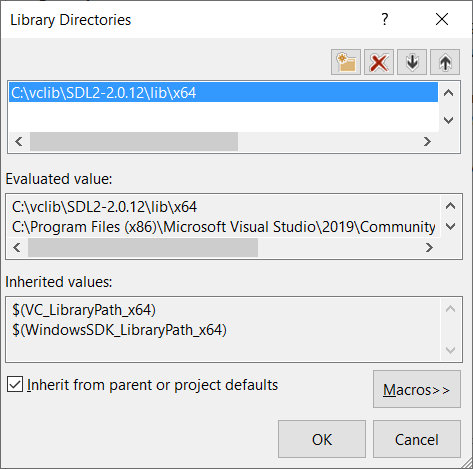
While we did tell Visual C++ to use the SDL library files, we didn't tell it where to find it. Add the library directory like you did the include directory
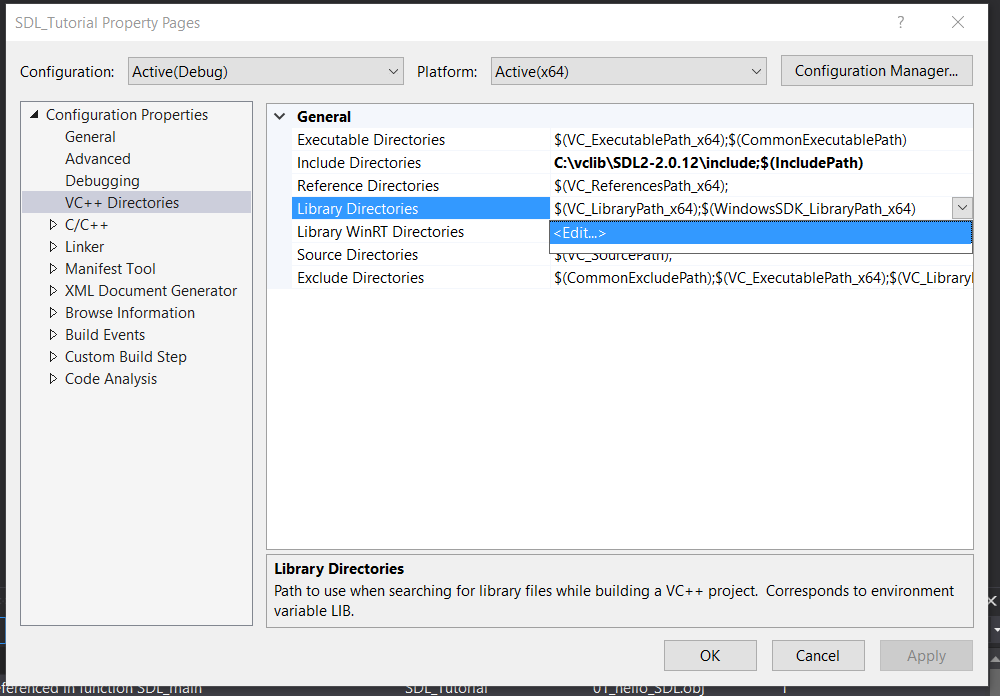
Make sure to add the library that matches your build configuation. If your building for x64, make sure to use the x64 library.
8)Build and your application should build, but try to run it and you'll get this error:
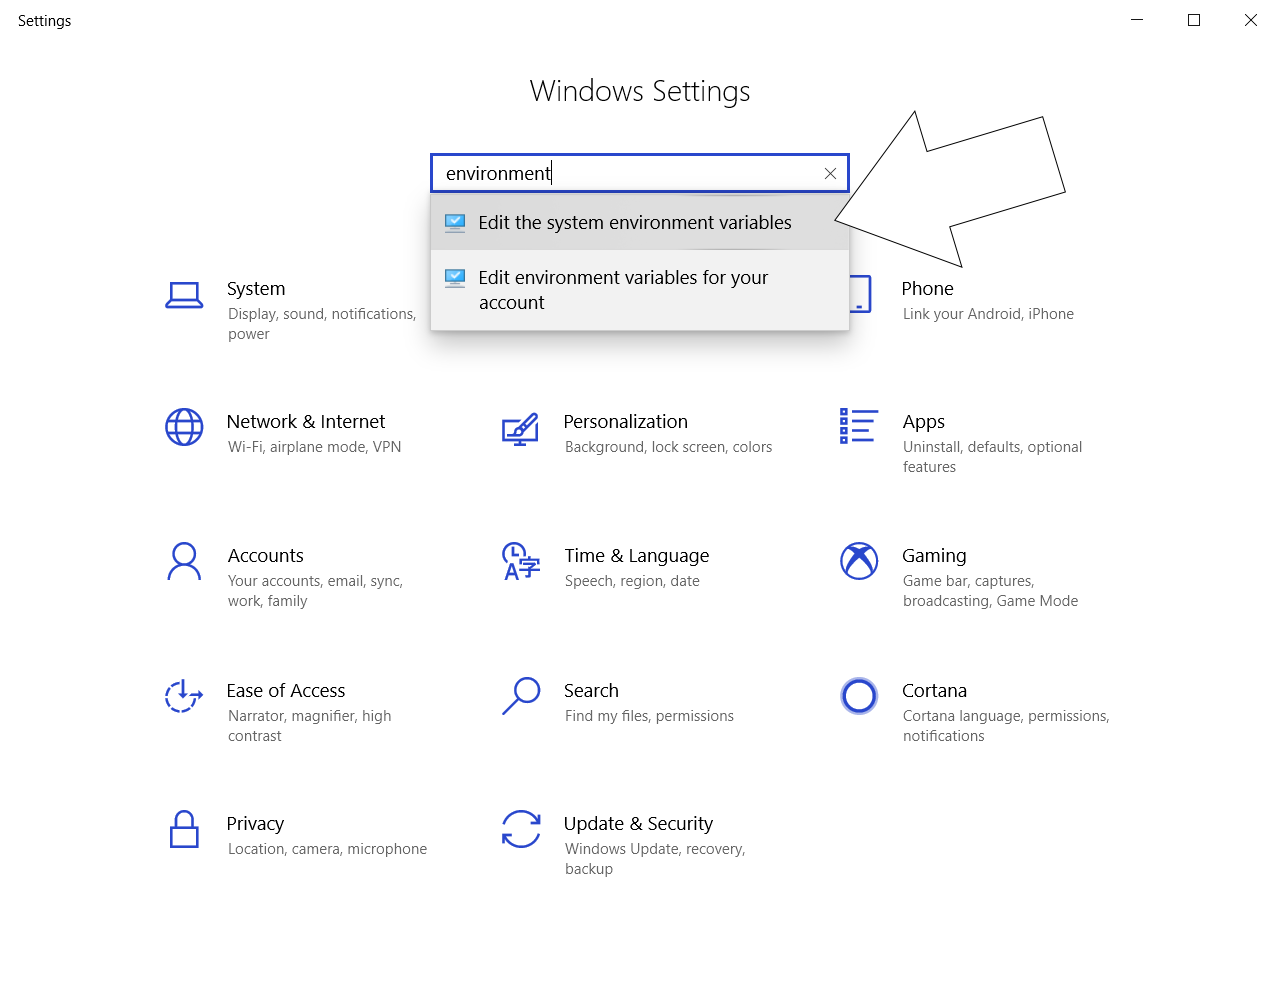
The code execution cannot proceed because SDL2.dll was not found.
This is because your application needs SDL2.dll to run but can't find it. Windows uses environment variables to define where to look for dll files. To edit the PATH environment variable, go into Windows Settings and search for edit the system environment variables:
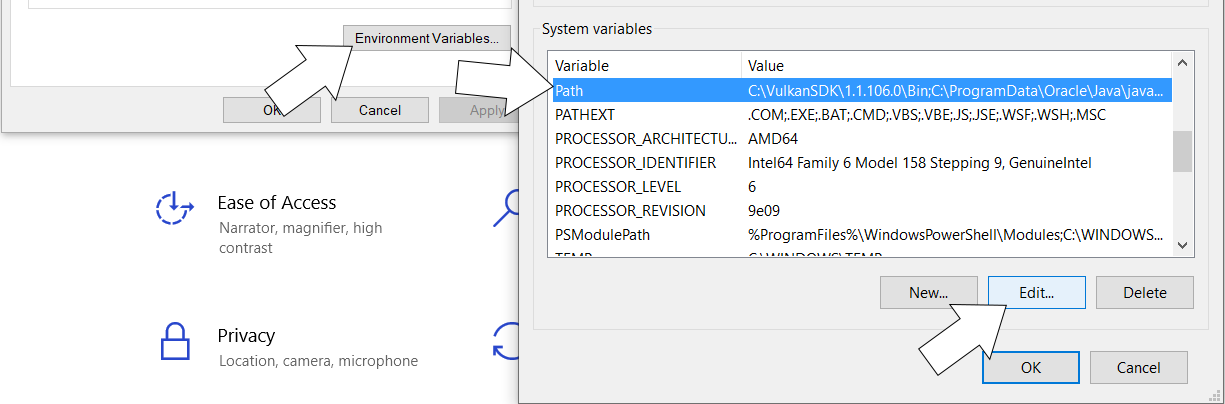
Click environment variables and under System Variables select Path and click Edit
Then click new, then browse to add the lib directory for your build configuation:
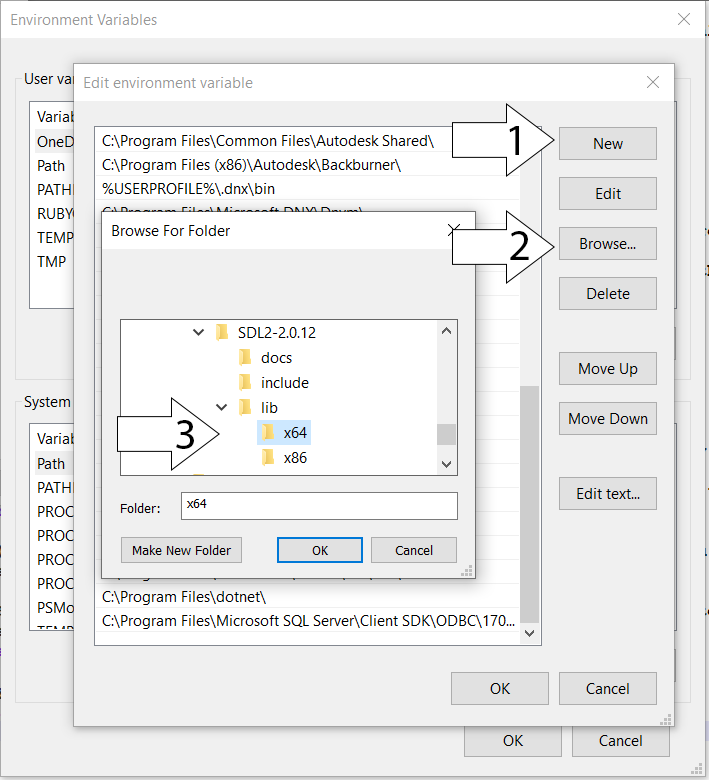
Restart Visual Studio so Visual C++ can get the updated path variable, start your program and it should run.
Now that you have SDL 2 compiling, it's time to go onto part 2 of the tutorial.
【转】Setting up SDL 2 on Visual Studio 2019 Community的更多相关文章
- 【转】Setting up SDL 2 on Visual Studio 2010 Ultimate
from: Lazy Foo'Productions - Setting up SDL 2 on Visual Studio 2010 Ultimate 1)First thing you need ...
- 【转】Setting up SDL Extension Libraries on Visual Studio 2019 Community
FROM:http://lazyfoo.net/tutorials/SDL/06_extension_libraries_and_loading_other_image_formats/windows ...
- 解决VS命令提示符 “Setting environment for using Microsoft Visual Studio. 此时不应有“系列错误
一.起因 近期在玩Boost库.当然首先是要进行Boost库的安装和配置.于是浅墨Google了一下boost库的安装配置攻略.下载了最新版1.55的boost库.就愉悦地開始进行配置了. 当进行到第 ...
- Visual Studio 2019 发布活动 - 2019 年 4 月 2 日
Visual Studio 2019 发布活动 2019 年 4 月 2 日,星期二 | 上午 9:00 (PT) 围观: https://visualstudio.microsoft.com/zh- ...
- Visual Studio 2019 正式发布,重磅更新,支持live share
如约而至,微软已于今天推出 Visual Studio 2019 正式版,一同发布的还有 Visual Studio 2019 for Mac. Visual Studio 2019 下载地址:htt ...
- “宇宙最强” IDE,Visual Studio 2019 正式发布
转载请注明出处:葡萄城官网,葡萄城为开发者提供专业的开发工具.解决方案和服务,赋能开发者. 本文由葡萄城翻译并发布 今天凌晨Visual Studio 2019已经正式发布,现在已经可以下载了.使用V ...
- Visual Studio 2019 使用 Live Share
一.前言 Visual Studio 2019 在今天发布(北京时间)了,这次带来了一个比较有趣的 Live Share 功能,使用它可以进行更好的协作开发.主要功能: 更多资料可看官方介绍: Vis ...
- Visual Studio 2019 正式版 更新内容
大早上更新了Visual Studio 2019, 试用一下 一.界面改变 1.项目创建界面 首先启动界面改变就不说了,创建项目的界面做了较大改变,感觉在向vs for mac 靠拢 ,而后者感觉像x ...
- Making every developer more productive with Visual Studio 2019
Today, in the Microsoft Connect(); 2018 keynote, Scott Guthrie announced the availability of Visual ...
随机推荐
- pwnable.kr-uaf-witeup
没错,这道题超纲了,代码调试能力很差很差. 一些相关小笔记. UAF是在内存释放后,原指针仍然指向此内存,可通过其他填充操作将此内存值设为指定的值,使得指针指向特定值. 分析程序.本程序中,可输入1. ...
- Next轻量级框架与主流工具的整合
前言 老大说以后会用 next 来做一下 SSR 的项目,让我们有空先学学.又从 0 开始学习新的东西了,想着还是记录一下学习历程,有输入就要有输出吧,免得以后给忘记学了些什么~ Next框架与主流工 ...
- Python-__init__ 和 __new__区别和原理
__init__ 和 __new__区别 1. 从传递参数角度看,__init__第一个参数是实例本身, __new__传递的是类本身 2. 从执行顺序角度看,__new__方法执行在 __init_ ...
- 协同过滤 Collaborative Filtering
协同过滤 collaborative filtering 人以类聚,物以群分 相似度 1. Jaccard 相似度 定义为两个集合的交并比: Jaccard 距离,定义为 1 - J(A, B),衡量 ...
- 027 01 Android 零基础入门 01 Java基础语法 03 Java运算符 07 逻辑“与”运算符
027 01 Android 零基础入门 01 Java基础语法 03 Java运算符 07 逻辑"与"运算符 本文知识点:Java中的逻辑"与"运算符 逻辑运 ...
- matlab中datest() 将日期和时间转换为字符串格式
来源:https://ww2.mathworks.cn/help/matlab/ref/datestr.html?searchHighlight=datestr&s_tid=doc_srcht ...
- 记录编译JDK11源码时遇到的两个问题
执行make all报错信息: 错误一 /src/hotspot/share/runtime/arguments.cpp:1461:35: error: result of comparison ag ...
- Vue:Vue-Cli 实现的交互式的项目脚手架
一.这份文档是对应 @vue/cli.老版本的 vue-cli 文档请移步https://github.com/vuejs/vue-cli/tree/v2#vue-cli-- Vue CLI 是一个基 ...
- mycat的privileges标签
参考https://blog.csdn.net/tornadojava/article/details/54948662 privileges标签 对用户的 schema以及表进行精细化的DML权限控 ...
- 17.JAVA-常用总结
for另一种写法 for(UserBean bean : list){ //for循环取出list中每个成员,并赋给bean变量 System.out.println(bean.getName()); ...