Salesforce LWC学习(二十二) 简单知识总结篇二
本篇参看:
https://developer.salesforce.com/docs/component-library/documentation/en/lwc/lwc.reactivity_fields
碰到之前接触的记录一下,深化一下印象。
一. 解决 lightning-record-edit-form没有入力时,效果和标准不一样的问题
先看一下标准的创建数据的UI,当有必入力字段的表单,点击Save按钮以后,上部会有DIV提示。

我们使用 lightning-record-edit-form实现时,发现onsubmit这种 handler需要再所有的字段都满足情况下才执行,也就是说页面中有 invalid的字段入力情况下,不会提交表单,也自然无法执行 onsubmit对应的方法。这个时候,我们就需要在submit的这个按钮添加 onclick方法去调用后台从而实现尽管提交不了表单还可以正常做一些UI效果的可能。简单代码如下
accountEditWithEditForm.html: 展示两个字段,save button除了在submit基础上,还有 onclick操作。需要注意的是, onclick会先于 onsubmit执行,所以我们可以在 onclick做一些validation操作,成功的话,让onsubmit正常执行表单提交操作。
<template>

    <lightning-record-edit-form

        record-id={recordId}

        object-api-name="Account"

        onsubmit={handleSubmit}

        >

        <lightning-messages></lightning-messages>

        <c-error-message-modal is-show-error-div={isShowErrorDiv} error-message-list={errorMessageList}></c-error-message-modal>

        <lightning-layout multiple-rows="true">

            <lightning-layout-item size="6">

                <lightning-input-field field-name="Name"></lightning-input-field>

            </lightning-layout-item>

            <lightning-layout-item size="6">

                <lightning-input-field field-name="AnnualRevenue"></lightning-input-field>

            </lightning-layout-item>

            <lightning-layout-item size="12">

                <div class="slds-m-top_medium">

                    <lightning-button class="slds-m-top_small" label="Cancel" onclick={handleReset}></lightning-button>

                    <lightning-button class="slds-m-top_small" type="submit" label="Save Record"  onclick={handleClick}></lightning-button>

                </div>

            </lightning-layout-item>

        </lightning-layout>

    </lightning-record-edit-form>

</template>
accountEditWithEditForm.js
import { LightningElement,track,api,wire } from 'lwc';

import { updateRecord,getRecord } from 'lightning/uiRecordApi';

import { ShowToastEvent } from 'lightning/platformShowToastEvent';

import { NavigationMixin } from 'lightning/navigation';

import { navigationWhenErrorOccur } from 'c/navigationUtils';

import {isSystemOrCustomError,getPageCustomErrorMessageList,getFieldCustomErrorMessageList} from 'c/errorCheckUtils';

import ACCOUNT_ID_FIELD from '@salesforce/schema/Account.Id';

import ACCOUNT_NAME_FIELD from '@salesforce/schema/Account.Name';

import ACCOUNT_ANNUALREVENUE_FIELD from '@salesforce/schema/Account.AnnualRevenue';

const fields = [

    ACCOUNT_ID_FIELD,

    ACCOUNT_NAME_FIELD,

    ACCOUNT_ANNUALREVENUE_FIELD

];

export default class AccountEditWithEditForm extends NavigationMixin(LightningElement) {

    @api recordId = '0010I00002U8dBPQAZ';

    @track isShowErrorDiv = false;

    @track errorMessageList = [];

    @track isFormValid = true;

    handleSubmit(event) {

        event.preventDefault();

        if(!this.isShowErrorDiv) {

            const fields = {};

            fields[ACCOUNT_ID_FIELD.fieldApiName] = this.recordId;

            fields[ACCOUNT_NAME_FIELD.fieldApiName] = event.detail.Name;

            fields[ACCOUNT_ANNUALREVENUE_FIELD.fieldApiName] = event.detail.AnnualRevenue;

            const recordInput = { fields };

            this.errorMessageList = [];

            this.isShowErrorDiv = false;

            updateRecord(recordInput)

            .then(() => {

                this.dispatchEvent(

                    new ShowToastEvent({

                        title: 'Success',

                        message: 'Account updated',

                        variant: 'success'

                    })

                );

            }).catch(error => {

                let systemOrCustomError = isSystemOrCustomError(error);

                if(systemOrCustomError) {

                    navigationWhenErrorOccur(this,error);

                } else {

                    this.isShowErrorDiv = true;

                    this.errorMessageList = getPageCustomErrorMessageList(error);

                    console.log(JSON.stringify(this.errorMessageList));

                    let errorList = getFieldCustomErrorMessageList(error);

                    if(errorList && errorList.length > 0) {

                        errorList.forEach(field => {

                            this.reportValidityForField(field.key,field.value);

                        });

                    }

                }

            });

        }

    }

    handleClick(event) {

        let allInputList = Array.from(this.template.querySelectorAll('lightning-input-field'));

        let invalidFieldLabel = [];

        const allValid = allInputList.forEach(field => {

            if(field.required && field.value === '') {

                invalidFieldLabel.push(field.fieldName);

                this.isShowErrorDiv = true;

            }

        });

        if(this.isShowErrorDiv) {

            this.errorMessageList.push('These required fields must be completed: ' + invalidFieldLabel.join(','));

        }

    }

    reportValidityForField(fieldName,errorMessage) {

        console.log('fieldname : ' + fieldName);

        if(fieldName === 'Name') {

            this.template.querySelector('.accountName').setCustomValidity(errorMessage);

            this.template.querySelector('.accountName').reportValidity();

        } else if(fieldName === 'AnnualRevenue') {

            this.template.querySelector('.accountRevenue').setCustomValidity(errorMessage);

            this.template.querySelector('.accountRevenue').reportValidity();

        }

    }

    handleReset(event) {

        const inputFields = this.template.querySelectorAll(

            'lightning-input-field'

        );

        if (inputFields) {

            inputFields.forEach(field => {

                field.reset();

            });

        }

    }

}
展示效果:

二. 「`」 的使用
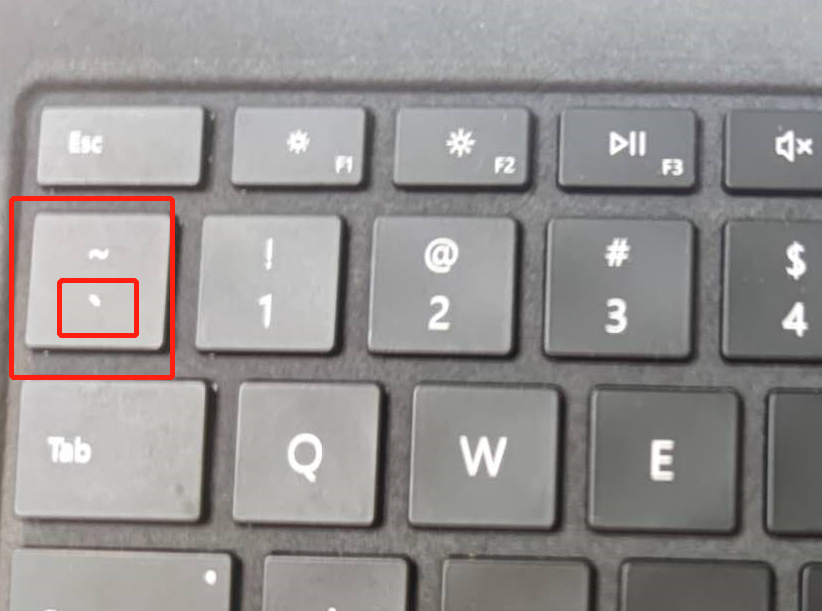
我们在程序中应该很习惯的使用 track / api这种 reactive的变量,改动以后就可以走 rendercallback 然后前端UI会自动渲染和他关联的。除了使用这两个情况,还可以使用getter方式进行 field reactive操作。官方的描述为,如果字段声明不需要使用 track / api这种reactive变量,尽量不用,所以某些case下,我们可以使用 关键字 ``进行操作。这个标签是键盘的哪个呢,看下图?
看一下官方提供的demo
helloExpressions.html:输入框展示两个入力项,下面展示一个拼以后的大写。
<template>

    <lightning-card title="HelloExpressions" icon-name="custom:custom14">

        <div class="slds-m-around_medium">

            <lightning-input

                name="firstName"

                label="First Name"

                onchange={handleChange}

            ></lightning-input>

            <lightning-input

                name="lastName"

                label="Last Name"

                onchange={handleChange}

            ></lightning-input>

            <p class="slds-m-top_medium">

                Uppercased Full Name: {uppercasedFullName}

            </p>

        </div>

    </lightning-card>

</template>
helloExpressions.js:使用 `方式整合两个private的字段,实现reactive的效果。这里需要注意的是,如果使用 `以后必须要使用 ${}将变量套起来,这个是固定的写法。
import { LightningElement } from 'lwc';

export default class HelloExpressions extends LightningElement {

    firstName = '';

    lastName = '';

    handleChange(event) {

        const field = event.target.name;

        if (field === 'firstName') {

            this.firstName = event.target.value;

        } else if (field === 'lastName') {

            this.lastName = event.target.value;

        }

    }

    get uppercasedFullName() {

        return `${this.firstName} ${this.lastName}`.trim().toUpperCase();

    }

}
效果:

总结:篇中主要总结两点。1是 record-edit-form submit前的onclick使用;2是` 搭配 {}实现 reactive的效果。篇中有错误地方欢迎指出,有不懂的欢迎留言。
Salesforce LWC学习(二十二) 简单知识总结篇二的更多相关文章
- Salesforce LWC学习(二十六) 简单知识总结篇三
首先本篇感谢长源edward老哥的大力帮助. 背景:我们在前端开发的时候,经常会用到输入框,并且对这个输入框设置 required或者其他的验证,当不满足条件时使用自定义的UI或者使用标准的 inpu ...
- Salesforce LWC学习(四十) dynamic interaction 浅入浅出
本篇参考: Configure a Component for Dynamic Interactions in the Lightning App Builder - Salesforce Light ...
- Salesforce LWC学习(三十九) lwc下quick action的recordId的问题和解决方案
本篇参考: https://developer.salesforce.com/docs/component-library/bundle/force:hasRecordId/documentation ...
- Salesforce LWC学习(三十) lwc superbadge项目实现
本篇参考:https://trailhead.salesforce.com/content/learn/superbadges/superbadge_lwc_specialist 我们做lwc的学习时 ...
- Salesforce LWC学习(三十二)实现上传 Excel解析其内容
本篇参考:salesforce lightning零基础学习(十七) 实现上传 Excel解析其内容 上一篇我们写了aura方式上传excel解析其内容.lwc作为salesforce的新宠儿,逐渐的 ...
- Salesforce LWC学习(三十四) 如何更改标准组件的相关属性信息
本篇参考: https://www.cnblogs.com/zero-zyq/p/14548676.html https://www.lightningdesignsystem.com/platfor ...
- Salesforce LWC学习(三十六) Quick Action 支持选择 LWC了
本篇参考: https://developer.salesforce.com/docs/component-library/documentation/en/lwc/lwc.use_quick_act ...
- Salesforce LWC学习(三十五) 使用 REST API实现不写Apex的批量创建/更新数据
本篇参考: https://developer.salesforce.com/docs/atlas.en-us.224.0.api_rest.meta/api_rest/resources_compo ...
- Salesforce LWC学习(三十八) lwc下如何更新超过1万的数据
背景: 今天项目组小伙伴问了一个问题,如果更新数据超过1万条的情况下,有什么好的方式来实现呢?我们都知道一个transaction只能做10000条DML数据操作,那客户的操作的数据就是超过10000 ...
随机推荐
- PDO::prepare
PDO::prepare — 准备要执行的SQL语句并返回一个 PDOStatement 对象(PHP 5 >= 5.1.0, PECL pdo >= 0.1.0) 说明 语法 publi ...
- Python学习手册第4版 中文PDF版|网盘下载内附地址
本书是学习Python编程语言的入门书籍.Python是一种很流行的开源编程语言,可以在各种领域中用于编写独立的程序和脚本.Python免费.可移植.功能强大,而且使用起来相当容易.来自软件产业各个角 ...
- x86架构:分页机制和原理
分页是现在CPU核心的管理内存方式,网上介绍材料很多,这里不赘述,简单介绍一下分页的背景和原理 1.先说说为什么要分段 实模式下程序之间不隔离,互相能直接读写对方内存,或跳转到其他进程的代码运行,导致 ...
- [转] 总结了N个真实线上故障
以下文章来源于架构师进阶之路 ,作者二马读书 1. JVM频繁FULL GC快速排查 在分享此案例前,先聊聊哪些场景会导致频繁Full GC: 内存泄漏(代码有问题,对象引用没及时释放,导致对象不能及 ...
- “随手记”开发记录day20
练习软件的展示,尽量将软件全方面的展示给大众,希望不要像上次一样有许多遗漏的地方,让其他团队以为我们的软件没有完善的功能.
- 畅购商城(八):微服务网关和JWT令牌
好好学习,天天向上 本文已收录至我的Github仓库DayDayUP:github.com/RobodLee/DayDayUP,欢迎Star,更多文章请前往:目录导航 畅购商城(一):环境搭建 畅购商 ...
- python获取系统内存占用信息的实例方法
psutil是一个跨平台库(http://code.google.com/p/psutil/),能够轻松实现获取系统运行的进程和系统利用率(包括CPU.内存.磁盘.网络等)信息.它主要应用于系统监控, ...
- 教你看懂Docker和K8S!
转载于 https://my.oschina.net/jamesview/blog/2994112 2010年,几个搞IT的年轻人,在美国旧金山成立了一家名叫“dotCloud”的公司. 这家公司主要 ...
- 分享:C语言大礼包(PDF)
链接:https://pan.baidu.com/s/1xpOcT1gRhdumV5MlkC4AFQ 提取码:4kh6
- git使用-分支管理
1.查看分支 git branch 2.创建分支 git branch name 3.切换分支 git checkout name 4.合并分支上的内容到master分支 切换到master分支上 g ...