RabbitMQ-Spring AMQP
上篇文章RabbitMQ基础入门学习了rabbitMQ一些基础的api,当然spring也在原生代码的基础上做了更多的封装,这篇文章就基于spring-rabbit,学习一下spring的实现。
引入jar:
<dependency>
<groupId>org.springframework.amqp</groupId>
<artifactId>spring-rabbit</artifactId>
<version>1.5.0.RELEASE</version>
</dependency>
上篇文章没有测试到Topic exchange,下面就使用Topic exchange做测试。
1.基于springframework.amqp.rabbit java写法。
 import org.springframework.amqp.core.BindingBuilder;

 import org.springframework.amqp.core.Queue;

 import org.springframework.amqp.core.TopicExchange;

 import org.springframework.amqp.rabbit.annotation.RabbitListener;

 import org.springframework.amqp.rabbit.connection.CachingConnectionFactory;

 import org.springframework.amqp.rabbit.core.RabbitAdmin;

 import org.springframework.amqp.rabbit.core.RabbitTemplate;

 import org.springframework.amqp.rabbit.listener.SimpleMessageListenerContainer;

 import org.springframework.amqp.rabbit.listener.adapter.MessageListenerAdapter;

 @RabbitListener(queues = "hello")

 public class Tut1Java {

     public static void main(final String... args) throws Exception {

         CachingConnectionFactory cf = new CachingConnectionFactory();

         cf.setAddresses("192.168.1.7:5672");

         cf.setUsername("admin");

         cf.setPassword("admin");

         // set up the queue, exchange, binding on the broker

         RabbitAdmin admin = new RabbitAdmin(cf);

         Queue queue = new Queue("myQueue");

         admin.declareQueue(queue);

         TopicExchange exchange = new TopicExchange("myExchange");

         admin.declareExchange(exchange);

         admin.declareBinding(BindingBuilder.bind(queue).to(exchange).with("foo.*"));

         // set up the listener and container

         SimpleMessageListenerContainer container = new SimpleMessageListenerContainer(cf);

         Object listener = new Object() {

             // 接受到消息时,会执行此方法

             public void handleMessage(String foo) {

                 System.out.println("Tut1Java " + foo);

             }

         };

         MessageListenerAdapter adapter = new MessageListenerAdapter(listener);

         container.setMessageListener(adapter);

         container.setQueueNames("myQueue");

         container.start();

         // send something

         RabbitTemplate template = new RabbitTemplate(cf);

         // 只有routingKey符合foo.*规则的才会被接受处理

         template.convertAndSend("myExchange", "foo.bar", "Hello, world!");

         container.stop();

     }

 }
整块代码可以简单的实现了发送接收消息,主要分为四个部分。
16~19行 初始化一个CachingConnectionFactory,其实底层也是原生的ConnectionFactory。
22~27行 主要是设置queue和exchange,并把它们按照"foo.*"的路由规则绑定起来。
new Queue("myQueue"),创建一个本地持久话名字叫myQueue的队列。
declareQueue(queue),声明一个队列。
new TopicExchange("myExchange"),创建一个topic exchange,看名字也知道exchange类型是topic,我们只要传递参数就好了。当然也会有FanoutExchange、DirectExchange、HeadersExchange。
BindingBuilder.bind(queue).to(exchange).with("foo.*"),将queue绑定到exchange上,并以"foo.*"作为他们之间的路由规则。
30~40行 主要是通过SimpleMessageListenerContainer去监听消息,并且可以设置特定类的方法去执行处理接受到的消息。
Object listener = new Object() {

    // 接受到消息时,会执行此方法

    public void handleMessage(String foo) {

        System.out.println("Tut1Java " + foo    );

    }

    public void handleMessage2(String foo) {

        System.out.println("Tut1Java2 " + foo);

    }

};

 MessageListenerAdapter adapter = new MessageListenerAdapter(listener);

 adapter.setDefaultListenerMethod("handleMessage2");

 container.setMessageListener(adapter);
如果消息监听写成上面这样,那么将执行handleMessage2(String foo) 。
43~46行 利用RabbitTemplate发送消息,三个参数依次为exchange、routingKey和发送的消息,
首先exchange名称要和admin声明的一致,routingKey要符合当前topic exchange的路由规则,否则消息不会发送到当前队列中。
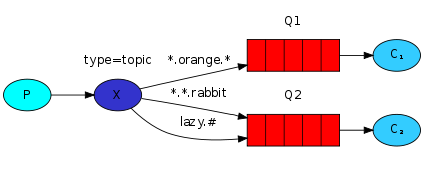
再看一下topic exchange的模型:
最后运行一下,可以发现消息被顺利打印出来了。
2.基于spring配置写法
<?xml version="1.0" encoding="UTF-8"?>

<beans xmlns="http://www.springframework.org/schema/beans" xmlns:xsi="http://www.w3.org/2001/XMLSchema-instance"

    xmlns:mvc="http://www.springframework.org/schema/mvc" xmlns:context="http://www.springframework.org/schema/context"

    xmlns:aop="http://www.springframework.org/schema/aop"

    xmlns:rabbit="http://www.springframework.org/schema/rabbit"

    xsi:schemaLocation="http://www.springframework.org/schema/beans http://www.springframework.org/schema/beans/spring-beans.xsd

        http://www.springframework.org/schema/context http://www.springframework.org/schema/context/spring-context.xsd

        http://www.springframework.org/schema/rabbit http://www.springframework.org/schema/rabbit/spring-rabbit-1.0.xsd

        http://www.springframework.org/schema/mvc http://www.springframework.org/schema/mvc/spring-mvc.xsd http://www.springframework.org/schema/aop http://www.springframework.org/schema/aop/spring-aop-3.1.xsd">

<rabbit:connection-factory id="connectionFactory" username="admin" password="admin" host="192.168.1.7" port="5672" virtual-host="/" />

<rabbit:template id="amqpTemplate" connection-factory="connectionFactory"

    exchange="myExchange" routing-key="foo.bar"/>

<rabbit:admin connection-factory="connectionFactory" />

<rabbit:queue name="myQueue" />

<rabbit:topic-exchange name="myExchange">

    <rabbit:bindings>

        <rabbit:binding queue="myQueue" pattern="foo.*" />

    </rabbit:bindings>

</rabbit:topic-exchange>

<rabbit:listener-container connection-factory="connectionFactory">

    <rabbit:listener ref="foo" method="listen" queue-names="myQueue" />

</rabbit:listener-container>

<bean id="foo" class="rabbitMQ.springAMQP.Foo" />

</beans>
在context.xml中可以看到很多熟悉的rabbitMQ的对象,这种写法只不过从上面new出来的对象,改为使用spring的xml去声明各种bean对象。
import org.springframework.amqp.rabbit.core.RabbitTemplate;

import org.springframework.context.support.AbstractApplicationContext;

import org.springframework.context.support.ClassPathXmlApplicationContext;

public class Tut1Spring {

    public static void main(final String... args) throws Exception {

        AbstractApplicationContext ctx =

            new ClassPathXmlApplicationContext("spring/context.xml");

        RabbitTemplate template = ctx.getBean(RabbitTemplate.class);

        template.convertAndSend("Tut1Spring " + "Hello, world!");

        Thread.sleep(1000);

        ctx.destroy();

    }

}
public class Foo {

    public void listen(String foo) {

        System.out.println("Foo=" + foo);

    }

}
Foo为处理接受并处理消息的类,在xml中也指定了执行的方法为listen。
最后运行一下,可以发现消息被顺利打印出来了。
其实无论是哪种方式的实现,内部本质还是基于最原生的api,我们只要理解最基础的部分,这些理解起来还是比较容易的。
RabbitMQ-Spring AMQP的更多相关文章
- 译: 1. RabbitMQ Spring AMQP 之 Hello World
本文是译文,原文请访问:http://www.rabbitmq.com/tutorials/tutorial-one-spring-amqp.html RabbitMQ 是一个Brocker (消息队 ...
- 译: 2. RabbitMQ Spring AMQP 之 Work Queues
在上一篇博文中,我们写了程序来发送和接受消息从一个队列中. 在这篇博文中我们将创建一个工作队列,用于在多个工作人员之间分配耗时的任务. Work Queues 工作队列(又称:任务队列)背后的主要思想 ...
- 译: 3. RabbitMQ Spring AMQP 之 Publish/Subscribe 发布和订阅
在第一篇教程中,我们展示了如何使用start.spring.io来利用Spring Initializr创建一个具有RabbitMQ starter dependency的项目来创建spring-am ...
- 译: 6. RabbitMQ Spring AMQP 之 RPC
Remote procedure call (RPC) 在第二篇教程中,我们学习了如何使用工作队列在多个工作人员之间分配耗时的任务. 但是如果我们需要在远程计算机上运行一个函数并等待结果呢?嗯,这是一 ...
- 译: 4. RabbitMQ Spring AMQP 之 Routing 路由
在上一个教程中,我们构建了一个简单的fanout(扇出)交换.我们能够向许多接收者广播消息. 在本教程中,我们将为其添加一个功能 - 我们将只能订阅一部分消息.例如,我们将只能将消息指向感兴趣的特定颜 ...
- 译: 5. RabbitMQ Spring AMQP 之 Topic 主题
在上一个教程中,我们提高了消息传递的灵活 我们使用direct交换而不是使用仅能够进行虚拟广播的fanout交换, 并且获得了基于路由key 有选择地接收消息的可能性. 虽然使用direct 交换改进 ...
- spring amqp rabbitmq fanout配置
基于spring amqp rabbitmq fanout配置如下: 发布端 <rabbit:connection-factory id="rabbitConnectionFactor ...
- 深入剖析 RabbitMQ —— Spring 框架下实现 AMQP 高级消息队列协议
前言 消息队列在现今数据量超大,并发量超高的系统中是十分常用的.本文将会对现时最常用到的几款消息队列框架 ActiveMQ.RabbitMQ.Kafka 进行分析对比.详细介绍 RabbitMQ 在 ...
- 消息中间件——RabbitMQ(九)RabbitMQ整合Spring AMQP实战!(全)
前言 1. AMQP 核心组件 RabbitAdmin SpringAMQP声明 RabbitTemplate SimpleMessageListenerContainer MessageListen ...
- RabbitMQ与Spring的框架整合之Spring AMQP实战
1.SpringAMQP用户管理组件RabbitAdmin. RabbitAdmin类可以很好的操作RabbitMQ,在Spring中直接进行注入即可.注意,autoStartup必须设置为true, ...
随机推荐
- 使用HttpClient4.5实现HTTPS的双向认证
说明:本文主要是在平时接口对接开发中遇到的为保证传输安全的情况特要求使用https进行交互的情况下,使用httpClient4.5版本对HTTPS的双向验证的 功能的实现 首先,老生常谈,文章 ...
- 让linux远程主机在后台运行脚本
后台挂起:python xxx.py & 在脚本命令后面加入"&"符号就可以后台运行.结束进程:kill -9 sidps -ef | grep ... 查询sid
- Angular开发实践(八): 使用ng-content进行组件内容投射
在Angular中,组件属于特殊的指令,它的特殊之处在于它有自己的模板(html)和样式(css).因此使用组件可以使我们的代码具有强解耦.可复用.易扩展等特性.通常的组件定义如下: demo.com ...
- python 中os.path.join 双斜杠的解决办法
这两天在写东西的时候遇到了这个问题,主要是上传图片之后,无法在页面展示,原因就出在用join 拼接的路径中出现了"\"而造成的. >>> import os &g ...
- 4-51单片机WIFI学习(开发板51单片机自动冷启动下载原理)
上一篇链接 http://www.cnblogs.com/yangfengwu/p/8743936.html 这一篇说一下自己板子的51单片机自动冷启动下载原理,我挥舞着键盘和鼠标,发誓要把世界写个明 ...
- linux下的Shell编程(3)shell里的流程控制
if 语句 if 表达式如果条件命令组为真,则执行 then 后的部分.标准形式: if 判断命令,可以有很多个,真假取最后的返回值 then 如果前述为真做什么 [ # 方括号代表可选,别真打进去了 ...
- Linux下的Shell编程(2)环境变量和局部变量
Shell Script是一种弱类型语言,使用变量的时候无需首先声明其类型. 局部变量在本地数据区分配内存进行存储,这个变量归当前的Shell所有,任何子进 程都不能访问本地变量.这些变量与环境变量不 ...
- 访问器属性:setter()函数和getter()函数
1.干嘛用的? getter()函数:返回有效的值 setter()函数:调用它并传入数据,这个函数决定如何处理数据 2.具备哪些属性?如何定义? configurable(默认为true),enum ...
- leetcode算法:Reshape the Matrix
In MATLAB, there is a very useful function called 'reshape', which can reshape a matrix into a new o ...
- mongodb聚合的使用
聚合: 主要用于计算和统计等,类似sql种的sum() avg() db.集合.aggregate( { 管道:{表达式} } ) 常用的管道: $group:将集合中的文档按照字段进行分组 $mat ...