02-Spring基于XML的Bean属性注入
属性值注入:就是给属性赋值
- 创建一个Account类:
public class Account implements Serializable {

    private int aid;

    private double balance;

    public int getAid() {

        return aid;

    }

    public void setAid(int aid) {

        this.aid = aid;

    }

    public double getBalance() {

        return balance;

    }

    public void setBalance(double balance) {

        this.balance = balance;

    }

    @Override

    public String toString() {

        return "Account{" +

                "aid=" + aid +

                ", balance=" + balance +

                '}';

    }

}
- 创建一个User类:
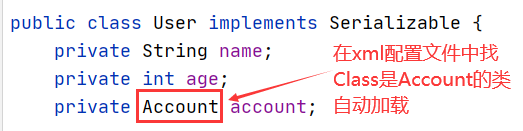
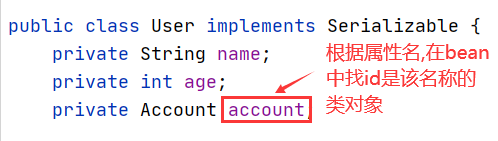
public class User implements Serializable {

    private String name;

    private int age;

    //引用数据类型

    private Account account;

    public String getName() {

        return name;

    }

    public void setName(String name) {

        this.name = name;

    }

    public int getAge() {

        return age;

    }

    public void setAge(int age) {

        this.age = age;

    }

    public Account getAccount() {

        return account;

    }

    public void setAccount(Account account) {

        this.account = account;

    }

    @Override

    public String toString() {

        return "User{" +

                "name='" + name + '\'' +

                ", age=" + age +

                ", account=" + account +

                '}';

    }

}
1. 简单数据类型和引用数据类型的属性注入
1.1 写配置文件
将User类交给Spring容器管理,在xml配置文件中添加<bean>
<?xml version="1.0" encoding="UTF-8"?>
<beans xmlns="http://www.springframework.org/schema/beans"
xmlns:xsi="http://www.w3.org/2001/XMLSchema-instance"
xsi:schemaLocation="http://www.springframework.org/schema/beans
https://www.springframework.org/schema/beans/spring-beans.xsd">
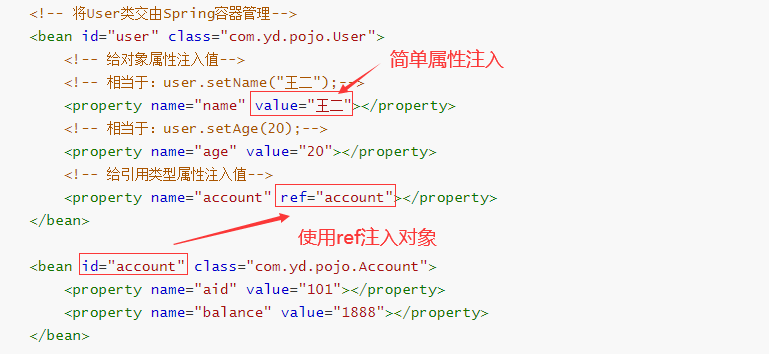
<!-- 将User类交由Spring容器管理-->
<bean id="user" class="com.yd.pojo.User">
<!-- 给对象属性注入值-->
<!-- 相当于:user.setName("王二");-->
<property name="name" value="王二"></property>
<!-- 相当于:user.setAge(20);-->
<property name="age" value="20"></property>
<!-- 给引用类型属性注入值-->
<property name="account" ref="account"></property>
</bean>
<bean id="account" class="com.yd.pojo.Account">
<property name="aid" value="101"></property>
<property name="balance" value="1888"></property>
</bean>
</beans>
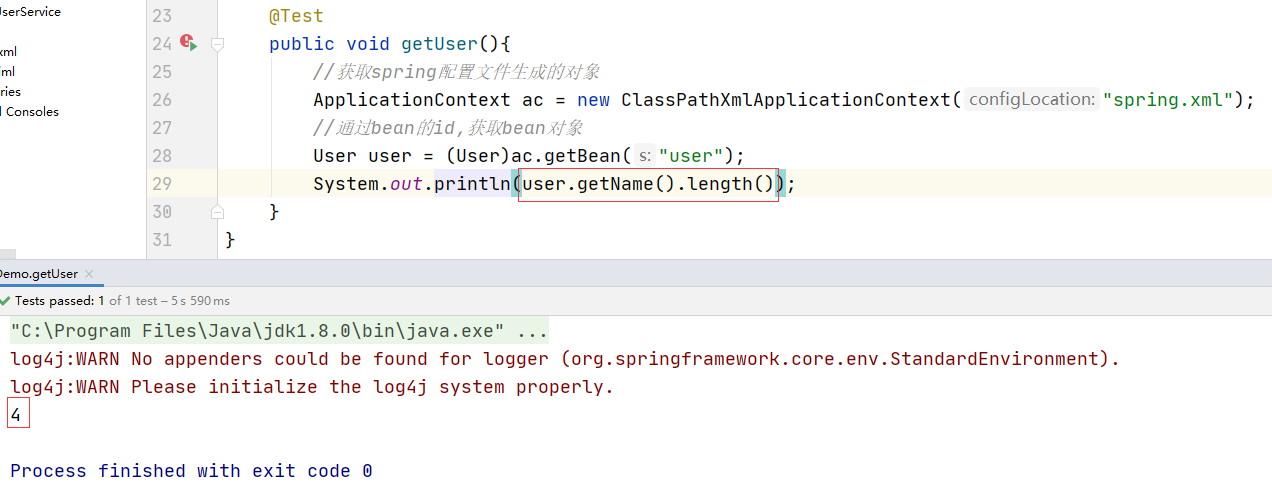
1.2 运行代码
@Test

public void getUser(){

    //获取spring配置文件生成的对象

    ApplicationContext ac = new ClassPathXmlApplicationContext("spring.xml");

    //通过bean的id,获取bean对象

    User user = (User)ac.getBean("user");

    System.out.println(user);

}
运行结果:

2. 构造器注入
- 给类加上无参构造和有参构造
2.1 配置文件注入
使用
- 构造参数有几个就要写几个,要与构造方法匹配
<?xml version="1.0" encoding="UTF-8"?>

<beans xmlns="http://www.springframework.org/schema/beans"

       xmlns:xsi="http://www.w3.org/2001/XMLSchema-instance"

       xsi:schemaLocation="http://www.springframework.org/schema/beans

        https://www.springframework.org/schema/beans/spring-beans.xsd">

    <bean id="user" class="com.yd.pojo.User">

        <constructor-arg name="name" value="小丽"></constructor-arg>

        <constructor-arg name="age" value="18"></constructor-arg>

        <constructor-arg name="account" ref="account"></constructor-arg>

    </bean>

    <bean id="account" class="com.yd.pojo.Account">

        <constructor-arg name="aid" value="201"></constructor-arg>

        <constructor-arg name="balance" value="9999.05"></constructor-arg>

    </bean>

</beans>
2.2 运行上面1.2的代码
运行结果:

3. 自动注入
3.1 根据类型 autowire="byType"(局部)
- 将User类的构造方法添加一个两个参数的构造,与xml匹配
- 在对应的bean标签上添加属性autowire="byType"
<?xml version="1.0" encoding="UTF-8"?>
<beans xmlns="http://www.springframework.org/schema/beans"
xmlns:xsi="http://www.w3.org/2001/XMLSchema-instance"
xsi:schemaLocation="http://www.springframework.org/schema/beans
https://www.springframework.org/schema/beans/spring-beans.xsd">
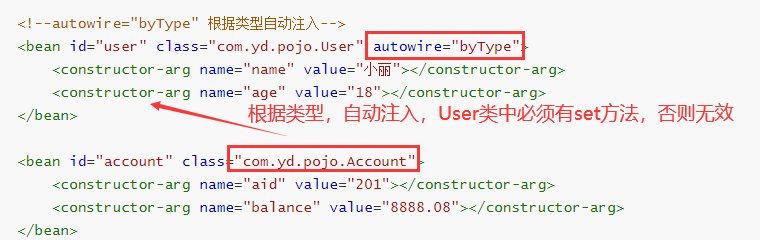
<!--autowire="byType" 根据类型自动注入-->
<bean id="user" class="com.yd.pojo.User" autowire="byType">
<constructor-arg name="name" value="小丽"></constructor-arg>
<constructor-arg name="age" value="18"></constructor-arg>
</bean>
<bean id="account" class="com.yd.pojo.Account">
<constructor-arg name="aid" value="201"></constructor-arg>
<constructor-arg name="balance" value="8888.08"></constructor-arg>
</bean>
</beans>
运行1.2代码结果:

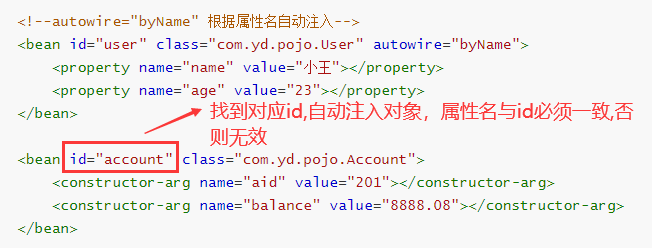
3.2 根据属性名 autowire="byName"(局部)
- 使用值注入,就不用带参构造(也可以同3.1使用构造注入)
- 在对应的bean标签上添加属性autowire="byName"
<?xml version="1.0" encoding="UTF-8"?>

<beans xmlns="http://www.springframework.org/schema/beans"

       xmlns:xsi="http://www.w3.org/2001/XMLSchema-instance"

       xsi:schemaLocation="http://www.springframework.org/schema/beans

        https://www.springframework.org/schema/beans/spring-beans.xsd">

    <!--autowire="byName" 根据属性名自动注入-->

    <bean id="user" class="com.yd.pojo.User" autowire="byName">

        <property name="name" value="小王"></property>

        <property name="age" value="23"></property>

    </bean>

    <bean id="account" class="com.yd.pojo.Account">

        <constructor-arg name="aid" value="201"></constructor-arg>

        <constructor-arg name="balance" value="8888.08"></constructor-arg>

    </bean>

</beans>
运行1.2代码结果:

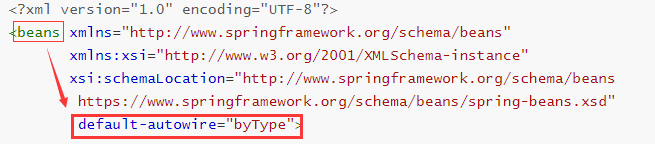
3.3 全局设置自动注入
- 在最大的<beans>标签中添加全局自动注入default-autowire="byType"
<?xml version="1.0" encoding="UTF-8"?>

<beans xmlns="http://www.springframework.org/schema/beans"

       xmlns:xsi="http://www.w3.org/2001/XMLSchema-instance"

       xsi:schemaLocation="http://www.springframework.org/schema/beans

        https://www.springframework.org/schema/beans/spring-beans.xsd"

        default-autowire="byType">

    <bean id="user" class="com.yd.pojo.User">

        <property name="name" value="小李"></property>

        <property name="age" value="30"></property>

    </bean>

    <bean id="account" class="com.yd.pojo.Account">

        <constructor-arg name="aid" value="301"></constructor-arg>

        <constructor-arg name="balance" value="6666.08"></constructor-arg>

    </bean>

</beans>
运行1.2代码结果:

4. 总结
- 局部注入只针对单个的bean对象;
- 全局注入针对的是<beans>下所有的bean对象;
- 开发中推荐使用autowire="byType",全局/局部根据实际情况选择。
4. 空值注入
- <value/>


- value = ""


- <null/>表示的是null,空指针


- value = "null" 表示的是“null”字符串

**** 注意:注意区分空指针和null字符串!
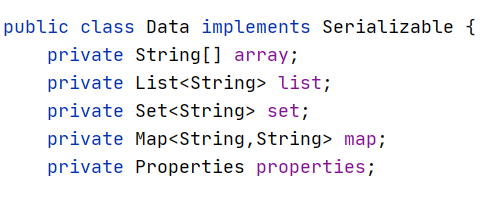
5. 集合属性注入(array、set、list、map、properties)(了解)
- 建一个Data类放以上属性(需包含get/set/toString方法)
- xml配置bean
<beans xmlns="http://www.springframework.org/schema/beans"

       xmlns:xsi="http://www.w3.org/2001/XMLSchema-instance"

       xsi:schemaLocation="http://www.springframework.org/schema/beans

        https://www.springframework.org/schema/beans/spring-beans.xsd"

        default-autowire="byName">

    <bean id="data" class="com.yd.pojo.Data">

        <property name="array">

            <array>

                <value>苏州</value>

                <value>无锡</value>

                <value>常州</value>

            </array>

        </property>

        <property name="list">

            <list>

                <value>蒸羊羔</value>

                <value>蒸熊掌</value>

                <value>蒸鹿尾</value>

            </list>

        </property>

        <property name="set">

            <set>

                <value>北京</value>

                <value>北京</value>

                <value>天津</value>

                <value>河北</value>

            </set>

        </property>

        <property name="map">

            <map>

                <entry key="101" value="张三"/>

                <entry key="102" value="李四"/>

                <entry key="103" value="王五"/>

            </map>

        </property>

        <property name="properties">

            <props>

                <prop key="user">root</prop>

                <prop key="pwd">123456</prop>

                <prop key="sex">male</prop>

            </props>

        </property>

    </bean>

</beans>
- 运行代码
@Test

public void getData(){

    //获取spring配置文件生成的对象

    ApplicationContext ac = new ClassPathXmlApplicationContext("spring.xml");

    Data data = (Data) ac.getBean("data");

    System.out.println(data);

}
- 运行结果:

注意:1. set集合存放不重复的数据
2. default-autowire="byName",若是byType,properties会自动注入系统默认属性值(系统配置信息等)
02-Spring基于XML的Bean属性注入的更多相关文章
- 吴裕雄--天生自然JAVA SPRING框架开发学习笔记:Spring基于XML装配Bean
Bean 的装配可以理解为依赖关系注入,Bean 的装配方式也就是 Bean 的依赖注入方式.Spring 容器支持多种形式的 Bean 的装配方式,如基于 XML 的 Bean 装配.基于 Anno ...
- spring学习笔记之---bean属性注入
bean属性注入 (一)构造方法的属性注入 1.Student.java package entity; public class Student { private String name; pri ...
- spring的基于XML方式的属性注入
1.掌握spring的属性注入的方法: 1.1构造方法注入普通值---------<constructor-arg>标签的使用 首先新建一个类 package spring.day1.de ...
- Spring基础——在 Spring Config 文件中基于 XML 的 Bean 的自动装配
一.Spring IOC 容器支持自动装配 Bean,所谓自动装配是指,不需要通过 <property> 或 <constructor-arg> 为 Bean 的属性注入值的过 ...
- spring基于xml的声明式事务控制配置步骤
<?xml version="1.0" encoding="UTF-8"?> <beans xmlns="http://www.sp ...
- Spring 基于Java的Bean声明
Spring 基于Java的Bean声明 使用@Configuration进行设置: Xml: <?xml version="1.0" encoding="UTF- ...
- spring 基于XML的申明式AspectJ通知的执行顺序
spring 基于XML的申明式AspectJ通知的执行顺序 关于各种通知的执行顺序,结论:与配置文件中的申明顺序有关 1. XML文件配置说明 图片来源:<Java EE企业级应用开发教程&g ...
- spring 基于xml的申明式AspectH中的后置通知的返回值获取
spring 基于xml的申明式AspectH中的后置通知的返回值获取 1. 配置文件 <aop:config> <aop:aspect ref="myAspect&quo ...
- spring实战一:装配bean之注入Bean属性
内容参考自spring in action一书. 创建应用对象之间协作关系的行为通常称为装配,这也是依赖注入的本质. 1. 创建spring配置 spring是一个基于容器的框架.如果没有配置spri ...
- Spring:特殊数据类型的属性注入(基于配置文件)
该处提到的特殊数据类型指的是除了基础数据类型和String以外的其他常用的数据类型,如:List.Map.Set.以及pojo对象等.则我们创建的Person类定义为: package bjtu.we ...
随机推荐
- 运筹学之线性规划 1.X
线性规划 线性规划问题的标准形式可以写成: \[\begin{aligned} &max~z=\pmb{c}^T\pmb{X} \\ &s.t.\{ \begin{aligned} & ...
- vue 打开页面触发事件
vue中created(),mounted()与activated()区别及应用 created():在创建vue对象时,当html渲染之前就触发:但是注意,全局vue.js不强制刷新或者重启时只创建 ...
- css - contenteditable
css - contenteditable contenteditable属性 contenteditable 属性是 HTML5 中的新属性.规定是否可编辑元素的内容. 让contenteditab ...
- iOS开发之定时器和tableview滑动阻塞问题
NSTimer *timer = [[NSTimer alloc]initWithFireDate:[NSDate distantPast] interval:1 target:self select ...
- React使用portal提示 The types returned by 'render()' are incompatible between these types. Type 'ReactPortal' is not assignable to type 'ReactNode'. Type '{}' is not assignable to type 'ReactNode'.
原因:组件返回了个不是<></>的东西 原先代码: export default class Index extends React.PureComponent { rende ...
- json字符串让里面的""和null不显示出来
工具类 ------------------------------------------------------------------------------------------------ ...
- Python基础数据类型-list(列表)
a = [1, 2, 3] a.append([1, 4]) a.append(8) a.append([8, 9, '10']) # 添加的是整体,即:将输入对象添加到列表末尾 print(a) # ...
- base64EncodedStringWithOptions iOS
// 64位编码//先将string转换成dataNSData *data = [string dataUsingEncoding:NSUTF8StringEncoding];NSData *base ...
- Day11-数组的使用
数组的使用 一.数组的使用 package com.array; public class ArrayDemo03 { public static void main(String[] args) { ...
- spring-boot-starter-webflux 与spring-cloud-starter-openfeign冲突
Thu Oct 22 17:16:01 CST 2020 [3be84a1c-14] There was an unexpected error (type=Internal Server Error ...