
spring的基于XML方式的属性注入
1.掌握spring的属性注入的方法:
1.1构造方法注入普通值---------<constructor-arg>标签的使用
首先新建一个类
package spring.day1.demo3;

public class car {

    private String name;

    private double price;

    public car(String name, Double price) {

        this.name = name;

        this.price = price;

    }

    @Override

    public String toString() {

        return "car [name=" + name + ", price=" + price + "]";

    }

}
在编写applicationContext2.xml
<?xml version="1.0" encoding="UTF-8"?>

<!-- =======================引入spring的关于bean的约束 ========================= -->

<beans xmlns="http://www.springframework.org/schema/beans"

    xmlns:p="http://www.springframework.org/schema/p"

    xmlns:xsi="http://www.w3.org/2001/XMLSchema-instance"

    xsi:schemaLocation="

        http://www.springframework.org/schema/beans

        http://www.springframework.org/schema/beans/spring-beans.xsd">

    <!-- ================spring属性注入=============================== -->

    <!-- 构造方法注入 -->

    <bean id="car" class="spring.day1.demo3.car">

        <constructor-arg name="name" value="宝马"></constructor-arg>

        <constructor-arg name="price" value="500000"></constructor-arg>

    </bean>

</beans>
在编写测试类SpringDemo3
package spring.day1.demo3;

import org.junit.Test;

import org.springframework.context.ApplicationContext;

import org.springframework.context.support.ClassPathXmlApplicationContext;

public class springDemo3 {

    @Test

    public void demo1() {

        ApplicationContext applicationContext = new ClassPathXmlApplicationContext("applicationContext2.xml");

        car bean = (car) applicationContext.getBean("car");

        System.out.println(bean);

    }

}
运行结果如下

1.2set方法注入普通值和对象属性(ref的使用)------<property>标签的使用
新建一个类car2
package spring.day1.demo3;

public class car2 {

    private String name;

    private double price;

    public void setName(String name) {

        this.name = name;

    }

    public void setPrice(double price) {

        this.price = price;

    }

    @Override

    public String toString() {

        return "car2 [name=" + name + ", price=" + price + "]";

    }

}
新建一个Employee类
package spring.day1.demo3;

public class employee {

    private String name;

    private car2 car;

    public void setName(String name) {

        this.name = name;

    }

    public void setCar(car2 car) {

        this.car = car;

    }

    @Override

    public String toString() {

        return "Employee [name=" + name + ", car=" + car + "]";

    }

}
在applicationContext2.xml中加入以下
<!-- set方法对car2注入普通值 -->

    <bean id="car2" class="spring.day1.demo3.car2">

        <property name="name" value="奔驰"></property>

        <property name="price" value="600000"></property>

    </bean>

    <!-- set方法注入对象 -->

    <bean id="employee" class="spring.day1.demo3.employee">

        <property name="name" value="张三"></property>

        <property name="car" ref="car2"></property>

    </bean>
在测试类SpringDemo3加入以下
@Test

    public void demo2() {

        ApplicationContext applicationContext = new ClassPathXmlApplicationContext("applicationContext2.xml");

        employee bean = (employee) applicationContext.getBean("employee");

        System.out.println(bean);

    }
运行截图如下

1.3SPEL方式注入普通值和对象值(Spring3.0以后)
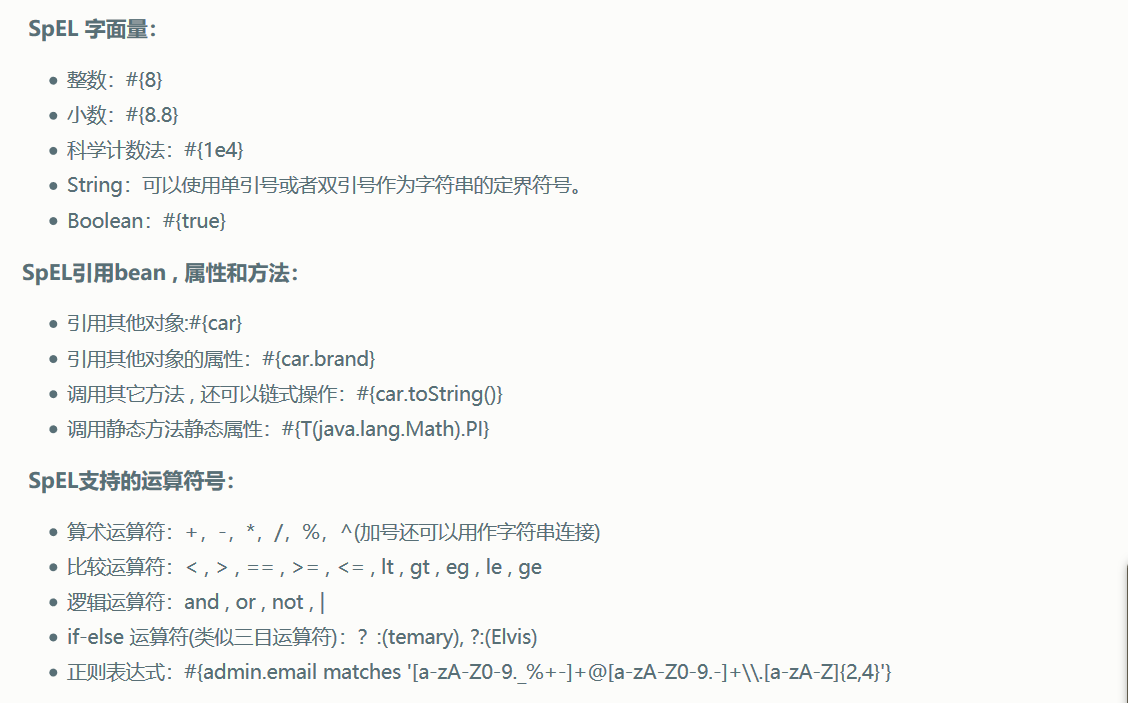
SpEL:Spring Expression Language,Spring的表达式语言。
语法格式:#{SPEL}
新建一个类carInfo
package spring.day1.demo3;

public class carInfo {

    private String name;

    private double price;

    public String getName() {

        return "小三轮儿";

    }

    public double getPrice() {

        return Math.random()*1000;

    }

}
修改applicationContext2.xml为如下
<?xml version="1.0" encoding="UTF-8"?>

<!-- =======================引入spring的关于bean的约束 ========================= -->

<beans xmlns="http://www.springframework.org/schema/beans"

    xmlns:p="http://www.springframework.org/schema/p"

    xmlns:xsi="http://www.w3.org/2001/XMLSchema-instance"

    xsi:schemaLocation="

        http://www.springframework.org/schema/beans

        http://www.springframework.org/schema/beans/spring-beans.xsd">

    <!-- ================spring属性注入=============================== -->

    <!-- 构造方法注入 -->

    <bean id="car" class="spring.day1.demo3.car">

        <constructor-arg name="name" value="宝马"></constructor-arg>

        <constructor-arg name="price" value="500000"></constructor-arg>

    </bean>

    <!-- set方法对car2注入普通值 -->

    <!-- <bean id="car2" class="spring.day1.demo3.car2">

        <property name="name" value="奔驰"></property>

        <property name="price" value="600000"></property>

    </bean> -->

    <!-- set方法注入对象 -->

    <!-- <bean id="employee" class="spring.day1.demo3.employee">

        <property name="name" value="张三"></property>

        <property name="car" ref="car2"></property>

    </bean> -->

    <!-- SPEL方式 -->

    <bean id="carInfo" class="spring.day1.demo3.carInfo"></bean>

    <bean id="car2" class="spring.day1.demo3.car2">

        <property name="name" value="#{carInfo.name}"></property>

        <property name="price" value="#{carInfo.getPrice()}"></property>

    </bean>

</beans>
在测试类SpringDemo3加入以下
@Test

    public void demo3() {

        ApplicationContext applicationContext = new ClassPathXmlApplicationContext("applicationContext2.xml");

        car2 bean = (car2) applicationContext.getBean("car2");

        System.out.println(bean);

    }
运行截图如下

1.4P名称空间方式注入普通值和对象(Spring2.5以后)了解

2.集合属性注入(了解)
1.新建CollectionBean类
2.在applicationContext2.xml中加入如下代码
3.新建测试类测试
<!-- =======================spring集合属性的注入============================ -->

    <bean id="collectionBean" class="zcc.spring.demo5.CollectionBean">

        <!-- 数组类型 -->

        <property name="arrs">

            <list>

                <value>张三</value>

                <value>李四</value>

                <value>王麻子</value>

            </list>

        </property>

        <!-- List集合类型 -->

        <property name="list">

            <list>

                <value>一号</value>

                <value>二号</value>

                <value>三号</value>

            </list>

        </property>

        <!-- Set集合类型 -->

        <property name="set">

            <set>

                <value>a</value>

                <value>b</value>

                <value>c</value>

            </set>

        </property>

        <!-- Map集合类型 -->

        <property name="map">

            <map>

                <entry key="数字" value="1"></entry>

                <entry key="性别" value="男"></entry>

            </map>

        </property>

    </bean>
package zcc.spring.demo5;

import java.util.Arrays;

import java.util.List;

import java.util.Map;

import java.util.Set;

/*

 * 集合属性的注入

 */

public class CollectionBean {

    private String []arrs;

    private List<String> list;

    private Set<String> set;

    private Map<String,String> map;

    public void setArrs(String[] arrs) {

        this.arrs = arrs;

    }

    public void setList(List<String> list) {

        this.list = list;

    }

    public void setSet(Set<String> set) {

        this.set = set;

    }

    public void setMap(Map<String, String> map) {

        this.map = map;

    }

    @Override

    public String toString() {

        return "CollectionBean [arrs=" + Arrays.toString(arrs) + ", list=" + list + ", set=" + set + ", map=" + map

                + "]";

    }

}
package zcc.spring.demo5;

import org.junit.Test;

import org.springframework.context.ApplicationContext;

import org.springframework.context.support.ClassPathXmlApplicationContext;

/*

 * 集合类型的属性注入

 */

public class SpringDemo5 {

    @Test

    public void demo1() {

        //创建spring的工厂来实例化xml中所有的bean对象

        ApplicationContext applicationContext = new ClassPathXmlApplicationContext("applicationContext.xml");

        CollectionBean bean = (CollectionBean) applicationContext.getBean("collectionBean");

        System.out.println(bean);

    }

}

spring的基于XML方式的属性注入的更多相关文章
- Spring声明式事务管理(基于XML方式实现)
--------------------siwuxie095 Spring 声明式事务管理(基于 XML 方式实现) 以转账为例 ...
- Spring 中IOC(控制反转)&& 通过SET方式为属性注入值 && Spring表达式
### 1. Spring IoC IoC:Inversion of control:控制反转:在传统开发模式下,对象的创建过程和管理过程都是由开发者通过Java程序来实现的,操作权在开发者的Java ...
- Spring boot 基于注解方式配置datasource
Spring boot 基于注解方式配置datasource 编辑 Xml配置 我们先来回顾下,使用xml配置数据源. 步骤: 先加载数据库相关配置文件; 配置数据源; 配置sqlSessionF ...
- Spring-注入方式(基于xml方式)
1.基于xml方式创建对象 <!--配置User类对象的创建 --> <bean id="user" class="com.at.spring5.Use ...
- 跟着刚哥学习Spring框架--通过XML方式配置Bean(三)
Spring配置Bean有两种形式(XML和注解) 今天我们学习通过XML方式配置Bean 1. Bean的配置方式 通过全类名(反射)的方式 √ id:标识容器中的bean.id唯一. √ cl ...
- 表达式SpEL方式的属性注入
-----------------------siwuxie095 表达式 SpEL 方式的属性注入 表达式 SpEL 方式的属性注入是 Spring 3.x 版本后提供的方式 1.编写一个普通类 B ...
- 命名空间p方式的属性注入
---------------------siwuxie095 命名空间 p 方式的属性注入 命名空间 p 方式的属性注入是 Spring 2.x 版本后提供的方式 1.编写一个普通类 Book.ja ...
- Spring 框架的概述以及Spring中基于XML的IOC配置
Spring 框架的概述以及Spring中基于XML的IOC配置 一.简介 Spring的两大核心:IOC(DI)与AOP,IOC是反转控制,DI依赖注入 特点:轻量级.依赖注入.面向切面编程.容器. ...
- Spring中基于xml的AOP
1.Aop 全程是Aspect Oriented Programming 即面向切面编程,通过预编译方式和运行期动态代理实现程序功能的同一维护的一种技术.Aop是oop的延续,是软件开发中的 一个热点 ...
随机推荐
- [转] 使用slim3快速开发RESTful API
本文转自:https://blog.csdn.net/u011250882/article/details/50101599 版权声明:本文为博主原创文章,转载请注明出处和作者名,尊重别人也是尊重自己 ...
- Cookie 用法
//Cookie:是一个客户端状态保持机制,(网站的数据是存在客户端),与隐藏域与ViewState对象都属于这种客户端状态保持,Cookie中存储的是关于网站相关的文本字符串数据.Cookie的存储 ...
- 【Java每日一题】20170314
20170313问题解析请点击今日问题下方的“[Java每日一题]20170314”查看(问题解析在公众号首发,公众号ID:weknow619) package Mar2017; public cla ...
- K8S RBAC
API Server 内部通过用户认证后,然后进入授权流程.对合法用户进行授权并且随后在用户访问时进行鉴权,是权限管理的重要环节. 在 kubernetes 集群中,各种操作权限是赋予角色(Role ...
- 2018-04-27 搭建Python官方文档翻译环境-汉化示例代码
通过官方i18n流程, 实现文档中的代码段的汉化, 效果如下(4. More Control Flow Tools): 步骤 基于python官方3.6版文档cpython/Doc生成pot文件. 参 ...
- 苹果手机怎么屏幕录屏 ios10怎么录屏
手机录屏已经现阶段经常使用的功能,有些人喜欢在手机上看视频,看直播.但是有时候看到很精彩的视频,就想要录制下来,这个时候可以采取录屏的方式.那么就涉及到手机怎么录制屏幕视频了?想用苹果手机把手机屏幕录 ...
- SSIS 包部署错误 0xC0010014
SSIS 包部署错误 0xC0010014 Reinhard 在部署 SSIS 包时,提示如下错误. 由于错误 0xC0010014"发生了一个或多个错误.在此消息之前应有更为具体的错误消息 ...
- 实战 | Android中文图混排时文图的居中对齐 FontMetrics以及自定义ImageSpan实现
这个标题有点长,乍一看这么个标题你可能没明白啥意思,且听我慢慢道来. 公司的项目中新增了一个“心动” 的功能,用户初次使用时需要给一个引导页,就是下面图中的这个样子(这就是做完之后的效果了). 在上图 ...
- Python_基于Python同Linux进行交互式操作实现通过堡垒机访问目标机
基于Python同Linux进行交互式操作实现通过堡垒机访问目标机 by:授客 QQ:1033553122 欢迎加入全国软件测试交流群:7156436 实现功能 1 测试环境 1 代码实践 2 注 ...
- Python 标准类库-Windows特殊服务之msvcrt
标准类库-Windows特殊服务之msvcrt by:授客 QQ:1033553122 广告:出售自研自动化小平台(无需编码也可用),有需要请联系 测试环境 win7 64位 Python 3.4 ...