02-Spring基于XML的Bean属性注入
属性值注入:就是给属性赋值
- 创建一个Account类:
public class Account implements Serializable {

    private int aid;

    private double balance;

    public int getAid() {

        return aid;

    }

    public void setAid(int aid) {

        this.aid = aid;

    }

    public double getBalance() {

        return balance;

    }

    public void setBalance(double balance) {

        this.balance = balance;

    }

    @Override

    public String toString() {

        return "Account{" +

                "aid=" + aid +

                ", balance=" + balance +

                '}';

    }

}
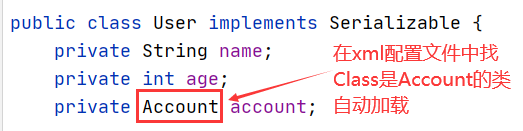
- 创建一个User类:
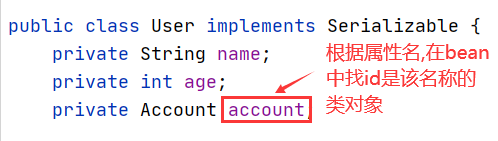
public class User implements Serializable {

    private String name;

    private int age;

    //引用数据类型

    private Account account;

    public String getName() {

        return name;

    }

    public void setName(String name) {

        this.name = name;

    }

    public int getAge() {

        return age;

    }

    public void setAge(int age) {

        this.age = age;

    }

    public Account getAccount() {

        return account;

    }

    public void setAccount(Account account) {

        this.account = account;

    }

    @Override

    public String toString() {

        return "User{" +

                "name='" + name + '\'' +

                ", age=" + age +

                ", account=" + account +

                '}';

    }

}
1. 简单数据类型和引用数据类型的属性注入
1.1 写配置文件
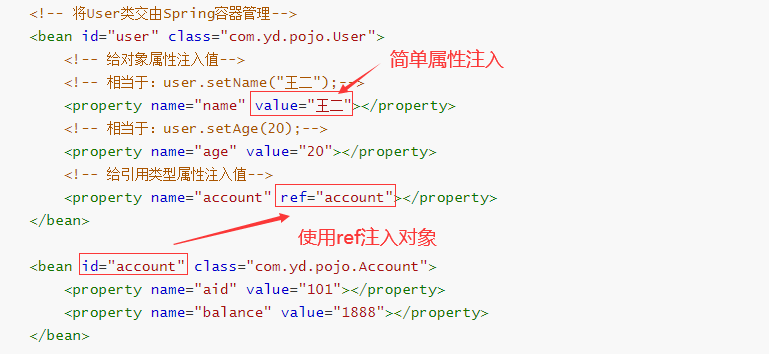
将User类交给Spring容器管理,在xml配置文件中添加<bean>
<?xml version="1.0" encoding="UTF-8"?>

<beans xmlns="http://www.springframework.org/schema/beans"

       xmlns:xsi="http://www.w3.org/2001/XMLSchema-instance"

       xsi:schemaLocation="http://www.springframework.org/schema/beans

        https://www.springframework.org/schema/beans/spring-beans.xsd">

	<!-- 将User类交由Spring容器管理-->

    <bean id="user" class="com.yd.pojo.User">

        <!-- 给对象属性注入值-->

        <!-- 相当于:user.setName("王二");-->

        <property name="name" value="王二"></property>

        <!-- 相当于:user.setAge(20);-->

        <property name="age" value="20"></property>

        <!-- 给引用类型属性注入值-->

        <property name="account" ref="account"></property>

    </bean>

    <bean id="account" class="com.yd.pojo.Account">

        <property name="aid" value="101"></property>

        <property name="balance" value="1888"></property>

    </bean>

</beans>
1.2 运行代码
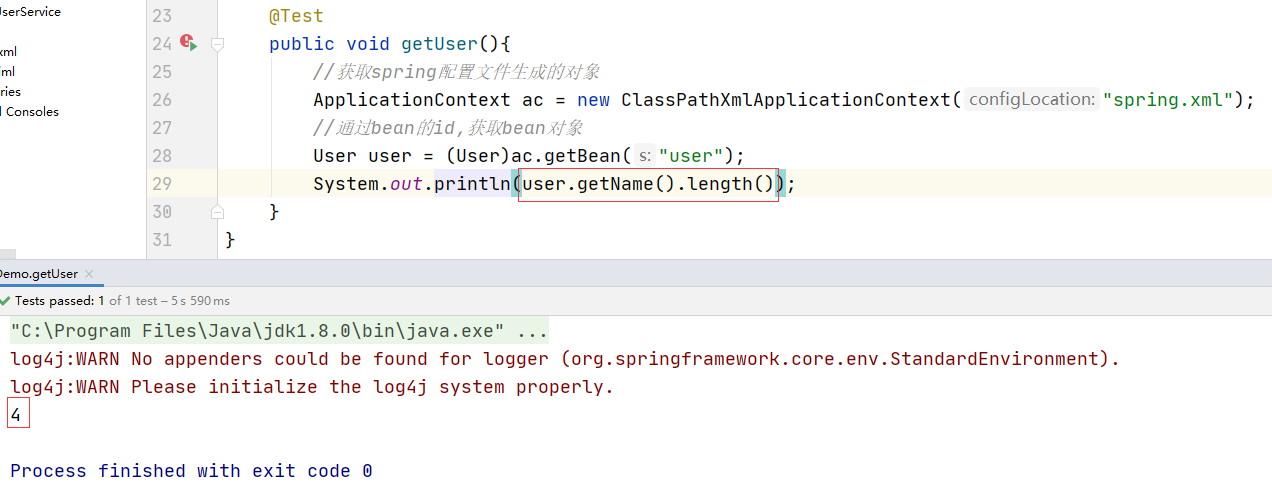
@Test

public void getUser(){

    //获取spring配置文件生成的对象

    ApplicationContext ac = new ClassPathXmlApplicationContext("spring.xml");

    //通过bean的id,获取bean对象

    User user = (User)ac.getBean("user");

    System.out.println(user);

}
运行结果:

2. 构造器注入
- 给类加上无参构造和有参构造
2.1 配置文件注入
使用
- 构造参数有几个就要写几个,要与构造方法匹配
<?xml version="1.0" encoding="UTF-8"?>

<beans xmlns="http://www.springframework.org/schema/beans"

       xmlns:xsi="http://www.w3.org/2001/XMLSchema-instance"

       xsi:schemaLocation="http://www.springframework.org/schema/beans

        https://www.springframework.org/schema/beans/spring-beans.xsd">

    <bean id="user" class="com.yd.pojo.User">

        <constructor-arg name="name" value="小丽"></constructor-arg>

        <constructor-arg name="age" value="18"></constructor-arg>

        <constructor-arg name="account" ref="account"></constructor-arg>

    </bean>

    <bean id="account" class="com.yd.pojo.Account">

        <constructor-arg name="aid" value="201"></constructor-arg>

        <constructor-arg name="balance" value="9999.05"></constructor-arg>

    </bean>

</beans>
2.2 运行上面1.2的代码
运行结果:

3. 自动注入
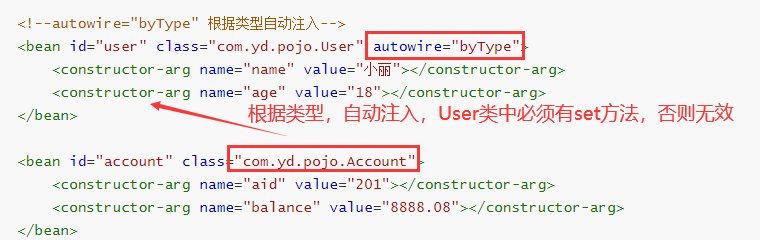
3.1 根据类型 autowire="byType"(局部)
- 将User类的构造方法添加一个两个参数的构造,与xml匹配
- 在对应的bean标签上添加属性autowire="byType"
<?xml version="1.0" encoding="UTF-8"?>

<beans xmlns="http://www.springframework.org/schema/beans"

       xmlns:xsi="http://www.w3.org/2001/XMLSchema-instance"

       xsi:schemaLocation="http://www.springframework.org/schema/beans

        https://www.springframework.org/schema/beans/spring-beans.xsd">

	<!--autowire="byType" 根据类型自动注入-->

    <bean id="user" class="com.yd.pojo.User" autowire="byType">

        <constructor-arg name="name" value="小丽"></constructor-arg>

        <constructor-arg name="age" value="18"></constructor-arg>

    </bean>

    <bean id="account" class="com.yd.pojo.Account">

        <constructor-arg name="aid" value="201"></constructor-arg>

        <constructor-arg name="balance" value="8888.08"></constructor-arg>

    </bean>

</beans>
运行1.2代码结果:

3.2 根据属性名 autowire="byName"(局部)
- 使用值注入,就不用带参构造(也可以同3.1使用构造注入)
- 在对应的bean标签上添加属性autowire="byName"
<?xml version="1.0" encoding="UTF-8"?>
<beans xmlns="http://www.springframework.org/schema/beans"
xmlns:xsi="http://www.w3.org/2001/XMLSchema-instance"
xsi:schemaLocation="http://www.springframework.org/schema/beans
https://www.springframework.org/schema/beans/spring-beans.xsd">
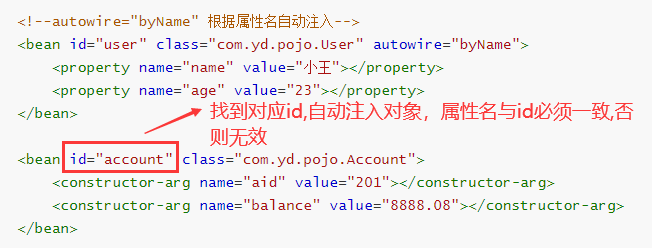
<!--autowire="byName" 根据属性名自动注入-->
<bean id="user" class="com.yd.pojo.User" autowire="byName">
<property name="name" value="小王"></property>
<property name="age" value="23"></property>
</bean>
<bean id="account" class="com.yd.pojo.Account">
<constructor-arg name="aid" value="201"></constructor-arg>
<constructor-arg name="balance" value="8888.08"></constructor-arg>
</bean>
</beans>
运行1.2代码结果:

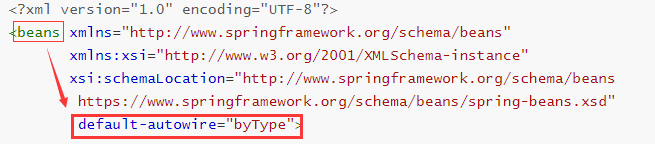
3.3 全局设置自动注入
- 在最大的<beans>标签中添加全局自动注入default-autowire="byType"
<?xml version="1.0" encoding="UTF-8"?>

<beans xmlns="http://www.springframework.org/schema/beans"

       xmlns:xsi="http://www.w3.org/2001/XMLSchema-instance"

       xsi:schemaLocation="http://www.springframework.org/schema/beans

        https://www.springframework.org/schema/beans/spring-beans.xsd"

        default-autowire="byType">

    <bean id="user" class="com.yd.pojo.User">

        <property name="name" value="小李"></property>

        <property name="age" value="30"></property>

    </bean>

    <bean id="account" class="com.yd.pojo.Account">

        <constructor-arg name="aid" value="301"></constructor-arg>

        <constructor-arg name="balance" value="6666.08"></constructor-arg>

    </bean>

</beans>
运行1.2代码结果:

4. 总结
- 局部注入只针对单个的bean对象;
- 全局注入针对的是<beans>下所有的bean对象;
- 开发中推荐使用autowire="byType",全局/局部根据实际情况选择。
4. 空值注入
- <value/>


- value = ""


- <null/>表示的是null,空指针


- value = "null" 表示的是“null”字符串

**** 注意:注意区分空指针和null字符串!
5. 集合属性注入(array、set、list、map、properties)(了解)
- 建一个Data类放以上属性(需包含get/set/toString方法)
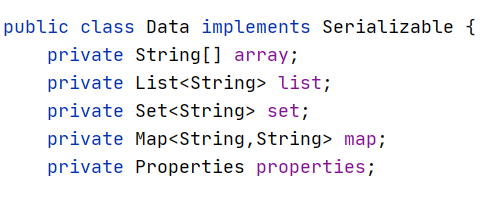
- xml配置bean
<beans xmlns="http://www.springframework.org/schema/beans"

       xmlns:xsi="http://www.w3.org/2001/XMLSchema-instance"

       xsi:schemaLocation="http://www.springframework.org/schema/beans

        https://www.springframework.org/schema/beans/spring-beans.xsd"

        default-autowire="byName">

    <bean id="data" class="com.yd.pojo.Data">

        <property name="array">

            <array>

                <value>苏州</value>

                <value>无锡</value>

                <value>常州</value>

            </array>

        </property>

        <property name="list">

            <list>

                <value>蒸羊羔</value>

                <value>蒸熊掌</value>

                <value>蒸鹿尾</value>

            </list>

        </property>

        <property name="set">

            <set>

                <value>北京</value>

                <value>北京</value>

                <value>天津</value>

                <value>河北</value>

            </set>

        </property>

        <property name="map">

            <map>

                <entry key="101" value="张三"/>

                <entry key="102" value="李四"/>

                <entry key="103" value="王五"/>

            </map>

        </property>

        <property name="properties">

            <props>

                <prop key="user">root</prop>

                <prop key="pwd">123456</prop>

                <prop key="sex">male</prop>

            </props>

        </property>

    </bean>

</beans>
- 运行代码
@Test

public void getData(){

    //获取spring配置文件生成的对象

    ApplicationContext ac = new ClassPathXmlApplicationContext("spring.xml");

    Data data = (Data) ac.getBean("data");

    System.out.println(data);

}
- 运行结果:

注意:1. set集合存放不重复的数据
2. default-autowire="byName",若是byType,properties会自动注入系统默认属性值(系统配置信息等)
02-Spring基于XML的Bean属性注入的更多相关文章
- 吴裕雄--天生自然JAVA SPRING框架开发学习笔记:Spring基于XML装配Bean
Bean 的装配可以理解为依赖关系注入,Bean 的装配方式也就是 Bean 的依赖注入方式.Spring 容器支持多种形式的 Bean 的装配方式,如基于 XML 的 Bean 装配.基于 Anno ...
- spring学习笔记之---bean属性注入
bean属性注入 (一)构造方法的属性注入 1.Student.java package entity; public class Student { private String name; pri ...
- spring的基于XML方式的属性注入
1.掌握spring的属性注入的方法: 1.1构造方法注入普通值---------<constructor-arg>标签的使用 首先新建一个类 package spring.day1.de ...
- Spring基础——在 Spring Config 文件中基于 XML 的 Bean 的自动装配
一.Spring IOC 容器支持自动装配 Bean,所谓自动装配是指,不需要通过 <property> 或 <constructor-arg> 为 Bean 的属性注入值的过 ...
- spring基于xml的声明式事务控制配置步骤
<?xml version="1.0" encoding="UTF-8"?> <beans xmlns="http://www.sp ...
- Spring 基于Java的Bean声明
Spring 基于Java的Bean声明 使用@Configuration进行设置: Xml: <?xml version="1.0" encoding="UTF- ...
- spring 基于XML的申明式AspectJ通知的执行顺序
spring 基于XML的申明式AspectJ通知的执行顺序 关于各种通知的执行顺序,结论:与配置文件中的申明顺序有关 1. XML文件配置说明 图片来源:<Java EE企业级应用开发教程&g ...
- spring 基于xml的申明式AspectH中的后置通知的返回值获取
spring 基于xml的申明式AspectH中的后置通知的返回值获取 1. 配置文件 <aop:config> <aop:aspect ref="myAspect&quo ...
- spring实战一:装配bean之注入Bean属性
内容参考自spring in action一书. 创建应用对象之间协作关系的行为通常称为装配,这也是依赖注入的本质. 1. 创建spring配置 spring是一个基于容器的框架.如果没有配置spri ...
- Spring:特殊数据类型的属性注入(基于配置文件)
该处提到的特殊数据类型指的是除了基础数据类型和String以外的其他常用的数据类型,如:List.Map.Set.以及pojo对象等.则我们创建的Person类定义为: package bjtu.we ...
随机推荐
- HTTP请求报文(请求行,请求头,请求体)
HTTP协议 1.简介 HTTP协议(Hyper Text Transfer Protocol,超文本传输协议),是用于从万维网(WWW:World Wide Web )服务器传输超文本到本地浏览器的 ...
- [node]把静态html挂到node接口下
主要适用于同网段下不同设备查看同一html. 来自知乎. 需要先安装一个node,安装过程不表. 新建文件:nodeServer.js var express = require('express') ...
- C#定时任务(Timer)
新建Timer类 using BaseAsset.Data.Infrastructure; using BaseAsset.Data.Repositories; using BaseAsset.Ent ...
- docker 中搭建 mysql pxc 集群
一.docker中创建pxc 容器 1.拉取PXC 镜像 pull docker pull percona/percona-xtradb-cluster:5.7.21 2.更改镜像名称为pxc t ...
- Mysql学习:4、DML命令(增删改查)及密码修改
1.查询表中所有数据: select * from students; 2.插入数据: insert into students (id,name,email,address) values(1,'张 ...
- 【BOOK】解析库--pyquery
CSS选择器 1.初始化 html=''' <div> <ul> <li class="item-0">first item</li> ...
- 前端使用JSEncrypt进行加密和解密
下载链接:https://www.bootcdn.cn/jsencrypt/ 使用方法: 1.引入jsencrypt 2.使用方法 // 加密公钥 const key = `xxxxxx`; func ...
- Java中File类
File类是java.io包中唯一代表磁盘文件本身的对象.File类的对象主要用来获取文件本身的一些信息,如文件所在目录.文件长度.读写权限等. 一. 文件的创建与删除 通常使用以下三种方法来创建一个 ...
- ORA-01427: 单行子查询返回多个行 出现原因及对应防止措施
原因:没有做好子查询约束条件 解决方法:1.加 AND ROWNUM =1 条件 但筛选结果可能并非一定是你想要的 2.匹配查询唯一约束条件
- Day11-数组的使用
数组的使用 一.数组的使用 package com.array; public class ArrayDemo03 { public static void main(String[] args) { ...