从零开始用electron整个跨平台桌面应用---基础配置篇
1.安装node、npm
node以及npm都需要是最新版本(版本过低有坑)
2.安装淘宝镜像cnpm(建议,下载较快)
npm install -g cnpm --registry=https://registry.npm.taobao.org
3.安装electron
cnpm install -g electron
4.安装打包输出工具
cnpm install -g electron-packager
5.安装electron 客户端工具(选择性,其实没必要)
Electron.exe
链接:http://pan.baidu.com/s/1mieJnLI 密码:x2i8
安装完成双击electron.exe文件
6.新建一个文件夹,命名为electron,在文件夹目录下,创建三个文件,package.json,main.js,index.htmlpackage.json可以直接npm init生成
package.json文件:
{

  "name": "your-app",

  "version": "0.1.0",

  "main": "main.js",

  "scripts": {

    "test": "echo \"Error: no test specified\" && exit 1",

    "start": "electron .",

    "pack": "electron-packager . myFirstElectron --win --out ./dist --arch=x64 --app-version=0.0.1 --electron-version=9.0.5"

  },

  "author": "",

  "license": "ISC",

  "description": "",

  "dependencies": {

    "sqlite3": "^4.2.0"

  }

}
main.js文件:
const electron = require('electron');

// Module to control application life.

const {app} = electron;

// Module to create native browser window.

const {BrowserWindow} = electron;

// Keep a global reference of the window object, if you don't, the window will

// be closed automatically when the JavaScript object is garbage collected.

let win;

function createWindow() {

  // Create the browser window.

  win = new BrowserWindow({

      width: 800,

      height: 600,

      webPreferences: { //If you add this sentence, you will not report an error

        nodeIntegration: true

        }

    });

  // and load the index.html of the app.

  win.loadURL(`file://${__dirname}/index.html`);

  // Open the DevTools.

  win.webContents.openDevTools();

  // Emitted when the window is closed.

  win.on('closed', () => {

    // Dereference the window object, usually you would store windows

    // in an array if your app supports multi windows, this is the time

    // when you should delete the corresponding element.

    win = null;

  });

}

// This method will be called when Electron has finished

// initialization and is ready to create browser windows.

// Some APIs can only be used after this event occurs.

app.on('ready', createWindow);

// Quit when all windows are closed.

app.on('window-all-closed', () => {

  // On OS X it is common for applications and their menu bar

  // to stay active until the user quits explicitly with Cmd + Q

  if (process.platform !== 'darwin') {

    app.quit();

  }

});

app.on('activate', () => {

  // On OS X it's common to re-create a window in the app when the

  // dock icon is clicked and there are no other windows open.

  if (win === null) {

    createWindow();

  }

});

// In this file you can include the rest of your app's specific main process

// code. You can also put them in separate files and require them here.

var sqlite3 = require('sqlite3').verbose();

const path = require('path');

var db = new sqlite3.Database(path.join(__dirname, 'db.db'));
index.html文件:
<!DOCTYPE html>

<html>

  <head>

    <meta charset="UTF-8">

    <title>Hello World!</title>

  </head>

  <body>

    <h1>Hello World!</h1>

    We are using node <script>document.write(process.versions.node)</script>,

    Chrome <script>document.write(process.versions.chrome)</script>,

    and Electron <script>document.write(process.versions.electron)</script>.

  </body>

</html>
7.运行electron
安装了客户端可以直接拖入
未安装就直接自定义下package.json,顺带把打包指令配置下
注意后面的版本--electron-version=9.0.5写你自己的enectron版本(cmd命令electron -v)
"scripts": {

"test": "echo \"Error: no test specified\" && exit 1",

"start": "electron .",

"pack": "electron-packager . myFirstElectron --win --out ./dist --arch=x64 --app-version=0.0.1 --electron-version=9.0.5"

},
8.集成sqlite3数据库
- Electron作为现今比较流行的客户端框架,势必会用本地缓存,在以往软件的一些缓存中一般用到的文件、日志等,这里提到的是sqlite3——轻量级数据库。
- Electron是完全符合node.js语法,并且支持很多第三方库,sqlite3也是其中一块,使用它首先需要具备node.js环境,这里不再赘述,安装sqlite3:
npm install sqlite3 --save
安装以后,发现Electron不能正常使用,会报出很多错误,比如缺少sqlite3模块,找不到,但是明明装了,这里需要对Sqlite3单独编译,
原因是:通过npm安装的sqlite3模块只实现了对node.js原生环境的支持,如果electron需要使用的话必须对其进行二次编辑。
1.首先进入到安装好的模块sqlite3目录下
cd .\node_modules\sqlite3
2.安装nan,并run,如果run失败可以跳过
npm install nan --save

npm run prepublish
3.编译下(可能会出现报错)
node-gyp configure --module_name=node_sqlite3 --module_path=../lib/binding/electron-v1.6.6-win32-ia32

node-gyp rebuild -target=1.6.6 -arch=win32 -target_platform=win32 -dist-url=https://atom.io/download/electron/ -module_name=node_sqlite3 -module_path=../lib/binding/electron-v1.6.6-win32-ia32
4.如果要修改electron的版本,直接修改下方图片标红处就可以了。

node报错解决方案(在使用node指令时可能会报错)gyp ERR! stack Error: Could not find any Visual Studio installation
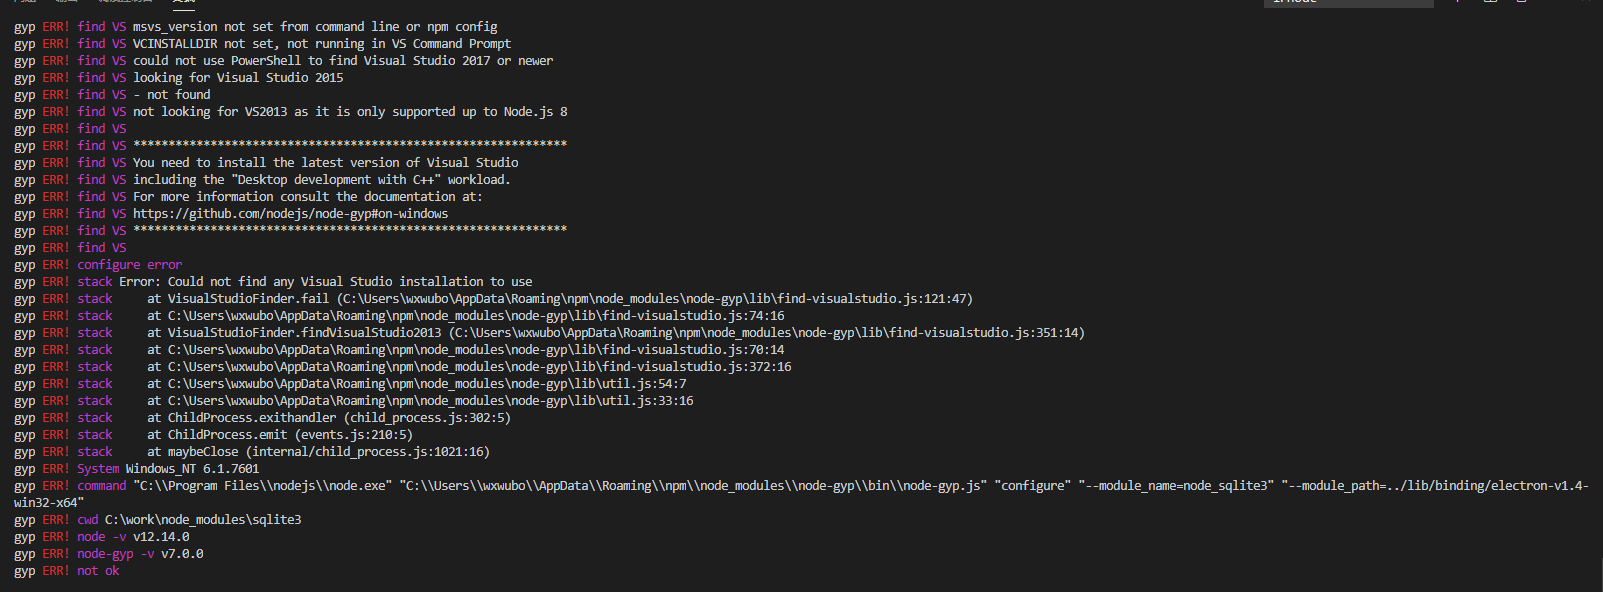
步骤一
npm install --global --production windows-build-tools
npm install -g node-gyp
步骤二
上面步骤一如果没有安装好python2.7,则安装下
npm install --python=python2.7
npm config set python python2.7
从零开始用electron整个跨平台桌面应用---基础配置篇的更多相关文章
- webpack3.x版本实战案例【基础配置篇】(一)
本文旨在通过一个一个实战例子来学习webpack如何配置,更加深入的学习webpack在实战项目中如何配置. 我们学习哪些配置呢? [基础配置] 打包JS 编译ES6 编译typeScript 打包公 ...
- 深入浅出 webpack 之基础配置篇
前言 前端工程化经历过很多优秀的工具,例如 Grunt.Gulp.webpack.rollup 等等,每种工具都有自己适用的场景,而现今应用最为广泛的当属 webpack 打包了,因此学习好 webp ...
- Electron开发跨平台桌面程序入门教程
最近一直在学习 Electron 开发桌面应用程序,在尝试了 java swing 和 FXjava 后,感叹还是 Electron 开发桌面应用上手最快.我会在这一篇文章中实现一个HelloWord ...
- 阿里云ECS服务器Linux环境下配置php服务器(一)--基础配置篇
开始安装软件了,我们需要安装的软件有apache,php和MySQL. ps:如果你购买的是北京的服务器,有个安全组需要设置,我全部用的默认设置,暂时还没发现会有什么影响. 首先关闭SELINUX(S ...
- lxc 容器基础配置篇
一, 首先配置lxc需要的网卡断 吧eth0复制一份变为br0 配置br0 配置eth0 重启网卡 /etc/init.d/network restart 安装lxc软件 需要epel源--- y ...
- 提高开发效率之VS Code基础配置篇
背景 之前一直是只用WebStorm作为IDE来编写代码,但是由于: 手中的这台Mac接了两个显示器以后,使用WebStorm会有卡顿. WebStorm需要付费(虽然可以通过某方法和谐). 所以需要 ...
- 从零开始的 Hexo 生活(一)入门安装篇
目录 前言 一.Hexo 是什么 1.什么是静态网站 2.为什么选择静态网站 3.为什么选择 Hexo 二.Markdown 是什么 1.为什么要学 Markdown 2.怎么学 Markdown 三 ...
- Electron+React+七牛云 实战跨平台桌面应用(最新更新)
课程资料获取链接:点击这里 前市场上对 Electron 的呼声很高,它几乎是 Web 开发人员开发桌面客户端的唯一途径,很多大厂都使用 Electron 开发自己的原生应用.Electron 天生适 ...
- Electron+Vue开发跨平台桌面应用
Electron+Vue开发跨平台桌面应用 xiangzhihong发布于 2019-12-23 虽然B/S是目前开发的主流,但是C/S仍然有很大的市场需求.受限于浏览器的沙盒限制,网页应用无法满足某 ...
随机推荐
- Java实现 LeetCode 541 反转字符串 II(暴力大法)
541. 反转字符串 II 给定一个字符串和一个整数 k,你需要对从字符串开头算起的每个 2k 个字符的前k个字符进行反转.如果剩余少于 k 个字符,则将剩余的所有全部反转.如果有小于 2k 但大于或 ...
- Java实现 LeetCode 414 第三大的数
414. 第三大的数 给定一个非空数组,返回此数组中第三大的数.如果不存在,则返回数组中最大的数.要求算法时间复杂度必须是O(n). 示例 1: 输入: [3, 2, 1] 输出: 1 解释: 第三大 ...
- Java实现 LeetCode 94 二叉树的中序遍历
94. 二叉树的中序遍历 给定一个二叉树,返回它的中序 遍历. 示例: 输入: [1,null,2,3] 1 2 / 3 输出: [1,3,2] 进阶: 递归算法很简单,你可以通过迭代算法完成吗? / ...
- java实现第五届蓝桥杯殖民地
殖民地 带着殖民扩张的野心,Pear和他的星际舰队登上X星球的某平原.为了评估这块土地的潜在价值,Pear把它划分成了M*N格,每个格子上用一个整数(可正可负)表示它的价值. Pear要做的事很简单- ...
- Spring Data JPA入门及深入
一:Spring Data JPA简介 Spring Data JPA 是 Spring 基于 ORM 框架.JPA 规范的基础上封装的一套JPA应用框架,可使开发者用极简的代码即可实现对数据库的访问 ...
- svg 贝塞尔曲线图解(记录)
path路径绘制中,绘制贝塞尔曲线的命令包括: Q 二次贝赛尔曲线 x1,y1 x,y T 平滑二次贝塞尔曲线 x,y C 曲线(curveto) x1,y1 x2,y2 x,y S 平滑曲线 x2, ...
- cocos2dx 实现遮罩
参考博文:http://blog.csdn.net/myarrow/article/details/19913653 参考博文:http://blog.csdn.net/song_hui_xiang/ ...
- input搜索框的搜索功能
如图,想要实现输入关键词,点击搜索按钮或者回车键都能进行搜索并返回. html部分代码如下: js部分—— function entersearch(){ var event = window.eve ...
- Apache(httpd)详解
httpd详解(思维导图) 1. httpd服务 ASF 服务器类型 http服务器 应用程序服务器 httpd的特性 高度模块化 DSO机制 MPM httpd的并发响应模型 prefork wor ...
- Random Point in Triangle【随机数解决期望值问题】
Random Point in Triangle 题目链接(点击) 题目描述 Bobo has a triangle ABC with A(x1,y1),B(x2,y2)A(x1,y1),B(x2,y ...