
Vue tinymce富文本编辑器
tinymce 官方为 vue 项目提供了一个组件 tinymce-vue
一、安装tinymce-vue
npm install @tinymce/tinymce-vue -S
二、下载tinymce
npm install tinymce -S
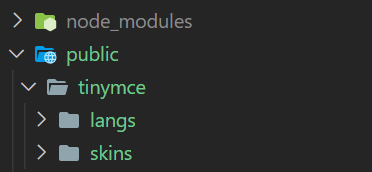
下载的时候可以先在static(public)下面建个目录tinymce,下载tinymce完成后在node_modules 中找到 tinymce/skins目录,将其复制到static\tinymce目录下面
三、下载中文语言包
https://www.tiny.cloud/get-tiny/language-packages/

下载完成后将其解压到public\tinymce目录下面,最终目录结构形式如下
四、创建组件tinymce.vue
<template>

  <div class="tinymce-editor">

    <editor v-model = "myValue" :init="init" :disabled="disabled" @onClick="onClick"></editor>

  </div>

</template>

<script>

// import axios from "axios";

import tinymce from "tinymce/tinymce";

import Editor from "@tinymce/tinymce-vue";

import "tinymce/themes/silver";

// 编辑器插件plugins

// 更多插件参考:https://www.tiny.cloud/docs/plugins/

import "tinymce/plugins/image"; // 插入上传图片插件

// import 'tinymce/plugins/media'// 插入视频插件

import "tinymce/plugins/table"; // 插入表格插件

import "tinymce/plugins/lists"; // 列表插件

import "tinymce/plugins/wordcount"; // 字数统计插件

export default {

  components: {

    Editor

  },

  props: {

    value: {

      type: String,

      default: ""

    },

    // 基本路径,默认为空根目录,如果你的项目发布后的地址为目录形式,

    // 即abc.com/tinymce,baseUrl需要配置成tinymce,不然发布后资源会找不到

    baseUrl: {

      type: String,

      default: ""

    },

    disabled: {

      type: Boolean,

      default: false

    },

    plugins: {

      type: [String, Array],

      default: "lists image table wordcount"

    },

    // 在toolbar中添加工具栏相应按钮

    toolbar: {

      type: [String, Array],

      default:

        "undo redo |  formatselect | bold italic forecolor backcolor | alignleft aligncenter alignright alignjustify | bullist numlist outdent indent | lists image table | removeformat"

    }

  },

  data() {

    return {

      init: {

        language_url: `${this.baseUrl}/tinymce/langs/zh_CN.js`, // 语言包路径

        language: "zh_CN",  //语言

        skin_url: `${this.baseUrl}/tinymce/skins/ui/oxide`, //skin路径

        content_css: `${this.baseUrl}/tinymce/skins/content/default/content.css`,

        // skin_url: `${this.baseUrl}/tinymce/skins/ui/oxide-dark`, // 暗色系

        // content_css: `${this.baseUrl}/tinymce/skins/content/dark/content.css`, // 暗色系

        height: 300,  //编辑器高度

        plugins: this.plugins,

        toolbar: this.toolbar,

        branding: false,  //是否禁用“Powered by TinyMCE”

        menubar: false, //顶部菜单栏显示

        // 此处为图片上传处理函数

        // 如需ajax上传可参考https://www.tiny.cloud/docs/configure/file-image-upload/#images_upload_handler

        // images_upload_handler: (blobInfo, success, failure) => {

          // let formdata = new FormData()

          // formdata.set('file', blobInfo.blob())

          // axios.post(url, formdata).then(res => {

          //   success(res.data.data)

          // }).catch(res => {

          //   failure('error')

          // })

        // },

      },

      myValue: this.value

    };

  },

  mounted() {

    tinymce.init({});

  },

  methods: {

    // 添加相关的事件,可用的事件参照文档=> https://github.com/tinymce/tinymce-vue => All available events

    // 需要什么事件可以自己增加

    onClick(e) {

      this.$emit("onClick", e, tinymce);

    },

    // 可以添加一些自己的自定义事件,如清空内容

    clear() {

      this.myValue = "";

    }

  },

  watch: {

    value(newValue) {

      this.myValue = newValue;

    },

    myValue(newValue) {

      this.$emit("input", newValue);

    }

  }

};

</script>
五、引入组件
<template>

  <div>

    <tinymce-editor ref="editor" v-model="value"></tinymce-editor>

  </div>

</template>

<script>

import tinymceEditor from "./tinymce.vue";

export default {

  data() {

    return {

      value: ""

    };

  },

  components: {

    tinymceEditor

  }

};

</script>
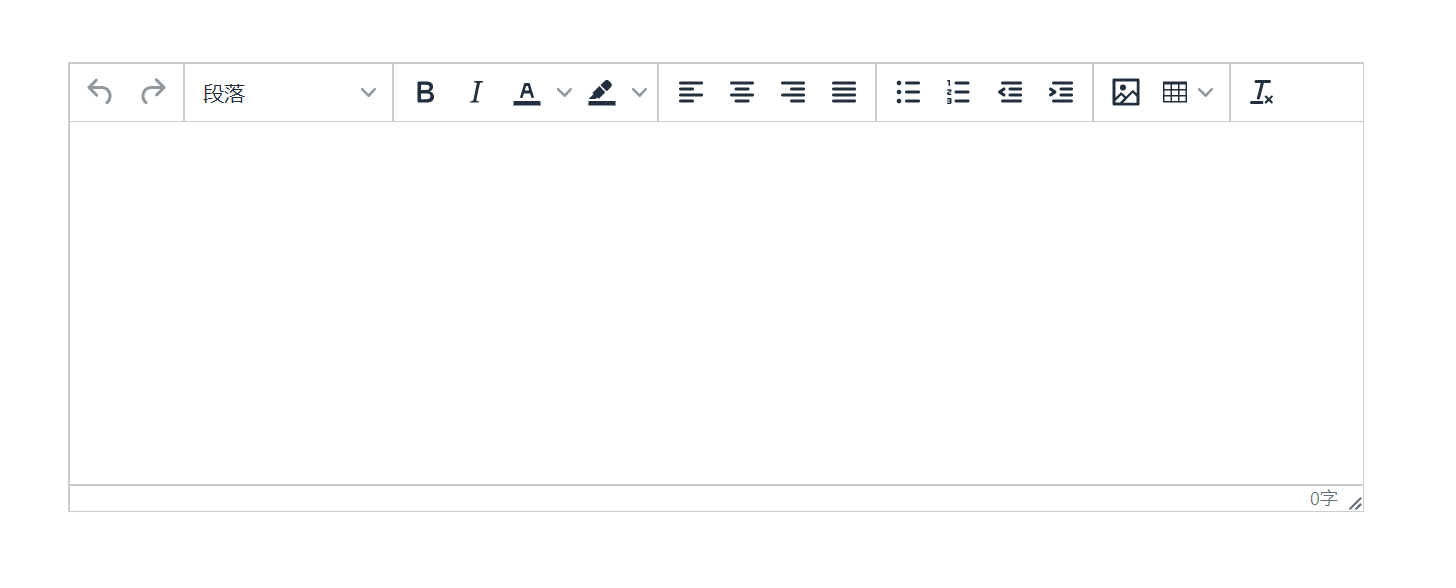
效果图如下
移动端处理富文本参数(图片、长串字母)
        let obj = res.data;    // 假如该参数为富文本内容

        obj.content = obj.content.replace(/<img/g, "<img width='100%'")

        obj.content = obj.content.replace(/[\s;]width:.+?/gi, '')

        obj.content = obj.content.replace(/<img[^>]*?(src="[^"]*?")[^>]*?>/g, '<img $1/>')

        obj.content = obj.content.replace(/\<img/gi, '<img style="max-width:100%;height:auto"')

        obj.content = obj.content.replace(/<p/g, "<p style='word-wrap:break-word'")
Vue tinymce富文本编辑器的更多相关文章
- vue项目富文本编辑器vue-quill-editor之自定义图片上传
使用富文本编辑器的第一步肯定是先安装依赖 npm i vue-quill-editor 1.如果按照官网富文本编辑器中的图片上传是将图片转为base64格式的,如果需要上传图片到自己的服务器,需要修改 ...
- 在 Vue 项目中引入 tinymce 富文本编辑器
项目中原本使用的富文本编辑器是 wangEditor,这是一个很轻量.简洁编辑器 但是公司的业务升级,想要一个功能更全面的编辑器,我找了好久,目前常见的编辑器有这些: UEditor:百度前端的开源项 ...
- vue中引入Tinymce富文本编辑器
最近想在项目上引入一个富文本编辑器,之前引入过summernote,感觉并不太适合vue使用, 然后在网上查了查,vue中使用Tinymce比较适合, 首先,我们在vue项目的components文件 ...
- Vue集成tinymce富文本编辑器并实现本地化指南(2019.11.21最新)
tinymce是一款综合口碑特别好.功能异常强大的富文本编辑器,在某些网站,甚至享有"宇宙最强富文本编辑器"的称号.那么,在Vue项目中如何集成呢?这并不困难,只需要参照官方教程 ...
- tinymce 富文本编辑器 编写资料
tinymce官方文档: 粘贴图片插件 博客搬运地址 使用Blob获取图片并二进制显示实例页面 tinymce自动调整插件 是时候掌握一个富文本编辑器了——TinyMCE(1) XMLHttpRequ ...
- Django使用tinymce富文本编辑器
1 - 安装 pip install django-tinymce==2.6.0 2 - 注册app INSTALLED_APPS = ( ... 'tinymce', ) 3 - 在setting中 ...
- tinymce富文本编辑器整合到django
第一步:定义表存图片路径 models.py class AdminIMG(models.Model): filename = models.CharField(max_length=200, ...
- vue集成百度UEditor富文本编辑器
在前端开发的项目中.难免会遇到需要在页面上集成一个富文本编辑器.那么.如果你有这个需求.希望可以帮助到你 vue是前端开发者所追捧的框架,简单易上手,但是基于vue的富文本编辑器大多数太过于精简.于是 ...
- 前端vue-TinyMCE富文本编辑器表情插件报错解决
最近项目中需要使用文本编辑器,比较了下最终选择了TinyMCE这款富文本编辑器.我安装的是TinyMCE v5但是在使用表情插件的时候,表情一直都出不来,报错信息如下: Uncaught Syntax ...
随机推荐
- tomcat增加内存 JVM内存调优
tomcat总是卡死,查看日志catalina.out 发现疯狂报错 如下,提示内存溢出 java.lang.OutOfMemoryError: Java heap space 此外常见的内存溢出有以 ...
- [转载]理解weight decay
http://blog.sina.com.cn/s/blog_a89e19440102x1el.html
- HDU 2018 DP
A - 母牛的故事 Time Limit:1000MS Memory Limit:32768KB 64bit IO Format:%I64d & %I64u Submit St ...
- 关于macos升级到catalina之后cisco无法使用的问题
最近升级macos到最新的catalina系统,发现cisco的anyconnect用不了了,google了下,发现不是个例,mac提示联系软件开发者更新软件以兼容catalina,这就呵呵了. 于是 ...
- Linux系统WEB服务之Nginx基础入门
一.Nginxi简介 Nginx是什么?它是一个开源.高性能的WEB服务器软件和代理服务器软件,由俄罗斯人Igor Sysoev 开发实现.它的功能主要分三类,第一是它作为一个WEB服务软件使用:第二 ...
- SignalR—实例
本例子将讲述使用SignalR实现页面实时显示数据,而不是需要用户刷新页面或使用Ajax轮询才能实现实时显示数据. 1.使用NuGet安装SignalR. 2.创建Hub类,起名为testHub. 3 ...
- leetcode—js—Add Two Numbers
You are given two non-empty linked lists representing two non-negative integers. The digits are stor ...
- eclipse创建java和web工程
JAVA Eclipse→File→New→Project.. WEB 右键mvn项目→Properties src/main/webapp pom.xml <project xmlns=&qu ...
- VBA-UTF-8文件的操作
1.读入UTF-8文件 Dim value As String Dim vLines As Variant Call ReadCsvUTF_8(vFile.Path, value) vLin ...
- 快速建立使用django_rest_framework
快速建立使用django_rest_framework 测试API 其实djangorestframework就是进行增删改查 前往要注意的是 POST的接口的的URL一定要写完整 包括最后的 `/` ...