基于EventAggregator的事件发布及订阅
EventAggregator简介
EventAggregator是Prism中专门处理ViewModel与ViewModel之间事件传递的类对象,它提供了针对事件的发布方法和订阅方法,所以可以非常方便的来管理事件。下面的图就是其实现的一个比较简便的说明:

下面就以一个比较简单的例子来说明其用法,这里我们就在WPF的一个页面上输入用户信息,然后通过点击按钮,让用户信息在同一个页面上输出。
EventAggregator单页传递数据
首先,新建一个WPF项目,然后安装好Prism,这里我们可以通过程序包管理器控制台安装,待到都安装好以后,我们就可以开始使用了。
其次,创建一个GetInputMessages的类,继承自CompositePresentationEvent<string>方法,由于我们传递的都是String类型的数据,所以这里我采用String类型。这个类不提供任何实现,只需要继承就好了:
using System;

using System.Collections.Generic;

using System.Linq;

using System.Text;

using Microsoft.Practices.Prism.Events;

namespace EventAggregatorPratice

{

    /// <summary>

    /// 自定义的事件,一定要继承自CompositePresentationEvent类,不做任何实现

    /// </summary>

    public class GetInputMessages:CompositePresentationEvent<string>

    {

    }

}
然后,创建EventAggregatorRepository类,这个类主要存储eventAggregator对象并保证其唯一:
using System;

using System.Collections.Generic;

using System.Linq;

using System.Text;

using Microsoft.Practices.Prism.Events;

namespace EventAggregatorPratice

{

    public class EventAggregatorRepository

    {

        public EventAggregatorRepository()

        {

            eventAggregator = new EventAggregator();

        }

        public IEventAggregator eventAggregator;

        public static EventAggregatorRepository eventRepository = null;

        //单例,保持内存唯一实例

        public static EventAggregatorRepository GetInstance()

        {

            if (eventRepository == null)

            {

                eventRepository = new EventAggregatorRepository();

            }

            return eventRepository;

        }

    }

}
最后则是创建EventAggregatorWindow.xaml窗体,然后编写窗体代码:
前台的XAML代码如下:


EventAggregatorWindow.xaml前台布局文件<Window x:Class="EventAggregatorPratice.MainWindow"

        xmlns="http://schemas.microsoft.com/winfx/2006/xaml/presentation"

        xmlns:x="http://schemas.microsoft.com/winfx/2006/xaml"

        Title="测试Event Aggregator的使用方法" Height="" Width="" WindowStartupLocation="CenterScreen" >

    <Grid>

        <Button Content="获取输入" Height="" HorizontalAlignment="Right" Margin="0,291,53,0" Name="button1" VerticalAlignment="Top" Width="" Click="button1_Click" />

        <GroupBox Header="用户信息" Height="" HorizontalAlignment="Left" Margin="12,12,0,0" Name="groupBox1" VerticalAlignment="Top" Width="">

            <Grid>

                <Label Content="用户昵称:" Height="" HorizontalAlignment="Left" Margin="19,18,0,0" Name="label1" VerticalAlignment="Top" />

                <Label Content="用户性别:" Height="" HorizontalAlignment="Left" Margin="19,52,0,0" Name="label2" VerticalAlignment="Top" />

                <Label Content="用户住址:" Height="" HorizontalAlignment="Left" Margin="19,86,0,0" Name="label3" VerticalAlignment="Top" />

                <Label Content="用户年龄:" Height="" HorizontalAlignment="Left" Margin="205,18,0,0" Name="label4" VerticalAlignment="Top" />

                <Label Content="用户电话:" Height="" HorizontalAlignment="Left" Margin="205,52,0,0" Name="label5" VerticalAlignment="Top" />

                <TextBox Height="" HorizontalAlignment="Left" Margin="79,20,0,0" Name="txtNick" VerticalAlignment="Top" Width="" TabIndex="" />

                <TextBox Height="" HorizontalAlignment="Left" Margin="269,54,0,0" Name="txtTel" VerticalAlignment="Top" Width="" TabIndex="" />

                <TextBox Height="" HorizontalAlignment="Left" Margin="79,54,0,0" Name="txtSex" VerticalAlignment="Top" Width="" TabIndex="" />

                <TextBox Height="" HorizontalAlignment="Left" Margin="269,20,0,0" Name="txtAge" VerticalAlignment="Top" Width="" TabIndex="" />

                <TextBox Height="" HorizontalAlignment="Left" Margin="79,88,0,0" Name="txtAddress" VerticalAlignment="Top" Width="" />

                <Border BorderBrush="Black" BorderThickness="" Height="" HorizontalAlignment="Left" Margin="6,117,0,0" Name="border1" VerticalAlignment="Top" Width="" />

                <Label Content="获取输入:" Height="" HorizontalAlignment="Left" Margin="19,124,0,0" Name="label6" VerticalAlignment="Top" />

                <TextBlock Height="" HorizontalAlignment="Left" Margin="79,124,0,0" Name="txtResult" Text="" VerticalAlignment="Top" Width="" Background="#FFF2F2F2" />

            </Grid>

        </GroupBox>

    </Grid>

</Window>
后台的代码如下:
EventAggregatorWindow后台代码using System.Windows;

using Microsoft.Practices.Prism.Events;

using System.Text;

using System;

namespace EventAggregatorPratice

{

    /// <summary>

    /// MainWindow.xaml 的交互逻辑

    /// </summary>

    public partial class MainWindow : Window

    {

        public MainWindow()

        {

            InitializeComponent();

            //订阅事件,一旦有事件引发,将会在这里接住

            SetSubscribe();

        }

        public void SetPublish(string messageData)

        {

            EventAggregatorRepository

                .GetInstance()

                .eventAggregator

                .GetEvent<GetInputMessages>()

                .Publish(messageData);

        }

        public void SetSubscribe()

        {

            EventAggregatorRepository

                .GetInstance()

                .eventAggregator

                .GetEvent<GetInputMessages>()

                .Subscribe(ReceiveMessage,ThreadOption.UIThread,true);

        }

        public void ReceiveMessage(string messageData)

        {

            this.txtResult.Text = messageData;

        }

        private void button1_Click(object sender, RoutedEventArgs e)

        {

            //抛出事件

            StringBuilder strBuilder = new StringBuilder();

            strBuilder.Append("用户昵称:").Append(txtNick.Text).Append(Environment.NewLine);

            strBuilder.Append("用户年龄:").Append(txtAge.Text).Append(Environment.NewLine);

            strBuilder.Append("用户性别:").Append(txtSex.Text).Append(Environment.NewLine);

            strBuilder.Append("用户电话:").Append(txtTel.Text).Append(Environment.NewLine);

            strBuilder.Append("用户住址:").Append(txtAddress.Text).Append(Environment.NewLine);

            SetPublish(strBuilder.ToString());

        }

    }

}
在这里,我来做一下解释:
首先,程序先通过SetSubscribe方法来订阅事件,一旦有事件抛出的时候,SetSubscribe便会利用其ReceiveMessage回调方法处理接收到的事件。
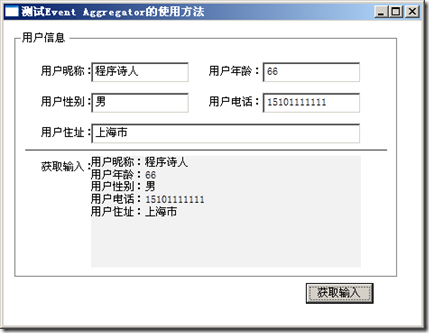
其次,当我们点击按钮的时候,一个SetPublish事件就被抛出了,并且会被SetSubscribe事件接住。效果如图:
其实现流程就如我上图中画的一样,如果你还是不很明白,我们可以利用C#中常见的Delegate来说明。
创建一个DelegateWindow.xaml窗体,窗体的前台代码与上面的一致,后台代码如下:
DelegateWindow后台代码using System;

using System.Collections.Generic;

using System.Linq;

using System.Text;

using System.Windows;

using System.Windows.Controls;

using System.Windows.Data;

using System.Windows.Documents;

using System.Windows.Input;

using System.Windows.Media;

using System.Windows.Media.Imaging;

using System.Windows.Shapes;

namespace EventAggregatorPratice

{

    public delegate void ValueTransferDelegate(string value);

    public partial class DelegateWindow : Window

    {

        public DelegateWindow()

        {

            InitializeComponent();

            //事件注册,一旦检测到有事件抛出,这里就会接住

            publishEvent += (string value) =>

            {

                txtResult.Text = value;

            };

        }

        public event ValueTransferDelegate publishEvent;  //声明代理的事件

        private void button1_Click(object sender, RoutedEventArgs e)

        {

            StringBuilder strBuilder = new StringBuilder();

            strBuilder.Append("用户昵称:").Append(txtNick.Text).Append(Environment.NewLine);

            strBuilder.Append("用户年龄:").Append(txtAge.Text).Append(Environment.NewLine);

            strBuilder.Append("用户性别:").Append(txtSex.Text).Append(Environment.NewLine);

            strBuilder.Append("用户电话:").Append(txtTel.Text).Append(Environment.NewLine);

            strBuilder.Append("用户住址:").Append(txtAddress.Text).Append(Environment.NewLine);

            if (publishEvent != null)

                publishEvent(strBuilder.ToString());  //事件抛出

        }

    }

}
在窗体Init的时候,我们注册了回调事件:
//事件注册,一旦检测到有事件抛出,这里就会接住

 publishEvent += (string value) =>

 {

        txtResult.Text = value;

 };
这段代码就类似于上面的SetSubscribe()方法,都是为了注册回调事件,以便于处理接收到的信息。
然后在点击按钮的时候,我们将事件抛出:
 if (publishEvent != null)

     publishEvent(strBuilder.ToString());  //事件抛出
这段代码就类似于上面的SetPublish(strBuilder.ToString())方法,用于抛出事件.
所以,看到这里,你是不是已经非常的清楚明了了呢?请看效果图:

EventAggregator向子页面传递数据
上面说到的都是单一窗体传值的情况,如果要是传值给子窗体,该如何设计呢?其实,使用方法和上面的示例类似,只不过需要弹出子窗体而已。
首先,在子窗体FormPostUsingEventAggregatorChild.xaml中,我们由于要接收父窗体传入的值,所以这里应该利用SetSubscribe方法来处理回调事件:
using System.Windows;

namespace EventAggregatorPratice

{

    public partial class FormPostUsingEventAggregatorChild : Window

    {

        public FormPostUsingEventAggregatorChild()

        {

            InitializeComponent();

            SetSubscribe();

        }

        public void SetSubscribe()

        {

            EventAggregatorRepository

                .GetInstance()

                .eventAggregator

                .GetEvent<GetInputMessages>()

                .Subscribe((message) =>

                {

                    txtResult.Text = message;

                });

        }

    }

}
而在父窗体FormPostUsingEventAggregator.xaml中,由于要抛出事件,所以我们只需要利用SetPublish抛出事件即可。
using System;

using System.Text;

using System.Windows;

namespace EventAggregatorPratice

{

    public partial class FormPostUsingEventAggregator : Window

    {

        public FormPostUsingEventAggregator()

        {

            InitializeComponent();

        }

        public void SetPublish(string message)

        {

            EventAggregatorRepository

                .GetInstance()

                .eventAggregator

                .GetEvent<GetInputMessages>()

                .Publish(message);

        }

        private void button1_Click(object sender, RoutedEventArgs e)

        {

            //先实例化子窗体

            FormPostUsingEventAggregatorChild child = new FormPostUsingEventAggregatorChild();

            child.Show();

            //然后抛出事件

            StringBuilder strBuilder = new StringBuilder();

            strBuilder.Append("用户昵称:").Append(txtNick.Text).Append(Environment.NewLine);

            strBuilder.Append("用户年龄:").Append(txtAge.Text).Append(Environment.NewLine);

            strBuilder.Append("用户性别:").Append(txtSex.Text).Append(Environment.NewLine);

            strBuilder.Append("用户电话:").Append(txtTel.Text).Append(Environment.NewLine);

            strBuilder.Append("用户住址:").Append(txtAddress.Text).Append(Environment.NewLine);

            SetPublish(strBuilder.ToString());

        }

    }

}
需要说明一下的是,子窗体一定要先显示,然后才能够抛出事件,否则会因为子窗体无法接收事件而导致父窗体抛出的事件丢失。运行效果如下:
父窗体输入:

子窗体接收:

具体的就说到这里了,后续有新的应用,会继续更新。
源码下载
基于EventAggregator的事件发布及订阅的更多相关文章
- WPF EventAggregator(基于EventAggregator的事件发布及订阅)
一.EventAggregator简介 EventAggregator是Prism中专门处理ViewModel与ViewModel之间事件传递的类对象,它提供了针对事件的发布方法和订阅方法,所以可以非 ...
- Dapr实现.Net Grpc服务之间的发布和订阅,并采用WebApi类似的事件订阅方式
大家好,我是失业在家,正在找工作的博主Jerry,找工作之余,总结和整理以前的项目经验,动手写了个洋葱架构(整洁架构)示例解决方案 OnionArch.其目的是为了更好的实现基于DDD(领域驱动分析) ...
- 模块(类)之间解耦利器:EventPublishSubscribeUtils 事件发布订阅工具类
如果熟悉C#语言的小伙伴们一般都会知道委托.事件的好处,只需在某个类中提前定义好公开的委托或事件(委托的特殊表现形式)变量,然后在其它类中就可以很随意的订阅该委托或事件,当委托或事件被触发执行时,会自 ...
- 使用MediatR重构单体应用中的事件发布/订阅
标题:使用MediatR重构单体应用中的事件发布/订阅 作者:Lamond Lu 地址:https://www.cnblogs.com/lwqlun/p/10640280.html 源代码:https ...
- ASP.NET Core中实现单体程序的事件发布/订阅
标题:ASP.NET Core中实现单体程序的事件发布/订阅 作者:Lamond Lu 地址:https://www.cnblogs.com/lwqlun/p/10468058.html 项目源代码: ...
- WPF的EventAggregator的发布和订阅
EventAggregator是Prism中专门处理ViewModel与ViewModel之间事件传递的类对象,它提供了针对事件的发布方法和订阅方法,所以可以非常方便的来管理事件.下面分几步来实现相关 ...
- guava的事件发布订阅功能
事件的重要性,不用说很重要,在很多时候我们做完一个操作的时候,需要告知另外一个对象让他执行相应操作,比如当用户注册成功的时候,需要抛出一个注册成功的事件,那么有监听器捕获到这个事件,完成后续用户信息初 ...
- Blazor+Dapr+K8s微服务之事件发布订阅
我们要实现的是:在blazorweb服务中发布一个事件,并传递事件参数,然后在serviceapi1服务中订阅该事件,接收到blazorweb服务中发布的事件和参数. 1 在blazo ...
- spring#事件发布订阅
1. 如果在应用中发生了某些事件,事件会被拦截和处理就好了,这样就有了很大的灵活性,至少代码不会紧密的耦合在一起, 代码的解耦就是业务的解耦,业务A的代码不用手动的调用业务B的代码,业务B只需要监听相 ...
随机推荐
- C# 零散知识 扩展方法 类型约束
今天看到这么一段代码,我看下面调用了NotifyPropertyChanged定义了两个参数,但是调用的时候只写了一个参数.后来查了下,原来这个是扩展方法的用法, 就是说给T扩展了一个方法Notify ...
- iOS设计模式 - 单例
备注:只能通过类的类方法才能创建单例类的实例,[[类名 alloc]init]创建实例没有用的. 原理图 说明 1. 单例模式人人用过,严格的单例模式很少有人用过 2. 严格的单例模式指的是无法通过常 ...
- Office 2013 激活工具
早上装机,顺便装了下Office 2013,界面还是不错的.网上找了下相关的激活工具. 发现还是独木成林做的最好呀,直接把别人的链接给拿过来好了,下载地址 http://pan.baidu.com/s ...
- java ee 面试时的机试题
写一个简单的用户登录 servlet+jsp+原生ajax+json实现方式: http://pan.baidu.com/s/1jGDY5h0
- 使用网站websequencediagrams在线画时序图
在线画时序图的网站:https://www.websequencediagrams.com/ 该网站提供拖拉图形和编写脚本代码2个方式来制作时序图,同时提供多种显示风格. 实例: 1.脚本代码: ti ...
- MongoDB学习笔记——聚合操作之MapReduce
MapReduce MongoDB中的MapReduce相当于关系数据库中的group by.使用MapReduce要实现两个函数Map和Reduce函数.Map函数调用emit(key,value) ...
- 烂泥:ubuntu安装KVM虚拟机管理virt-manager
本文由秀依林枫提供友情赞助,首发于烂泥行天下. 打算学习KVM的图形界面管理器virt-manager,但是virt-manager只有linux系统的,没有windows下的.所以只能使用linux ...
- oracle创建数据库和用户
以前开发的时候用得比较多的是mysql和sql server,oracle用的比较少,用起来比较生疏,mysql和sql server用起来比较类似,就oracle的使用方式和他们不同,oracle在 ...
- 本地数据下,radiobutton和图片组合,利用adapter+listview进行单选
浮生偷得半日闲,等接口定义的过程中,重新复习下adapter+listview实现单选的方法 主界面 <RelativeLayout xmlns:android="http://sch ...
- #include <NOIP2009 Junior> 细胞分裂 ——using namespace wxl;
题目描述 Hanks 博士是 BT (Bio-Tech,生物技术) 领域的知名专家.现在,他正在为一个细胞实 验做准备工作:培养细胞样本. Hanks 博士手里现在有 N 种细胞,编号从 1~N,一个 ...