MacOS下VUEJS简单入门
微信搜索"艺术行者",关注并回复关键词"vue"获取课程资料
上传的在线学习视频(黑马和传智双元,感谢)
VueJs概述与快速入门
学习之前假设你已了解关于 HTML、CSS 和 JavaScript 的中级知识。如果你刚开始学习前端开发,将框架作为你的第一步可能不是最好的主意——掌握好基础知识再来吧!之前有其它框架的使用经验会有帮助,但这不是必需的。
VueJs介绍
Vue.js是一个构建数据驱动的 web 界面的渐进式框架。Vue.js 的目标是通过尽可能简单的 API 实现响应的数据绑定和组合的视图组件。它不仅易于上手,还便于与第三方库或既有项目整合。
官网
MVVM模式
MVVM是Model-View-ViewModel的简写。它本质上就是MVC 的改进版。MVVM 就是将其中的View 的状态和行为抽象化,让我们将视图 UI 和业务逻辑分开。MVVM模式和MVC模式一样,主要目的是分离视图(View)和模型(Model)。Vue.js 是一个提供了 MVVM 风格的双向数据绑定的 Javascript 库,专注于View 层。它的核心是 MVVM 中的 VM,也就是 ViewModel。 ViewModel负责连接 View 和 Model,保证视图和数据的一致性,这种轻量级的架构让前端开发更加高效、便捷。

VueJS 快速入门
环境搭建
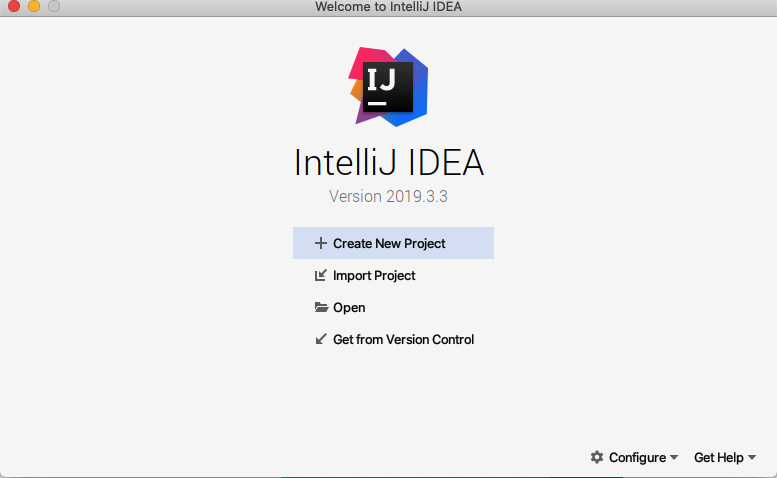
打开IDEA创建新的工程
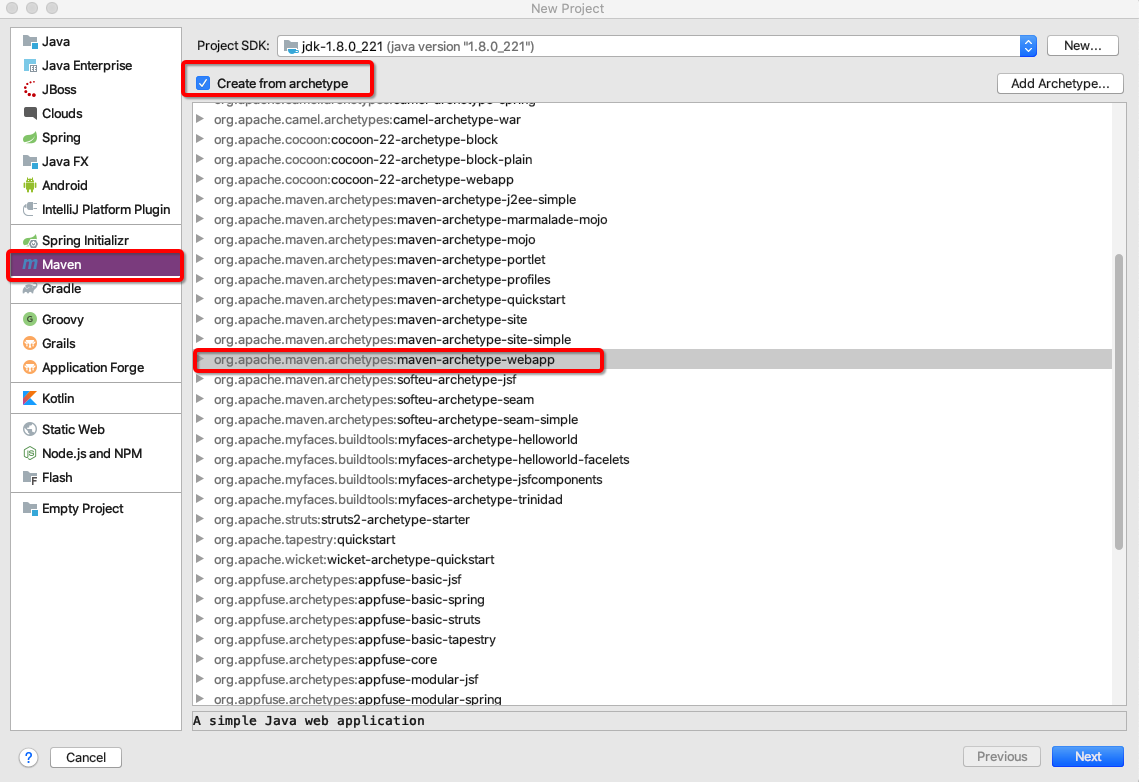
使用Maven骨架创建工程
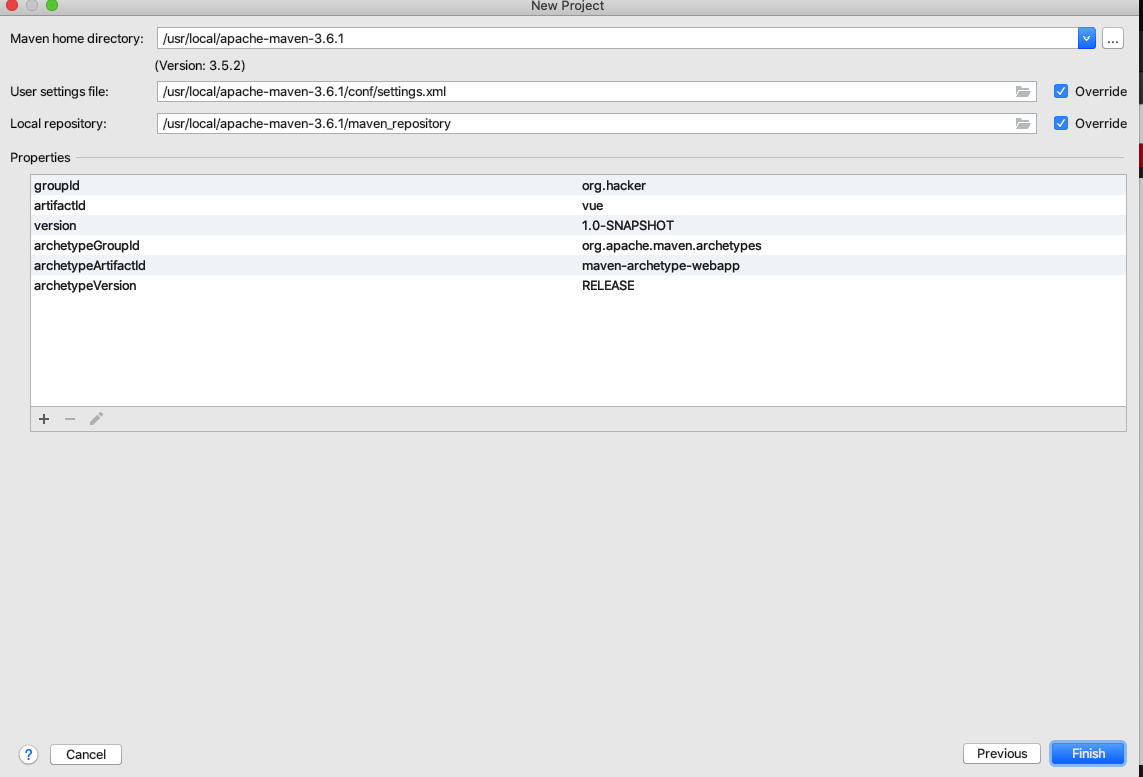
填写工程名称和存放目录

Finish
修改Pom文件
<?xml version="1.0" encoding="UTF-8"?>

<project xmlns="http://maven.apache.org/POM/4.0.0" xmlns:xsi="http://www.w3.org/2001/XMLSchema-instance"

  xsi:schemaLocation="http://maven.apache.org/POM/4.0.0 http://maven.apache.org/xsd/maven-4.0.0.xsd">

  <modelVersion>4.0.0</modelVersion>

  <groupId>org.hacker</groupId>

  <artifactId>vue</artifactId>

  <version>1.0-SNAPSHOT</version>

  <packaging>war</packaging>

  <properties>

    <project.build.sourceEncoding>UTF-8</project.build.sourceEncoding>

    <maven.compiler.source>1.8</maven.compiler.source>

    <maven.compiler.target>1.8</maven.compiler.target>

  </properties>

</project>
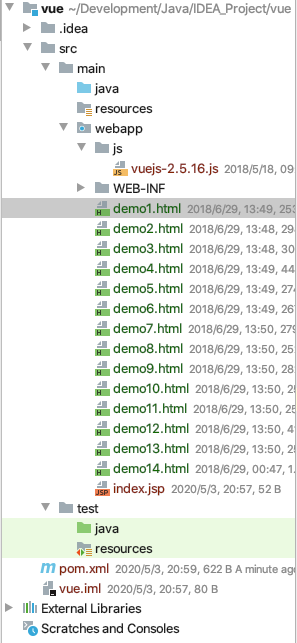
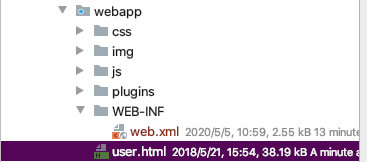
补全工程目录
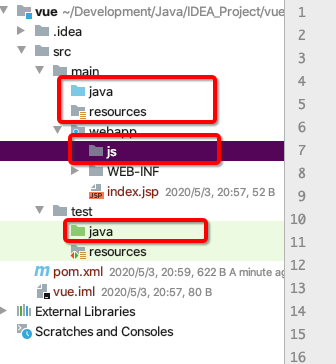
把vuejs文件导入到js目录中,页面导入到webapp下,初期环境准备完毕
编写html文件快速入门
<details>

<summary>快速入门html代码</summary>

<!DOCTYPE html>

<html lang="en">

<head>

    <meta charset="UTF-8">

    <title>快速开始</title>

    <script src="js/vuejs-2.5.16.js"></script>

</head>

<body>

<div id="app">{{message}}</div>

<script>

    new Vue({

        el:'#app',//表示当前vue对象接管了id叫app的div区域

        data:{

            message:'hello vuejs'//注意不要写分号结尾

        }

    });

</script>

</body>

</html>

</details>
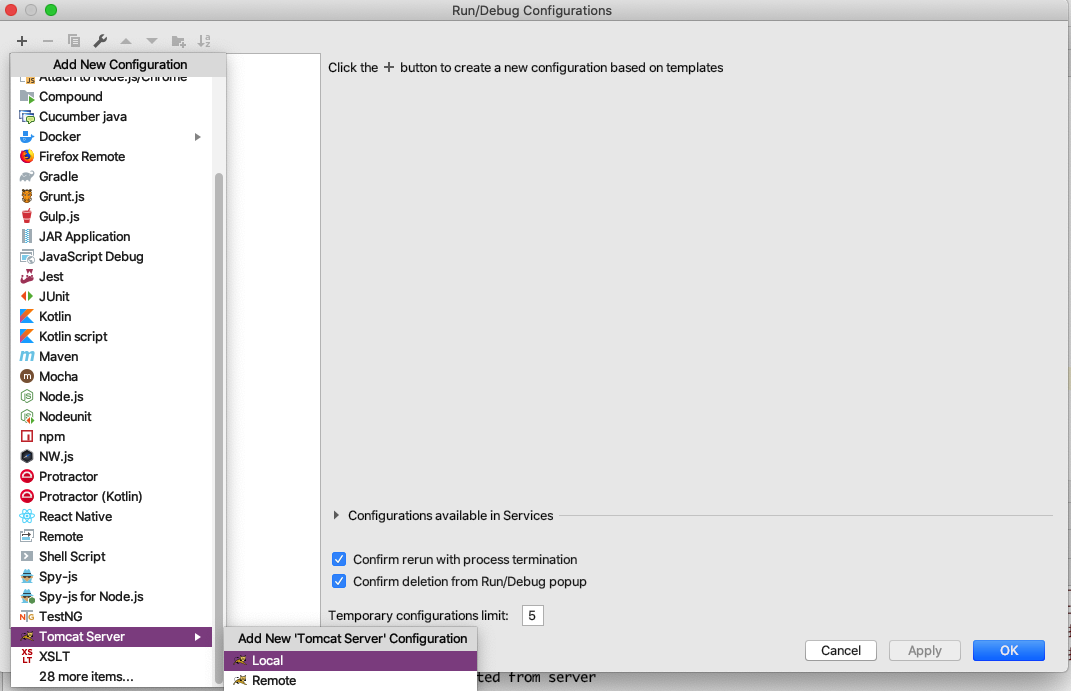
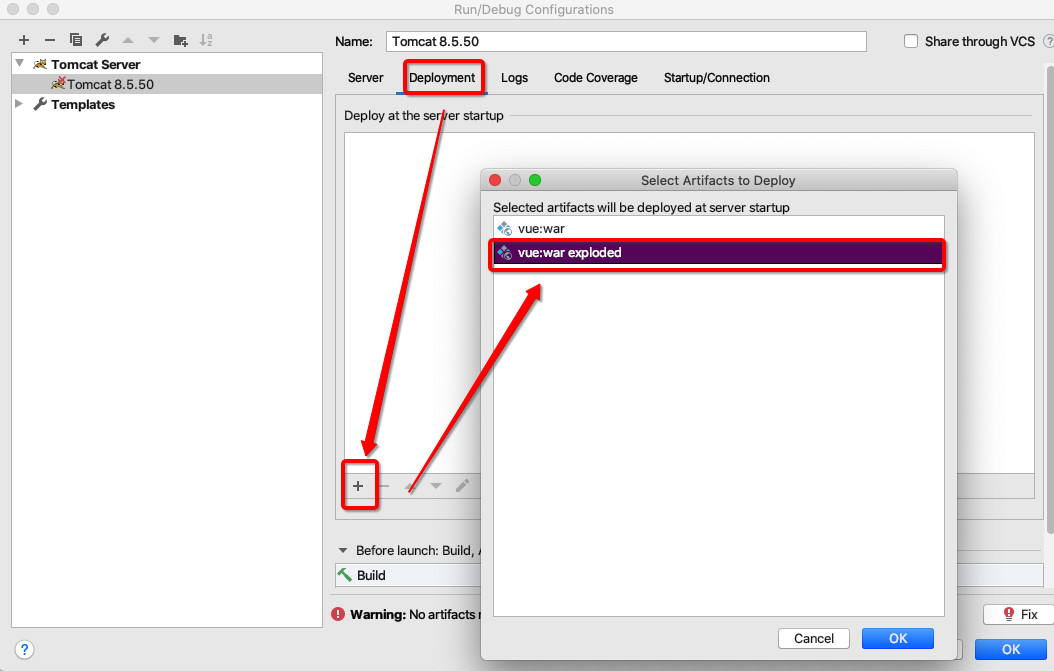
配置tomcat本地服务器并启动

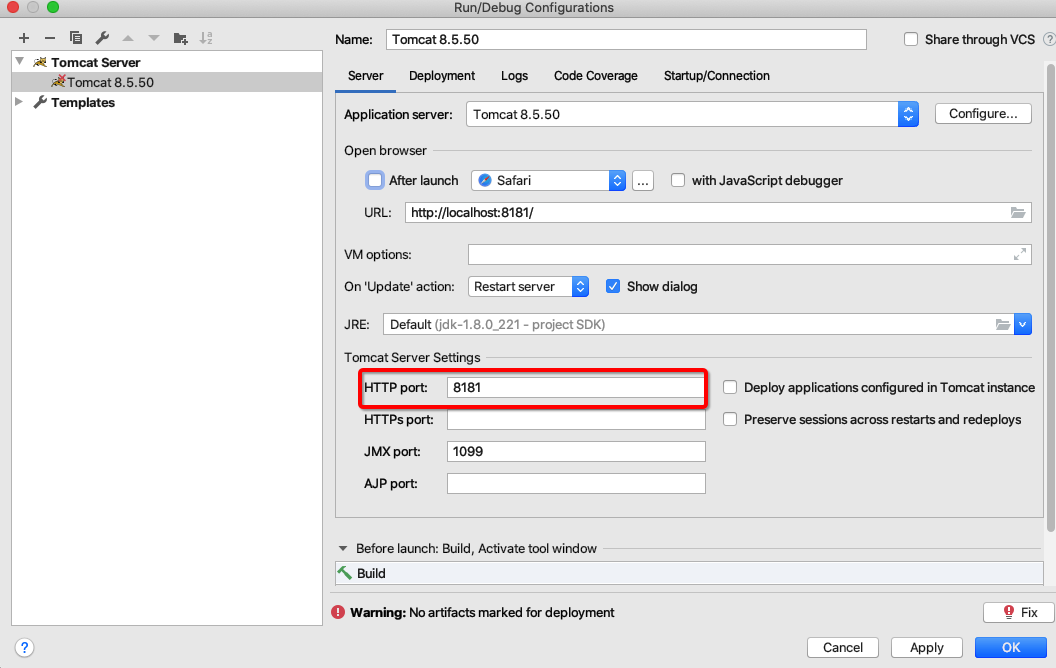
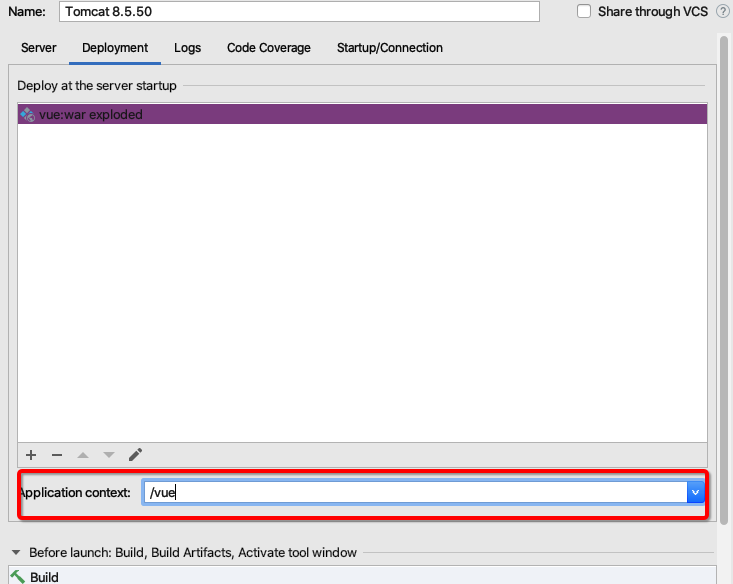
6.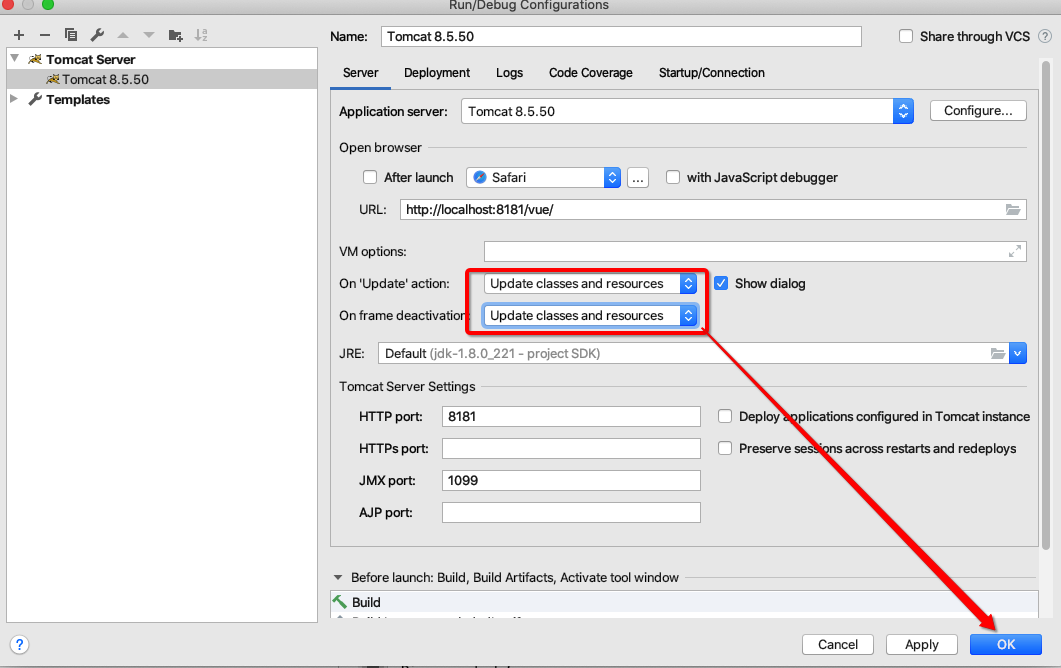
之后打开浏览器地址栏为http://localhost:8181/vue/quickStart.html效果为(注意地址栏要修改为自己写的快速入门的html文件,因为tomcat默认打开index.jsp)

插值表达式
数据绑定最常见的形式就是使用“Mustache”语法 (双大括号) 的文本插值,Mustache 标签将会被替代为对应数据对象上属性的值。无论何时,绑定的数据对象上属性发生了改变,插值处的内容都会更新。v
vue.js 都提供了完全的 JavaScript 表达式支持。
{{ number + 1 }}

{{ ok ? 'YES' : 'NO'}}
这些表达式会在所属 Vue 实例的数据作用域下作为 JavaScript 被解析。有个限制就是,每个绑定都只能包含单个表达式,所以下面的例子都不会生效。
<!-- 这是语句,不是表达式 -->

{{ var a = 1 }}

<!-- 流控制也不会生效,请使用三元表达式 -->

{{ if (ok) { return message } }}
练习代码
<!DOCTYPE html>

<html>

<head>

    <meta charset="utf-8"/>

    <title>快速入门</title>

    <script src="js/vuejs-2.5.16.js"></script>

</head>

<body>

<div id="app">

	{{ message }}

</div>

</body>

<script>

    //view model

    new Vue({

        el: "#app",

        data:{

        message:"Hello Vue!"

        }

    });

</script>

</html>
VueJS 常用系统指令
v-on
可以用v-on指令监听 DOM 事件,并在触发时运行一些 JavaScript 代码
v-on:click
练习
<!DOCTYPE html>

<html>

	<head>

		<meta charset="utf-8" />

		<title>v-on:click</title>

		<script src="js/vuejs-2.5.16.js"></script>

	</head>

	<body>

		<div id="app">

			{{message}}

			<button v-on:click="fun('这是使用vue绑定的单击事件')">vue的onclick</button>

		</div>

	</body>

	<script>

		//view model

		new Vue({

			el:'#app',

			data:{

				message:'Hello world'

			},

			methods:{

				fun:function (msg) {

					this.message = msg;

				}

			}

		});

	</script>

</html>
v-on:keydown
练习
<!DOCTYPE html>

<html>

	<head>

		<meta charset="utf-8" />

		<title>v-on:keydown</title>

		<script src="js/vuejs-2.5.16.js"></script>

	</head>

	<body>

		<div id="app">

			<input type="text" v-on:keydown="fun($event)">

		</div>

	</body>

	<script>

		//view model

		new Vue({

			el:"#app",

			methods:{

				fun:function(event){

					//alert(event.keyCode);

					var keyCode = event.keyCode;

					if(!(keyCode >= 48 && keyCode <= 57)) {

						//2.阻止默认行为执行

						event.preventDefault();

					}

				}

			}

		})

		function showKeyCode(){

			var code = event.keyCode;

			alert(code);

		}

	</script>

</html>
v-on:mouseover
练习
<!DOCTYPE html>

<html>

	<head>

		<meta charset="utf-8" />

		<title>v-on:mouseover</title>

		<style>

			#div {

				background-color: red;

				width: 200px;

				height: 200px;

			}

		</style>

		<script src="js/vuejs-2.5.16.js"></script>

	</head>

	<body>

		<div id="app">

			<div @mouseover="fun1" id="div">

				<textarea @mouseover="fun2($event)">这是一个文件域</textarea>

			</div>

		</div>

	</body>

	<script>

		//view model

		new Vue({

			el:'#app',

			methods:{

				fun1:function () {

					alert("div");

				},

				fun2:function (event) {

					alert("textarea");

					event.stopPropagation();//阻止传播到div

				}

			}

		})

	</script>

</html>
事件修饰符
Vue.js 为 v-on 提供了事件修饰符来处理 DOM 事件细节,如:event.preventDefault() 或event.stopPropagation()。
Vue.js通过由点(.)表示的指令后缀来调用修饰符。
.stop.prevent.capture.self.once
练习
<!DOCTYPE html>

<html>

	<head>

		<meta charset="utf-8" />

		<title>v-on:事件修饰符</title>

		<script src="js/vuejs-2.5.16.js"></script>

	</head>

	<body>

		<div id="app">

<!--			加入.prevent阻止提交-->

			<form  v-on:submit.prevent action="https://www.baidu.com">

				<input type="submit" value="Go"/>

			</form>

//不知道为什么.stop没有作用

			<div v-on:click="fun">

				<a v-on:click.stop href="https://www.baidu.com">baidu</a>

			</div>

		</div>

	</body>

	<script>

		//view model

		new Vue({

			el:'#app',

			methods:{

				fun:function(){

					alert("prevent");

				}

			}

		});

	</script>

</html>
按键修饰符
Vue 允许为 v-on 在监听键盘事件时添加按键修饰符
全部的按键别名:
.enter.tab.delete(捕获 "删除" 和 "退格" 键).esc.space.up.down.left.right.ctrl.alt.shift.meta
练习
不知道为什么没有效果
<!DOCTYPE html>

<html>

<head>

    <meta charset="utf-8"/>

    <title>v-on:按键修饰符</title>

    <script src="js/vuejs-2.5.16.js"></script>

</head>

<body>

<div id="app">

<!--	@等于v-on:-->

    <input type="text" @keydown.enter="fun"/>

</div>

</body>

<script>

    //view model

	new Vue({

		el:'#app',

		methods:{

			fun:function () {

				alert("aaa");

			}

		}

	})

</script>

</html>
v-text与v-html
v-text:将内容原封不动显示
v-html:会将标签解析
练习
<!DOCTYPE html>

<html>

	<head>

		<meta charset="utf-8" />

		<title>v-text与v-html</title>

		<script src="js/vuejs-2.5.16.js"></script>

	</head>

	<body>

		<div id="app">

			<div v-text="message"></div>

			<div v-html="message"></div>

		</div>

	</body>

	<script>

		//view model

		new Vue({

			el:"#app",

			data:{

				message:"<h1>hello vue!</h1>"

			}

		})

	</script>

</html>
v-model
<!DOCTYPE html>

<html>

	<head>

		<meta charset="utf-8" />

		<title>v-model</title>

		<script src="js/vuejs-2.5.16.js"></script>

	</head>

	<body>

		<div id="app">

			用户名:<input type="text" v-model="user.username"/><br/>

			密码:<input type="text" v-model="user.password"><br/>

			<input type="button" @click="fun" value="按钮">

		</div>

	</body>

	<script>

		//view model

		new Vue({

			el:"#app",

			data:{

				user:{

					username:"test",

					password:"123"

				}

			},

			methods:{

				fun:function () {

					this.user.username="java";

					this.user.password="1234";

				}

			}

		})

	</script>

</html>
v-bind
插值语法不能作用在 HTML 特性上,遇到这种情况应该使用 v-bind指令
<!DOCTYPE html>

<html>

	<head>

		<meta charset="utf-8" />

		<title>v-text与v-html在v-bind上的使用</title>

		<script src="js/vuejs-2.5.16.js"></script>

	</head>

	<body>

		<div id="app">

			<font size="5" v-bind:color="ys1">Java</font>

<!--			v-bind等于:-->

			<font siez="5" :color="ys2">web</font>

			<hr/>

			<a :={href:"https://www.baidu.com/index/"+id}>baidu</a>

		</div>

	</body>

	<script>

		//view model

		new Vue({

			el:"#app",

			data:{

				ys1:"red",

				ys2:"green",

				id:1

			}

		})

	</script>

</html>
v-for
(值,键):值在前面,键在后面
操作array
<!DOCTYPE html>

<html>

<head>

    <meta charset="utf-8"/>

    <title>v-for遍历数组</title>

    <script src="js/vuejs-2.5.16.js"></script>

</head>

<body>

<div id="app">

    <ul>

        <li v-for="(value,index) in arr"

        >{{value}} and {{index}}

        </li>

    </ul>

</div>

</body>

<script>

    //view model

	new Vue({

		el:"#app",

		data:{

			arr:['a', 'b', 'c', 'd']

		}

	})

</script>

</html>
操作对象
<!DOCTYPE html>

<html>

	<head>

		<meta charset="utf-8" />

		<title>v-for遍历对象</title>

		<script src="js/vuejs-2.5.16.js"></script>

	</head>

	<body>

		<div id="app">

			<ul>

				<li v-for="(value,key) in product">

					{{key}} and {{value}}

				</li>

			</ul>

		</div>

	</body>

	<script>

		//view model

		new Vue({

			el:"#app",

			data:{

				product:{id:1, name:"phone", price:1000}

			}

		});

	</script>

</html>
操作对象数组
<!DOCTYPE html>

<html>

	<head>

		<meta charset="utf-8" />

		<title>v-for遍历对象</title>

		<script src="js/vuejs-2.5.16.js"></script>

	</head>

	<body>

		<div id="app">

			<table border="1">

				<tr>

					<td>序号</td>

					<td>编号</td>

					<td>名称</td>

					<td>价格</td>

				</tr>

				<tr v-for="(p,index) in products">

					<td>{{index}}</td>

					<td>{{p.id}}</td>

					<td>{{p.name}}</td>

					<td>{{p.price}}</td>

				</tr>

			</table>

		</div>

	</body>

	<script>

		//view model

		new Vue({

			el:"#app",

			data:{

				products:[

					{

						id: '001',

						name: "电视机",

						price: 1000},

					{

						id: "002",

						name: "洗衣机",

						price: 2000}

				]

			}

		})

	</script>

</html>
v-if与v-show
v-if是根据表达式的值来决定是否渲染元素
v-show是根据表达式的值来切换元素的display css属性
<!DOCTYPE html>

<html>

	<head>

		<meta charset="utf-8" />

		<title>v-if与v-show</title>

		<script src="js/vuejs-2.5.16.js"></script>

	</head>

	<body>

		<div id="app">

			<span v-if="flag">hello java</span>

			<span v-show="flag">helle vue</span>

			<button @click="fun">change</button>

		</div>

	</body>

	<script>

		//view model

		new Vue({

			el:"#app",

			data:{

				flag:true

			},

			methods:{

				fun:function () {

					this.flag = !this.flag;

				}

			}

		})

	</script>

</html>
VueJS生命周期
每个 Vue 实例在被创建之前都要经过一系列的初始化过程.
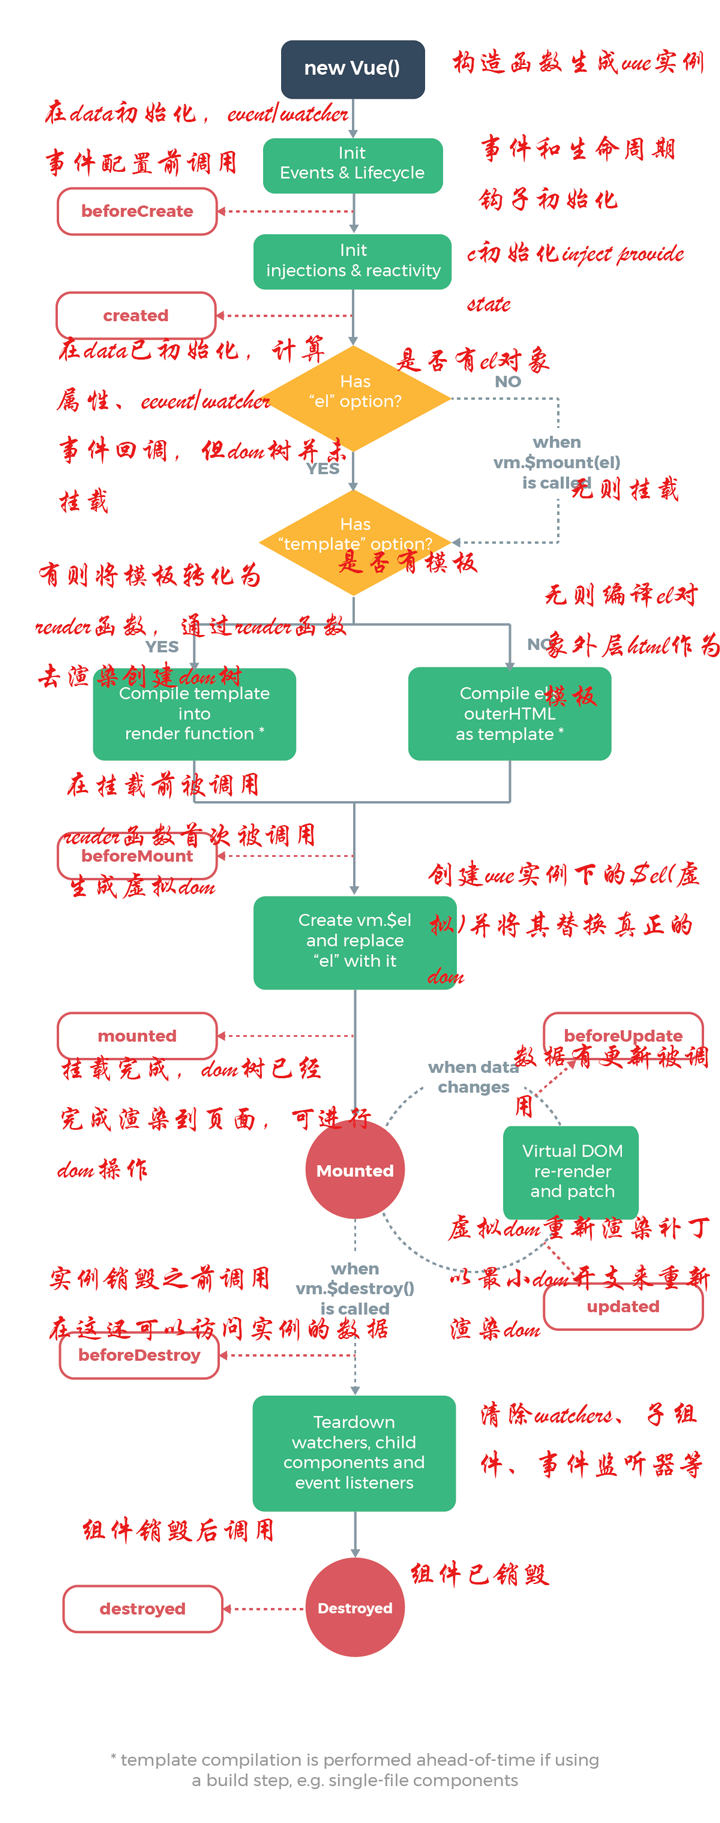
vue在生命周期中有这些状态,beforeCreate,created,beforeMount,mounted,beforeUpdate,updated,beforeDestroy,destroyed。Vue在实例化的过程中,会调用这些生命周期的钩子,给我们提供了执行自定义逻辑的机会。那么,在这些vue钩子中,vue实例到底执行了那些操作,我们先看下面执行的例子
<!DOCTYPE html>

<html>

	<head>

		<meta charset="utf-8" />

		<title>vuejs生命周期</title>

		<script src="js/vuejs-2.5.16.js"></script>

	</head>

	<body>

		<div id="app">

			{{message}}

		</div>

	</body>

	<script>

		var vm = new Vue({

			el: "#app",

			data: {

				message: 'hello world'

			},

			beforeCreate: function() {

				console.log(this);

				showData('创建vue实例前', this);

			},

			created: function() {

				showData('创建vue实例后', this);

			},

			beforeMount: function() {

				showData('挂载到dom前', this);

			},

			mounted: function() {

				showData('挂载到dom后', this);

			},

			beforeUpdate: function() {

				showData('数据变化更新前', this);

			},

			updated: function() {

				showData('数据变化更新后', this);

			},

			beforeDestroy: function() {

				vm.test = "3333";

				showData('vue实例销毁前', this);

			},

			destroyed: function() {

				showData('vue实例销毁后', this);

			}

		});

		function realDom() {

			console.log('真实dom结构:' + document.getElementById('app').innerHTML);

		}

		function showData(process, obj) {

			console.log(process);

			console.log('data 数据:' + obj.message)

			console.log('挂载的对象:')

			console.log(obj.$el)

			realDom();

			console.log('------------------')

			console.log('------------------')

		}

		//vm.message = "good...";

		vm.$destroy();

	</script>

</html>
vue对象初始化过程中,会执行到beforeCreate,created,beforeMount,mounted 这几个钩子的内容
- beforeCreate :数据还没有监听,没有绑定到vue对象实例,同时也没有挂载对象
- created :数据已经绑定到了对象实例,但是还没有挂载对象
- beforeMount: 模板已经编译好了,根据数据和模板已经生成了对应的元素对象,将数据对象关联到了对象的el属性,el属性是一个HTMLElement对象,也就是这个阶段,vue实例通过原生的createElement等方法来创建这个html片段,准备注入到我们vue实例指明的el属性所对应的挂载点
- mounted:将el的内容挂载到了el,相当于我们在jquery执行了(el).html(el),生成页面上真正的dom,上面我们就会发现dom的元素和我们el的元素是一致的。在此之后,我们能够用方法来获取到el元素下的dom对象,并进行各种操作
- 当我们的data发生改变时,会调用beforeUpdate和updated方法
- beforeUpdate :数据更新到dom之前,我们可以看到$el对象已经修改,但是我们页面上dom的数据还没有发生改变
- updated: dom结构会通过虚拟dom的原则,找到需要更新页面dom结构的最小路径,将改变更新到dom上面,完成更新
- beforeDestroy,destroed :实例的销毁,vue实例还是存在的,只是解绑了事件的监听还有watcher对象数据与view的绑定,即数据驱动
VueJS ajax
vue-resource
vue-resource是Vue.js的插件提供了使用XMLHttpRequest或JSONP进行Web请求和处理响应的服务。当vue更新到2.0之后,作者就宣告不再对vue-resource更新,而是推荐的axios,在这里大家了解一下vue-resource就可以。vue-resource的github: https://github.com/pagekit/vue-resource
axios
Axios 是一个基于 promise 的 HTTP 库,可以用在浏览器和 node.js 中
axios的github:https://github.com/axios/axios
引入axios
首先就是引入axios,如果你使用es6,只需要安装axios模块
import axios from 'axios';

//安装方法

npm install axios

//或

bower install axios
当然也可以用script引入
<script src="https://unpkg.com/axios/dist/axios.min.js"></script>
也可以下载到本地,引入本地的js文件
get请求
//通过给定的ID来发送请求

axios.get('/user?ID=12345')

.then(function(response){ //得到的响应

		console.log(response);

})

.catch(function(err){//出错

		console.log(err);

});

//以上请求也可以通过这种方式来发送

axios.get('/user',{params:{ID:12345}})

.then(function(response){

		console.log(response);

})

.catch(function(err){

		console.log(err);

});
post请求
axios.post('/user',{

	firstName:'Fred',

	lastName:'Flintstone'

})

.then(function(res){

	console.log(res);

})

.catch(function(err){

	console.log(err);

})
为方便起见,为所有支持的请求方法提供了别名
axios.request(config)
axios.get(url[, config])
axios.delete(url[, config])
axios.head(url[, config])
axios.post(url[, data[, config]])
axios.put(url[, data[, config]])
axios.patch(url[, data[, config]])
综合案例
案例需求
完成用户的查询与修改操作
数据库设置与表结构
创建数据库和插入数据
DROP TABLE IF EXISTS `user`;

CREATE TABLE `user` (

  `id` int(11) NOT NULL AUTO_INCREMENT,

  `age` int(11) DEFAULT NULL,

  `username` varchar(20) DEFAULT NULL,

  `PASSWORD` varchar(50) DEFAULT NULL,

  `email` varchar(50) DEFAULT NULL,

  `sex` varchar(20) DEFAULT NULL,

  PRIMARY KEY (`id`)

) ENGINE=InnoDB AUTO_INCREMENT=9 DEFAULT CHARSET=utf8;

INSERT INTO `user` VALUES ('1', '33', '张老师', '123', 'zzz@xxx.cn', '男 ');

INSERT INTO `user` VALUES ('2', '31', '刘老师', '123', 'lll@xxx.cn', '女');

INSERT INTO `user` VALUES ('3', '17', '赵工', '213', 'zg@xxx.cn', '女');

INSERT INTO `user` VALUES ('4', '40', '高管', '213', 'gg@xxx.cn', 'female');

INSERT INTO `user` VALUES ('5', '28', '李总', '312', 'lz@jxjt.com', 'male');

INSERT INTO `user` VALUES ('6', '34', '王董', '312', 'wd@jxjt.com', 'male');

INSERT INTO `user` VALUES ('7', '55', '孙老板', '4321', 'slb@xzjt.com', '男');

INSERT INTO `user` VALUES ('8', '19', '陈秘书', '4321', 'cms@xzjt.com', '女');
服务器端
环境搭建和之前的快速入门基本一样
填入配置文件和页面文件
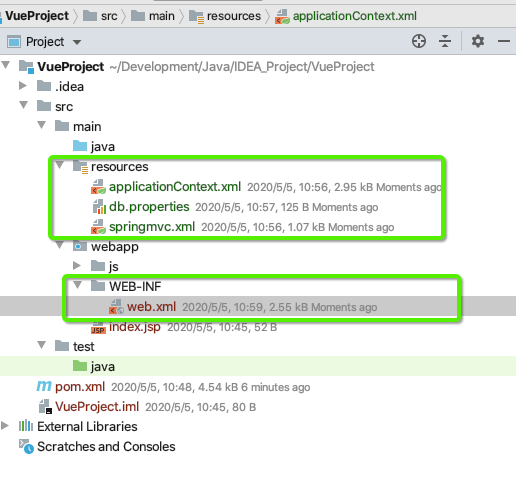
配置文件
resources/applicationContext.xml
<?xml version="1.0" encoding="UTF-8"?>

<beans xmlns="http://www.springframework.org/schema/beans"

       xmlns:xsi="http://www.w3.org/2001/XMLSchema-instance"

       xmlns:aop="http://www.springframework.org/schema/aop"

       xmlns:tx="http://www.springframework.org/schema/tx"

       xmlns:context="http://www.springframework.org/schema/context"

       xsi:schemaLocation="http://www.springframework.org/schema/beans http://www.springframework.org/schema/beans/spring-beans.xsd

                            http://www.springframework.org/schema/tx http://www.springframework.org/schema/tx/spring-tx.xsd

                            http://www.springframework.org/schema/aop http://www.springframework.org/schema/aop/spring-aop.xsd

                            http://www.springframework.org/schema/context http://www.springframework.org/schema/context/spring-context.xsd">

    <!-- 配置 spring 创建容器时要扫描的包 -->

    <context:component-scan base-package="org.hacker">

        <!--制定扫包规则,不扫描@Controller 注解的 JAVA 类,其他的还是要扫描 -->

        <context:exclude-filter type="annotation"

                                expression="org.springframework.stereotype.Controller"/>

    </context:component-scan>

    <!-- 加载配置文件 -->

    <context:property-placeholder location="classpath:db.properties"/>

    <!-- 配置 MyBatis 的 Session 工厂 -->

    <bean id="sqlSessionFactory" class="org.mybatis.spring.SqlSessionFactoryBean">

        <!-- 数据库连接池 -->

        <property name="dataSource" ref="dataSource"/>

    </bean>

    <!-- 配置数据源 -->

    <bean id="dataSource" class="com.mchange.v2.c3p0.ComboPooledDataSource">

        <property name="driverClass" value="${jdbc.driver}"></property>

        <property name="jdbcUrl" value="${jdbc.url}"></property>

        <property name="user" value="${jdbc.username}"></property>

        <property name="password" value="${jdbc.password}"></property>

    </bean>

    <!-- 配置 Mapper 扫描器 -->

    <bean class="org.mybatis.spring.mapper.MapperScannerConfigurer">

        <property name="basePackage" value="org.hacker.dao"/>

    </bean>

    <tx:annotation-driven/>

    <!-- 配置事务管理器 -->

    <bean id="transactionManager" class="org.springframework.jdbc.datasource.DataSourceTransactionManager">

        <property name="dataSource" ref="dataSource"/>

    </bean>

    <!-- 配置事务的通知 -->

    <tx:advice id="txAdvice" transaction-manager="transactionManager">

        <tx:attributes>

            <tx:method name="*" propagation="REQUIRED" read-only="false"/>

            <tx:method name="find*" propagation="SUPPORTS" read-only="true"/>

        </tx:attributes>

    </tx:advice>

    <!-- 配置aop -->

    <aop:config>

        <aop:pointcut expression="execution(* org.hacker.service.impl.*.*(..))" id="pt1"/>

        <aop:advisor advice-ref="txAdvice" pointcut-ref="pt1"/>

    </aop:config>

</beans>
resources/springmvc.xml
<?xml version="1.0" encoding="UTF-8"?>

<beans xmlns="http://www.springframework.org/schema/beans"

       xmlns:mvc="http://www.springframework.org/schema/mvc"

       xmlns:context="http://www.springframework.org/schema/context"

       xmlns:xsi="http://www.w3.org/2001/XMLSchema-instance"

       xsi:schemaLocation="http://www.springframework.org/schema/beans

http://www.springframework.org/schema/beans/spring-beans.xsd

http://www.springframework.org/schema/mvc

http://www.springframework.org/schema/mvc/spring-mvc.xsd

http://www.springframework.org/schema/context

http://www.springframework.org/schema/context/spring-context.xsd">

    <!-- 配置创建 spring 容器要扫描的包 -->

    <context:component-scan base-package="org.hacker">

        <!-- 制定扫包规则 ,只扫描使用@Controller 注解的 JAVA 类 -->

        <context:include-filter type="annotation"

                                expression="org.springframework.stereotype.Controller"/>

    </context:component-scan>

    <mvc:annotation-driven></mvc:annotation-driven>

</beans>
resources/db.properties
jdbc.driver=com.mysql.jdbc.Driver

jdbc.url=jdbc:mysql://localhost:3306/vue

jdbc.username=root

jdbc.password=wangxinxing666
WEB-INF/web.xml
<?xml version="1.0" encoding="UTF-8"?>

<web-app xmlns:xsi="http://www.w3.org/2001/XMLSchema-instance" xmlns="http://java.sun.com/xml/ns/javaee" xsi:schemaLocation="http://java.sun.com/xml/ns/javaee http://java.sun.com/xml/ns/javaee/web-app_2_5.xsd" version="2.5">

  <display-name></display-name>

  <!-- 手动指定 spring 配置文件位置 -->

  <context-param>

    <param-name>contextConfigLocation</param-name>

    <param-value>classpath:applicationContext.xml</param-value>

  </context-param>

  <!-- 配置 spring 提供的监听器,用于启动服务时加载容器 。该间监听器只能加载 WEB-INF 目录中名称为 applicationContext.xml 的配置文件 -->

  <listener>

    <listener-class>

      org.springframework.web.context.ContextLoaderListener

    </listener-class>

  </listener>

  <!-- 配置 spring mvc 的核心控制器 -->

  <servlet>

    <servlet-name>springmvcDispatcherServlet</servlet-name>

    <servlet-class>org.springframework.web.servlet.DispatcherServlet</servlet-class>

    <!-- 配置初始化参数,用于读取 springmvc 的配置文件 -->

    <init-param>

      <param-name>contextConfigLocation</param-name>

      <param-value>classpath:springmvc.xml</param-value>

    </init-param>

    <!-- 配置 servlet 的对象的创建时间点:应用加载时创建。取值只能是非 0 正整数,表示启动顺 序 -->

    <load-on-startup>1</load-on-startup>

  </servlet>

  <servlet-mapping>

    <servlet-name>springmvcDispatcherServlet</servlet-name>

    <url-pattern>*.do</url-pattern>

  </servlet-mapping>

  <!-- 配置 springMVC 编码过滤器 -->

  <filter>

    <filter-name>CharacterEncodingFilter</filter-name>

    <filter-class>org.springframework.web.filter.CharacterEncodingFilter</filter-class>

    <!-- 设置过滤器中的属性值 -->

    <init-param>

      <param-name>encoding</param-name>

      <param-value>UTF-8</param-value>

    </init-param>

    <!-- 启动过滤器 -->

    <init-param>

      <param-name>forceEncoding</param-name>

      <param-value>true</param-value>

    </init-param>

  </filter>

  <!-- 过滤所有请求 -->

  <filter-mapping>

    <filter-name>CharacterEncodingFilter</filter-name>

    <url-pattern>/*</url-pattern>

  </filter-mapping>

  <welcome-file-list>

    <welcome-file>index.html</welcome-file>

    <welcome-file>index.htm</welcome-file>

    <welcome-file>index.jsp</welcome-file>

    <welcome-file>default.html</welcome-file>

    <welcome-file>default.htm</welcome-file>

    <welcome-file>default.jsp</welcome-file>

  </welcome-file-list>

</web-app>
编写User类
目录结构

package org.hacker.domain;

import java.io.Serializable;

/**

 * @author HackerStar

 * @create 2020-05-05 11:02

 */

public class User implements Serializable {

    private Integer id;

    private Integer age;

    private String username;

    private String password;

    private String email;

    private String sex;

    @Override

    public String toString() {

        return "User{" +

                "id=" + id +

                ", age=" + age +

                ", username='" + username + '\'' +

                ", password='" + password + '\'' +

                ", email='" + email + '\'' +

                ", sex='" + sex + '\'' +

                '}';

    }

    public Integer getId() {

        return id;

    }

    public void setId(Integer id) {

        this.id = id;

    }

    public Integer getAge() {

        return age;

    }

    public void setAge(Integer age) {

        this.age = age;

    }

    public String getUsername() {

        return username;

    }

    public void setUsername(String username) {

        this.username = username;

    }

    public String getPassword() {

        return password;

    }

    public void setPassword(String password) {

        this.password = password;

    }

    public String getEmail() {

        return email;

    }

    public void setEmail(String email) {

        this.email = email;

    }

    public String getSex() {

        return sex;

    }

    public void setSex(String sex) {

        this.sex = sex;

    }

}
Controller
package org.hacker.web.controller;

import org.hacker.domain.User;

import org.hacker.service.IUserService;

import org.springframework.beans.factory.annotation.Autowired;

import org.springframework.stereotype.Controller;

import org.springframework.web.bind.annotation.RequestMapping;

import java.util.List;

/**

 * @author HackerStar

 * @create 2020-05-05 11:28

 */

@Controller

@RequestMapping("/user")

public class UserController {

    @Autowired

    private IUserService userService;

    @RequestMapping("/findAll")

    public List<User> findAll() {

        return userService.findAll();

    }

    @RequestMapping("/findById")

    public User findById(Integer id) {

        return userService.findById(id);

    }

    @RequestMapping("/updateUser")

    public void updateUser(User user) {

        userService.updateUser(user);

    }

}
Service
package org.hacker.service.impl;

import org.hacker.dao.IUserDao;

import org.hacker.domain.User;

import org.hacker.service.IUserService;

import org.springframework.beans.factory.annotation.Autowired;

import org.springframework.stereotype.Service;

import java.util.List;

/**

 * @author HackerStar

 * @create 2020-05-05 11:35

 */

@Service

public class UserServiceImpl implements IUserService {

    @Autowired

    private IUserDao userDao;

    @Override

    public List<User> findAll() {

        return userDao.findAll();

    }

    @Override

    public User findById(Integer userID) {

        return userDao.findById(userID);

    }

    @Override

    public void updateUser(User user) {

        userDao.updateUser(user);

    }

}
package org.hacker.service;

import org.hacker.domain.User;

import java.util.List;

/**

 * @author HackerStar

 * @create 2020-05-05 11:06

 */

public interface IUserService {

    List<User> findAll();

    User findById(Integer userID);

    void updateUser(User user);

}
Dao
package org.hacker.dao;

import org.apache.ibatis.annotations.Select;

import org.apache.ibatis.annotations.Update;

import org.hacker.domain.User;

import java.util.List;

/**

 * @author HackerStar

 * @create 2020-05-05 11:37

 */

public interface IUserDao {

    @Select("select * from user")

    List<User> findAll();

    @Select("select * from user where id = #{userId}")

    User findById(Integer id);

    @Update("update user set username=#{username}, password=#{password},age=#{age},sex=#{sex},email=#{email} where id=#{id}")

    void updateUser(User user);

}
编写测试类
package org.hacker.test;

import org.hacker.domain.User;

import org.hacker.service.IUserService;

import org.junit.Test;

import org.junit.runner.RunWith;

import org.springframework.beans.factory.annotation.Autowired;

import org.springframework.test.context.ContextConfiguration;

import org.springframework.test.context.junit4.SpringJUnit4ClassRunner;

import java.util.List;

/**

 * @author HackerStar

 * @create 2020-05-05 11:43

 */

@RunWith(SpringJUnit4ClassRunner.class)

@ContextConfiguration(locations = "classpath:applicationContext.xml")

public class UserTest {

    @Autowired

    private IUserService userService;

    @Test

    public void testFindAll(){

        List<User> users = userService.findAll();

        System.out.println(users);

    }

    @Test

    public void testFindById(){

        User user = userService.findById(1);

        System.out.println(user);

    }

    @Test

    public void testUpdateUser(){

        User user = userService.findById(1);

        user.setUsername("张老师");

        userService.updateUser(user);

    }

}
客户端
这里把主要的精力放在js的编写
user.html页面
修改中资源位置,比如本项目定义的tomcat目录为/vue,各个插件获取时需要到/vue目录下来获取相应的资源,其次在实现findById时,需要开启modal,之后获取数据(使用了findById方法)在小页面获取到原来的信息,之后可以修改内容在点击修改即可修改数据库的内容,此处需要注意定义'修改'标签那里的@click="updateUser"中@click的名字要和user.js中需要实现的功能名字保持一致,其次就是user.js编写时,需要把功能方法先搭建起来(就是只有方法名,内容先不用填写),否则实现了一个功能,虽然代码没错,但是浏览器的console会产生‘没有其他方法’的异常
<!DOCTYPE html>
<html>
<head>
<!-- 页面meta -->
<meta charset="utf-8">
<meta http-equiv="X-UA-Compatible" content="IE=edge">
<title>数据 - AdminLTE2定制版</title>
<meta name="description" content="AdminLTE2定制版">
<meta name="keywords" content="AdminLTE2定制版">
<meta content="width=device-width,initial-scale=1,maximum-scale=1,user-scalable=no" name="viewport">
<script src="https://oss.maxcdn.com/html5shiv/3.7.3/html5shiv.min.js"></script>
<script src="https://oss.maxcdn.com/respond/1.4.2/respond.min.js"></script>
<link rel="stylesheet" href="/vue/plugins/bootstrap/css/bootstrap.min.css">
<link rel="stylesheet" href="/vue/plugins/font-awesome/css/font-awesome.min.css">
<link rel="stylesheet" href="/vue/plugins/ionicons/css/ionicons.min.css">
<link rel="stylesheet" href="/vue/plugins/iCheck/square/blue.css">
<link rel="stylesheet" href="/vue/plugins/morris/morris.css">
<link rel="stylesheet" href="/vue/plugins/jvectormap/jquery-jvectormap-1.2.2.css">
<link rel="stylesheet" href="/vue/plugins/datepicker/datepicker3.css">
<link rel="stylesheet" href="/vue/plugins/daterangepicker/daterangepicker.css">
<link rel="stylesheet" href="/vue/plugins/bootstrap-wysihtml5/bootstrap3-wysihtml5.min.css">
<link rel="stylesheet" href="/vue/plugins/datatables/dataTables.bootstrap.css">
<link rel="stylesheet" href="/vue/plugins/treeTable/jquery.treetable.css">
<link rel="stylesheet" href="/vue/plugins/treeTable/jquery.treetable.theme.default.css">
<link rel="stylesheet" href="/vue/plugins/select2/select2.css">
<link rel="stylesheet" href="/vue/plugins/colorpicker/bootstrap-colorpicker.min.css">
<link rel="stylesheet" href="/vue/plugins/bootstrap-markdown/css/bootstrap-markdown.min.css">
<link rel="stylesheet" href="/vue/plugins/adminLTE/css/AdminLTE.css">
<link rel="stylesheet" href="/vue/plugins/adminLTE/css/skins/_all-skins.min.css">
<link rel="stylesheet" href="/vue/css/style.css">
<link rel="stylesheet" href="/vue/plugins/ionslider/ion.rangeSlider.css">
<link rel="stylesheet" href="/vue/plugins/ionslider/ion.rangeSlider.skinNice.css">
<link rel="stylesheet" href="/vue/plugins/bootstrap-slider/slider.css">
<link rel="stylesheet" href="/vue/plugins/bootstrap-datetimepicker/bootstrap-datetimepicker.css">
</head>
<body class="hold-transition skin-purple sidebar-mini">
<div class="wrapper" id="app">
<!-- 页面头部 -->
<header class="main-header">
<!-- Logo -->
<a href="all-admin-index.html" class="logo">
<!-- mini logo for sidebar mini 50x50 pixels -->
<span class="logo-mini"><b>数据</b></span>
<!-- logo for regular state and mobile devices -->
<span class="logo-lg"><b>数据</b>后台管理</span>
</a>
<!-- Header Navbar: style can be found in header.less -->
<nav class="navbar navbar-static-top">
<!-- Sidebar toggle button-->
<a href="#" class="sidebar-toggle" data-toggle="offcanvas" role="button">
<span class="sr-only">Toggle navigation</span>
</a>
<div class="navbar-custom-menu">
<ul class="nav navbar-nav">
<!-- Messages: style can be found in dropdown.less-->
<li class="dropdown messages-menu">
<a href="#" class="dropdown-toggle" data-toggle="dropdown">
<i class="fa fa-envelope-o"></i>
<span class="label label-success">4</span>
</a>
<ul class="dropdown-menu">
<li class="header">你有4个邮件</li>
<li>
<!-- inner menu: contains the actual data -->
<ul class="menu">
<li>
<!-- start message -->
<a href="#">
<div class="pull-left">
<img src="/vue/img/user2-160x160.jpg" class="img-circle"
alt="User Image">
</div>
<h4>
系统消息
<small><i class="fa fa-clock-o"></i> 5 分钟前</small>
</h4>
<p>欢迎登录系统?</p>
</a>
</li>
<!-- end message -->
<li>
<a href="#">
<div class="pull-left">
<img src="/vue/img/user3-128x128.jpg" class="img-circle"
alt="User Image">
</div>
<h4>
团队消息
<small><i class="fa fa-clock-o"></i> 2 小时前</small>
</h4>
<p>你有新的任务了</p>
</a>
</li>
<li>
<a href="#">
<div class="pull-left">
<img src="/vue/img/user4-128x128.jpg" class="img-circle"
alt="User Image">
</div>
<h4>
Developers
<small><i class="fa fa-clock-o"></i> Today</small>
</h4>
<p>Why not buy a new awesome theme?</p>
</a>
</li>
<li>
<a href="#">
<div class="pull-left">
<img src="/vue/img/user3-128x128.jpg" class="img-circle"
alt="User Image">
</div>
<h4>
Sales Department
<small><i class="fa fa-clock-o"></i> Yesterday</small>
</h4>
<p>Why not buy a new awesome theme?</p>
</a>
</li>
<li>
<a href="#">
<div class="pull-left">
<img src="/vue/img/user4-128x128.jpg" class="img-circle"
alt="User Image">
</div>
<h4>
Reviewers
<small><i class="fa fa-clock-o"></i> 2 days</small>
</h4>
<p>Why not buy a new awesome theme?</p>
</a>
</li>
</ul>
</li>
<li class="footer"><a href="#">See All Messages</a></li>
</ul>
</li>
<!-- Notifications: style can be found in dropdown.less -->
<li class="dropdown notifications-menu">
<a href="#" class="dropdown-toggle" data-toggle="dropdown">
<i class="fa fa-bell-o"></i>
<span class="label label-warning">10</span>
</a>
<ul class="dropdown-menu">
<li class="header">你有10个新消息</li>
<li>
<!-- inner menu: contains the actual data -->
<ul class="menu">
<li>
<a href="#">
<i class="fa fa-users text-aqua"></i> 5 new members joined today
</a>
</li>
<li>
<a href="#">
<i class="fa fa-warning text-yellow"></i> Very long description here that
may not
fit into the page and may cause design problems
</a>
</li>
<li>
<a href="#">
<i class="fa fa-users text-red"></i> 5 new members joined
</a>
</li>
<li>
<a href="#">
<i class="fa fa-shopping-cart text-green"></i> 25 sales made
</a>
</li>
<li>
<a href="#">
<i class="fa fa-user text-red"></i> You changed your username
</a>
</li>
</ul>
</li>
<li class="footer"><a href="#">View all</a></li>
</ul>
</li>
<!-- Tasks: style can be found in dropdown.less -->
<li class="dropdown tasks-menu">
<a href="#" class="dropdown-toggle" data-toggle="dropdown">
<i class="fa fa-flag-o"></i>
<span class="label label-danger">9</span>
</a>
<ul class="dropdown-menu">
<li class="header">你有9个新任务</li>
<li>
<!-- inner menu: contains the actual data -->
<ul class="menu">
<li>
<!-- Task item -->
<a href="#">
<h3>
Design some buttons
<small class="pull-right">20%</small>
</h3>
<div class="progress xs">
<div class="progress-bar progress-bar-aqua" style="width: 20%"
role="progressbar" aria-valuenow="20" aria-valuemin="0"
aria-valuemax="100">
<span class="sr-only">20% Complete</span>
</div>
</div>
</a>
</li>
<!-- end task item -->
<li>
<!-- Task item -->
<a href="#">
<h3>
Create a nice theme
<small class="pull-right">40%</small>
</h3>
<div class="progress xs">
<div class="progress-bar progress-bar-green" style="width: 40%"
role="progressbar" aria-valuenow="20" aria-valuemin="0"
aria-valuemax="100">
<span class="sr-only">40% Complete</span>
</div>
</div>
</a>
</li>
<!-- end task item -->
<li>
<!-- Task item -->
<a href="#">
<h3>
Some task I need to do
<small class="pull-right">60%</small>
</h3>
<div class="progress xs">
<div class="progress-bar progress-bar-red" style="width: 60%"
role="progressbar" aria-valuenow="20" aria-valuemin="0"
aria-valuemax="100">
<span class="sr-only">60% Complete</span>
</div>
</div>
</a>
</li>
<!-- end task item -->
<li>
<!-- Task item -->
<a href="#">
<h3>
Make beautiful transitions
<small class="pull-right">80%</small>
</h3>
<div class="progress xs">
<div class="progress-bar progress-bar-yellow" style="width: 80%"
role="progressbar" aria-valuenow="20" aria-valuemin="0"
aria-valuemax="100">
<span class="sr-only">80% Complete</span>
</div>
</div>
</a>
</li>
<!-- end task item -->
</ul>
</li>
<li class="footer">
<a href="#">View all tasks</a>
</li>
</ul>
</li>
<!-- User Account: style can be found in dropdown.less -->
<li class="dropdown user user-menu">
<a href="#" class="dropdown-toggle" data-toggle="dropdown">
<img src="/vue/img/user2-160x160.jpg" class="user-image" alt="User Image">
<span class="hidden-xs">张猿猿</span>
</a>
<ul class="dropdown-menu">
<!-- User image -->
<li class="user-header">
<img src="/vue/img/user2-160x160.jpg" class="img-circle" alt="User Image">
<p>
张猿猿 - 数据管理员
<small>最后登录 11:20AM</small>
</p>
</li>
<!-- Menu Footer-->
<li class="user-footer">
<div class="pull-left">
<a href="#" class="btn btn-default btn-flat">修改密码</a>
</div>
<div class="pull-right">
<a href="#" class="btn btn-default btn-flat">注销</a>
</div>
</li>
</ul>
</li>
</ul>
</div>
</nav>
</header>
<!-- 页面头部 /-->
<!-- 导航侧栏 -->
<aside class="main-sidebar">
<!-- sidebar: style can be found in sidebar.less -->
<section class="sidebar">
<!-- Sidebar user panel -->
<div class="user-panel">
<div class="pull-left image">
<img src="/vue/img/user2-160x160.jpg" class="img-circle" alt="User Image">
</div>
<div class="pull-left info">
<p>张猿猿</p>
<a href="#"><i class="fa fa-circle text-success"></i> 在线</a>
</div>
</div>
<!-- search form -->
<!--<form action="#" method="get" class="sidebar-form">
<div class="input-group">
<input type="text" name="q" class="form-control" placeholder="搜索...">
<span class="input-group-btn">
<button type="submit" name="search" id="search-btn" class="btn btn-flat"><i class="fa fa-search"></i>
</button>
</span>
</div>
</form>-->
<!-- /.search form -->
<!-- sidebar menu: : style can be found in sidebar.less -->
<ul class="sidebar-menu">
<li class="header">菜单</li>
<li id="admin-index"><a href="all-admin-index.html"><i class="fa fa-dashboard"></i> <span>首页</span></a>
</li>
<!-- 菜单 -->
<li class="treeview">
<a href="#">
<i class="fa fa-folder"></i> <span>用户管理</span>
<span class="pull-right-container">
<i class="fa fa-angle-left pull-right"></i>
</span>
</a>
<ul class="treeview-menu">
<li id="admin-login">
<a href="all-admin-login.html">
<i class="fa fa-circle-o"></i> 查询所有用户
</a>
</li>
</ul>
</li>
<!-- 菜单 /-->
</ul>
</section>
<!-- /.sidebar -->
</aside>
<!-- 导航侧栏 /-->
<!-- 内容区域 -->
<!-- @@master = admin-layout.html-->
<!-- @@block = content -->
<div class="content-wrapper">
<!-- 内容头部 -->
<section class="content-header">
<h1>
数据管理
<small>数据列表</small>
</h1>
<ol class="breadcrumb">
<li><a href="#"><i class="fa fa-dashboard"></i> 首页</a></li>
<li><a href="#">数据管理</a></li>
<li class="active">数据列表</li>
</ol>
</section>
<!-- 内容头部 /-->
<!-- 正文区域 -->
<section class="content">
<!-- .box-body -->
<div class="box box-primary">
<div class="box-header with-border">
<h3 class="box-title">列表</h3>
</div>
<div class="box-body">
<!-- 数据表格 -->
<div class="table-box">
<!--工具栏-->
<div class="pull-left">
<div class="form-group form-inline">
<div class="btn-group">
<button type="button" class="btn btn-default" title="新建"><i
class="fa fa-file-o"></i> 新建
</button>
<button type="button" class="btn btn-default" title="删除"><i
class="fa fa-trash-o"></i> 删除
</button>
<button type="button" class="btn btn-default" title="开启"><i class="fa fa-check"></i>
开启
</button>
<button type="button" class="btn btn-default" title="屏蔽"><i class="fa fa-ban"></i>
屏蔽
</button>
<button type="button" class="btn btn-default" title="刷新"><i
class="fa fa-refresh"></i> 刷新
</button>
</div>
</div>
</div>
<div class="box-tools pull-right">
<div class="has-feedback">
<input type="text" class="form-control input-sm" placeholder="搜索">
<span class="glyphicon glyphicon-search form-control-feedback"></span>
</div>
</div>
<!--工具栏/-->
<!--数据列表-->
<table id="dataList" class="table table-bordered table-striped table-hover dataTable">
<thead>
<tr>
<th class="" style="padding-right:0px;">
<input id="selall" type="checkbox" class="icheckbox_square-blue">
</th>
<th class="sorting_asc">ID</th>
<th class="sorting_desc">用户名</th>
<th class="sorting_asc sorting_asc_disabled">密码</th>
<th class="sorting_desc sorting_desc_disabled">性别</th>
<th class="sorting">年龄</th>
<th class="text-center sorting">邮箱</th>
<th class="text-center">操作</th>
</tr>
</thead>
<tbody>
<tr v-for="u in userList">
<td><input name="ids" type="checkbox"></td>
<td>{{u.id}}</td>
<td>{{u.username}}
</td>
<td>{{u.password}}</td>
<td>{{u.sex}}</td>
<td>{{u.age}}</td>
<td class="text-center">{{u.email}}</td>
<td class="text-center">
<button type="button" class="btn bg-olive btn-xs">详情</button>
<button type="button" class="btn bg-olive btn-xs" @click="findById(u.id)">编辑
</button>
</td>
</tr>
</tbody>
<!--模态窗口-->
<div class="tab-pane" id="tab-model">
<div id="myModal" class="modal modal-primary" role="dialog">
<div class="modal-dialog modal-lg">
<div class="modal-content">
<div class="modal-header">
<button type="button" class="close" data-dismiss="modal"
aria-label="Close">
<span aria-hidden="true">×</span></button>
<h4 class="modal-title">用户信息</h4>
</div>
<div class="modal-body">
<div class="box-body">
<div class="form-horizontal">
<div class="form-group">
<label class="col-sm-2 control-label">用户名:</label>
<div class="col-sm-5">
<input type="text" class="form-control"
v-model="user.username">
</div>
</div>
<div class="form-group">
<label class="col-sm-2 control-label">密码:</label>
<div class="col-sm-5">
<input type="text" class="form-control"
v-model="user.password">
</div>
</div>
<div class="form-group">
<label class="col-sm-2 control-label">性别:</label>
<div class="col-sm-5">
<input type="text" class="form-control"
v-model="user.sex">
</div>
</div>
<div class="form-group">
<label class="col-sm-2 control-label">年龄:</label>
<div class="col-sm-5">
<input type="text" class="form-control"
v-model="user.age">
</div>
</div>
<div class="form-group">
<label class="col-sm-2 control-label">邮箱:</label>
<div class="col-sm-5">
<input type="text" class="form-control"
v-model="user.email">
</div>
</div>
</div>
</div>
</div>
<div class="modal-footer">
<button type="button" class="btn btn-outline" data-dismiss="modal">关闭
</button>
<button type="button" class="btn btn-outline" data-dismiss="modal"
@click="updateUser">修改
</button>
</div>
</div>
<!-- /.modal-content -->
</div>
<!-- /.modal-dialog -->
</div>
<!-- /.modal -->
</div>
<!--模态窗口/-->
</table>
<!--数据列表/-->
<!--工具栏-->
<div class="pull-left">
<div class="form-group form-inline">
<div class="btn-group">
<button type="button" class="btn btn-default" title="新建"><i
class="fa fa-file-o"></i> 新建
</button>
<button type="button" class="btn btn-default" title="删除"><i
class="fa fa-trash-o"></i> 删除
</button>
<button type="button" class="btn btn-default" title="开启"><i class="fa fa-check"></i>
开启
</button>
<button type="button" class="btn btn-default" title="屏蔽"><i class="fa fa-ban"></i>
屏蔽
</button>
<button type="button" class="btn btn-default" title="刷新"><i
class="fa fa-refresh"></i> 刷新
</button>
</div>
</div>
</div>
<div class="box-tools pull-right">
<div class="has-feedback">
<input type="text" class="form-control input-sm" placeholder="搜索">
<span class="glyphicon glyphicon-search form-control-feedback"></span>
</div>
</div>
<!--工具栏/-->
</div>
<!-- 数据表格 /-->
</div>
<!-- /.box-body -->
<!-- .box-footer-->
<div class="box-footer">
<div class="pull-left">
<div class="form-group form-inline">
总共2 页,共14 条数据。 每页
<select class="form-control">
<option>1</option>
<option>2</option>
<option>3</option>
<option>4</option>
<option>5</option>
</select> 条
</div>
</div>
<div class="box-tools pull-right">
<ul class="pagination">
<li>
<a href="#" aria-label="Previous">首页</a>
</li>
<li><a href="#">上一页</a></li>
<li><a href="#">1</a></li>
<li><a href="#">2</a></li>
<li><a href="#">3</a></li>
<li><a href="#">4</a></li>
<li><a href="#">5</a></li>
<li><a href="#">下一页</a></li>
<li>
<a href="#" aria-label="Next">尾页</a>
</li>
</ul>
</div>
</div>
<!-- /.box-footer-->
</div>
</section>
<!-- 正文区域 /-->
</div>
<!-- @@close -->
<!-- 内容区域 /-->
<!-- 底部导航 -->
<footer class="main-footer">
<div class="pull-right hidden-xs">
<b>Version</b> 1.0.8
</div>
<strong>Copyright © 2014-2017 <a href="#">项目练习</a>.</strong> All rights reserved.
</footer>
<!-- 底部导航 /-->
</div>
<script src="/vue/plugins/jQuery/jquery-2.2.3.min.js"></script>
<script src="/vue/plugins/jQueryUI/jquery-ui.min.js"></script>
<script>
$.widget.bridge('uibutton', $.ui.button);
</script>
<script src="/vue/plugins/bootstrap/js/bootstrap.min.js"></script>
<script src="/vue/plugins/raphael/raphael-min.js"></script>
<script src="/vue/plugins/morris/morris.min.js"></script>
<script src="/vue/plugins/sparkline/jquery.sparkline.min.js"></script>
<script src="/vue/plugins/jvectormap/jquery-jvectormap-1.2.2.min.js"></script>
<script src="/vue/plugins/jvectormap/jquery-jvectormap-world-mill-en.js"></script>
<script src="/vue/plugins/knob/jquery.knob.js"></script>
<script src="/vue/plugins/daterangepicker/moment.min.js"></script>
<script src="/vue/plugins/daterangepicker/daterangepicker.js"></script>
<script src="/vue/plugins/daterangepicker/daterangepicker.zh-CN.js"></script>
<script src="/vue/plugins/datepicker/bootstrap-datepicker.js"></script>
<script src="/vue/plugins/datepicker/locales/bootstrap-datepicker.zh-CN.js"></script>
<script src="/vue/plugins/bootstrap-wysihtml5/bootstrap3-wysihtml5.all.min.js"></script>
<script src="/vue/plugins/slimScroll/jquery.slimscroll.min.js"></script>
<script src="/vue/plugins/fastclick/fastclick.js"></script>
<script src="/vue/plugins/iCheck/icheck.min.js"></script>
<script src="/vue/plugins/adminLTE/js/app.min.js"></script>
<script src="/vue/plugins/treeTable/jquery.treetable.js"></script>
<script src="/vue/plugins/select2/select2.full.min.js"></script>
<script src="/vue/plugins/colorpicker/bootstrap-colorpicker.min.js"></script>
<script src="/vue/plugins/bootstrap-wysihtml5/bootstrap-wysihtml5.zh-CN.js"></script>
<script src="/vue/plugins/bootstrap-markdown/js/bootstrap-markdown.js"></script>
<script src="/vue/plugins/bootstrap-markdown/locale/bootstrap-markdown.zh.js"></script>
<script src="/vue/plugins/bootstrap-markdown/js/markdown.js"></script>
<script src="/vue/plugins/bootstrap-markdown/js/to-markdown.js"></script>
<script src="/vue/plugins/ckeditor/ckeditor.js"></script>
<script src="/vue/plugins/input-mask/jquery.inputmask.js"></script>
<script src="/vue/plugins/input-mask/jquery.inputmask.date.extensions.js"></script>
<script src="/vue/plugins/input-mask/jquery.inputmask.extensions.js"></script>
<script src="/vue/plugins/datatables/jquery.dataTables.min.js"></script>
<script src="/vue/plugins/datatables/dataTables.bootstrap.min.js"></script>
<script src="/vue/plugins/chartjs/Chart.min.js"></script>
<script src="/vue/plugins/flot/jquery.flot.min.js"></script>
<script src="/vue/plugins/flot/jquery.flot.resize.min.js"></script>
<script src="/vue/plugins/flot/jquery.flot.pie.min.js"></script>
<script src="/vue/plugins/flot/jquery.flot.categories.min.js"></script>
<script src="/vue/plugins/ionslider/ion.rangeSlider.min.js"></script>
<script src="/vue/plugins/bootstrap-slider/bootstrap-slider.js"></script>
<script src="/vue/plugins/bootstrap-datetimepicker/bootstrap-datetimepicker.js"></script>
<script src="/vue/plugins/bootstrap-datetimepicker/locales/bootstrap-datetimepicker.zh-CN.js"></script>
<script src="/vue/js/vuejs-2.5.16.js"></script>
<script src="/vue/js/axios-0.18.0.js"></script>
<script src="/vue/js/user.js"></script>
<script>
$(document).ready(function () {
// 选择框
$(".select2").select2();
// WYSIHTML5编辑器
$(".textarea").wysihtml5({
locale: 'zh-CN'
});
});
// 设置激活菜单
function setSidebarActive(tagUri) {
var liObj = $("#" + tagUri);
if (liObj.length > 0) {
liObj.parent().parent().addClass("active");
liObj.addClass("active");
}
}
$(document).ready(function () {
// 激活导航位置
setSidebarActive("admin-datalist");
// 列表按钮
$("#dataList td input[type='checkbox']").iCheck({
checkboxClass: 'icheckbox_square-blue',
increaseArea: '20%'
});
// 全选操作
$("#selall").click(function () {
var clicks = $(this).is(':checked');
if (!clicks) {
$("#dataList td input[type='checkbox']").iCheck("uncheck");
} else {
$("#dataList td input[type='checkbox']").iCheck("check");
}
$(this).data("clicks", !clicks);
});
});
</script>
</body>
</html>
user.js页面
功能一个一个的实现,首先编写findAll,测试,之后findById,测试,之后updateUser,测试
new Vue({

    el: "#app",

    data: {

        user: {

            is: '',

            username: '',

            password: '',

            email: '',

            age: '',

            sex: ''

        },

        userList: []

    },

    methods: {

        findAll: function () {

            var _this = this;//定义this为vue对象,如果在axios中定义则是axios对象

            axios.get(

                '/vue/user/findAll.do'

            )

                .then(function (response) {//需要在controller里加上@ResponseBody,直接加在类上就不用在每个需要加的方法上加了

                    _this.userList = response.data;//响应数据给userList(上边定义了userList)赋值

                    console.log(response);

                })

                .catch(function (erroe) {

                    console.log(error);

                })

        },

        findById: function (userId) {

            var _this = this;//定义this为vue对象,如果在axios中定义则是axios对象

            axios.get('/vue/user/findById.do', {params:{id:userId}})

                .then(function (response) {//需要在controller里加上@ResponseBody,直接加在类上就不用在每个需要加的方法上加了

                    _this.user = response.data;//响应数据给user(上边定义了user)

                    $("#myModal").modal("show");//开启编辑修改功能

                })

                .catch(function (error) {

                    console.log(error);

                })

        },

        updateUser: function (user) {//post请求

            var _this = this;//定义this为vue对象,如果在axios中定义则是axios对象

            axios.post('/vue/user/updateUser.do', _this.user)//需要在controller里的updataUser的参数类型前加上@RequsetBody

                .then(function (response) {

                    _this.findAll();

                })

                .catch(function (error) {

                    console.log(error);

                })

        }

    },

    created: function () {//当页面加载时触发请求来查询所有

        this.findAll();

    }

});
结果

MacOS下VUEJS简单入门的更多相关文章
- MacOS SVN简单入门
背景:MacOS内置了SVN的客户端和服务器端的软件,下边所使用到的目录需要结合自己电脑的具体情况进行设置,并不是很困难. MacOS SVN简单入门 第一部分,创建本地的SVN测试仓库,并修改相应的 ...
- macOS 下使用命令行进行用户(组)管理,就是这么简单! dscl 你很有必要了解一下!!
大家好,我是@小猿来也... Command-line interface to Directory Services. 在 linux 系统中我们习惯了使用 useradd,userdel,user ...
- 用IntelliJ IDEA创建Gradle项目简单入门
Gradle和Maven一样,是Java用得最多的构建工具之一,在Maven之前,解决jar包引用的问题真是令人抓狂,有了Maven后日子就好过起来了,而现在又有了Gradle,Maven有的功能它都 ...
- [原创]MYSQL的简单入门
MYSQL简单入门: 查询库名称:show databases; information_schema mysql test 2:创建库 create database 库名 DEFAULT CHAR ...
- Okio 1.9简单入门
Okio 1.9简单入门 Okio库是由square公司开发的,补充了java.io和java.nio的不足,更加方便,快速的访问.存储和处理你的数据.而OkHttp的底层也使用该库作为支持. 该库极 ...
- emacs最简单入门,只要10分钟
macs最简单入门,只要10分钟 windwiny @2013 无聊的时候又看到鼓吹emacs的文章,以前也有几次想尝试,结果都是玩不到10分钟就退出删除了. 这次硬着头皮,打开几篇文章都看完 ...
- 【java开发系列】—— spring简单入门示例
1 JDK安装 2 Struts2简单入门示例 前言 作为入门级的记录帖,没有过多的技术含量,简单的搭建配置框架而已.这次讲到spring,这个应该是SSH中的重量级框架,它主要包含两个内容:控制反转 ...
- git简单入门
git简单入门 标签(空格分隔): git git是作为程序员必备的技能.在这里就不去介绍版本控制和git产生的历史了. 首先看看常用的git命令: git init git add git comm ...
- Windows下FFmpeg高速入门
本系列文章导航 Windows下FFmpeg高速入门 ffmpeg參数解释 mencoder和ffmpeg參数具体解释(Java处理视频) Java 生成视频缩略图(ffmpeg) 使用ffmpeg进 ...
随机推荐
- 多核CPU硬件架构介绍
转自:http://book.51cto.com/art/201004/197196.htm SISD.MIMD.SIMD.MISD计算机的体系结构 1. 计算平台介绍 Flynn于1972年提出了计 ...
- 从别人的代码中学习golang系列--02
这篇博客还是整理从https://github.com/LyricTian/gin-admin 这个项目中学习的golang相关知识 作者在项目中使用了https://github.com/googl ...
- File and Code Templates IN IDEA
File and Code Templates (文件代码模板) 如何自定义设置头文件的注释,其中包括一些作者和文件创建时间和版本的设置 先打开File->Settings(或Alt+Ctrl+ ...
- 内存节省到极致!!!Redis中的压缩表,值得了解...
redis源码分析系列文章 [Redis源码系列]在Liunx安装和常见API 为什么要从Redis源码分析 String底层实现——动态字符串SDS 双向链表都不懂,还说懂Redis? 面试官:说说 ...
- 11.unity3d 摄像机快速定位到Scene视角
选中Camera,比如Main Camera摄像机,在菜单选择GameObject->Align With View就可以了.如下图所示,参照前三步操作,第4步是最终效果.
- Jetbranis学习资料之全家桶
相信很多小伙伴,用的代码编辑器很多都是Jetbrains的,但好东西不可能免费的,而且找了很多激活码都是失效总是莫名其妙的就过期了.下面分享一个不错的激活码地址,比其他的应该更加可靠.本人实测目前支持 ...
- scala 数据结构(三):元组Tuple
1 元组Tuple-元组的基本使用 基本介绍 元组也是可以理解为一个容器,可以存放各种相同或不同类型的数据. 说的简单点,就是将多个无关的数据封装为一个整体,称为元组, 最多的特点灵活,对数据没有过多 ...
- 数据可视化之powerBI入门 (一)认识PowerBI
来自 https://zhuanlan.zhihu.com/p/64144024 Power BI是什么? Power BI是微软推出的数据分析和可视化工具,我们先来看看微软官方是怎么介绍的: Po ...
- How to start MySQL on Linux
启动MySQL数据库 service mysql start 查看MySQL进程 ps -ef |grep mysql 查看MySQL端口号 cd /etc/init.d/ netstat -atnp ...
- 使用位运算、值交换等方式反转java字符串-共四种方法
在本文中,我们将向您展示几种在Java中将String类型的字符串字母倒序的几种方法. StringBuilder(str).reverse() char[]循环与值交换 byte循环与值交换 apa ...