
WPF中的PathAnimation(路径动画)
WPF中的PathAnimation(路径动画)
周银辉
在WPF中我们可以指定元素按照某一路径运动而形成动画,这称之为路径动画,在SDK中你会发现以[Type]AnimationUsingPath这种形式命名的类,它们就是用来创建路径动画的,其中[Type]表示一系列类型比如double,point等,这与DoubleAnimation等的命名方式一致。
为对路径动画有一个大体上的认识,你可以粘贴下面的代码到XamlPad:
 <Window xmlns="http://schemas.microsoft.com/winfx/2006/xaml/presentation" xmlns:x="http://schemas.microsoft.com/winfx/2006/xaml" x:Name="Window" Title="Window1" Width="640" Height="480"> <Window.Resources> <Storyboard x:Key="Timeline1" RepeatBehavior = "Forever" AutoReverse="True"> <DoubleAnimationUsingPath BeginTime="00:00:00" Duration="00:00:02" Storyboard.TargetName="button" Storyboard.TargetProperty="(UIElement.RenderTransform).(TransformGroup.Children)[3].(TranslateTransform.X)" Source="X"> <DoubleAnimationUsingPath.PathGeometry> <PathGeometry Figures="M-68,149.00022 C-39.695816,109.3744 -17.383496,83.397528 39,74.000287 C73.433618,68.261356 91.198465,71.210009 125,89.000273 C157.86626,106.29829 181.01028,123.79991 204,155.00021 C213.7418,168.22121 224.03351,180.96708 234,194.00017 C246.07551,209.79121 257.36571,220.41957 275,231.00014 C285.57406,237.34456 295.83653,242.84775 307,248.00012 C317.8183,252.99318 324.46505,252.89547 337,252.00012 C362.92461,250.14836 384.46844,240.41978 404,225.00014"/> </DoubleAnimationUsingPath.PathGeometry> </DoubleAnimationUsingPath> <DoubleAnimationUsingPath BeginTime="00:00:00" Duration="00:00:02" Storyboard.TargetName="button" Storyboard.TargetProperty="(UIElement.RenderTransform).(TransformGroup.Children)[3].(TranslateTransform.Y)" Source="Y"> <DoubleAnimationUsingPath.PathGeometry> <PathGeometry Figures="M-68,149.00022 C-39.695816,109.3744 -17.383496,83.397528 39,74.000287 C73.433618,68.261356 91.198465,71.210009 125,89.000273 C157.86626,106.29829 181.01028,123.79991 204,155.00021 C213.7418,168.22121 224.03351,180.96708 234,194.00017 C246.07551,209.79121 257.36571,220.41957 275,231.00014 C285.57406,237.34456 295.83653,242.84775 307,248.00012 C317.8183,252.99318 324.46505,252.89547 337,252.00012 C362.92461,250.14836 384.46844,240.41978 404,225.00014"/> </DoubleAnimationUsingPath.PathGeometry> </DoubleAnimationUsingPath> </Storyboard> </Window.Resources> <Window.Triggers> <EventTrigger RoutedEvent="FrameworkElement.Loaded"> <BeginStoryboard Storyboard="{StaticResource Timeline1}"/> </EventTrigger> </Window.Triggers> <Grid x:Name="LayoutRoot"> <Path Fill="#FFFFFFFF" Stretch="Fill" Stroke="#FF000000" Margin="63.5,128.847,87.5,133.025" Data="M64,207 C92.304184,167.37414 114.6165,141.39725 171,132 205.43362,126.26106 223.19847,129.20972 257,147 289.86626,164.29803 313.01028,181.79967 336,213 345.7418,226.22101 356.03351,238.96689 366,252 378.07551,267.79105 389.36571,278.41942 407,289 417.57406,295.34443 427.83653,300.84763 439,306 449.8183,310.99306 456.46505,310.89535 469,310 494.92461,308.14824 516.46844,298.41966
536,283"/> <Button RenderTransformOrigin="0.5,0.5" HorizontalAlignment="Left" Margin="82,30,0,0" x:Name="button" VerticalAlignment="Top" Width="100" Height="56" Content="Button"> <Button.RenderTransform> <TransformGroup> <ScaleTransform ScaleX="1" ScaleY="1"/> <SkewTransform AngleX="0" AngleY="0"/> <RotateTransform Angle="0"/> <TranslateTransform X="0" Y="0"/> </TransformGroup> </Button.RenderTransform> </Button> </Grid></Window>
<Window xmlns="http://schemas.microsoft.com/winfx/2006/xaml/presentation" xmlns:x="http://schemas.microsoft.com/winfx/2006/xaml" x:Name="Window" Title="Window1" Width="640" Height="480"> <Window.Resources> <Storyboard x:Key="Timeline1" RepeatBehavior = "Forever" AutoReverse="True"> <DoubleAnimationUsingPath BeginTime="00:00:00" Duration="00:00:02" Storyboard.TargetName="button" Storyboard.TargetProperty="(UIElement.RenderTransform).(TransformGroup.Children)[3].(TranslateTransform.X)" Source="X"> <DoubleAnimationUsingPath.PathGeometry> <PathGeometry Figures="M-68,149.00022 C-39.695816,109.3744 -17.383496,83.397528 39,74.000287 C73.433618,68.261356 91.198465,71.210009 125,89.000273 C157.86626,106.29829 181.01028,123.79991 204,155.00021 C213.7418,168.22121 224.03351,180.96708 234,194.00017 C246.07551,209.79121 257.36571,220.41957 275,231.00014 C285.57406,237.34456 295.83653,242.84775 307,248.00012 C317.8183,252.99318 324.46505,252.89547 337,252.00012 C362.92461,250.14836 384.46844,240.41978 404,225.00014"/> </DoubleAnimationUsingPath.PathGeometry> </DoubleAnimationUsingPath> <DoubleAnimationUsingPath BeginTime="00:00:00" Duration="00:00:02" Storyboard.TargetName="button" Storyboard.TargetProperty="(UIElement.RenderTransform).(TransformGroup.Children)[3].(TranslateTransform.Y)" Source="Y"> <DoubleAnimationUsingPath.PathGeometry> <PathGeometry Figures="M-68,149.00022 C-39.695816,109.3744 -17.383496,83.397528 39,74.000287 C73.433618,68.261356 91.198465,71.210009 125,89.000273 C157.86626,106.29829 181.01028,123.79991 204,155.00021 C213.7418,168.22121 224.03351,180.96708 234,194.00017 C246.07551,209.79121 257.36571,220.41957 275,231.00014 C285.57406,237.34456 295.83653,242.84775 307,248.00012 C317.8183,252.99318 324.46505,252.89547 337,252.00012 C362.92461,250.14836 384.46844,240.41978 404,225.00014"/> </DoubleAnimationUsingPath.PathGeometry> </DoubleAnimationUsingPath> </Storyboard> </Window.Resources> <Window.Triggers> <EventTrigger RoutedEvent="FrameworkElement.Loaded"> <BeginStoryboard Storyboard="{StaticResource Timeline1}"/> </EventTrigger> </Window.Triggers> <Grid x:Name="LayoutRoot"> <Path Fill="#FFFFFFFF" Stretch="Fill" Stroke="#FF000000" Margin="63.5,128.847,87.5,133.025" Data="M64,207 C92.304184,167.37414 114.6165,141.39725 171,132 205.43362,126.26106 223.19847,129.20972 257,147 289.86626,164.29803 313.01028,181.79967 336,213 345.7418,226.22101 356.03351,238.96689 366,252 378.07551,267.79105 389.36571,278.41942 407,289 417.57406,295.34443 427.83653,300.84763 439,306 449.8183,310.99306 456.46505,310.89535 469,310 494.92461,308.14824 516.46844,298.41966
536,283"/> <Button RenderTransformOrigin="0.5,0.5" HorizontalAlignment="Left" Margin="82,30,0,0" x:Name="button" VerticalAlignment="Top" Width="100" Height="56" Content="Button"> <Button.RenderTransform> <TransformGroup> <ScaleTransform ScaleX="1" ScaleY="1"/> <SkewTransform AngleX="0" AngleY="0"/> <RotateTransform Angle="0"/> <TranslateTransform X="0" Y="0"/> </TransformGroup> </Button.RenderTransform> </Button> </Grid></Window>你可以得到如图所示的一个窗体: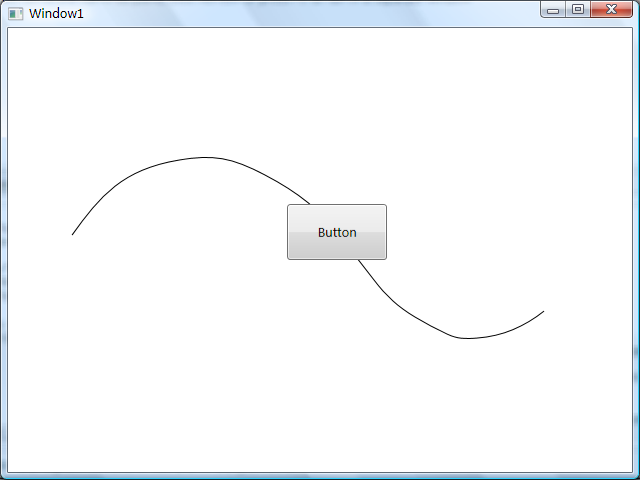
窗体上的按钮沿着曲线来回的运动(按钮的中心始终与曲线相切)。
1,使用Microsoft Expression Blend工具为我们自动生成路径动画
打造路径动画的最简单的方式是使用 Microsoft Expression Blend工具来自动生成,当然这自然会失去灵活性。
第一步:创建动画对象(比如上图中的那个Button)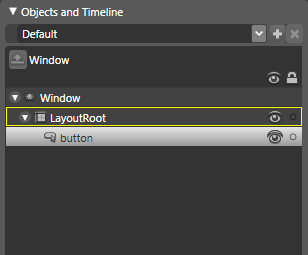
第二步:创建动画路径(比如一条曲线,一个圆)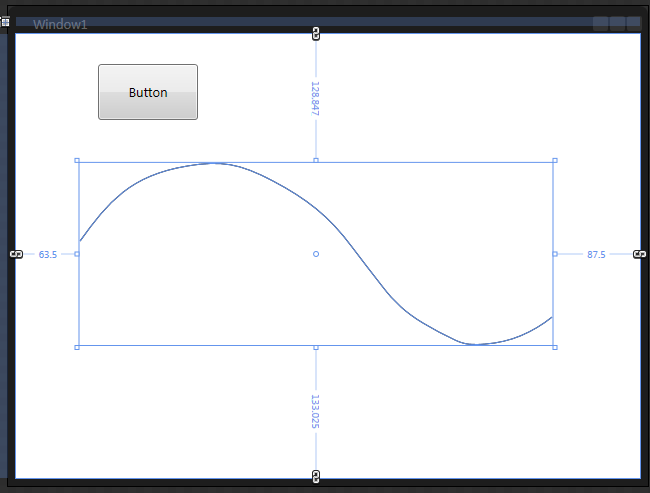
记得将路径的逻辑树层次上调整得比刚才那个按钮低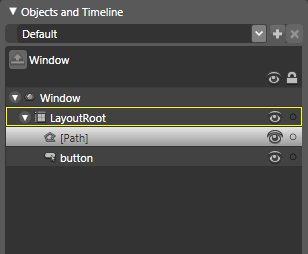
第三步:将路径转化为MotionPath
选中逻辑树上的[Path]对象,单击菜单栏的Object,选择Path子项,在选择Convert To MotionPath,则会弹出如下窗口: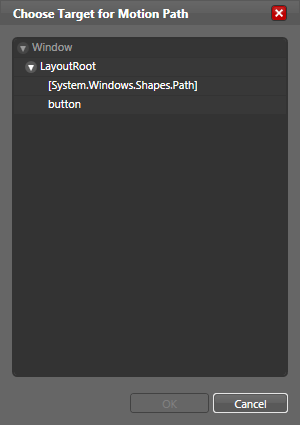
其要求你选择MotionPath的目标,也就是路径动画的目标,我们这里选择我们的button按钮
单击OK,其会自动为你生成Timeline(此后的操作就与打造普通Timeline 的操作一样了,其实此时该路径动画已经生成,你可以单击Timeline录制旁边的“播放”按钮来观看效果了,或直接F5)
2,使用代码来打造更灵活的路径动画
我更喜欢使用手写代码的方式来做更多的事情,这让事情变得更容易控制,同时也更具有灵活性。
以DoubleAnimationUsingPath为例,我们逐步讲解一下如何使用代码来打造上面的示例。
为了让对象沿着曲线运动,我们通过改变一个TranslateTransform的X与Y值来做到,并将该TranslateTransform指定给按钮的RenderTransform。
假设我们动画中的路径(也就是示例中的那条曲线)为path1,动画的对象为border1,如果你有过编写WPF动画代码的经验,那么你可以很轻松地编写出以下代码:
DoubleAnimationUsingPath animationX = new DoubleAnimationUsingPath(); animationX.PathGeometry = this.path1.Data.GetFlattenedPathGeometry(); animationX.Source = PathAnimationSource.X; animationX.Duration = new Duration(TimeSpan.FromSeconds(2)); DoubleAnimationUsingPath animationY = new DoubleAnimationUsingPath(); animationY.PathGeometry = this.path1.Data.GetFlattenedPathGeometry(); animationY.Source = PathAnimationSource.Y; animationY.Duration = animationX.Duration;其中
animationX.PathGeometry = this.path1.Data.GetFlattenedPathGeometry();指定了我们的animationX所遵照的路径为path1
animationX.Source = PathAnimationSource.X;指定了animationX将遵照路径的X值的变化而变化,其中PathAnimationSource枚举存在三个值,分别是X,Y与Angle,在沿着路径旋转的动画中将会用到Angle值。
将代码补充完整后如下:
TranslateTransform translate = new TranslateTransform(); this.border1.RenderTransform = translate; NameScope.SetNameScope(this, new NameScope()); this.RegisterName("translate", translate); DoubleAnimationUsingPath animationX = new DoubleAnimationUsingPath(); animationX.PathGeometry = this.path1.Data.GetFlattenedPathGeometry(); animationX.Source = PathAnimationSource.X; animationX.Duration = new Duration(TimeSpan.FromSeconds(2)); DoubleAnimationUsingPath animationY = new DoubleAnimationUsingPath(); animationY.PathGeometry = this.path1.Data.GetFlattenedPathGeometry(); animationY.Source = PathAnimationSource.Y; animationY.Duration = animationX.Duration; Storyboard story = new Storyboard(); story.RepeatBehavior = RepeatBehavior.Forever; story.AutoReverse = true; story.Children.Add(animationX); story.Children.Add(animationY); Storyboard.SetTargetName(animationX, "translate"); Storyboard.SetTargetName(animationY, "translate"); Storyboard.SetTargetProperty(animationX, new PropertyPath(TranslateTransform.XProperty)); Storyboard.SetTargetProperty(animationY, new PropertyPath(TranslateTransform.YProperty)); story.Begin(this);到此为止,我们可以说已经打造了一个路径动画,效果如下图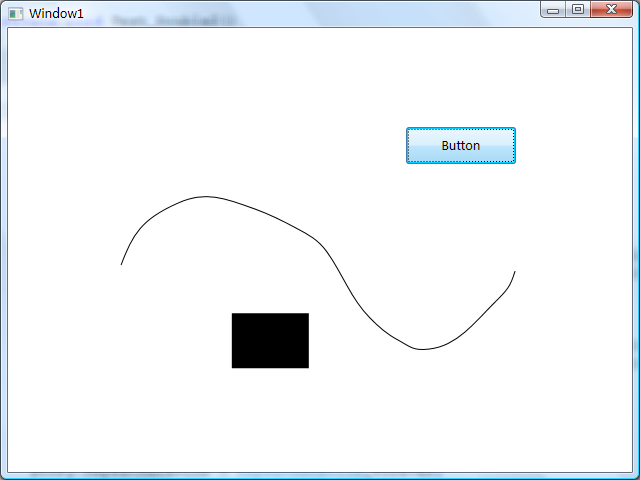
但不难发现,图中方块运动的路径与曲线并为完全重合,而是存在X与Y方向上的平移。这是一个很让人头疼的问题,但是我发现,只要在动画播放之前,将方块的中心位置设置为与动画所在容器的(0,0)位置向重合,那么该问题就可以被避免。
修改后的代码:
Canvas.SetTop(this.border1, -this.border1.ActualHeight / 2); Canvas.SetLeft(this.border1, -this.border1.ActualWidth / 2); TranslateTransform translate = new TranslateTransform(); this.border1.RenderTransform = translate; NameScope.SetNameScope(this, new NameScope()); this.RegisterName("translate", translate); DoubleAnimationUsingPath animationX = new DoubleAnimationUsingPath(); animationX.PathGeometry = this.path1.Data.GetFlattenedPathGeometry(); animationX.Source = PathAnimationSource.X; animationX.Duration = new Duration(TimeSpan.FromSeconds(2)); DoubleAnimationUsingPath animationY = new DoubleAnimationUsingPath(); animationY.PathGeometry = this.path1.Data.GetFlattenedPathGeometry(); animationY.Source = PathAnimationSource.Y; animationY.Duration = animationX.Duration; Storyboard story = new Storyboard(); story.RepeatBehavior = RepeatBehavior.Forever; story.AutoReverse = true; story.Children.Add(animationX); story.Children.Add(animationY); Storyboard.SetTargetName(animationX, "translate"); Storyboard.SetTargetName(animationY, "translate"); Storyboard.SetTargetProperty(animationX, new PropertyPath(TranslateTransform.XProperty)); Storyboard.SetTargetProperty(animationY, new PropertyPath(TranslateTransform.YProperty)); story.Begin(this);然后,运行效果如下: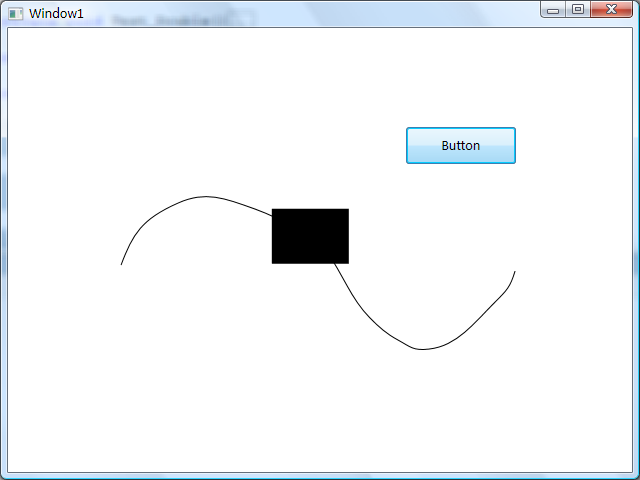
刚才已经提到,PathAnimationSource枚举拥有第三个值Angle,它是用来使我们的动画对象沿着路径旋转的,旋转对象与移动类似,但需要注意的是:
(1)旋转时对象的中心点始终与路径相切,那么你需要注意旋转时对象的中心在哪,比如上面的方块的中心点在其长宽的50%处,那么我们设置其RenderTransformOrigin为(0.5,0.5)
this.border1.RenderTransformOrigin = new Point(0.5, 0.5);(2)如果我们在旋转的同时在进行其他动作,比如平移,那么我们需要注意动作叠加的顺序,先旋转再平移与先平移再旋转的效果是不同的(你可以参考WPF中的MatrixTransform),这在编码时体现在向TransformGroup中添加元素时的顺序
TranslateTransform translate = new TranslateTransform(); RotateTransform rotate = new RotateTransform(); TransformGroup group = new TransformGroup(); group.Children.Add(rotate);//先旋转 group.Children.Add(translate);//再平移 this.border1.RenderTransform = group;补充完整后的代码:
Canvas.SetTop(this.border1, -this.border1.ActualHeight / 2); Canvas.SetLeft(this.border1, -this.border1.ActualWidth / 2); this.border1.RenderTransformOrigin = new Point(0.5, 0.5); TranslateTransform translate = new TranslateTransform(); RotateTransform rotate = new RotateTransform(); TransformGroup group = new TransformGroup(); group.Children.Add(rotate);//先旋转 group.Children.Add(translate);//再平移 this.border1.RenderTransform = group; NameScope.SetNameScope(this, new NameScope()); this.RegisterName("translate", translate); this.RegisterName("rotate", rotate); DoubleAnimationUsingPath animationX = new DoubleAnimationUsingPath(); animationX.PathGeometry = this.path1.Data.GetFlattenedPathGeometry(); animationX.Source = PathAnimationSource.X; animationX.Duration = new Duration(TimeSpan.FromSeconds(2)); DoubleAnimationUsingPath animationY = new DoubleAnimationUsingPath(); animationY.PathGeometry = this.path1.Data.GetFlattenedPathGeometry(); animationY.Source = PathAnimationSource.Y; animationY.Duration = animationX.Duration; DoubleAnimationUsingPath animationAngle = new DoubleAnimationUsingPath(); animationAngle.PathGeometry = this.path1.Data.GetFlattenedPathGeometry(); animationAngle.Source = PathAnimationSource.Angle; animationAngle.Duration = animationX.Duration; Storyboard story = new Storyboard(); story.RepeatBehavior = RepeatBehavior.Forever; story.AutoReverse = true; story.Children.Add(animationX); story.Children.Add(animationY); story.Children.Add(animationAngle); Storyboard.SetTargetName(animationX, "translate"); Storyboard.SetTargetName(animationY, "translate"); Storyboard.SetTargetName(animationAngle, "rotate"); Storyboard.SetTargetProperty(animationX, new PropertyPath(TranslateTransform.XProperty)); Storyboard.SetTargetProperty(animationY, new PropertyPath(TranslateTransform.YProperty)); Storyboard.SetTargetProperty(animationAngle, new PropertyPath(RotateTransform.AngleProperty)); story.Begin(this);效果图如下: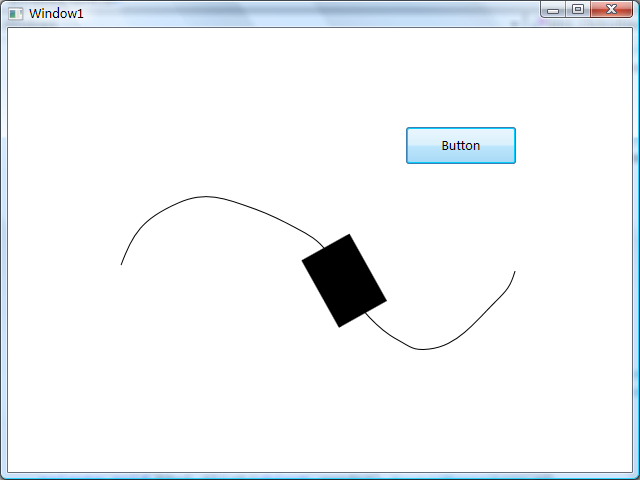
关于路径动画,先介绍到这里,不过其实实现上面的的动画更为常用的方式是使用MatrixAnimationUsingPath,可以参考以下代码:
Canvas.SetLeft(this.border1, -this.border1.ActualWidth / 2); Canvas.SetTop(this.border1, -this.border1.ActualHeight / 2); this.border1.RenderTransformOrigin = new Point(0.5, 0.5); MatrixTransform matrix = new MatrixTransform(); this.border1.RenderTransform = matrix; NameScope.SetNameScope(this, new NameScope()); this.RegisterName("matrix", matrix); MatrixAnimationUsingPath matrixAnimation = new MatrixAnimationUsingPath(); matrixAnimation.PathGeometry = this.path1.Data.GetFlattenedPathGeometry(); matrixAnimation.Duration = new Duration(TimeSpan.FromSeconds(2)); matrixAnimation.RepeatBehavior = RepeatBehavior.Forever; matrixAnimation.AutoReverse = true; matrixAnimation.IsOffsetCumulative = !matrixAnimation.AutoReverse; matrixAnimation.DoesRotateWithTangent = true;//旋转 Storyboard story = new Storyboard(); story.Children.Add(matrixAnimation); Storyboard.SetTargetName(matrixAnimation, "matrix"); Storyboard.SetTargetProperty(matrixAnimation, new PropertyPath(MatrixTransform.MatrixProperty)); story.Begin(this);下载Demo:http://files.cnblogs.com/zhouyinhui/PathAnimationDemo.rar
WPF中的PathAnimation(路径动画)的更多相关文章
- PowerPoint 2013中创建自定义路径动画的方法
1.在幻灯片中选择对象,在“动画”选项卡的“高级动画”组中单击“添加动画”按钮,在打开的下拉列表中选择“自定义路径”选项,如图1所示. 图1 选择“自定义路径”选项 2.此时鼠标指针变为十字形,在幻灯 ...
- [原][osgEarth]在osgearth中添加相机路径动画
在osg中添加相机动画路径请参考:http://www.cnblogs.com/lyggqm/p/8075277.html 这里的代码是在osgearth中添加相机动画路径漫游器: #include ...
- WPF中的简单水动画
原文 https://stuff.seans.com/2008/08/21/simple-water-animation-in-wpf/ 很多年前(80年代中期),我在一家拥有Silicon Grap ...
- 在 WPF 中使用 Path 路径
在 WPF 中总会修改 Button 的 Style,比如一个自定义的 Close 按钮.刚入门的可能会用一张 PNG 格式的图片来做这个按钮的 Icon,但这个是不优雅的.而且你要改的时候还得去操作 ...
- wpf 中 Ellipse 对象对动画性能的影响
vs2019 .NetFramework 4.8 win10-64 1909 接手一个wpf项目,某窗口中包含大量的 Shape 对象(线,矩形,圆形等). 这些内容要匀速的向左平移,类似于游戏&qu ...
- 示例:WPF中自定义StoryBoarService在代码中封装StoryBoard、Animation用于简化动画编写
原文:示例:WPF中自定义StoryBoarService在代码中封装StoryBoard.Animation用于简化动画编写 一.目的:通过对StoryBoard和Animation的封装来简化动画 ...
- 《深入浅出WPF》笔记——绘画与动画
<深入浅出WPF>笔记——绘画与动画 本篇将记录一下如何在WPF中绘画和设计动画,这方面一直都不是VS的强项,然而它有一套利器Blend:这方面也不是我的优势,幸好我有博客园,能记录一 ...
- WPF中图形表示语法详解(Path之Data属性语法)ZZ
大可山 [MSN:a3news(AT)hotmail.com] http://www.zpxp.com 萝卜鼠在线图形图像处理 ------------------------------------ ...
- WPF中图形表示语法详解(Path之Data属性语法)
原文 http://blog.csdn.net/johnsuna/article/details/1885597 老规矩,看图说话. 先看显示效果:(图1) XAML(代码A):<Page xm ...
随机推荐
- Django之settings.py 的media路径设置
在一个 models 中使用 FileField 或 ImageField 需要以下步骤: 1. 在你的 settings.py文件中, 定义一个完整路径给MEDIA_ROOT 以便让 Django在 ...
- nodejs版本号更新问题:express不是内部或外部命令
版本号更新后,我们使用熟悉的npm install -g express命令安装,可是,成功安装之后竟然提示express不是内部或外部命令. nodejs小问题:[1]express不是内部或外部命 ...
- android之ContentProvider和Uri具体解释
一.使用ContentProvider(内容提供者)共享数据 在android中ContentProvider的作用是对外共享数据,就是说能够通过ContentProvider把应用中的数据共享给其它 ...
- erlang浅谈
优点: 1.面向并发,有成熟而且久经考验的框架可供使用,网络部分已经经过了良好封装 2.内存缓存解决方案进程字典,前者的读写速度是50NS-100Ns级别的 3.对二进制数据解析的语法是直观,简单,强 ...
- 【codeforces 776A】A Serial Killer
[题目链接]:http://codeforces.com/contest/776/problem/A [题意] 这个杀手每天会除掉一个人; 这个杀手每天都有两个目标; 给你它杀人的日志,以及这个人被杀 ...
- FreeBSD中的SYSINIT框架【转】
SYSINIT是一个通用的调用排序与分别执行机制的框架.FreeBSD目前使用它来进行内核的动态初始化.SYSINIT使得FreeBSD的内核各子系统可以在内核或模块动态加载链接时被重整.添加.删除. ...
- visual studio 编译器在辨异 C/C++ 程序时的注意事项
1. 数组大小的限制 visual studio 对数组的维数(元素的个数)没有限制,但要求数组的 size (sizeof() 后的结果,所占内存的大小)不得超过 0x7fff ffff = 2^3 ...
- Twitter "like" 动画实战
http://zhuanlan.zhihu.com/FrontendMagazine/20486738
- Android开发中如何加载API源码帮助开发
在eclipse中添加android源码既可以帮助我们的开发,又能使我们边开发边学习. android环境的搭建:http://blog.csdn.net/dawanganban/article/de ...
- 自由WiFi软体,你也太简单了
自由WiFi市场热点,自然不用多说.支付宝钱包计划实现全民免费WiFi,360.百度.金山.小米都在着手WiFi产品. 只是.这些免费WiFi或者实现WiFi的硬件或软件.都是争夺新的市场入口,推广产 ...