
【springcloud】配置中心(Config-Server)
转自:https://blog.csdn.net/pengjunlee/article/details/88061736
参考文章
Spring Cloud 配置中心为分布式系统中的服务器端和客户端提供外部化配置支持。通过Config-Server,你可以在一个地方集中对所有环境中的应用程序的外部化配置进行管理。例如,当一个应用程序从开发环境切换到测试环境,然后再从测试环境切换到生产环境,你可以使用Config-Server统一管理这些环境之间的配置,并确保应用程序在迁移时能够拥有它运行所需要的一切配置。简而言之:Config-Server 就是用来实现配置统一管理和不同环境间配置的统一切换的。Config-Server 服务器的后端存储默认使用Git,因此它很容易支持配置环境的标签版本,同时可供多数的内容管理工具去访问。你也可以很容易地添加其他的替代实现,并将它们插入到Spring配置中。
相关产品:
来自淘宝的Diamond:https://github.com/takeseem/diamond
来自百度的Disconf:https://disconf.readthedocs.io/zh_CN/latest/
来自Springcloud的Config-Server:https://cloud.spring.io/spring-cloud-stream/
搭建配置中心
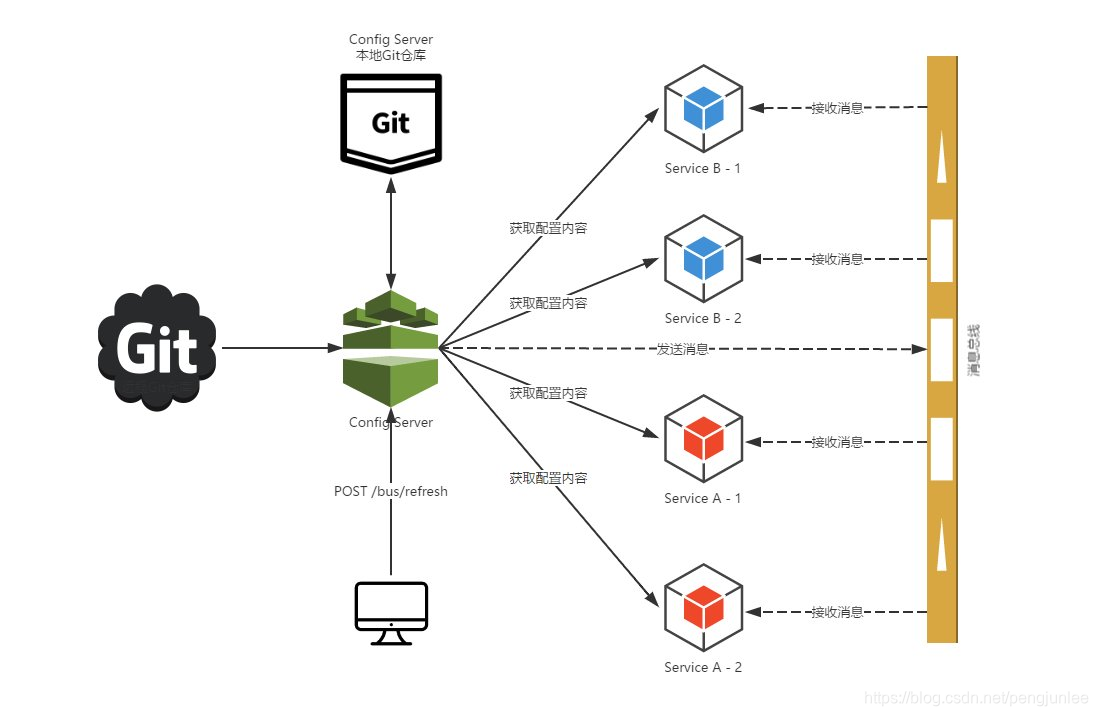
Config-Server配置中心的工作原理如下图所示:
引入依赖
新建一个maven项目,起名为config-center,在其 pom.xml 文件中引入如下依赖:
<parent>

		<groupId>org.springframework.boot</groupId>

		<artifactId>spring-boot-starter-parent</artifactId>

		<version>2.0.6.RELEASE</version>

	</parent>

	<properties>

		<spring-cloud.version>Finchley.SR2</spring-cloud.version>

	</properties>

	<dependencies>

		<!-- Eureka-Client 依赖 -->

		<dependency>

			<groupId>org.springframework.cloud</groupId>

			<artifactId>spring-cloud-starter-netflix-eureka-client</artifactId>

		</dependency>

		<!-- Config-Server 依赖 -->

		<dependency>

			<groupId>org.springframework.cloud</groupId>

			<artifactId>spring-cloud-config-server</artifactId>

		</dependency>

	</dependencies>

	<dependencyManagement>

		<dependencies>

			<!-- SpringCloud 版本控制依赖 -->

			<dependency>

				<groupId>org.springframework.cloud</groupId>

				<artifactId>spring-cloud-dependencies</artifactId>

				<version>${spring-cloud.version}</version>

				<type>pom</type>

				<scope>import</scope>

			</dependency>

		</dependencies>

	</dependencyManagement>
创建启动类
新建一个Springboot应用的启动类ConfigCenterApplication类,并在上增加@EnableConfigServer注解,用来启用Config-Server。
import org.springframework.boot.SpringApplication;

import org.springframework.boot.autoconfigure.SpringBootApplication;

import org.springframework.cloud.config.server.EnableConfigServer;

@SpringBootApplication

@EnableConfigServer

public class ConfigCenterApplication {

	public static void main(String[] args) {

		SpringApplication.run(ConfigCenterApplication.class, args);

	}

}
添加配置
application.yml 添加配置如下:
server:

  port: 9001

spring:

  application:

    name: config-center

eureka:

  client:

    serviceUrl:

      defaultZone: http://localhost:8761/eureka/
此时,由于尚未配置用来作为服务器后端存储的Git仓库地址,若启动应用会报如下错误:
***************************

APPLICATION FAILED TO START

***************************

Description:

Invalid config server configuration.

Action:

If you are using the git profile, you need to set a Git URI in your configuration.  If you are using a native profile and have spring.cloud.config.server.bootstrap=true, you need to use a composite configuration.
与一般的Spring Boot应用相同,默认情况下Config-Server也通过8080端口启动。为了客户端读取配置方便,你可以把启动端口改为8888(客户端默认会从http://localhost:8888/加载与服务ID相同的配置)。此外,Config-Server还通过spring.config.name=configserver(Config-Server Jar包中有一个configserver.yml 配置文件)配置为我们设置了一个默认配置库,客户端通过配置 spring.cloud.config.discovery.serviceId=configserver 便可直接使用。当然你也可以通过application.yml来对配置中心进行配置。
创建Git仓库
本文使用开源中国的码云来创建我们的Git仓库,当然你也可以选择其他的Github或者阿里云Git等创建自己的Git仓库。
点击导航栏中的“+”按钮==>新建仓库,填入仓库信息,完成创建。
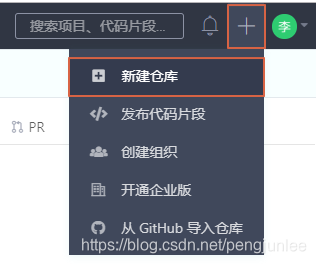
点击 克隆/下载 ==>复制,将Git仓库地址复制下来备用。

配置Git仓库
接下来,在application.yml中添加Git仓库配置如下:
spring:

  cloud:

    config:

      server:

        git:

          uri: https://gitee.com/pengjunlee/config-cloud.git

          username: 你的码云账号

          password: 你的账号密码
再次启动ConfigCenterApplication,发现可以正常启动了。启动完成之后,Eureka注册中心中注册的服务列表如下:

搭建客户端
接下来,我们通过对上一章《微服务下的链路追踪(Sleuth+Zipkin)》中的product-service服务进行改造,来示例如何从配置中心获取配置。
引入依赖
在product-service的pom.xml中添加配置中心客户端依赖:
<!-- Config-Client 依赖 -->

		<dependency>

			<groupId>org.springframework.cloud</groupId>

			<artifactId>spring-cloud-config-client</artifactId>

		</dependency>
或者:
<!-- Starter-Config 依赖 -->

		<dependency>

			<groupId>org.springframework.cloud</groupId>

			<artifactId>spring-cloud-starter-config</artifactId>

		</dependency>
修改配置
先将product-service中的application.yml文件改名为bootstrap.yml(bootstrap.yml在应用上下文启动阶段加载,比application.yml早),然后再对其内容进行修改:
# 设置服务(应用)名称

spring:

  application:

    name: product-service

# 指定用于获取配置的配置中心服务(应用)名称

  cloud:

    config:

      discovery:

        enabled: true

        serviceId: config-center

      profile: dev

      # 指定分枝版本,默认为master

      label: master

# 指定注册中心地址

eureka:

  client:

    serviceUrl:

      defaultZone: http://localhost:8761/eureka/
注意:如果不指定配置中心,客户端默认会从http://localhost:8888 加载与服务ID相同的配置。
在Git仓库创建配置文件
客户端通过发送Http请求来从配置中心读取配置,这些Http请求的URI遵循以下规则:
/{name}-{profiles}.properties

/{name}-{profiles}.yml || /{name}-{profiles}.yaml

/{label}/{name}-{profiles}.properties

/{label}/{name}-{profiles}.json

/{name}/{profiles}/{label:.*}

/{name}-{profiles}.json

/{label}/{name}-{profiles}.yml || /{label}/{name}-{profiles}.yaml

/{name}/{profiles:.*[^-].*}

/{name}/{profile}/{label}/**

/{name}/{profile}/{label}/**

/{name}/{profile}/**
其中各个参数的含义如下:
name 服务的ID,即spring.application.name的值,本例中为 product-service;
profiles 激活的profile,通过spring.cloud.config.profile指定,本例中为 dev;
label 分枝的版本,通过spring.cloud.config.label指定,本例中为默认值 master;
接下来我们需要按照上述规则,在Git仓库的相应位置创建配置文件。根据bootstrap.yml中的配置,资源请求地址可以为 /master/product-service-dev.yml 。
在Git仓库的master分枝中创建product-service-dev.yml和product-service-test.yml两个文件,分别将服务的启动端口指定为8771和8772:
# product-service-dev.yml

server:

port: 8771

# product-service-test.yml

server:

port: 8772
文件创建完成之后,启动配置中心,先在浏览器对两个文件进行访问。


此时,启动product-service将读取http://localhost:8888/product-service-dev.yml中的配置,即启动端口为8771。若将 bootstrap.yml中的spring.cloud.config.profile的值设置为test,则将读取http://localhost:8888/product-service-test.yml中的配置,应用的启动端口也会相应地变为8772,证明从配置中心读取配置成功。
参考文章
《一篇好TM长的关于配置中心的文章》
https://cloud.spring.io/spring-cloud-stream/
https://spring.io/projects/spring-cloud-config
https://cloud.spring.io/spring-cloud-static/Finchley.SR2/single/spring-cloud.html
【springcloud】配置中心(Config-Server)的更多相关文章
- SpringCloud配置中心config
1,配置中心可以用zookeeper来实现,也可以用apllo 来实现,springcloud 也自带了配置中心config Apollo 实现分布式配置中心 zookeeper:实现分布式配置中心, ...
- SpringCloud学习系列之五-----配置中心(Config)和消息总线(Bus)完美使用版
前言 在上篇中介绍了SpringCloud Config的使用,本篇则介绍基于SpringCloud(基于SpringBoot2.x,.SpringCloud Finchley版)中的分布式配置中心( ...
- 七、springcloud之配置中心Config(二)之高可用集群
方案一:传统作法(不推荐) 服务端负载均衡 将所有的Config Server都指向同一个Git仓库,这样所有的配置内容就通过统一的共享文件系统来维护,而客户端在指定Config Server位置时, ...
- 六、springcloud之配置中心Config
一.配置中心提供的核心功能 Spring Cloud Config为服务端和客户端提供了分布式系统的外部化配置支持.配置服务器为各应用的所有环境提供了一个中心化的外部配置.它实现了对服务端和客户端对S ...
- Spring-cloud微服务实战【九】:分布式配置中心config
回忆一下,在前面的文章中,我们使用了spring cloud eureka/ribbon/feign/hystrix/zuul搭建了一个完整的微服务系统,不管是队内还是对外都已经比较完善了,那我们 ...
- 学习一下 SpringCloud (五)-- 配置中心 Config、消息总线 Bus、链路追踪 Sleuth、配置中心 Nacos
(1) 相关博文地址: 学习一下 SpringCloud (一)-- 从单体架构到微服务架构.代码拆分(maven 聚合): https://www.cnblogs.com/l-y-h/p/14105 ...
- SpringCloud分布式配置中心Config
统一管理所有配置. 1.微服务下的分布式配置中心 简介:讲解什么是配置中心及使用前后的好处 什么是配置中心: 一句话:统一管理配置, 快速切换各个环境的配置 相关产品: 百度的disconf 地址:h ...
- springcloud(四):应用配置中心config的安全设置
springcloud应用配置中心config的安全设置 在springcloud应用开发中,为了方便在线管理我们的配置文件,通常会配一个配置中心config-server,这里托管着应用的一些配置文 ...
- springcloud配置中心
SpringCloud Config简介 Spring Cloud Config 是 Spring Cloud 团队创建的一个全新项目,用来为分布式系统中的基础设施和微服务应用提供集中化的外部配置支持 ...
- (七)Spring Cloud 配置中心config
spring cloud config是一个基于http协议的远程配置实现方式. 通过统一的配置管理服务器进行配置管理,客户端通过http协议主动的拉取服务的的配置信息,完成配置获取. 下面我们对 ...
随机推荐
- 案例分享:Qt+Arm基于RV1126平台的内窥镜软硬整套解决方案(实时影像、冻结、拍照、录像、背光调整、硬件光源调整,其他产品也可使用该平台,如视频监控,物联网产品等等)
自研产品系列方案 1. 基于瑞芯微的 RV1126 芯片平台: 2. 外接 USB 摄像头(OV9734. OV6946.OV2740 等 UVC 模块)作为图像输入源: 3. 可通过 LED ...
- prignMVC+myBatis整合—— 基于MapperFactoryBean
学习本节内容请先看"MyBatis的基本应用".地址:http://lydia-fly.iteye.com/admin/blogs/2152948 Spring与MyBatis整合 ...
- Day8 方法详解及递归思想.
何为方法 Java方法是语句的集合,它们在一起执行一个功能. 方法是解决一类问题步骤的有序组合 方法包含于类或对象中 方法在程序中被创建,在其他地方被引用 设计方法的原则: 方法的本意是功能块,就是实 ...
- Window安装构建神器Jenkins
Jenkins是什么? Jenkins是一款开源 CI&CD 软件,用于自动化各种任务,包括构建.测试和部署软件.支持各种运行方式,可通过系统包.Docker 或者通过一个独立的 Java 程 ...
- 标准化R包开发流程
3个武器: devtools:各种开发小工具的合集,让开发变得简单,非常实用 roxygens:通过注释的方式,生成文档,远离LaTex的烦恼 testthat:单元测试,让R包稳定.健壮.减少升级的 ...
- python通过sha1和base64生成签名
一.python生成时间戳 # 案例 生成时间戳 import time t = time.time() print(t) # 原始时间数据 print(int(t)) # 秒级时间戳 print(i ...
- python算法学习--待续
几个算法网站 算法可视化网站:https://visualgo.net/en,通过动画展示算法实现过程 程序可视化网站:http://www.pythontutor.com/visualize.htm ...
- 第十八篇 -- GPIO学习
先学习一下GPIO,网上各种找资料,拼凑,所以就不一一贴网址了. 一.GPIO GPIO的英文全称General-Purpose Input /Output Ports,中文意思是通用I/O端口 一个 ...
- 最长公共子序列问题(LCS)——Python实现
# 最长公共子序列问题 # 作用:求两个序列的最长公共子序列 # 输入:两个字符串数组:A和B # 输出:最长公共子序列的长度和序列 def LCS(A,B): print('输入字符串数组A', ...
- 选择排序(selection_sort)——Python实现
# 选择排序 # 作用:对给出的n个顺序不定的数进行排序 # 输入:任意数组A # 输出:按顺序排列的数组A # 时间复杂度 (n(n-1))/2 # 选择排序 # 第一趟:选择第一个元素,依次与 ...