SSM整合配置(Spring+Spring MVC+Mybatis)
一、配置准备
通过Maven工程,在eclipse中整合SSM,并在Tomcat服务器上运行
在进行配置前,先理清楚要配置哪些文件,如图,除web.xml外,其余三个配置文件名称均可自定义:
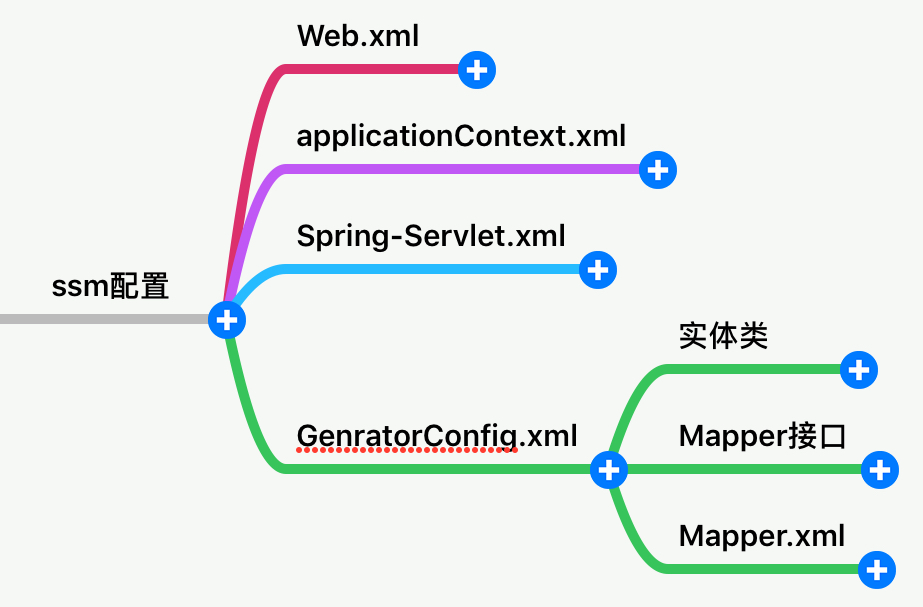
如图所示,一共有四个需要手动配置的文件:
1、web.xml:配置servlet、filter、listener
2、applicationContext.xml:配置相关的bean,与mybatis整合
3、Spring-Servlet.xml:用于配置视图解析器、控制器等
4、GenratorConfig.xml:用于生成Mybatis用到的实体类、Mapper接口、Map配置文件
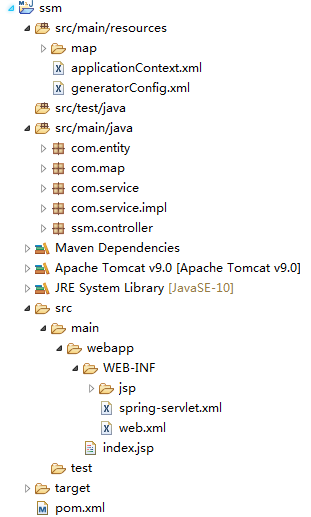
新建一个Maven工程,工程结构如图:
二、配置过程
大致了解所需配置文件后,开始配置
1、Web.xml
配置前首先导入依赖包
<project xmlns="http://maven.apache.org/POM/4.0.0" xmlns:xsi="http://www.w3.org/2001/XMLSchema-instance"
xsi:schemaLocation="http://maven.apache.org/POM/4.0.0 http://maven.apache.org/maven-v4_0_0.xsd">
<modelVersion>4.0.0</modelVersion>
<groupId>ssm</groupId>
<artifactId>ssm</artifactId>
<packaging>war</packaging>
<version>0.0.1-SNAPSHOT</version>
<name>ssm Maven Webapp</name>
<url>http://maven.apache.org</url>
<properties>
<spring.version>5.0.0.RELEASE</spring.version>
<!--mybatis版本号,3.4.5是2017年8月发布的新版本-->
<mybatis.version>3.4.5</mybatis.version>
<!--<slf4j.version>1.7.25</slf4j.version>-->
<slf4j.version>1.7.25</slf4j.version>
<log4j.version>1.2.17</log4j.version>
</properties> <dependencies>
<dependency>
<groupId>junit</groupId>
<artifactId>junit</artifactId>
<version>4.11</version>
<scope>test</scope>
</dependency> <!--spring核心包——Start-->
<dependency>
<groupId>org.springframework</groupId>
<artifactId>spring-core</artifactId>
<version>${spring.version}</version>
</dependency>
<dependency>
<groupId>org.springframework</groupId>
<artifactId>spring-web</artifactId>
<version>${spring.version}</version>
</dependency>
<dependency>
<groupId>org.springframework</groupId>
<artifactId>spring-oxm</artifactId>
<version>${spring.version}</version>
</dependency>
<dependency>
<groupId>org.springframework</groupId>
<artifactId>spring-tx</artifactId>
<version>${spring.version}</version>
</dependency>
<dependency>
<groupId>org.springframework</groupId>
<artifactId>spring-jdbc</artifactId>
<version>${spring.version}</version>
</dependency>
<dependency>
<groupId>org.springframework</groupId>
<artifactId>spring-webmvc</artifactId>
<version>${spring.version}</version>
</dependency>
<dependency>
<groupId>org.springframework</groupId>
<artifactId>spring-aop</artifactId>
<version>${spring.version}</version>
</dependency>
<dependency>
<groupId>org.springframework</groupId>
<artifactId>spring-context-support</artifactId>
<version>${spring.version}</version>
</dependency>
<dependency>
<groupId>org.springframework</groupId>
<artifactId>spring-test</artifactId>
<version>${spring.version}</version>
<scope>test</scope>
</dependency> <dependency>
<groupId>org.mybatis</groupId>
<artifactId>mybatis</artifactId>
<version>${mybatis.version}</version>
</dependency>
<dependency>
<groupId>com.github.pagehelper</groupId>
<artifactId>pagehelper</artifactId>
<version>4.1.6</version>
</dependency>
<dependency>
<groupId>tk.mybatis</groupId>
<artifactId>mapper</artifactId>
<version>3.3.8</version>
</dependency>
<!--mybatis/spring包-->
<dependency>
<groupId>org.mybatis</groupId>
<artifactId>mybatis-spring</artifactId>
<version>1.3.1</version>
</dependency> <!--mysql数据库的jdbc连接包-->
<dependency>
<groupId>mysql</groupId>
<artifactId>mysql-connector-java</artifactId>
<!-- mysql-8 需要 Connector/J 8.0.9 or higher -->
<version>8.0.13</version>
</dependency>
<!-- 导入dbcp的jar包,用来在applicationContext.xml中配置数据库 -->
<dependency>
<groupId>commons-dbcp</groupId>
<artifactId>commons-dbcp</artifactId>
<version>1.4</version>
</dependency> </dependencies>
<build>
<finalName>ssm</finalName>
<plugins>
<plugin>
<groupId>org.mybatis.generator</groupId>
<artifactId>mybatis-generator-maven-plugin</artifactId>
<version>1.3.2</version>
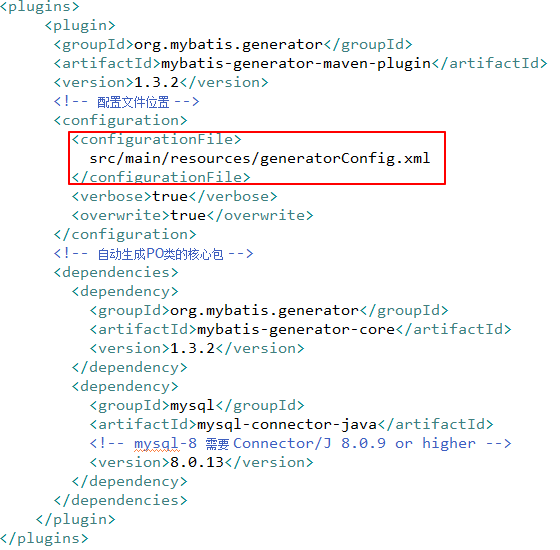
<!-- 配置文件位置 -->
<configuration>
<configurationFile>
src/main/resources/generatorConfig.xml
</configurationFile>
<verbose>true</verbose>
<overwrite>true</overwrite>
</configuration>
<!-- 自动生成PO类的核心包 -->
<dependencies>
<dependency>
<groupId>org.mybatis.generator</groupId>
<artifactId>mybatis-generator-core</artifactId>
<version>1.3.2</version>
</dependency>
<dependency>
<groupId>mysql</groupId>
<artifactId>mysql-connector-java</artifactId>
<!-- mysql-8 需要 Connector/J 8.0.9 or higher -->
<version>8.0.13</version>
</dependency>
</dependencies>
</plugin>
</plugins>
</build>
</project>
spring mvc采用前置控制器的设计模式,由一个DispatcherServlet负责分派,因此要在web.xml中对这个Servlet进行配置,该Servlet在启动时便实例化,因此要配置load-on-startup属性,我们先了解一下Spring MVC中的Context Hierarchy,首先看一张来自官网的图
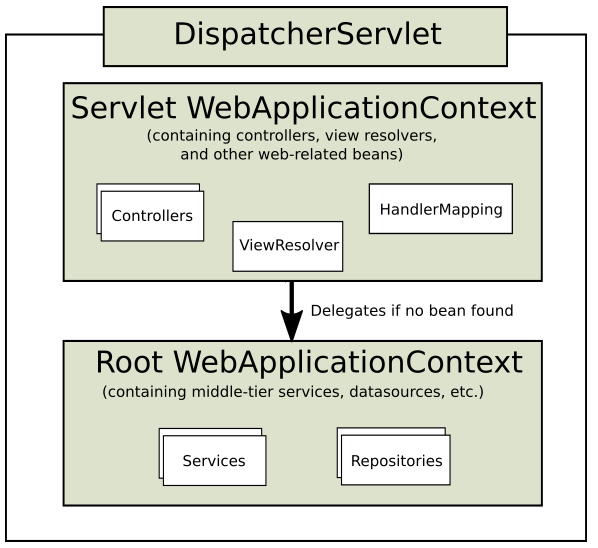
WebApplicationContext是ApplicationContext的拓展,是用于生成Bean的工厂,每个DispatcherServlet都需要一个Servlet WebApplicationContext来进行自己的配置,多个DispatcherServlet共享一个Root WebApplicationContext的配置,通常,在Servlet WebApplicationContext中配置控制器、视图解析器,在Root WebApplicationContext配置需要被多个Servlet共享的业务逻辑以及数据访问的Bean。
每个DispatcherServlet对应的Servlet WebApplicationContext,默认名称为[servlet-name]-servlet,如本例中web.xml中配置servlet-name为spring,那么默认的Servlet WebApplicationContext配置文件名称便为spring-servlet,其默认路径在WEB-INF下,当然,也可以通过在Servlet中配置init-param的contextConfigLocation来自定义配置路径以及配置名称,本例中不进行配置,采用默认的名称 spring-servlet
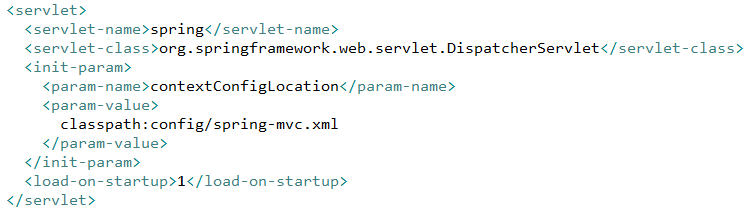
对于Root WebApplicationContext的配置,首先要在web.xml中通过<context-param>标签,设置该标签中contextConfigLocation的值,指定Root WebApplicationContext的路径与名称,随后在通过配置一个名为org.springframework.web.context.ContextLoaderListener的监听器,在启动时读取contextConfigLocation指定的Root WebApplicationContext,这里指定的Root WebApplicationContext在src/main/resources/applicationContext.xml中。配置完毕后的web.xml如下所示
<!DOCTYPE web-app PUBLIC

 "-//Sun Microsystems, Inc.//DTD Web Application 2.3//EN"

 "http://java.sun.com/dtd/web-app_2_3.dtd" >

<web-app>

  <context-param>

      <param-name>contextConfigLocation</param-name>

      <param-value>classpath:applicationContext.xml</param-value>

  </context-param>

  <listener>

    <listener-class>org.springframework.web.context.ContextLoaderListener</listener-class>

  </listener>

   <servlet>

      <servlet-name>spring</servlet-name>

      <servlet-class>

         org.springframework.web.servlet.DispatcherServlet

      </servlet-class>

      <load-on-startup>1</load-on-startup>

   </servlet>

   <servlet-mapping>

      <servlet-name>spring</servlet-name>

      <url-pattern>/</url-pattern>

   </servlet-mapping>

</web-app>
2、spring-servlet.xml配置
在该配置文件中,主要配置控制器与视图解析器,配置过程比较简单,先在工程中新建一个实现控制器的包,这里定义为ssm.controller,随后配置一个视图解析器的bean以及扫描控制器注解,配置完毕后如图所示
<?xml version="1.0" encoding="UTF-8"?>

<beans xmlns="http://www.springframework.org/schema/beans"

       xmlns:xsi="http://www.w3.org/2001/XMLSchema-instance"

       xmlns:context="http://www.springframework.org/schema/context"

       xmlns:mvc="http://www.springframework.org/schema/mvc"

       xsi:schemaLocation="http://www.springframework.org/schema/beans

    http://www.springframework.org/schema/beans/spring-beans.xsd

    http://www.springframework.org/schema/context

    http://www.springframework.org/schema/context/spring-context.xsd

    http://www.springframework.org/schema/mvc

    http://www.springframework.org/schema/mvc/spring-mvc.xsd">

    <!--启用spring的一些annotation -->

    <context:annotation-config/>

    <!--  自动扫描该包,使SpringMVC认为包下用了@controller注解的类是控制器  -->

    <context:component-scan base-package="ssm.controller">

        <context:include-filter type="annotation" expression="org.springframework.stereotype.Controller"/>

    </context:component-scan>

    <!--配置视图解析器-->

    <bean id="viewResolver" class="org.springframework.web.servlet.view.InternalResourceViewResolver">

        <property name="prefix" value="/WEB-INF/jsp/"/>

        <property name="suffix" value=".jsp"/>

    </bean>

</beans>
3、generatorConfig.xml配置
要在applicationContext.xml中整合spring与mybatis,至少要配置两样东西:一个 SqlSessionFactory 和至少一个数据映射器类,因此,我们要先通过generatorConfig.xml,帮助我们自动生成实体对象、Mapper接口,以及对应的Mapper.xml文件。generatorConfig.xml的路径由pom.xml中configurationFile指定
在这个配置文件中:
jdbcConnection指定数据连接
javaModelGenerator指定要生成的实体对象的位置,
sqlMapGenerator指定要生成的Map.xml文件的位置
javaClientGenerator指定要生成的Mapper接口的位置
table指定要生成的表,通过enable**ByExample属性,指定是否要生成example文件
我们指定生成的数据表如下:

最终配置文件如图
<?xml version="1.0" encoding="UTF-8"?>
<!DOCTYPE generatorConfiguration
PUBLIC "-//mybatis.org//DTD MyBatis Generator Configuration 1.0//EN"
"http://mybatis.org/dtd/mybatis-generator-config_1_0.dtd"> <generatorConfiguration> <context id="test" defaultModelType="flat"> <commentGenerator>
<property name="suppressDate" value="true"/>
<!-- 是否去除自动生成的注释 true:是 : false:否 -->
<property name="suppressAllComments" value="true"/>
</commentGenerator> <jdbcConnection driverClass="com.mysql.cj.jdbc.Driver" connectionURL="jdbc:mysql://127.0.0.1:3306/test?autoReconnect=true&utoReconnectForPools=true&
useUnicode=true&characterEncoding=utf-8&useSSL=false&
serverTimezone=UTC"
userId="root" password="wqk123">
</jdbcConnection> <javaTypeResolver>
<property name="forceBigDecimals" value="false"/>
</javaTypeResolver>
<!-- pojo -->
<javaModelGenerator targetPackage="com.entity" targetProject="src/main/java">
</javaModelGenerator>
<!-- 创建mapxml -->
<sqlMapGenerator targetPackage="map" targetProject="src/main/resources">
<property name="enableSubPackages" value="true"/>
</sqlMapGenerator>
<!-- 创建map接口,作用等同于dao接口 -->
<javaClientGenerator targetPackage="com.map" type="XMLMAPPER" targetProject="src/main/java">
<property name="enableSubPackages" value="true"/>
</javaClientGenerator> <table tableName="food_item" enableCountByExample="false" enableUpdateByExample="false" enableDeleteByExample="false"
enableSelectByExample="false" selectByExampleQueryId="false">
<generatedKey column="food_id" sqlStatement="MySql" identity="true"/>
</table> </context> </generatorConfiguration>
配置完毕后,在项目上指定maven build,并设置Goals为mybatis-generator:generate -X,随后自动生成相应文件如图

4、配置applicationContext.xml
在配置generatorConfig.xml时提到了,如果要想在applicationContext.xml中实现Mybatis与spring的整合,那么至少需要配置两样东西:一个 SqlSessionFactory 和至少一个数据映射器类,此外,在applicationContext.xml中还要扫描实现业务逻辑的service包并配置数据库链接源
<?xml version="1.0" encoding="UTF-8"?>
<beans xmlns="http://www.springframework.org/schema/beans"
xmlns:xsi="http://www.w3.org/2001/XMLSchema-instance"
xmlns:context="http://www.springframework.org/schema/context"
xmlns:tx="http://www.springframework.org/schema/tx"
xsi:schemaLocation="http://www.springframework.org/schema/beans
http://www.springframework.org/schema/beans/spring-beans.xsd
http://www.springframework.org/schema/context
http://www.springframework.org/schema/context/spring-context.xsd
http://www.springframework.org/schema/tx
http://www.springframework.org/schema/tx/spring-tx.xsd">
<!--配置连接池数据源-->
<bean id="dataSource" class="org.apache.commons.dbcp.BasicDataSource">
<property name="driverClassName" value="com.mysql.cj.jdbc.Driver"/>
<property name="url" value="jdbc:mysql://127.0.0.1:3306/test?autoReconnect=true&utoReconnectForPools=true&
useUnicode=true&characterEncoding=utf-8&useSSL=false&
serverTimezone=UTC"/>
<property name="username" value="root"/>
<property name="password" value="wqk123"/>
</bean>
<!--spring和mybatis整合-->
<!--会话工厂bean SQLSessionFactory-->
<bean id="SqlSessionFactory" class="org.mybatis.spring.SqlSessionFactoryBean">
<!--数据源-->
<property name="dataSource" ref="dataSource"/>
<!--别名-->
<property name="typeAliasesPackage" value="com.entity"/>
<!-- 感觉这里不应该直接写:ToolTPOMapper.xml -->
<!--sql映射文件-->
<property name="mapperLocations" value="classpath:map/FoodItemMapper.xml"/>
<!--<property name="configLocation" value="classpath:config/mybatis-config.xml"/>-->
</bean>
<!--扫描mapper接口包-->
<bean class="org.mybatis.spring.mapper.MapperScannerConfigurer">
<!--指定要自动扫描接口的基础包,实现接口-->
<property name="basePackage" value="com.map"/>
<!--指定会话工厂,如果上下文中只有一个则可以省去-->
<property name="sqlSessionFactoryBeanName" >
<idref bean="SqlSessionFactory"/>
</property>
</bean>
<!--service实现类扫描-->
<context:component-scan base-package="com.service"/>
<!--事务管理-->
<bean id="transactionManager" class="org.springframework.jdbc.datasource.DataSourceTransactionManager">
<property name="dataSource" ref="dataSource"/>
</bean>
<!--支持注解驱动的事务管理,指定事务管理器-->
<tx:annotation-driven transaction-manager="transactionManager"/> </beans>
至此,配置以及完成
三、验证配置
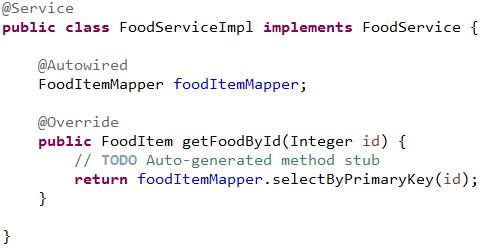
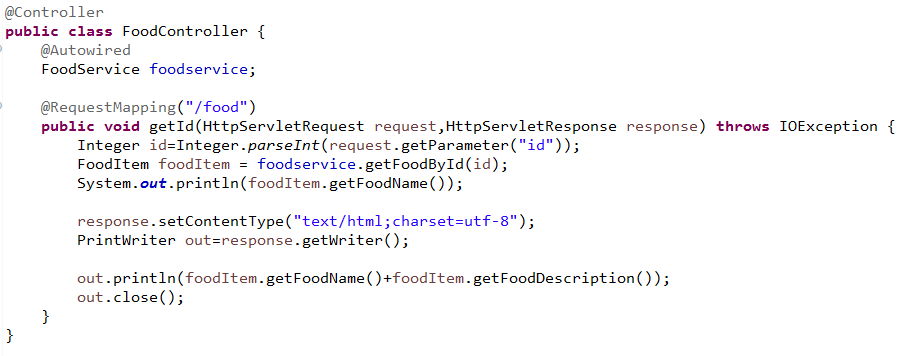
实现一个简单的功能,通过id参数读取相应食品的名称以及描述
1、定义业务逻辑的service接口并实现

2、定义控制器并实现
3、测试实际效果

SSM整合配置(Spring+Spring MVC+Mybatis)的更多相关文章
- SSM整合配置
SSM三大框架整合详细教程(Spring+SpringMVC+MyBatis) 使用SSM(Spring.SpringMVC和Mybatis)已经有三个多月了,项目在技术上已经没有什么难点了,基于现有 ...
- SSM 整合配置
目录 1. Maven : pox.xml 2. Web container : web.xml 3. Spring context : dbconfig.properties + applicati ...
- SSM 整合配置以及一个简单登陆案例(个人记录)
SSM 文件以及大部分参考博客 https://blog.csdn.net/qq598535550/article/details/51703190 简答的登陆注册案例下载链接在末尾补贴图了 我建立的 ...
- SSM三大框架整合配置(Spring+SpringMVC+MyBatis)
web.xml <?xml version="1.0" encoding="UTF-8"?> <web-app xmlns:xsi=" ...
- JAVA 框架 / SSM / SSM SPRING+SPING MVC + MYBATIS 三大框架整合详细步骤
http://how2j.cn/k/ssm/ssm-tutorial/1137.html
- SSM整合案例(Spring+Struts+Mybatis)
项目目录结构 第一步:创建数据库和数据表 CREATE DATABASE IF NOT EXISTS mybatis; USE mybatis; CREATE TABLE t_user ( ) NOT ...
- redis与ssm整合(用 redis 替代mybatis二级缓存)
SSM+redis整合 这里主要是利用redis去做mybatis的二级缓存,mybaits映射文件中所有的select都会刷新已有缓存,如果不存在就会新建缓存,所有的insert,update操作都 ...
- SSM整合配置错误记录
org.springframework.beans.factory.UnsatisfiedDependencyException: Error creating bean with name 'dic ...
- SSM Spring +SpringMVC+Mybatis 整合配置 及pom.xml
SSM Spring +SpringMVC+Mybatis 配置 及pom.xml SSM框架(spring+springMVC+Mybatis) pom.xml文件 maven下的ssm整合配置步骤
随机推荐
- RecyclerView嵌套TextView时显示文字不全的解决方法之一
先描述一下这个小bug:简单的TextView嵌套RecyclerView作为itemView时,可能会在文本中出现布局覆盖的现象,itemView的布局其实很简单,就是一个RelativeLayou ...
- opensuse编译安装Python3后缺少zlib
目录 opensuse编译安装Python3后缺少zlib 前言 编译安装 python导入zlib 重新编译python并指定zlib opensuse编译安装Python3后缺少zlib 前言 由 ...
- Django2.0路由层-URLconf
目录 DJango2.0路由层-URLconf 概述 urlpatterns 实例 path转换器 自定义path转换器 使用正则表达式 命名组(有名分组) URLconf匹配请求URL中的哪些部分 ...
- WCF 基于 WinForm 宿主 发布
ServiceHost Host = new ServiceHost(typeof(ServiceHTTP)); //绑定 System.ServiceModel.Channels.Binding h ...
- csv文件的读取
.csv Introduction CSV是一种常以逗号或者制表符分割的文件格式. 利用Excel创建一个csv文件 用记事本打开,实际上是这样子的: 读取csv文件 直接用open()打开 with ...
- 基于Java反射的map自动装配JavaBean工具类设计
我们平时在用Myabtis时不是常常需要用map来传递参数,大体是如下的步骤: public List<Role> findRoles(Map<String,Object> p ...
- Lombok快速上手(安装、使用与注解参数)
目录 Lombok插件安装与使用说明 常见参数 lombok的依赖于安装 依赖管理 IDEA插件的安装 @Data小例子 扩展@ToString 构造器注解扩展 @Log及其他日志注解 资料链接 Lo ...
- Java POI单元格使用心得
1: /** * Created by liuguangxin on 2018/5/16. * <p> * MergeRegion:表示excel中cell的信息,startRow与end ...
- 关于Netty Pipeline中Handler的执行顺序问题
原文地址:http://blog.csdn.net/wgyvip/article/details/25637651 最近在学习Netty框架,根据官网的教程学着做了几个小测试,都成功了,后面开始试着写 ...
- 【转】android Toast大全(五种情形)建立属于你自己的Toast
Toast用于向用户显示一些帮助/提示.下面我做了5中效果,来说明Toast的强大,定义一个属于你自己的Toast. 1.默认效果 代码 Toast.makeText(getApplicationCo ...