Android四种基本布局(LinearLayout \ RelativeLayout \ FrameLayout \ TableLayout)
------------------------------------------LinearLayout---------------------------------------------------
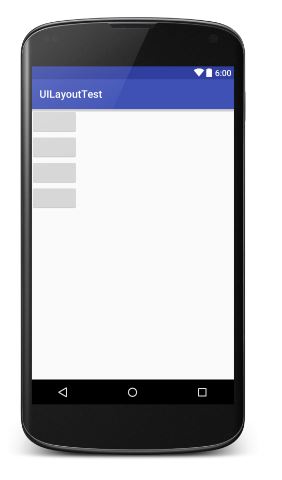
LinearLayout又称作线性布局,是一种非常常用的布局。
正如名字所描述的一样,这个布局会将它所包含的控件在线性方向上依次排列。
<?xml version="1.0" encoding="utf-8"?>

<!--水平布局--><!--android:orientation="vertical"-->

<LinearLayout xmlns:android="http://schemas.android.com/apk/res/android"

    android:layout_width="match_parent"

    android:layout_height="match_parent"

    android:orientation="vertical">

    <Button

        android:layout_width="wrap_content"

        android:layout_height="wrap_content" />

    <Button

        android:layout_width="wrap_content"

        android:layout_height="wrap_content" />

    <Button

        android:layout_width="wrap_content"

        android:layout_height="wrap_content" />

    <Button

        android:layout_width="wrap_content"

        android:layout_height="wrap_content" />

</LinearLayout>
<?xml version="1.0" encoding="utf-8"?>

<!--垂直布局--><!--android:orientation="horizontal"-->

<LinearLayout xmlns:android="http://schemas.android.com/apk/res/android"

    android:layout_width="match_parent"

    android:layout_height="match_parent"

    android:orientation="horizontal">

    <Button

        android:layout_width="wrap_content"

        android:layout_height="wrap_content" />

    <Button

        android:layout_width="wrap_content"

        android:layout_height="wrap_content" />

    <Button

        android:layout_width="wrap_content"

        android:layout_height="wrap_content" />

    <Button

        android:layout_width="wrap_content"

        android:layout_height="wrap_content" />

</LinearLayout>

提示:如果LinearLayout的排列方式是horizontal,内部控件就绝不能将宽度指定为imatch_parent,因为这样的话单独一个控件就会将整个水平方向占满,其他控件就没有可放置的位置了。同样的道理,如果LinearLayout的排列方向是vertical,内部的控件就不能将高度指定为match_parent。
Layout_gravity属性:
注意:android:gravity是用于指定文字在控件中的对齐方式,而android:layout_gravity是用于指定控件在布局中的对齐方式。
android:layout_gravity的限制:
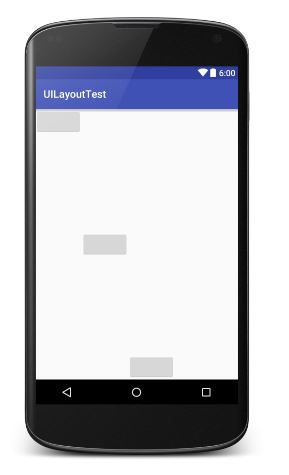
当LinearLayout的排了方式是horizontal时,只有垂直方向上的对齐方式才会生效,因为此时水平方向上的长度是不固定的,每添加一个控件,水平方向的长度都会发生改变,因此无法指定该方向上的对齐方式。
同样的道理,当LinearLayout的排列方向是vertical时,只有水平方向上的对齐方式才会生效。
horizontal: top bottom center_vertical
vertical: left right center_horizontal
<?xml version="1.0" encoding="utf-8"?>

<!--layout_gravity的示例-->

<LinearLayout xmlns:android="http://schemas.android.com/apk/res/android"

    android:layout_width="match_parent"

    android:layout_height="match_parent"

    android:orientation="horizontal">

    <Button

        android:layout_width="wrap_content"

        android:layout_height="wrap_content"

        android:layout_gravity="top" />

    <Button

        android:layout_width="wrap_content"

        android:layout_height="wrap_content"

        android:layout_gravity="center_vertical" />

    <Button

        android:layout_width="wrap_content"

        android:layout_height="wrap_content"

        android:layout_gravity="bottom" />

</LinearLayout>
Layout_weight属性:
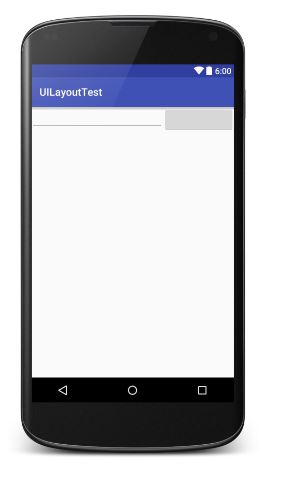
android:layout_weight 这个属性允许我们使用比例的方式来指定控件的大小,它在手机屏幕的适配性方面可以起到非常重要的作用。
Layout_weight表示屏占比。系统会根据layout_weight的数值大小为控件分配空间。调节layout_weight数值,也就是调整各个控件所占空间的比例。
<?xml version="1.0" encoding="utf-8"?>

<LinearLayout xmlns:android="http://schemas.android.com/apk/res/android"

    android:layout_width="match_parent"

    android:layout_height="match_parent"

    android:orientation="horizontal">

    <!--EditText占5/6-->

    <EditText

        android:layout_width="wrap_content"

        android:layout_height="wrap_content"

        android:layout_weight="5" />

    <!--Button占1/6-->

    <Button

        android:layout_width="wrap_content"

        android:layout_height="wrap_content"

        android:layout_weight="1" />

</LinearLayout>
------------------------------------------------RelativeLayout--------------------------------------------------------
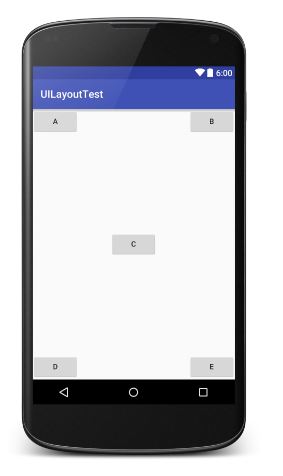
RelativeLayout又称为相对布局,也是一种非常常用的布局。它可以通过相对定位的方式让控件出现在布局的任何位置。
父元素定位属性:
        android:layout_alignParentTop="true"        对齐父类顶端

        android:layout_alignParentBottom="true"     对齐父类底端

        android:layout_alignParentLeft="true"       对齐父类左端

        android:layout_alignParentRight="true"      对齐父类右端

        android:layout_centerInParent="true"        居于父类中间
<?xml version="1.0" encoding="utf-8"?>

<RelativeLayout xmlns:android="http://schemas.android.com/apk/res/android"

    android:layout_width="match_parent"

    android:layout_height="match_parent">

    <Button

        android:layout_width="wrap_content"

        android:layout_height="wrap_content"

        android:layout_alignParentLeft="true"

        android:layout_alignParentTop="true"

        android:text="A" />

    <Button

        android:layout_width="wrap_content"

        android:layout_height="wrap_content"

        android:layout_alignParentRight="true"

        android:layout_alignParentTop="true"

        android:text="B" />

    <Button

        android:layout_width="wrap_content"

        android:layout_height="wrap_content"

        android:layout_centerInParent="true"

        android:text="C" />

    <Button

        android:layout_width="wrap_content"

        android:layout_height="wrap_content"

        android:layout_alignParentBottom="true"

        android:layout_alignParentLeft="true"

        android:text="D" />

    <Button

        android:layout_width="wrap_content"

        android:layout_height="wrap_content"

        android:layout_alignParentBottom="true"

        android:layout_alignParentRight="true"

        android:text="E" />

</RelativeLayout>
相对控件ID定位:
      android:layout_above="@+id/A"       居于A元素顶端

      android:layout_below="@+id/A"       居于A元素底端

      android:layout_toLeftOf="@+id/A"    居于A元素左端

      android:layout_toRightOf="@+id/A"   居于A元素右端
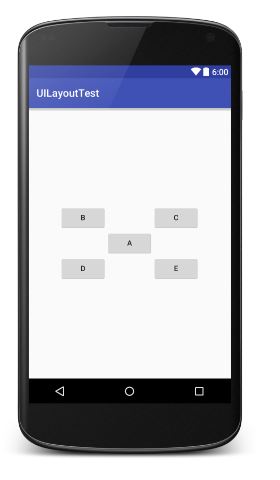
<?xml version="1.0" encoding="utf-8"?>

<RelativeLayout xmlns:android="http://schemas.android.com/apk/res/android"

    android:layout_width="match_parent"

    android:layout_height="match_parent">

    <Button

        android:id="@+id/A"

        android:layout_width="wrap_content"

        android:layout_height="wrap_content"

        android:layout_centerInParent="true"

        android:text="A" />

    <Button

        android:id="@+id/B"

        android:layout_width="wrap_content"

        android:layout_height="wrap_content"

        android:layout_above="@+id/A"

        android:layout_toLeftOf="@+id/A"

        android:text="B" />

    <Button

        android:id="@+id/C"

        android:layout_width="wrap_content"

        android:layout_height="wrap_content"

        android:layout_above="@+id/A"

        android:layout_toRightOf="@+id/A"

        android:text="C" />

    <Button

        android:id="@+id/D"

        android:layout_width="wrap_content"

        android:layout_height="wrap_content"

        android:layout_below="@+id/A"

        android:layout_toLeftOf="@+id/A"

        android:text="D" />

    <Button

        android:id="@+id/E"

        android:layout_width="wrap_content"

        android:layout_height="wrap_content"

        android:layout_below="@+id/A"

        android:layout_toRightOf="@+id/A"

        android:text="E" />

</RelativeLayout>
居中对齐:
      android:layout_centerHorizontal="true"      水平居中

      android:layout_centerVertical="true"        垂直居中
提示:居中属性可能会有点难以理解,尝试着这样去想象,指定垂直或水平表示该方向有界,居中就是找到这个界限的中间位置。
尝试去做下面这个RelativeLayout:

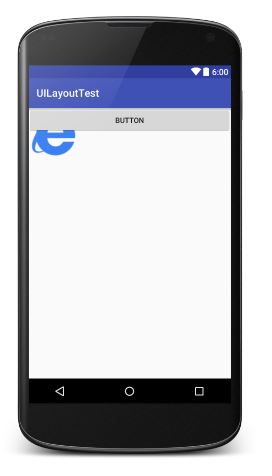
---------------------------------------------------FrameLayout----------------------------------------------------
FrameLayout相比前面两种布局就简单太多了。这种布局没有任何定位方式,所有的控件都会摆放在布局的左上角。
<?xml version="1.0" encoding="utf-8"?>

<FrameLayout xmlns:android="http://schemas.android.com/apk/res/android"

    android:layout_width="match_parent"

    android:layout_height="match_parent">

    <ImageView

        android:layout_width="wrap_content"

        android:layout_height="wrap_content"

        android:src="@drawable/ie" />

    <Button

        android:layout_width="match_parent"

        android:layout_height="wrap_content"

        android:text="Button" />

</FrameLayout>
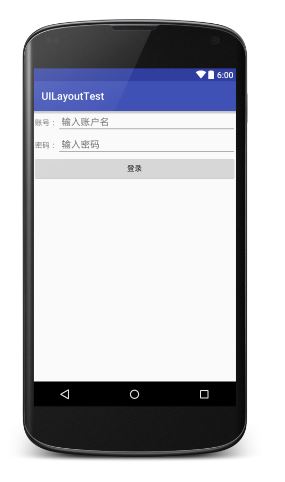
-----------------------------------------------------TableLayout-----------------------------------------------------------
TableLayout允许我们使用表格的方式来排列控件,这种布局也不是很常用,只需要了解一下它的基本用法就可以了。
既然是表格,那就一定会有行和列,在设计表格时我们尽量让每一行都拥有相同的列数,这样的表格也是最简单的。
不过有时候事情并非总会顺从我们的心意,当表格的某行一定要有不相等的列数时,就需要通过合并单元格的方式来应对。
<?xml version="1.0" encoding="utf-8"?>

<TableLayout xmlns:android="http://schemas.android.com/apk/res/android"

    android:layout_width="match_parent"

    android:layout_height="match_parent">

    <TableRow>

        <TextView android:text=" 账号:" />

        <EditText android:hint=" 输入账户名" />

    </TableRow>

    <TableRow>

        <TextView android:text=" 密码:" />

        <EditText android:hint=" 输入密码" />

    </TableRow>

    <TableRow>

        <Button android:text="登录" />

    </TableRow>

</TableLayout>

在TableLayout中每添加一个TableRow就表示在表格中添加了一行,然后再TableRow中每添加一个控件,就表示在该列中加入了一列。
TableRow中的控件是不能指定宽度的。这时就需要通过对单元格进行合并来解决这个问题,使用android:layout_span="2"让登录按钮占据两列的空间,以保证表格结构的合理性。
因为TableRow中无法指定控件的宽度,所以当前的登录界面并没有充分利用屏幕的宽度。这时使用android:strechColumns属性将TableLayout的某一列进行拉伸,以达到自动适应屏幕宽度的作用。
注意:android:stretchColumns的值是从0开始,表示第一行。
<?xml version="1.0" encoding="utf-8"?>

<TableLayout xmlns:android="http://schemas.android.com/apk/res/android"

    android:layout_width="match_parent"

    android:layout_height="match_parent"

    android:stretchColumns="1">

    <TableRow>

        <TextView android:text=" 账号:" />

        <EditText android:hint=" 输入账户名" />

    </TableRow>

    <TableRow>

        <TextView android:text=" 密码:" />

        <EditText android:hint=" 输入密码" />

    </TableRow>

    <TableRow>

        <Button

            android:layout_span="2"

            android:text="登录" />

    </TableRow>

</TableLayout>
Android中其实还有一个AbsoluteLayout,不过这个布局已经被GridLayout替代了。官方已经不推荐使用这种布局了,因此直接将它忽略就好。
Android四种基本布局(LinearLayout \ RelativeLayout \ FrameLayout \ TableLayout)的更多相关文章
- android:四种基本布局
一个丰富的界面总是要由很多个控件组成的,那我们如何才能让各个控件都有条不紊地 摆放在界面上,而不是乱糟糟的呢?这就需要借助布局来实现了.布局是一种可用于放置很 多控件的容器,它可以按照一定的规律调整内 ...
- 从0系统学Android--3.2四种基本布局
从0系统学Android--3.2四种基本布局 本系列文章目录:更多精品文章分类 本系列持续更新中.... 3.3 系统控件不够用?创建自定义控件 上一节我们学习了 Android 中的一些常用的控件 ...
- Android学习笔记(八)——四种基本布局
//此系列博文是<第一行Android代码>的学习笔记,如有错漏,欢迎指正! 布局是一种可用于放置很多控件的容器,它可以按照一定的规律调整内部控件的位置,或是嵌套子布局,从而编写出精美的界 ...
- Android学习之基础知识六—Android四种布局详解
一.Android基本布局 布局是一种可以放置多个控件的容器,它可以按照一定规律调整内部控件的位置,而且布局内部除了可以放置控件外,还可以放置布局,实现多层布局嵌套.布局和控件.布局和布局之间的关系如 ...
- Android四种布局方式
线性布局 <LinearLayout android:layout_width="match_parent" android:layout_height="wrap ...
- android 基本布局(RelativeLayout、TableLayout等)使用方法及各种属性
本文介绍 Android 界面开发中最基本的四种布局LinearLayout.RelativeLayout.FrameLayout.TableLayout 的使用方法及这四种布局中常用的属性. ...
- [Android]Android之四种常见布局
一个丰富的界面总是要由很多个控件组成的,那我们如何才能让各个控件都有条不紊地 摆放在界面上,而不是乱糟糟的呢?这就需要借助布局来实现了.布局是一种可用于放置很 多控件的容器,它可以按照一定的规律调整内 ...
- Android几种layout(布局)的区别
1.FrameLayout:children按照从左上开始的顺序排列,主要用于tabed view或者图片切换功能:最简单的布局模型,在这种布局下每个添加的子控件都被放在布局的左上角,并覆盖在前一子控 ...
- Android四种点击事件和五中存储方式
Android点击事件的四种实现方式 1.内部类实现onClickListenter接口 bt_login.setOnClickListener(new MyListener()); class My ...
随机推荐
- Stack类
栈是采用先进后出的数据存储方式,每一个栈都包含一个栈顶,每次出栈是将栈顶的数据取出. import java.util.Stack; //=============================== ...
- 在VS中向命令行添加参数的方法
在VS中向命令行添加参数的方法 在VS中向命令行添加参数,即向main()函数传递参数的方法: 右键单击要 添加参数的工程-->属性-->配置属性-->调试,在右侧“命令参数”栏输入 ...
- hasClass addClass removeClass
//函数有class function hasClass(ele,cls){ return -1<(" "+ele.className+" ").inde ...
- JQM页面跳转,多种效果
<div data-role="page" id="pageone"> <div data-role="header"&g ...
- Camera
Unity摄像机Viewport使用 http://blog.sina.com.cn/s/blog_64ab3f630100y7e7.html http://blog.sina.com.cn/s/ ...
- 带条件Count
END) , END) , END) , END) FROM TB
- Struts2版本配置2.1以前与以后---关于filter的配置
严重: Dispatcher initialization failed java.lang.RuntimeException JavaStrutsfreemarkerApacheXML 严重: D ...
- RabbitMQ安装后不能运行 Error: unable to connect to node nodedown
本地安装RabbitMQ后总是不能正常的使用.. 命令行输入 rabbitMQctl Status 报下边的错 Error: unable to connect to node 'rabbit@YO ...
- 判断QQ是否在线
<html> <body> ggygygygy<br> <td><a href="http://wpa.qq.com/msgrd?V=1 ...
- iOS数据库学习(2)-基础SQL语句
/* 1. 创建一个数据表 */ CREATE TABLE IF NOT EXISTS t_dog (name text, age integer); CREATE TABLE IF NOT EXIS ...