使用PHP连接数据库实现留言板功能
PHP实现留言板功能:
1 首先是登录页面:
<!DOCTYPE html>
<html>
<head>
<meta charset="UTF-8">
<title>留言板登录</title>
<script src="bootstrap/js/jquery-1.11.2.min.js"></script>
<script src="bootstrap/js/bootstrap.min.js"></script>
<link href="bootstrap/css/bootstrap.min.css" rel="stylesheet" type="text/css"/>
</head>
<style>
.header{
margin-left: 550px;
margin-top: 150px;
height: 300px;
max-width: 300px;
}
.xiugai{
max-width: 200px;
}
.login{
margin-top: 10px;
}
</style>
<body>
<form action="messloginchuli.php" method="post">
<div class="header">
<h2>开发部内部留言板</h2>
<div class="input-group xiugai">
<span class="input-group-addon" style="margin-top: 20px;">用户名:</span>
<input type="text" class="form-control" name="uid" placeholder="请输入用户名">
</div>
<div class="input-group xiugai" style="margin-top: 10px;">
<span class="input-group-addon">口令:</span>
<input type="text" class="form-control" name="pwd" placeholder="请输入口令">
</div>
<button type="submit" class="btn btn-success login">登录</button>
</div>
</form>
</body>
</html>
2 登录页面完成后要进入登录处理页面了,也就是上面提交到的messloginchuli.php
<?php
session_start(); // 登录之后要把所包含登录的页面连接起来,开启session
$uid = $_POST["uid"];
$pwd = $_POST["pwd"];
require_once "./DBDA.class.php";
$db = new DBDA();
$sql = "select password from yuangong where username='{$uid}'";
$arr = $db->query($sql,0);
//var_dump($arr[0][0]);
if($arr[0][0]=$pwd && !empty($pwd)){
$_SESSION["uid"]=$uid;
header("location:message.php");
}
?>
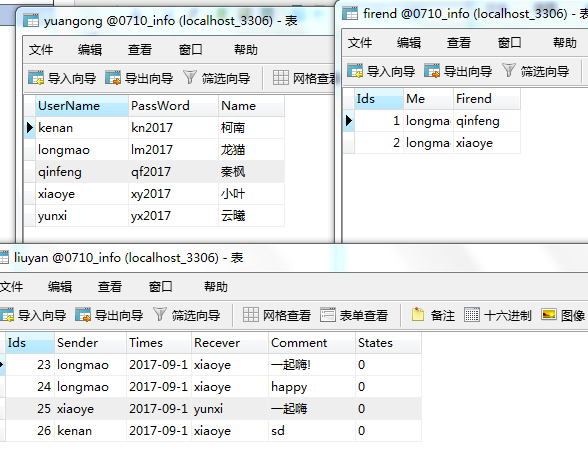
登录页面效果如图:
3.登录完成后是进入主页面,也就是显示自己收到的对话内容,下面是设计的数据库的表格和主页面的代码:
<!DOCTYPE html>
<html>
<head>
<meta charset="UTF-8">
<title></title>
<script src="bootstrap/js/jquery-1.11.2.min.js"></script>
<script src="bootstrap/js/bootstrap.min.js"></script>
<link href="bootstrap/css/bootstrap.min.css" rel="stylesheet" type="text/css"/>
</head>
<style>
.mess{
max-width: 800px;
margin-left: 250px;
margin-top: 150px;
}
</style>
<body>
<?php
session_start();
$uid = $_SESSION["uid"];
if(empty($_SESSION["uid"])){
header("location:messlogin.php");
exit;
}
?>
<div style="margin-left: 880px; margin-top: 50px;font-size: 20px;" >
<a href="publish_info.php" >发布信息</a>
<a href="tuichuchuli.php">退出系统</a>
</div>
<table class="table table-bordered mess" style="margin-top: -40px;">
<caption style="font-size: 20px;">
留言信息:
</caption>
<thead>
<tr>
<th>发送人</th>
<th>发送时间</th>
<th>接收人</th>
<th>信息内容</th>
</tr>
</thead>
<tbody>
<?php
require_once "./DBDA.class.php";
$db = new DBDA();
$sql = "select * from liuyan where recever='{$uid}' or recever='all'";
$arr = $db->query($sql,0);
foreach($arr as $v){
echo "<tr>
<td>{$v[1]}</td>
<td>{$v[2]}</td>
<td>{$v[3]}</td>
<td>{$v[4]}</td>
</tr>";
}
?>
</tbody>
</table>
</body>
</html>
退出登录系统实现用户注销,返回登录页面功能代码如下:
<?php
session_start();
$uid = $_SESSION["uid"];
unset($uid);
header("location:messlogin.php");
?>
代码写到这里,比较重要的部分就完成了,下面是要进入发布信息页面了,相当于之前写的添加的页面,其处理页面也是和之前没什么区别的,差别在于现在的处理页面是在用户登录的情况下操作的,需要用session把所有的登录情况下的页面连接起来
主页面效果如图:

4.最后是信息发布页面,可以给任何人发送信息
代码如下:
<!DOCTYPE html>
<html>
<head>
<meta charset="UTF-8">
<title>发布信息界面</title>
<script src="bootstrap/js/jquery-1.11.2.min.js"></script>
<script src="bootstrap/js/bootstrap.min.js"></script>
<link href="bootstrap/css/bootstrap.min.css" rel="stylesheet" type="text/css"/>
</head>
<style>
.mess{
max-width: 200px;
margin-top: 10px;
}
.mess1{
margin-top: 10px;
}
.opt{
max-width: 200px;
margin-left: 80px;
}
.txt{
max-width: 200px;
}
</style>
<body>
<?php
session_start();
$uid = $_SESSION["uid"];
if (empty($_SESSION["uid"])) {
header("location:messlogin.php");
exit ;
}
?>
<div style="margin-left: 500px; margin-top: 150px;">
<div style="margin-left: 60px; margin-bottom: 20px;font-size: 20px;" >
<a href="message.php" >查看信息</a>
<a href="seemess.php" style="margin-left: 80px;" >查看发送信息</a>
</div>
<form class="form-horizontal" role="form" action="infochuli.php" method="post">
<div class="form-group">
<label for="firstname" class="col-sm-2 control-label mess1">接收人:</label>
<div class="form-group ">
<select class="form-control opt" name="recever">
<option value="all">所有人</option>
<?php
require_once "./DBDA.class.php";
$db = new DBDA();
//这里可以给特定的朋友发送信息的sql语句
//$sql = "select firend.firend,yuangong.name from firend,yuangong where firend.firend
//= yuangong.username and firend.me = '{$uid}'";
$sname = "select * from yuangong where username not in ('{$uid}')";
$arr = $db->query($sname,0);
//var_dump($arr[0][2]);
foreach($arr as $v){
echo "<option value='{$v[0]}'>{$v[2]}</option>";
}
?>
</select>
</div>
</div>
<div class="form-group">
<label for="lastname" class="col-sm-2 control-label mess1">信息内容:</label>
<div class="col-sm-10">
<textarea class="form-control txt" rows="3" name="content"></textarea>
</div>
</div>
<div class="form-group">
<div class="col-sm-offset-2 col-sm-10">
<button type="submit" class="btn btn-default">
发送
</button>
</div>
</div>
</form>
</div>
</body>
</html>
发信息页面如图: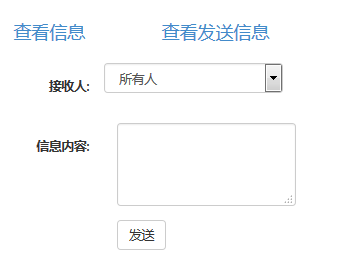
5.发布信息完成后要进入处理页面了,也就是提交到的infochuli.php,最后返回发送信息界面
<?php
session_start();
$uid = $_SESSION["uid"];
$recever = $_POST["recever"];
$content = $_POST["content"];
$arr = $_POST["recever"];
$t = date("Y-m-d H:i:s");
require_once "./DBDA.class.php";
$db = new DBDA();
$sql = "insert into liuyan values('','{$uid}','{$t}','{$recever}','{$content}',0)";
$arr = $db->query($sql);
if($arr && !empty($arr)){
header("location:publish_info.php");
}else{
echo "发送失败!";
}
?>
使用PHP连接数据库实现留言板功能的更多相关文章
- jsp中运用application实现共享留言板功能
jsp中application的知识点总结: 1.一个Web应用程序启动后,将会自动创建一个application对象,在整个应用程序的运行过程中只有这一个application对象,即所有访问该网站 ...
- Web开发从零单排之二:在自制电子请帖中添加留言板功能,SAE+PHP+MySql
在上一篇博客中介绍怎样在SAE平台搭建一个html5的电子请帖网站,收到很多反馈,也有很多人送上婚礼的祝福,十分感谢! web开发从零学起,记录自己学习过程,各种前端大神们可以绕道不要围观啦 大婚将至 ...
- 利用反馈字段给帝国cms添加留言板功能(图文教程)
帝国cms的插件中提供信息反馈字段,很多人却不会用.这里谢寒教大家如何来给自己的帝国cms网站添加留言板功能 1.找到添加地址 2.添加字段 3.你可以在字段中添加多种字段类型(有文本域,单行文本框, ...
- php实现留言板功能
这个小小的留言板功能适合班级内或者公司内部之间的讨论,对话和留言,非常的方便,更重要的是无需网络,对于公司管理层来说是非常乐于常见的, 下面是这个留言板的写法: 1 首先是登录页面: <form ...
- JS原生编写实现留言板功能
实现这个留言板功能比较简单,所以先上效果图: 实现用户留言内容,留言具体时间. <script> window.onload = function(){ var oMessageBox = ...
- 原生JS实现简单留言板功能
原生JS实现简单留言板功能,实现技术:css flex,原生JS. 因为主要是为了练手js,所以其中布局上的一些细节并未做处理. <!DOCTYPE html> <html lang ...
- 用php(session)实现留言板功能----2017-05-09
要实现留言功能,发送者和接受者必不可少,其次就是留言时间留言内容. 要实现的功能: 1.登录者只能查看自己和所有人的信息,并能够给好友留言 2.留言板页面,好友采取下拉列表,当留言信息为空时,显示提示 ...
- Vue之简易的留言板功能
今天我将带大家通过Vue的todolist案例来完成一个简易的网页留言板! LES'T GO! 首先我们需要在页面上搭建一个input文本输入框,并设置提交按钮,通过循环指令来完成输入框的信息提交! ...
- Django web框架开发基础-django实现留言板功能
1.创建项目 cmd django-admin startpoject cloudms 2.创建APP cmd django-admin startapp msgapp 3.修改settings,T ...
随机推荐
- Python中生成器generator和迭代器Iterator的使用方法
一.生成器 1. 生成器的定义 把所需要值得计算方法储存起来,不会先直接生成数值,而是等到什么时候使用什么时候生成,每次生成一个,减少计算机占用内存空间 2. 生成器的创建方式 第一种只要把一个列表生 ...
- ElasticSearch启动错误处理方法
在配置完elasticsearch,启动程序会包如下错误: [elk@localhost bin]$ ./elasticsearch ... ... ERROR: [3] bootstrap chec ...
- css 选择符中的 >,+,~,=,^,$,*,|,:,空格 的意思
一,作为元素选择符 * 表示通配选择符 * {} // 所有元素 二,作为关系选择符 空格 表示包含选择符 a div{} // 被a元素包含的div > 表示子元素选择符 a > div ...
- ONI无法启动: Uh oh! Unable to launch Neovim...
问题描述 在终端中是可以打开nvim的,ONI无法正确找到位置 解决方法 修改配置文件,指定nvim的路径 终端中输入which nvim定位所在位置,这里返回的结果是/usr/local/bin/n ...
- php关联Apache和nginx
编辑apache配置文件httpd.conf,以apache支持php vim /etc/httpd/httpd.conf添加如下二行 AddType application/x-httpd-php ...
- 【非专业前端】Vue UI 之 建立Vuetify工程
先建立一个工程[Webpack] .. ..建立好之后,进入目录,添加vuetify插件 cd vuetify-demo vue add vuetify[会出错] npm install vuetif ...
- session/cookie/token
1.cookie是把登录信息存放在客户端 2.session是把登录信息存放在服务器 3.token是在登录的时候服务器提供一个令牌标识,可以存放在local storage,请求资源时带上token ...
- 【清北学堂2018-刷题冲刺】Contest 1
Task 1:最小公倍数 输入n,求n与246913578的最小公倍数. 结果对1234567890取模. [样例输入] 3 [样例输出] 246913578 [数据规模和约定] 对于30%的数据 ...
- passat QA / error code 20190210
s 帕萨特B5 技术资料下载 https://pan.baidu.com/s/1KXYly7eGDUSI5QiLcz8fiQ 提取码: 1i7u 星期日,10,二月,2019,17:16:16:317 ...
- awk 处理文本:行转列,列转行
[root@centos ~]# cat f 1 2 3 4 5 1 2 3 4 5 1 2 3 4 5 1 2 3 4 51 2 3 4 5 awk '{for(i=1;i<=NF;i++)a ...