Upload Files In ASP.NET Core 1.0 (Form POST And JQuery Ajax)
Uploading files is a common requirement in web applications. In ASP.NET Core 1.0 uploading files and saving them on the server is quite easy. To that end this article shows how to do just that.
Begin by creating a new ASP.NET Core project. Then add HomeController to the controllers folder. Then add UploadFiles view to Views > Home folder of the application.
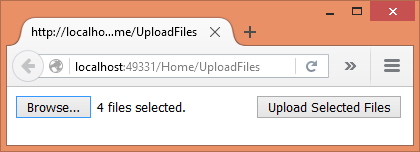
HTML form for uploading files
Open the UploadFiles view and add the following HTML markup in it:
<form asp-action="UploadFiles"

      asp-controller="Home"

      method="post"

      enctype="multipart/form-data">

    <input type="file" name="files" multiple />

    <input type="submit" value="Upload Selected Files" />

</form>
The above markup uses form tag helper of ASP.NET Core MVC. The asp-action attribute indicates that the form will be processed by the UploadFiles action upon submission. The asp-controller attribute specifies the name of the controller containing the action method. The form is submitted using POST method. The enctype attribute of the form is set to multipart/form-data indicating that it will be used for file upload operation.
The form contains an input field of type file. The name attribute of the file input field is set to files and the presence of multiple attribute indicates that multiple files can be uploaded at once. The submit button submits the form to the server.
If you run the application at this stage, the UploadFiles view should look like this:
Constructor and UploadFiles() GET action
Now, open the HomeController and add a constructor to it as shown below:
public class HomeController : Controller

{

    private IHostingEnvironment hostingEnv;

    public HomeController(IHostingEnvironment env)

    {

        this.hostingEnv = env;

    }

}
The constructor has a parameter of type IHostingEnvironment (Microsoft.AspNet.Hosting namespace). This parameter will be injected by MVC framework into the constructor. You need this parameter to construct the full path for saving the uploaded files. The IHostingEnvironment object is saved into a local variable for later use.
Then add UploadFiles() action for GET requests as shown below:
public IActionResult UploadFiles()

{

    return View();

}
UploadFiles() POST action
Finally, add UploadFiles() action for handling the POST requests.
[HttpPost]
public IActionResult UploadFiles(IList<IFormFile> files)
{
long size = 0;
foreach(var file in files)
{
var filename = ContentDispositionHeaderValue
.Parse(file.ContentDisposition)
.FileName
.Trim('"');
filename = hostingEnv.WebRootPath + $@"\{fileName}";
size += file.Length;
using (FileStream fs = System.IO.File.Create(filename))
{
file.CopyTo(fs);
fs.Flush();
}
}
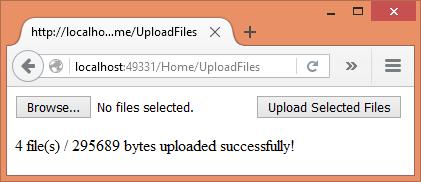
ViewBag.Message = $"{files.Count} file(s) /
{size} bytes uploaded successfully!";
return View();
}
The UploadFiles() action has a parameter - IList<IFormFile> - to receive the uploaded files. The IFormFile object represents a single uploaded file. Inside, a size variable keeps track of how much data is being uploaded. Then a foreach loop iterates through the files collection.
The client side file name of an uploaded file is extracted using the ContentDispositionHeaderValue class (Microsoft.Net.Http.Headers namespace) and the ContentDisposition property of the IFormFile object. Let's assume that you wish to save the uploaded files into the wwwroot folder. So, to arrive at the full path you use the WebRootPath property of IHostingEnvironment and append the filename to it.
Finally, the file is saved by the code inside the using block. That code basically creates a new FileStream and copies the uploaded file into it. This is done using the Create() and the CopyTo() methods. A message is stored in ViewBag to be displayed to the end user.
The following figure shows a sample successful run of the application:
Using jQuery Ajax to upload the files
In the preceding example you used form POST to submit the files to the server. What if you wish to send files through Ajax? You can accomplish the task with a little bit of change to the <form> and the action.
Modify the <form> to have a plain push button instead of submit button as shown below:
<form method="post" enctype="multipart/form-data">

    <input type="file" id="files"

           name="files" multiple />

    <input type="button"

           id="upload"

           value="Upload Selected Files" />

</form>
Then add a <script> reference to the jQuery library and write the following code to handle the click event of the upload button:
$(document).ready(function () {

    $("#upload").click(function (evt) {

        var fileUpload = $("#files").get(0);

        var files = fileUpload.files;

        var data = new FormData();

        for (var i = 0; i < files.length ; i++) {

            data.append(files[i].name, files[i]);

        }

        $.ajax({

            type: "POST",

            url: "/home/UploadFilesAjax",

            contentType: false,

            processData: false,

            data: data,

            success: function (message) {

                alert(message);

            },

            error: function () {

                alert("There was error uploading files!");

            }

        });

    });

});
The above code grabs each file from the file field and adds it to a FormData object (HTML5 feature). Then $.ajax() method POSTs the FormData object to the UploadFilesAjax() action of the HomeController. Notice that the contentType and processData properties are set to false since the FormData contains multipart/form-data content. The data property holds the FormData object.
Finally, add UploadFilesAjax() action as follows:
[HttpPost]

public IActionResult UploadFilesAjax()

{

    long size = 0;

    var files = Request.Form.Files;

    foreach (var file in files)

    {

        var filename = ContentDispositionHeaderValue

                        .Parse(file.ContentDisposition)

                        .FileName

                        .Trim('"');

        filename = hostingEnv.WebRootPath + $@"\{filename}";

        size += file.Length;

        using (FileStream fs = System.IO.File.Create(filename))

        {

           file.CopyTo(fs);

           fs.Flush();

        }

    }

    string message = $"{files.Count} file(s) /

                       {size} bytes uploaded successfully!";

    return Json(message);

}
The code inside UploadFilesAjax() is quite similar to UploadFiles() you wrote earlier. The main difference is how the files are received. The UploadFilesAjax() doesn't have IList<IFormFile> parameter. Instead it receives the files through the Request.Form.Files property. Secondly, the UploadFilesAjax() action returns a JSON string message to the caller for the sake of displaying in the browser.
That's it for now! Keep coding!!
Upload Files In ASP.NET Core 1.0 (Form POST And JQuery Ajax)的更多相关文章
- ASP.NET Core 1.0中实现文件上传的两种方式(提交表单和采用AJAX)
Bipin Joshi (http://www.binaryintellect.net/articles/f1cee257-378a-42c1-9f2f-075a3aed1d98.aspx) Uplo ...
- 用VSCode开发一个asp.net core2.0+angular5项目(5): Angular5+asp.net core 2.0 web api文件上传
第一部分: http://www.cnblogs.com/cgzl/p/8478993.html 第二部分: http://www.cnblogs.com/cgzl/p/8481825.html 第三 ...
- [Asp.net core 2.0]Ueditor 图片上传
摘要 在项目中要用到富文本编辑器,包含上传图片,插入视频等功能.但ueditor只有.net版本,没有支持core.那么上传等接口就需要自己实现了. 一个例子 首先去百度ueditor官网下载简化版的 ...
- ASP.NET Core 1.0 入门——了解一个空项目
var appInsights=window.appInsights||function(config){ function r(config){t[config]=function(){var i= ...
- #ASP.NET Core 1.0 Key Features
Cross platform support and flexible runtime engine(跨平台支持和灵活的运行时引擎) ASP.NET Core 1.0 offers support f ...
- 【原生态跨平台:ASP.NET Core 1.0(非Mono)在 Ubuntu 14.04 服务器上一对一的配置实现-篇幅1】
鸡冻人心的2016,微软高产年. build 2016后 各种干货层出不穷. 1 Win10 集成了bash ,实现了纳德拉的成诺,Microsoft Love Linux!!! 2 跨平台 ,收 ...
- Amazing ASP.NET Core 2.0
前言 ASP.NET Core 的变化和发展速度是飞快的,当你发现你还没有掌握 ASP.NET Core 1.0 的时候, 2.0 已经快要发布了,目前 2.0 处于 Preview 1 版本,意味着 ...
- 从头编写 asp.net core 2.0 web api 基础框架 (1)
工具: 1.Visual Studio 2017 V15.3.5+ 2.Postman (Chrome的App) 3.Chrome (最好是) 关于.net core或者.net core 2.0的相 ...
- 【转载】从头编写 asp.net core 2.0 web api 基础框架 (1)
工具: 1.Visual Studio 2017 V15.3.5+ 2.Postman (Chrome的App) 3.Chrome (最好是) 关于.net core或者.net core 2.0的相 ...
随机推荐
- Feature Extractor[SENet]
0.背景 这个模型是<Deep Learning高质量>群里的牛津大神Weidi Xie在介绍他们的VGG face2时候,看到对应的论文<VGGFace2: A dataset f ...
- IntelliJ IDEA(四) :Settings(上)
前言 IDEA是一个智能开发工具,每个开发者的使用习惯不同,如何个性化自己的IDEA?我们可以通过Settings功能来设置.Settings文件是IDEA的配置文件,通过他可以设置主题,项目,插件, ...
- Spring MVC自定义403,404,500状态码返回页面
代码 HTTP状态码干货:http://tool.oschina.net/commons?type=5 import org.springframework.boot.web.servlet.erro ...
- SNMP 获取交换机端口相关信息
原文地址:https://blog.csdn.net/ysdaniel/article/details/37927541 我们想用snmpwalk查看网络设备的端口,MIB库中相关定义的信息如下: [ ...
- Python_列表推导式_生成器的表达式_各种推导式_40
列表推导式: #列表推导式: egg_list = [] for i in range(10): egg_list.append('鸡蛋%s'%i) print(egg_list) egon egg_ ...
- H5 32-百度首页
32-百度首页 新 闻 网 页 贴 吧 知 道 音 乐 图 片 视 频 地 图 百科 文库 hao123 | 更多>> 百度地图带你吃喝玩乐,全心全意为人民服务 把百度设为主页 安装百度卫 ...
- Spectral Bounds for Sparse PCA: Exact and Greedy Algorithms[贪婪算法选特征]
目录 概括 Sparse PCA Formulation 非常普遍的问题 Optimality Conditions Eigenvalue Bounds 算法 代码 概括 这篇论文,不像以往的那些论文 ...
- ubuntu中更改apache默认目录的方法
如上,在这两个文件中,我都改为/home/www 及/home/www/html
- bat 文本合并
小工具—把多个TXT文件合成一个 - TTXS_RS的博客 - CSDN博客https://blog.csdn.net/TTXS_RS/article/details/79743384 把所有文本文件 ...
- Jenkins Installing and migration
JAVA_Zookeeper_hadoop - CSDN博客https://blog.csdn.net/wangmuming Installing Jenkins on Red Hat distrib ...