深度学习中batch normalization
目录
Batch Normalization笔记
我们将会用MNIST数据集来演示这个batch normalization的使用, 以及他所带来的效果:
引包
import tensorflow as tf

import os

from tensorflow.examples.tutorials.mnist import input_data

from tensorflow.contrib.layers import flatten

import numpy as np

import tensorflow.contrib.slim as slim
构建模型:
def model1(input, is_training, keep_prob):

    input = tf.reshape(input, shape=[-1, 28, 28, 1])

    batch_norm_params = {

        'decay': 0.95,

        'updates_collections': None

    }

    with slim.arg_scope([slim.batch_norm, slim.dropout], is_training=is_training):

        with slim.arg_scope([slim.conv2d, slim.fully_connected],

                            weights_initializer=tf.truncated_normal_initializer(stddev=0.1),

                                normalizer_fn=slim.batch_norm, normalizer_params=batch_norm_params,

                            activation_fn=tf.nn.crelu):

            conv1 = slim.conv2d(input, 16, 5, scope='conv1')

            pool1 = slim.max_pool2d(conv1, 2, scope='pool1')

            conv2 = slim.conv2d(pool1, 32, 5, scope='conv2')

            pool2 = slim.max_pool2d(conv2, 2, scope='pool2')

            flatten = slim.flatten(pool2)

            fc = slim.fully_connected(flatten, 1024, scope='fc1')

            print(fc.get_shape())

            drop = slim.dropout(fc, keep_prob=keep_prob)

            logits = slim.fully_connected(drop, 10, activation_fn=None, scope='logits')

            return logits
def model2(input, is_training, keep_prob):

    input = tf.reshape(input, shape=[-1, 28, 28, 1])

    with slim.arg_scope([slim.conv2d, slim.fully_connected],

                        weights_initializer=tf.truncated_normal_initializer(stddev=0.1),

                            normalizer_fn=None, activation_fn=tf.nn.crelu):

        with slim.arg_scope([slim.dropout], is_training=is_training):

            conv1 = slim.conv2d(input, 16, 5, scope='conv1')

            pool1 = slim.max_pool2d(conv1, 2, scope='pool1')

            conv2 = slim.conv2d(pool1, 32, 5, scope='conv2')

            pool2 = slim.max_pool2d(conv2, 2, scope='pool2')

            flatten = slim.flatten(pool2)

            fc = slim.fully_connected(flatten, 1024, scope='fc1')

            print(fc.get_shape())

            drop = slim.dropout(fc, keep_prob=keep_prob)

            logits = slim.fully_connected(drop, 10, activation_fn=None, scope='logits')

            return logits
构建训练函数
def train(model, model_path, train_log_path, test_log_path):

    # 计算图

    graph = tf.Graph()

    with graph.as_default():

        X = tf.placeholder(dtype=tf.float32, shape=[None, 28 * 28])

        Y = tf.placeholder(dtype=tf.float32, shape=[None, 10])

        is_training = tf.placeholder(dtype=tf.bool)

        logit = model(X, is_training, 0.7)

        loss =tf.reduce_mean(tf.nn.softmax_cross_entropy_with_logits(logits=logit, labels=Y))

        accuray = tf.reduce_mean(tf.cast(tf.equal(tf.argmax(logit, 1), tf.argmax(Y, 1)), tf.float32))

        global_step = tf.Variable(0, trainable=False)

        learning_rate = tf.train.exponential_decay(0.1, global_step, 1000, 0.95, staircase=True)

        optimizer = tf.train.AdagradOptimizer(learning_rate=learning_rate)

        update = slim.learning.create_train_op(loss, optimizer, global_step)

        mnist = input_data.read_data_sets("tmp", one_hot=True)

        saver = tf.train.Saver()

        tf.summary.scalar("loss", loss)

        tf.summary.scalar("accuracy", accuray)

        merged_summary_op = tf.summary.merge_all()

        train_summary_writter = tf.summary.FileWriter(train_log_path, graph=tf.get_default_graph())

        test_summary_writter = tf.summary.FileWriter(test_log_path, graph=tf.get_default_graph())

        init = tf.global_variables_initializer()

        iter_num = 10000

        batch_size = 1024

        os.environ["CUDA_VISIBLE_DEVICES"] = '2'  # 选择cuda的设备

        gpu_options = tf.GPUOptions(per_process_gpu_memory_fraction=0.2)  # gpu显存使用

        with tf.Session(config=tf.ConfigProto(gpu_options=gpu_options)) as sess:

            sess.run(init)

            if not os.path.exists(os.path.dirname(model_path)):

                os.makedirs(os.path.dirname(model_path))

            else:

                try:

                    saver.restore(sess, model_path)

                except:

                    pass

            for i in range(iter_num):

                x, y = mnist.train.next_batch(batch_size)

                sess.run(update, feed_dict={X:x, Y:y, is_training:True})

                if i  % 100 == 0:

                    x_test, y_test = mnist.test.next_batch(batch_size)

                    print("train:", sess.run(accuray, feed_dict={X: x, Y: y, is_training:False}))

                    print("test:", sess.run(accuray, feed_dict={X: x_test, Y: y_test, is_training:False}))

                    saver.save(sess, model_path)

                    g, summary = sess.run([global_step, merged_summary_op], feed_dict={X: x, Y: y, is_training:False})

                    train_summary_writter.add_summary(summary, g)

                    train_summary_writter.flush()

                    g, summary = sess.run([global_step, merged_summary_op], feed_dict={X: x_test, Y: y_test, is_training:False})

                    test_summary_writter.add_summary(summary, g)

                    test_summary_writter.flush()

        train_summary_writter.close()

        test_summary_writter.close()
下面我们来进行计算:
train(model1, "model1/model", "model1_train_log", "model1_test_log")
train(model2, "model2/model", "model2_train_log", "model2_test_log")
结论
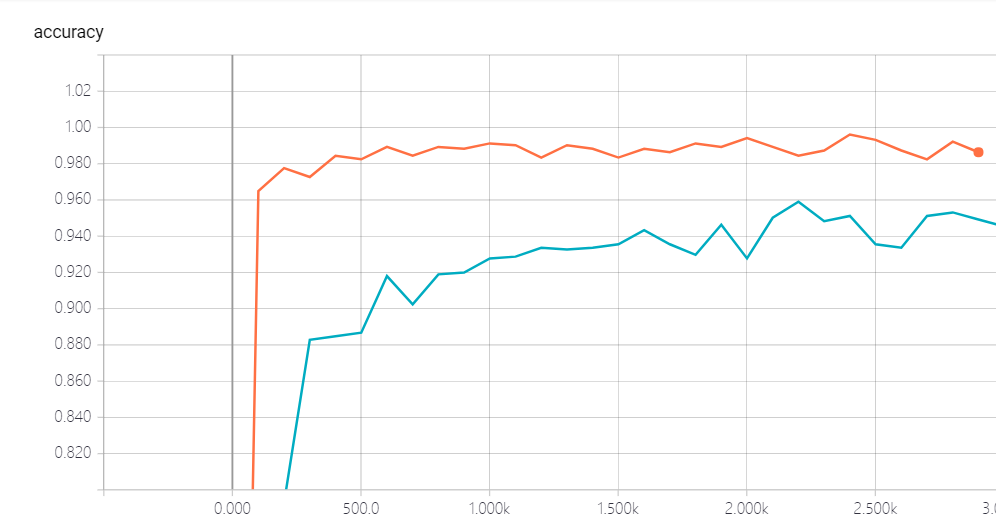
我们发现, 加了batch norm的似乎收敛的更快一些, 这个我们可以从对比上可以很清楚的看到, 所以这个bn是我们一个很好的技术, 前提是你选的参数比较适合.
以下是两个注意点:
The keys to use batch normalization in slim are:
Set proper decay rate for BN layer. Because a BN layer uses EMA (exponential moving average) to approximate the population mean/variance, it takes sometime to warm up, i.e. to get the EMA close to real population mean/variance. The default decay rate is 0.999, which is kind of high for our little cute MNIST dataset and needs ~1000 steps to get a good estimation. In my code, decay is set to 0.95, then it learns the population statistics very quickly. However, a large value of decay does have it own advantage: it gathers information from more mini-batches thus is more stable.
Use slim.learning.create_train_op to create train op instead of tf.train.GradientDescentOptimizer(0.1).minimize(loss) or something else!.
深度学习中batch normalization的更多相关文章
- 深度学习中 Batch Normalization
深度学习中 Batch Normalization为什么效果好?(知乎) https://www.zhihu.com/question/38102762
- 深度学习中 Batch Normalization为什么效果好
看mnist数据集上其他人的CNN模型时了解到了Batch Normalization 这种操作.效果还不错,至少对于训练速度提升了很多. batch normalization的做法是把数据转换为0 ...
- zz详解深度学习中的Normalization,BN/LN/WN
详解深度学习中的Normalization,BN/LN/WN 讲得是相当之透彻清晰了 深度神经网络模型训练之难众所周知,其中一个重要的现象就是 Internal Covariate Shift. Ba ...
- 深度学习中的Normalization模型
Batch Normalization(简称 BN)自从提出之后,因为效果特别好,很快被作为深度学习的标准工具应用在了各种场合.BN 大法虽然好,但是也存在一些局限和问题,诸如当 BatchSize ...
- [优化]深度学习中的 Normalization 模型
来源:https://www.chainnews.com/articles/504060702149.htm 机器之心专栏 作者:张俊林 Batch Normalization (简称 BN)自从提出 ...
- 深度学习之Batch Normalization
在机器学习领域中,有一个重要的假设:独立同分布假设,也就是假设训练数据和测试数据是满足相同分布的,否则在训练集上学习到的模型在测试集上的表现会比较差.而在深层神经网络的训练中,当中间神经层的前一层参数 ...
- 深度学习中优化【Normalization】
深度学习中优化操作: dropout l1, l2正则化 momentum normalization 1.为什么Normalization? 深度神经网络模型的训练为什么会很困难?其中一个重 ...
- 深度学习中的batch、epoch、iteration的含义
深度学习的优化算法,说白了就是梯度下降.每次的参数更新有两种方式. 第一种,遍历全部数据集算一次损失函数,然后算函数对各个参数的梯度,更新梯度.这种方法每更新一次参数都要把数据集里的所有样本都看一遍, ...
- 深度学习中 --- 解决过拟合问题(dropout, batchnormalization)
过拟合,在Tom M.Mitchell的<Machine Learning>中是如何定义的:给定一个假设空间H,一个假设h属于H,如果存在其他的假设h’属于H,使得在训练样例上h的错误率比 ...
随机推荐
- CSS深入理解学习笔记之vertical-align
1.vertical-align基本认识 支持的属性值: ①线类:baseline(默认),top,middle,bottom ②文本类:text-top,text-bottom ③上标下标类:sub ...
- linkin大话设计模式--桥接模式
linkin大话设计模式--桥接模式 桥接模式是一种结构化模式,他主要应对的是:由于实际的需要,某个类具有2个或者2个以上维度的变化,如果只是使用继承将无法实现功能,或者会使得设计变得相当的臃肿.我们 ...
- java 基本数据类型与变量类型
Java语言提供了八种基本类型.六种数字类型(四个整数型,两个浮点型),一种字符类型,还有一种布尔型. byte,short,char,int,long,float,double Java语言支持的变 ...
- mysql 出现Duplicate entry ‘xxx’ for key ‘PRIMARY’,一个自增字段达到了上限,
mysql 出现Duplicate entry 'xxx' for key 'PRIMARY',一个自增字段达到了上限,
- Unity 使用Plugins接入安卓SDK 基础篇
一.须知 本帖适合对安卓一点基础都没有,有一定Unity基础.刚刚接完一个某文档很简单的渠道SDk,也当是自己总结一下. 二.Unity中的目录创建与理解. Plugins:插件目录,该目录再编译项目 ...
- 深入浅出Hadoop之HDFS
hadoop生态系统一直是大数据灵域的热点,其中包括今天要聊的HDFS,和计划以后想聊的yarn, mapreduce, spark, hive, hbase, 已经聊过的zookeeper,等等. ...
- xBIM 格式之间转换
目录 xBIM 应用与学习 (一) xBIM 应用与学习 (二) xBIM 基本的模型操作 xBIM 日志操作 XBIM 3D 墙壁案例 xBIM 格式之间转换 xBIM 使用Linq 来优化查询 x ...
- 让44.1版本的sketch打开更高版本的sketch文件
我们都知道,sketch的有效license与版本挂钩.最近设计师又更新了sketch版本,导致她生成的源文件我都无法打开. 毕竟我不是使用sketch进行UI设计,仅用它来查看设计稿参数,再花99美 ...
- verilog实验3:AD转换后串口输出到PC端
一.实验任务 通过tcl549AD转换芯片将模拟电压信号转换为数字信号,并通过串口显示到电脑上.此AD转换芯片为串行转换芯片,且转换速率要和串口选择的速率匹配.等待串口发送完后,再进行下一次AD转换. ...
- Codewars练习
记录一下比较聪明的codewars练习题解决方案,不得转载. 2017/12/19 You will be given a string and you task is to check if it ...