opencv python:直线检测 与 圆检测
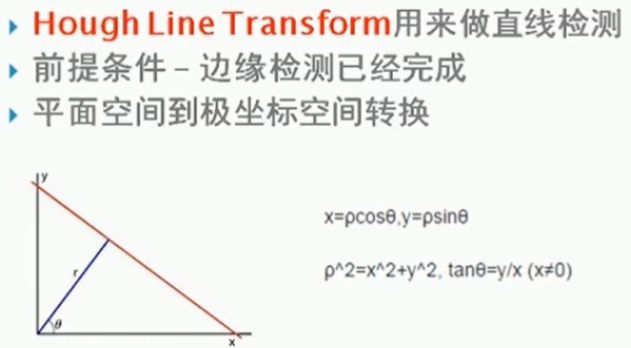
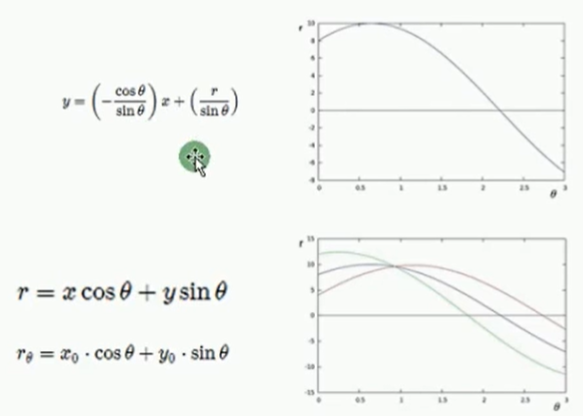
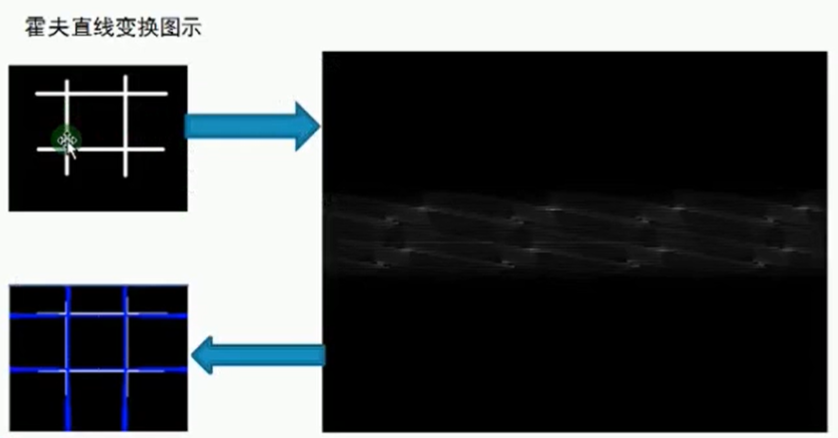
霍夫直线变换介绍
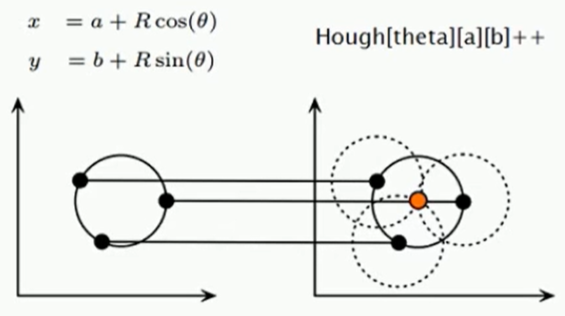
霍夫圆检测


现实中:
example
import cv2 as cv

import numpy as np

# 关于霍夫变换的相关知识可以看看这个博客:https://blog.csdn.net/kbccs/article/details/79641887

def line_detection(image):

    gray = cv.cvtColor(image, cv.COLOR_BGR2GRAY)

    edges = cv.Canny(gray, 50, 150, apertureSize=3)

    # cv2.HoughLines()返回值就是(ρ,θ)。ρ 的单位是像素,θ 的单位是弧度。

    # 这个函数的第一个参数是一个二值化图像,所以在进行霍夫变换之前要首先进行二值化,或者进行 Canny 边缘检测。

    # 第二和第三个值分别代表 ρ 和 θ 的精确度。第四个参数是阈值,只有累加其中的值高于阈值时才被认为是一条直线,

    # 也可以把它看成能 检测到的直线的最短长度(以像素点为单位)。

    lines = cv.HoughLines(edges, 1, np.pi/180, 200)

    for rho, theta in lines[0]:

        a = np.cos(theta)

        b = np.sin(theta)

        x0 = a * rho

        y0 = b * rho

        x1 = int(x0 + 1000*(-b))

        y1 = int(y0 + 1000*(a))

        x2 = int(x0 - 1000*(-b))

        y2 = int(y0 - 1000*(a))

        cv.line(image, (x1, y1), (x2, y2), (0, 0, 255), 2)

    cv.imshow("line_detection", image)

def line_detection_possible_demo(image):

    gray = cv.cvtColor(image, cv.COLOR_BGR2GRAY)

    edges = cv.Canny(gray, 50, 150, apertureSize=3)

    minLineLength = 100

    maxLineGap = 10

    lines = cv.HoughLinesP(edges, 1, np.pi / 180, 100, minLineLength, maxLineGap)

    for x1, y1, x2, y2 in lines[0]:

        cv.line(image, (x1, y1), (x2, y2), (0, 255, 0), 2)

    cv.imshow('hough_lines', image)

# Hough Circle 在xy坐标系中一点对应Hough坐标系中的一个圆,xy坐标系中圆上各个点对应Hough坐标系各个圆,

# 相加的一点,即对应xy坐标系中圆心

# 现实考量:Hough圆对噪声比较敏感,所以做hough圆之前要中值滤波,

# 基于效率考虑,OpenCV中实现的霍夫变换圆检测是基于图像梯度的实现,分为两步:

# 1. 检测边缘,发现可能的圆心候选圆心开始计算最佳半径大小

# 2. 基于第一步的基础上,从

def detection_circles_demo(image):

    dst = cv.pyrMeanShiftFiltering(image, 10, 100)  # 均值迁移,sp,sr为空间域核与像素范围域核半径

    gray = cv.cvtColor(dst, cv.COLOR_BGR2GRAY)

    """

    .   @param image 8-bit, single-channel, grayscale input image.

    .   @param circles Output vector of found circles. Each vector is encoded as  3 or 4 element

    .   floating-point vector \f$(x, y, radius)\f$ or \f$(x, y, radius, votes)\f$ .

    .   @param method Detection method, see #HoughModes. Currently, the only implemented method is #HOUGH_GRADIENT

    .   @param dp Inverse ratio of the accumulator resolution to the image resolution. For example, if

    .   dp=1 , the accumulator has the same resolution as the input image. If dp=2 , the accumulator has

    .   half as big width and height.

        累加器图像的分辨率。这个参数允许创建一个比输入图像分辨率低的累加器。

        (这样做是因为有理由认为图像中存在的圆会自然降低到与图像宽高相同数量的范畴)。

        如果dp设置为1,则分辨率是相同的;如果设置为更大的值(比如2),累加器的分辨率受此影响会变小(此情况下为一半)。

        dp的值不能比1小。

    .   @param minDist Minimum distance between the centers of the detected circles. If the parameter is

    .   too small, multiple neighbor circles may be falsely detected in addition to a true one. If it is

    .   too large, some circles may be missed.

        该参数是让算法能明显区分的两个不同圆之间的最小距离。

    .   @param param1 First method-specific parameter. In case of #HOUGH_GRADIENT , it is the higher

    .   threshold of the two passed to the Canny edge detector (the lower one is twice smaller).

        用于Canny的边缘阀值上限,下限被置为上限的一半。

    .   @param param2 Second method-specific parameter. In case of #HOUGH_GRADIENT , it is the

    .   accumulator threshold for the circle centers at the detection stage. The smaller it is, the more

    .   false circles may be detected. Circles, corresponding to the larger accumulator values, will be

    .   returned first.

        累加器的阀值。

    .   @param minRadius Minimum circle radius.

        最小圆半径

    .   @param maxRadius Maximum circle radius. If <= 0, uses the maximum image dimension. If < 0, returns

    .   centers without finding the radius.

        最大圆半径。

    """

    circles = cv.HoughCircles(gray, cv.HOUGH_GRADIENT, 1, 20, param1=40, param2=30, minRadius=0, maxRadius=0)

    circles = np.uint16(np.around(circles))

    print(circles.shape)

    for i in circles[0,:]:  # draw the outer circle

        cv.circle(image, (i[0], i[1]), i[2], (0, 255, 0), 2) # draw the center of the circle

        cv.circle(image, (i[0], i[1]), 2, (0, 0, 255), 3)

    cv.imshow('detected circles', image)

def main():

    src = cv.imread("../images/sudoku.png")

    cv.imshow("demo",src)

    line_detection(src)

    # line_detection_possible_demo(src)

    # img = cv.imread("../images/circle.png")

    # detection_circles_demo(img)

    cv.waitKey(0)  # 等有键输入或者1000ms后自动将窗口消除,0表示只用键输入结束窗口

    cv.destroyAllWindows()  # 关闭所有窗口

if __name__ == '__main__':

    main()
opencv python:直线检测 与 圆检测的更多相关文章
- OpenCV——霍夫变换(直线检测、圆检测)
x #include <opencv2/opencv.hpp> #include <iostream> #include <math.h> using namesp ...
- 14、OpenCV Python 直线检测
__author__ = "WSX" import cv2 as cv import numpy as np #-----------------霍夫变换------------- ...
- 【python+opencv】直线检测+圆检测
Python+OpenCV图像处理—— 直线检测 直线检测理论知识: 1.霍夫变换(Hough Transform) 霍夫变换是图像处理中从图像中识别几何形状的基本方法之一,应用很广泛,也有很多改进 ...
- OpenCV 学习笔记03 直线和圆检测
检测边缘和轮廓不仅重要,还经常用到,它们也是构成其他复杂操作的基础. 直线和形状检测与边缘和轮廓检测有密切的关系. 霍夫hough 变换是直线和形状检测背后的理论基础.霍夫变化是基于极坐标和向量开展的 ...
- Python+OpenCV图像处理(十五)—— 圆检测
简介: 1.霍夫圆变换的基本原理和霍夫线变换原理类似,只是点对应的二维极径.极角空间被三维的圆心和半径空间取代.在标准霍夫圆变换中,原图像的边缘图像的任意点对应的经过这个点的所有可能圆在三维空间用圆心 ...
- OpenCV + Python 人脸检测
必备知识 Haar-like opencv api 读取图片 灰度转换 画图 显示图像 获取人脸识别训练数据 探测人脸 处理人脸探测的结果 实例 图片素材 人脸检测代码 人脸检测结果 总结 下午的时候 ...
- opencv —— HoughCircles 霍夫圆变换原理及圆检测
霍夫圆变换原理 霍夫圆变换的基本原理与霍夫线变换(https://www.cnblogs.com/bjxqmy/p/12331656.html)大体类似. 对直线来说,一条直线能由极径极角(r,θ)表 ...
- cv2.cornerHarris()详解 python+OpenCV 中的 Harris 角点检测
参考文献----------OpenCV-Python-Toturial-中文版.pdf 参考博客----------http://www.bubuko.com/infodetail-2498014. ...
- OpenCV + python 实现人脸检测(基于照片和视频进行检测)
OpenCV + python 实现人脸检测(基于照片和视频进行检测) Haar-like 通俗的来讲,就是作为人脸特征即可. Haar特征值反映了图像的灰度变化情况.例如:脸部的一些特征能由矩形特征 ...
随机推荐
- HTML列表,表格与媒体元素
一.无序列表 <ul> <li>无序列表</li> <li>有序列表</li> <li>自定义列表</li> < ...
- ISCC2018_leftleftrightright-Writeup
leftleftrightright(150) 这个题学到了不少东西,值得认真写一下 下载好文件后发现是upx的壳,upx -d直接脱掉后运行,发现是经典的check输入的题目(作为一个linuxer ...
- Anaconda多环境Python
1. Create a new environment for 32bit Python 2.7: set CONDA_FORCE_32BIT=1 conda create -n py27_32 py ...
- Federal Learning(联邦学习)认知
本人是学生党,同时也是小菜鸡一枚,撞运气有机会能够给老师当项目助理,在这个过程中肯定会学到一些有趣的知识,就在此平台上记录一下,在知识点方面有不对的还请各位指正. What(什么是联邦学习?) 联邦学 ...
- Python_初识面向对象
楔子 你现在是一家游戏公司的开发人员,现在需要你开发一款叫做<人狗大战>的游戏,你就思考呀,人狗作战,那至少需要2个角色,一个是人, 一个是狗,且人和狗都有不同的技能,比如人拿棍打狗, 狗 ...
- 【Unity|C#】基础篇(0)——C#与.NET框架
[学习资料] <C#图解教程>(第1章):https://www.cnblogs.com/moonache/p/7687551.html 电子书下载:https://pan.baidu.c ...
- 生产环境实践:Cana实现MySQL到ES实时同步
注:由于文章篇幅有限,完整文档可扫下面二维码免费获取,更有深受好评的大数据实战精英+架构师好课等着你. 速点链接加入高手战队:http://www.dajiangtai.com/course/112. ...
- 【PAT甲级】1113 Integer Set Partition (25分)
题意: 输入一个正整数N(2<=N<=1e5),接着输入N个正整数,将这些数字划分为两个不相交的集合,使得他们的元素个数差绝对值最小且元素和差绝对值最大. AAAAAccepted cod ...
- JSON对比XML
相同点 纯文本 具有“自我描述性”(人类可读) 具有层级结构 可通过JavaScript解析 数据可使用AJAX传输 不同点 没有结束标签 更短 读写速度更快 能够使用内建的JavaScript ev ...
- python调用c/c++ (入参出参为指针)
python可以使用ctypes库调用c++编译的so库函数 0x01 c/c++编译为so库文件 编译C文件 gcc -o libpycallfoo.so -shared -fPIC rsa.c ...