springadmin环境搭建
一路走过来都是坑,记录下来以后避免在踩
springboot版本信息2.0.3
admin服务端
maven配置信息
<properties>

        <project.build.sourceEncoding>UTF-</project.build.sourceEncoding>

        <project.reporting.outputEncoding>UTF-</project.reporting.outputEncoding>

        <java.version>1.8</java.version>

        <spring-boot-admin.version>2.0.</spring-boot-admin.version>

        <spring-cloud.version>Finchley.RELEASE</spring-cloud.version>

    </properties>

    <dependencies>

        <dependency>

            <groupId>de.codecentric</groupId>

            <artifactId>spring-boot-admin-starter-server</artifactId>

        </dependency>

        <dependency>

            <groupId>org.springframework.boot</groupId>

            <artifactId>spring-boot-starter-web</artifactId>

        </dependency>

        <dependency>

            <groupId>org.springframework.boot</groupId>

            <artifactId>spring-boot-starter-security</artifactId>

        </dependency>

        <dependency>

            <groupId>org.springframework.boot</groupId>

            <artifactId>spring-boot-starter-actuator</artifactId>

        </dependency>

        <dependency>

            <groupId>org.springframework.cloud</groupId>

            <artifactId>spring-cloud-starter-netflix-eureka-client</artifactId>

        </dependency>

    </dependencies>

    <dependencyManagement>

        <dependencies>

            <dependency>

                <groupId>org.springframework.cloud</groupId>

                <artifactId>spring-cloud-dependencies</artifactId>

                <version>${spring-cloud.version}</version>

                <type>pom</type>

                <scope>import</scope>

            </dependency>

            <dependency>

                <groupId>de.codecentric</groupId>

                <artifactId>spring-boot-admin-dependencies</artifactId>

                <version>${spring-boot-admin.version}</version>

                <type>pom</type>

                <scope>import</scope>

            </dependency>

        </dependencies>

    </dependencyManagement>

    <build>

        <plugins>

            <plugin>

                <groupId>org.springframework.boot</groupId>

                <artifactId>spring-boot-maven-plugin</artifactId>

                <executions>

                    <execution>

                        <goals>

                            <goal>build-info</goal>

                        </goals>

                    </execution>

                </executions>

            </plugin>

        </plugins>

    </build>
yml配置文件
spring:

  application:

    name: claimadmin

  profiles:

    active:

      - secure

# tag::configuration-eureka[]

eureka:   #<>

  instance:

    leaseRenewalIntervalInSeconds:

    health-check-url-path: /actuator/health #.0后actuator的地址发生了变化

  client:

    registryFetchIntervalSeconds:

    serviceUrl:

      defaultZone: ${EUREKA_SERVICE_URL:http://localhost:8091}/eureka/

# .0开始,actuator默认不开放,所以要设置为开发

management:

  endpoints:

    web:

      exposure:

        include: "*"

  endpoint:

    health:

      show-details: ALWAYS

server:

  port:

# end::configuration-eureka[]

---

spring:

  profiles: insecure

---

# admin登录的用户名和密码

spring:

  profiles: secure

  security:

    user:

      name: user

      password:

# 注册给eureka的时候告诉eureka自己的密码

eureka:

  instance:

    metadata-map:

      "user.name": ${spring.security.user.name}         #These two are needed so that the server

      "user.password": ${spring.security.user.password} #can access the protected client endpoints
启动类
@EnableDiscoveryClient

@EnableAdminServer

@SpringBootApplication

public class ClaimadminApplication {

    public static void main(String[] args) {

        SpringApplication.run(ClaimadminApplication.class, args);

    }

    @Profile("insecure")

    @Configuration

    public static class SecurityPermitAllConfig extends WebSecurityConfigurerAdapter {

        @Override

        protected void configure(HttpSecurity http) throws Exception {

            http.authorizeRequests().anyRequest().permitAll()//

                    .and().csrf().disable();

        }

    }

    @Profile("secure")

    @Configuration

    public static class SecuritySecureConfig extends WebSecurityConfigurerAdapter {

        private final String adminContextPath;

        public SecuritySecureConfig(AdminServerProperties adminServerProperties) {

            this.adminContextPath = adminServerProperties.getContextPath();

        }

        @Override

        protected void configure(HttpSecurity http) throws Exception {

            // @formatter:off

            SavedRequestAwareAuthenticationSuccessHandler successHandler = new SavedRequestAwareAuthenticationSuccessHandler();

            successHandler.setTargetUrlParameter("redirectTo");

            http.authorizeRequests()

                    .antMatchers(adminContextPath + "/assets/**").permitAll()

                    .antMatchers(adminContextPath + "/login").permitAll()

                    .anyRequest().authenticated()

                    .and()

                    .formLogin().loginPage(adminContextPath + "/login").successHandler(successHandler)

                    .and()

                    .logout().logoutUrl(adminContextPath + "/logout").and()

                    .httpBasic().and()

                    .csrf().disable();

            // @formatter:on

        }

    }

}
总结下来没有多少东西,按官方文档或者找博客按套路来就行,没有什么高深的东西
admin客户端
添加maven配置
<!--监控平台引用  begin-->

        <dependency>

            <groupId>org.springframework.cloud</groupId>

            <artifactId>spring-cloud-starter</artifactId>

        </dependency>

        <dependency>

            <groupId>de.codecentric</groupId>

            <artifactId>spring-boot-admin-starter-client</artifactId>

        </dependency>

        <dependency>

            <groupId>org.springframework.boot</groupId>

            <artifactId>spring-boot-starter-actuator</artifactId>

        </dependency>

        <dependency>

            <groupId>org.springframework.boot</groupId>

            <artifactId>spring-boot-starter-security</artifactId>

        </dependency>

        <dependency>

            <groupId>org.springframework.boot</groupId>

            <artifactId>spring-boot-devtools</artifactId>

            <scope>runtime</scope>

        </dependency>

        <!--监控平台引用  end-->
properties配置添加
#性能监控 加载所有的端点/默认只加载了 info / health

management.endpoints.web.exposure.include=*

management.endpoint.health.show-details=always

spring.boot.admin.client.url=http://localhost:8181

spring.boot.admin.client.username=user

spring.boot.admin.client.password=

spring.boot.admin.client.instance.prefer-ip=true
特殊说明:
spring.boot.admin.client.url的配置遇到了一个坑,yml下面添加了"",properties使用""监控平台没有信息,原因待查。
启动类添加
@Configuration

    public static class SecurityPermitAllConfig extends WebSecurityConfigurerAdapter {

        @Override

        protected void configure(HttpSecurity http) throws Exception {

            http.authorizeRequests().anyRequest().permitAll()

                    .and().csrf().disable();

        }

    }
到此服务端和客户端全部完成
在浏览器输入http://localhost:8181
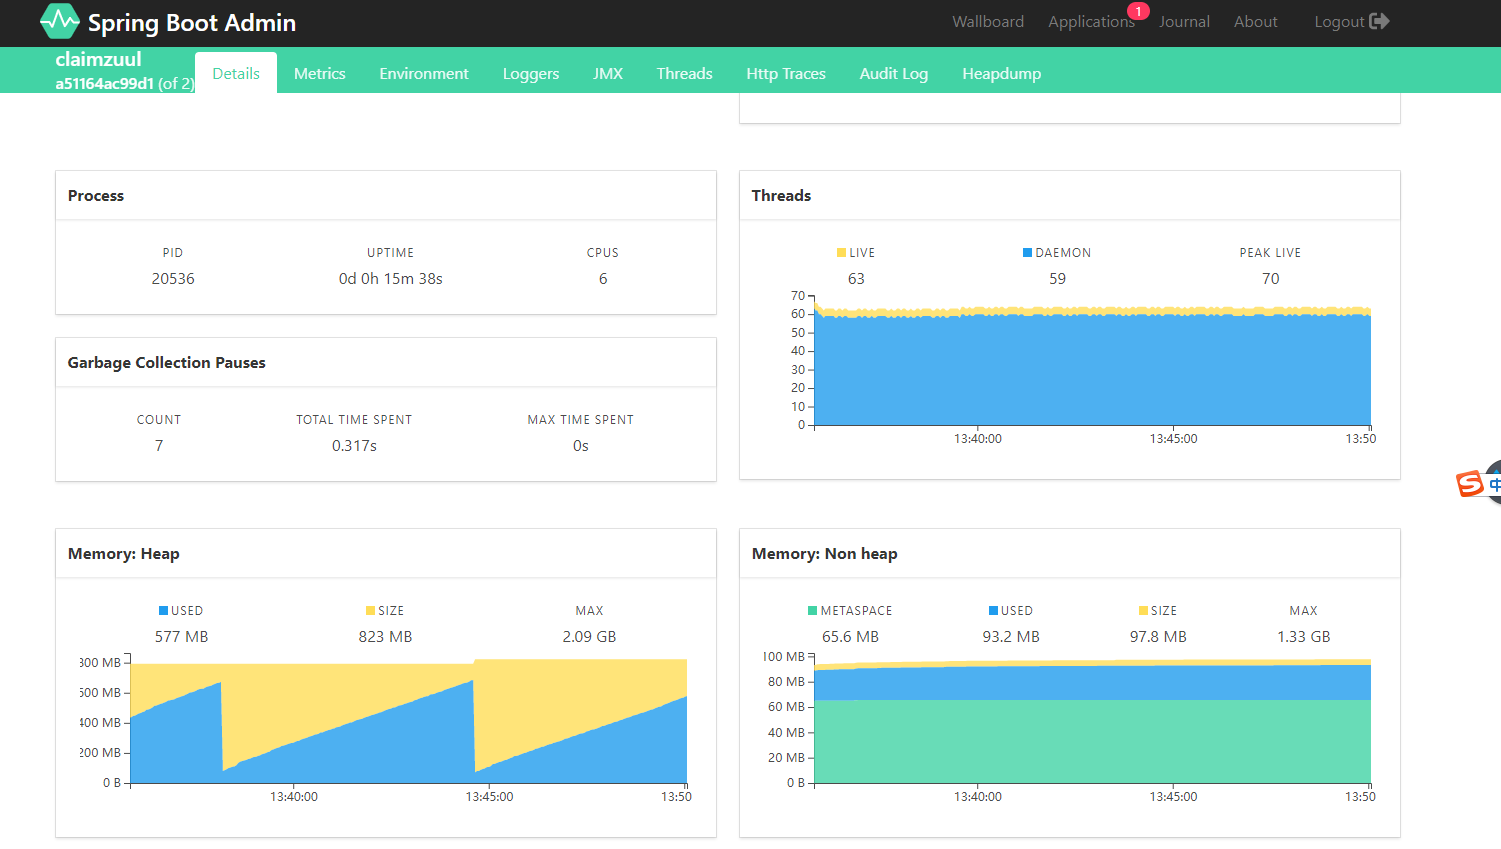
分别显示了磁盘空间,线程数,堆的大小,非堆占用的内存等
springadmin环境搭建的更多相关文章
- .NET Core系列 : 1、.NET Core 环境搭建和命令行CLI入门
2016年6月27日.NET Core & ASP.NET Core 1.0在Redhat峰会上正式发布,社区里涌现了很多文章,我也计划写个系列文章,原因是.NET Core的入门门槛相当高, ...
- Azure Service Fabric 开发环境搭建
微服务体系结构是一种将服务器应用程序构建为一组小型服务的方法,每个服务都按自己的进程运行,并通过 HTTP 和 WebSocket 等协议相互通信.每个微服务都在特定的界定上下文(每服务)中实现特定的 ...
- rnandroid环境搭建
react-native 环境搭建具体步骤这个大家已经玩烂了,这个主要是记录下来自己做win7系统遇到的坑 1.com.android.ddmlib.installexception 遇到这个问题,在 ...
- python开发环境搭建
虽然网上有很多python开发环境搭建的文章,不过重复造轮子还是要的,记录一下过程,方便自己以后配置,也方便正在学习中的同事配置他们的环境. 1.准备好安装包 1)上python官网下载python运 ...
- springMVC初探--环境搭建和第一个HelloWorld简单项目
注:此篇为学习springMVC时,做的笔记整理. MVC框架要做哪些事情? a,将url映射到java类,或者java类的方法上 b,封装用户提交的数据 c,处理请求->调用相关的业务处理—& ...
- 【定有惊喜】android程序员如何做自己的API接口?php与android的良好交互(附环境搭建),让前端数据动起来~
一.写在前面 web开发有前端和后端之分,其实android还是有前端和后端之分.android开发就相当于手机app的前端,一般都是php+android或者jsp+android开发.androi ...
- Nexus(一)环境搭建
昨天,成功搭建了自己的 Maven 环境(详见:Maven(一)环境搭建),今天就来研究和探讨下 Nexus 的搭建! 使用背景: 安装环境:Windows 10 -64位 JDK版本:1.7 Mav ...
- 「译」JUnit 5 系列:环境搭建
原文地址:http://blog.codefx.org/libraries/junit-5-setup/ 原文日期:15, Feb, 2016 译文首发:Linesh 的博客:环境搭建 我的 Gith ...
- appium+robotframework环境搭建
appium+robotframework环境搭建步骤(Windows系统的appium自动化测试,只适用于测试安卓机:ios机需要在mac搭建appium环境后测试) 搭建步骤,共分为3部分: 一. ...
随机推荐
- MVC中的HtmlHelper详解
熟悉MVC开发的朋友都应该知道在MVC中,每一个Controller都对应一个View,并且CS文件和对应的ASPX文件也被分离了,更重要的是不再有服务器端控件在工具箱中,不再是代码后至了.MVC中的 ...
- STOMP
STOMP: 说明:STOMP is a simple text-orientated messaging protocol. 面向文本消息协议 spring 之stomp https://www.c ...
- Python 中 and 和 or 的短路原则
对于 and 来说: 如果第一个条件的结论为假,那么 and 前后两个条件组成的表达式计算结果一定为假,后面的条件计算机不会进行计算 对于 or 来说: 如果第一个条件的结论为真,那么 or 前后两个 ...
- vue-cli脚手架之webpack.prod.conf.js
webpack.prod.conf.js 生产环境配置文件: 'use strict'//js严格模式执行 const path = require('path')//这个模块是发布到NPM注册中心的 ...
- numpy之random学习
在机器学习中参数初始化需要进行随机生成,同时样本也需要随机生成,或者遵从一定规则随机生成,所以对随机生成的使用显得格外重要. 有的是生成随机数,有的是随机序列,有点是从随机序列中选择元素等等. 简单的 ...
- SD从零开始71 业务信息仓库(BW)
SD从零开始71 业务信息仓库(BW)概念 在线事务处理的环境OLTP Environment 在事务处理中,我们不断地填充用于跟踪我们的业务流程的数千个不同步骤的特定的表: 例如,销售凭证行条目来自 ...
- 根据需要扩展java中的ThreadPoolExecutor
经常被重写的三个方法 ThreadPoolExecutor是可扩展的,通过查看源码可以发现,它提供了几个可以在子类化中改写的方法:beforeExecute,afterExecute,terminat ...
- loadrunner 脚本开发-int型变量和字符串的相互转换
脚本开发-int型变量和字符串的相互转换 by:授客 QQ:1033553122 字符串转化为int型变量 Action2() { int j = 0; j = atoi("12345&qu ...
- 使用wxpy来实现自动发送消息统计微信好友信息的功能
发送消息太频繁会出现禁言消息 1:导入wxpy模块 pip install wxpy pip3 install wxpy #二者选一 调用模块 # 导入模块 from wxpy import * # ...
- zookeeper.Net
原文转至:http://www.cnblogs.com/shanyou/p/3221990.html 之前整理过一篇文章<zookeeper 分布式锁服务>,本文介绍的 Zookeeper ...