react-native 项目实战 -- 新闻客户端(2) -- 完善TabBar
1.创建 drawable-xxhdpi 文件夹,保存 TabBar 的 icon图标
android -- app -- src -- main -- res -- drawable-xxhdpi

2.修改后的 Main.js
/**

 * 主页面

 */

import React, { Component } from 'react';

import {

    StyleSheet,

    Text,

    View,

    Image,

    Platform,  //判断当前运行的系统

} from 'react-native';

/*=============导入外部组件类==============*/

import TabNavigator from 'react-native-tab-navigator';

// 引入外部的组件(此处注意是相当于了项目根目录)

var Home = require('../Component/Home');

var Message = require('../Component/Message');

var Find = require('../Component/Find');

var Mine = require('../Component/Mine');

// ES5

var Main = React.createClass({

    // 初始化函数(变量是可以改变的,充当状态机的角色)

    getInitialState(){

        return{

            selectedTab:'home' // 默认选中的tabBar

        }

    },

    render() {

        return (

            <TabNavigator>

                {/*--首页--*/}

                <TabNavigator.Item

                    title="首页"

                    renderIcon={() => <Image source={{uri:"icon_tabbar_home"}} style={styles.iconStyle} />}

                    renderSelectedIcon={() => <Image source={{uri:"icon_tabbar_home_selected"}} style={styles.iconStyle} />}

                    selected={this.state.selectedTab === "home"}

                    onPress={() => this.setState({ selectedTab: "home" })}

                    selectedTitleStyle={styles.selectedTitleStyle} //tabBarItem选中的文字样式

                    badgeText="1"

                >

                    <Home />

                </TabNavigator.Item>

                {/*--消息--*/}

                <TabNavigator.Item

                    title="消息"

                    renderIcon={() => <Image source={{uri:"icon_tabbar_message"}} style={styles.iconStyle} />}

                    renderSelectedIcon={() => <Image source={{uri:"icon_tabbar_message_selected"}} style={styles.iconStyle} />}

                    selected={this.state.selectedTab === "message"}

                    onPress={() => this.setState({ selectedTab: "message" })}

                    selectedTitleStyle={styles.selectedTitleStyle} //tabBarItem选中的文字样式

                    badgeText="2"

                >

                    <Message />

                </TabNavigator.Item>

                {/*--发现--*/}

                <TabNavigator.Item

                    title="发现"

                    renderIcon={() => <Image source={{uri:"icon_tabbar_find"}} style={styles.iconStyle} />}

                    renderSelectedIcon={() => <Image source={{uri:"icon_tabbar_find_selected"}} style={styles.iconStyle} />}

                    selected={this.state.selectedTab === "find"}

                    onPress={() => this.setState({ selectedTab: "find" })}

                    selectedTitleStyle={styles.selectedTitleStyle} //tabBarItem选中的文字样式

                >

                    <Find />

                </TabNavigator.Item>

                {/*--我的--*/}

                <TabNavigator.Item

                    title="我的"

                    renderIcon={() => <Image source={{uri:"icon_tabbar_mine"}} style={styles.iconStyle} />}

                    renderSelectedIcon={() => <Image source={{uri:"icon_tabbar_mine_selected"}} style={styles.iconStyle} />}

                    selected={this.state.selectedTab === "mine"}

                    onPress={() => this.setState({ selectedTab: "mine" })}

                    selectedTitleStyle={styles.selectedTitleStyle} //tabBarItem选中的文字样式

                >

                    <Mine />

                </TabNavigator.Item>

            </TabNavigator>

        );

    },

});

const styles = StyleSheet.create({

    // icon默认样式

    iconStyle:{

        width: Platform.OS === 'ios' ? 30 : 25,

        height:Platform.OS === 'ios' ? 30 : 25,

    },

    // tabBarItem选中的文字样式

    selectedTitleStyle:{

        color: 'rgba(212,97,0,1)',

    }

});

// 输出

module.exports = Main;
3.效果图
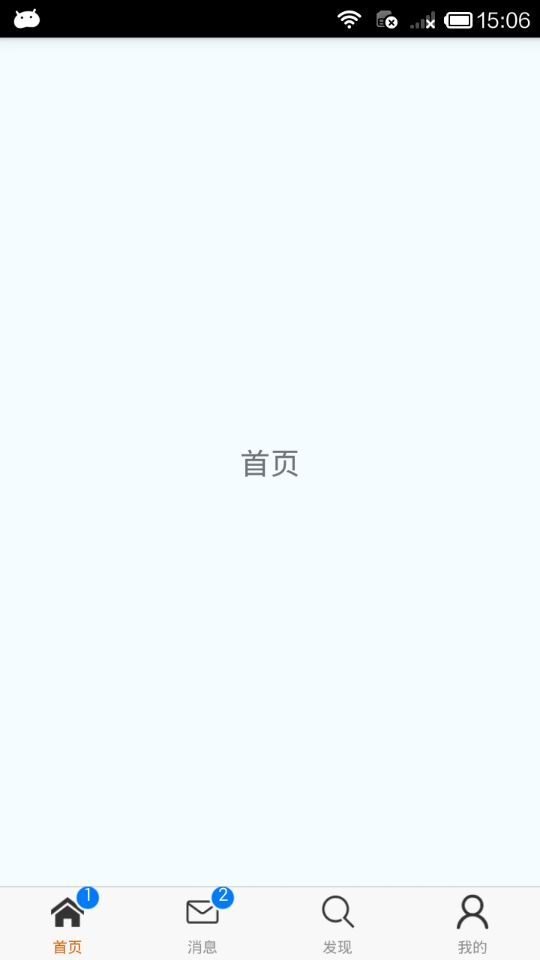
.
react-native 项目实战 -- 新闻客户端(2) -- 完善TabBar的更多相关文章
- 【腾讯Bugly干货分享】React Native项目实战总结
本文来自于腾讯bugly开发者社区,非经作者同意,请勿转载,原文地址:http://dev.qq.com/topic/577e16a7640ad7b4682c64a7 “8小时内拼工作,8小时外拼成长 ...
- React Native 项目实战-Tamic
layout: post title: React Native 项目实战 date: 2016-10-18 15:02:29 +0800 comments: true categories: Rea ...
- React Native 项目实战 -- DoubanProject
引言:本文是我研究react-native时写的一个简单的demo,代码里有详细的注释,好废话不多说,直接上代码. 1.项目目录 2.index.android.js /** * index.andr ...
- React Native项目实战
算是学习React Native的一次项目总结吧,目的还是提高自己. 包含的内容: 1>仿"美团"页面的实现; 2>封装项目中和自己常用的一些组件; 3>学习别人 ...
- react-native 项目实战 -- 新闻客户端(6) -- 完善ListView头部视图
1.因为需要定时器,所以我们要cd到当前项目根目录下安装这个类库: $ npm i react-timer-mixin --save 2.Component/ScrollImage.js /** * ...
- react-native 项目实战 -- 新闻客户端(5) -- 完善首页列表数据
1.Home.js: /** * 首页 */ import React, { Component } from 'react'; import { AppRegistry, StyleSheet, T ...
- react-native 项目实战 -- 新闻客户端(7) -- 新闻详情页
http://c.3g.163.com/nc/article/BUH64L0J00031H2L/full.html 观察这个地址,BUH64L0J00031H2L 就是每条新闻数据里的postid. ...
- react-native 项目实战 -- 新闻客户端(4) -- 请求网络数据
1.Home.js /** * 首页 */ import React, { Component } from 'react'; import { AppRegistry, StyleSheet, Te ...
- react-native 项目实战 -- 新闻客户端(3) -- 包装导航控制器
1.修改后的 Main.js /** * 主页面 */ import React, { Component } from 'react'; import { StyleSheet, Text, Vie ...
随机推荐
- [LeetCode] Combinations 回溯
Given two integers n and k, return all possible combinations of k numbers out of 1 ... n. For exampl ...
- unicode ascii 互转 函数 C实现 MultiByteToWideChar/WideCharToMultiByte 详解
void Ascii2UnicodeLen(char*src,int len,unsigned short*tar) { unsigned int word_cnt; word_cnt=MultiBy ...
- 基于Xen实现一种domain0和domainU的应用层数据交互高效机制
项目里有一个需求,domain0的应用层需要定时给domainU(hvm windows)的应用层传递一块数据,原来的方案是在domainU的应用层架设一个http服务器,监听在某个端口,然后需要塞数 ...
- xen hypercall 的应用层实现
一句话描述: xen hypercall 在应用层的实现,最终都变成对 /proc/xen/privcmd 的 ioctl 系统调用 我们知道,xen 在应用层最上层的接口是 libxl , 基本上 ...
- Python学习杂记_14_模块(二)_常用模块
常用模块 random 模块 import random print(random.random()) # 随机浮点数,默认取0-1,不能指定范围 print(random.randint(1, 20 ...
- C#实时读取数据----局部页面刷新【转】
I)现在刚开始学习C#,对一些基本的控件了解的不够,有个实时监控的系统,需要页面中的数据每5秒钟刷新一次, 要是每5秒钟页面全部的刷新,那页面根本就没法看了,对这个问题在CSDN上也专门开了帖子,问了 ...
- html控件使用
<html> <head> <title>登录页面</title> </head> <body> <form action ...
- 阿里最新出的图书《码出高效:Java开发手册》宣传手册图片里出了比较搞笑的错误,大家没有发现?
- create-react-app创建项目后运行npm run eject命令报错解决办法
最近在用create-react-app创建项目,因要配置各种组件,比如babel,antd等, 需要运行npm run eject命令把项目的配置文件暴露出来,但是还是一如既然碰到报错,因为是在本地 ...
- #420 Div2 D
#420 Div2 D 题意 给出一个方格矩阵,其中存在亮着的方格,只能在亮着的方格上行走,可以在初始亮的方格上花费一枚硬币临时点亮任意一行或一列,地图上同一时间只能存在一个这样的行或列,问走到终点最 ...