HyperLedger Fabric ca 1.2 正式环境部署
生成一个根CA(RootCA),在根CA下3个中间CA(IntermediaCA)。
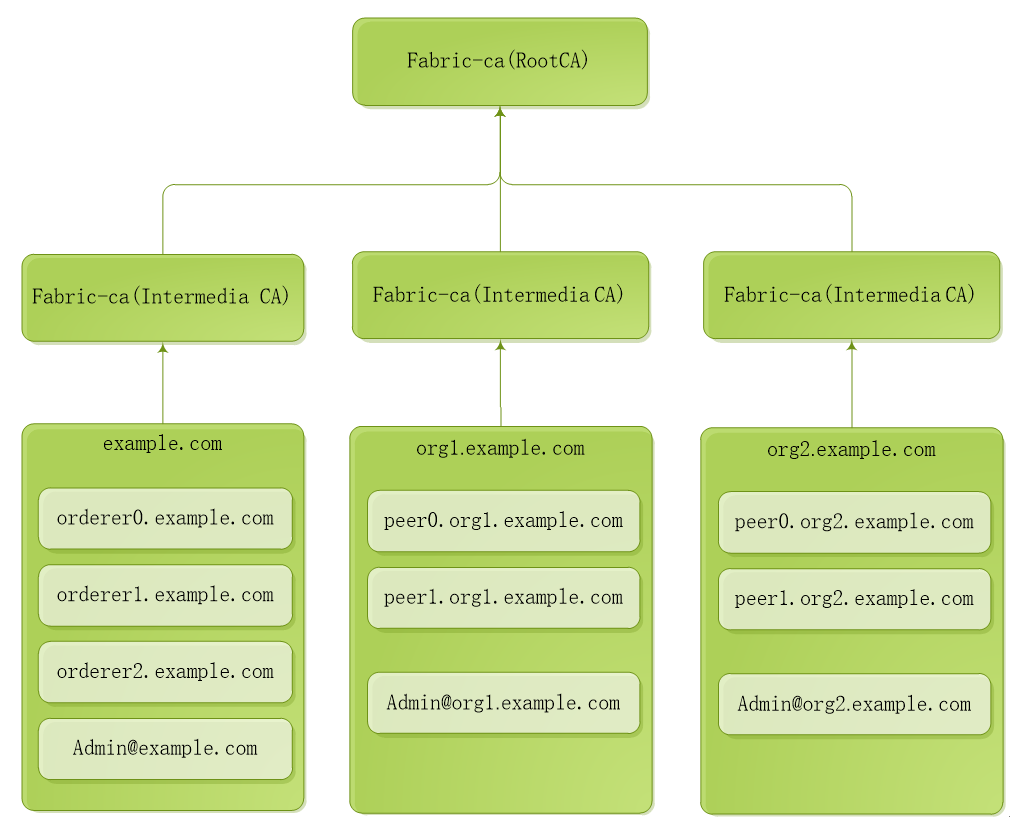
1. 运行和配置RootCA服务
#cd /opt/gopath/src/github.com/hyperledger/fabric-ca/bin
#mkdir ca-server
#cd ca-server
#fabric-ca-server start -b admin:adminpw --home ./rootca --cfg.affiliations.allowremove --cfg.identities.allowremove
【docker】方式运行
拷贝文件docker-rootca.yml到ca-server目录
#docker-compose -f docker-rootca.yaml up –d
2. 运行和配置IntermediaCA1
步骤一:启动 ca
#cd /opt/gopath/src/github.com/hyperledger/fabric-ca/bin/ca-server
#fabric-ca-server init -b admin1:adminpw1 -u http://admin:adminpw@localhost:7054 --home ./intermediaca1
#vi ./intermediaca1/fabric-ca-server-config.yaml
修改port为7055
#fabric-ca-server start -b admin1:adminpw1 -u http://admin:adminpw@localhost:7054 --home ./intermediaca1 --cfg.affiliations.allowremove --cfg.identities.allowremove
【docker】方式运行
拷贝文件docker-intermediaca1.yml到ca-server目录
#docker-compose -f docker-intermediaca1.yaml up
#vi ./intermediaca1/fabric-ca-server-config.yaml
修改port为7055
#docker-compose -f docker-intermediaca1.yaml up
步骤二:为example.com准备msp
#cd /opt/gopath/src/github.com/hyperledger/fabric-ca/bin/ca-server
#fabric-ca-client enroll -M ./crypto-config/ordererOrganizations/example.com/msp -u http://admin1:adminpw1@localhost:7055 --home ./fabric-ca-client
#fabric-ca-client affiliation list -M ./crypto-config/ordererOrganizations/example.com/msp -u http://admin1:adminpw1@localhost:7055 --home ./fabric-ca-client
#fabric-ca-client affiliation remove --force org1 -M ./crypto-config/ordererOrganizations/example.com/msp -u http://admin1:adminpw1@localhost:7055 --home ./fabric-ca-client
#fabric-ca-client affiliation remove --force org2 -M ./crypto-config/ordererOrganizations/example.com/msp -u http://admin1:adminpw1@localhost:7055 --home ./fabric-ca-client
#fabric-ca-client affiliation add com -M ./crypto-config/ordererOrganizations/example.com/msp -u http://admin1:adminpw1@localhost:7055 --home ./fabric-ca-client
#fabric-ca-client affiliation add com.example -M ./crypto-config/ordererOrganizations/example.com/msp -u http://admin1:adminpw1@localhost:7055 --home ./fabric-ca-client
步骤三:注册example.com的管理员Admin@example.com
#fabric-ca-client register --id.name Admin@example.com --id.type client --id.affiliation "com.example" --id.attrs '"hf.Registrar.Roles=client,orderer,peer,user","hf.Registrar.DelegateRoles=client,orderer,peer,user",hf.Registrar.Attributes=*,hf.GenCRL=true,hf.Revoker=true,hf.AffiliationMgr=true,hf.IntermediateCA=true,role=admin:ecert' --id.secret=123456 -M ./crypto-config/ordererOrganizations/example.com/msp -u http://admin1:adminpw1@localhost:7055 --home ./fabric-ca-client
#fabric-ca-client enroll -u http://Admin@example.com:123456@localhost:7055 -M ./crypto-config/ordererOrganizations/example.com/users/Admin@example.com/msp --home ./fabric-ca-client
#mkdir ./fabric-ca-client/crypto-config/ordererOrganizations/example.com/users/Admin@example.com/msp/admincerts
#cp ./fabric-ca-client/crypto-config/ordererOrganizations/example.com/users/Admin@example.com/msp/signcerts/cert.pem ./fabric-ca-client/crypto-config/ordererOrganizations/example.com/users/Admin@example.com/msp/admincerts
#mkdir ./fabric-ca-client/crypto-config/ordererOrganizations/example.com/msp/admincerts
#cp ./fabric-ca-client/crypto-config/ordererOrganizations/example.com/users/Admin@example.com/msp/signcerts/cert.pem ./fabric-ca-client/crypto-config/ordererOrganizations/example.com/msp/admincerts
步骤四:为orderer0.example.com准备msp
#fabric-ca-client register --id.name orderer0.example.com --id.type orderer --id.affiliation "com.example" --id.attrs '"role=orderer",ecert=true' --id.secret=123456 -M ./crypto-config/ordererOrganizations/example.com/msp -u http://admin1:adminpw1@localhost:7055 --home ./fabric-ca-client
#fabric-ca-client enroll -u http://orderer0.example.com:123456@localhost:7055 -M ./crypto-config/ordererOrganizations/example.com/orderers/orderer0.example.com/msp --home ./fabric-ca-client
#mkdir ./fabric-ca-client/crypto-config/ordererOrganizations/example.com/orderers/orderer0.example.com/msp/admincerts
#cp ./fabric-ca-client/crypto-config/ordererOrganizations/example.com/users/Admin@example.com/msp/signcerts/cert.pem ./fabric-ca-client/crypto-config/ordererOrganizations/example.com/orderers/orderer0.example.com/msp/admincerts
步骤五:为orderer1.example.com准备msp
#fabric-ca-client register --id.name orderer1.example.com --id.type orderer --id.affiliation "com.example" --id.attrs '"role=orderer",ecert=true' --id.secret=123456 -M ./crypto-config/ordererOrganizations/example.com/msp -u http://admin1:adminpw1@localhost:7055 --home ./fabric-ca-client
#fabric-ca-client enroll -u http://orderer1.example.com:123456@localhost:7055 -M ./crypto-config/ordererOrganizations/example.com/orderers/orderer1.example.com/msp --home ./fabric-ca-client
#mkdir ./fabric-ca-client/crypto-config/ordererOrganizations/example.com/orderers/orderer1.example.com/msp/admincerts
#cp ./fabric-ca-client/crypto-config/ordererOrganizations/example.com/users/Admin@example.com/msp/signcerts/cert.pem ./fabric-ca-client/crypto-config/ordererOrganizations/example.com/orderers/orderer1.example.com/msp/admincerts
步骤六:为orderer2.example.com准备msp
#fabric-ca-client register --id.name orderer2.example.com --id.type orderer --id.affiliation "com.example" --id.attrs '"role=orderer",ecert=true' --id.secret=123456 -M ./crypto-config/ordererOrganizations/example.com/msp -u http://admin1:adminpw1@localhost:7055 --home ./fabric-ca-client
#fabric-ca-client enroll -u http://orderer2.example.com:123456@localhost:7055 -M ./crypto-config/ordererOrganizations/example.com/orderers/orderer2.example.com/msp --home ./fabric-ca-client
#mkdir ./fabric-ca-client/crypto-config/ordererOrganizations/example.com/orderers/orderer2.example.com/msp/admincerts
#cp ./fabric-ca-client/crypto-config/ordererOrganizations/example.com/users/Admin@example.com/msp/signcerts/cert.pem ./fabric-ca-client/crypto-config/ordererOrganizations/example.com/orderers/orderer2.example.com/msp/admincerts
3. 运行和配置IntermediaCA2
步骤一:启动 ca
#cd /opt/gopath/src/github.com/hyperledger/fabric-ca/bin/ca-server
#fabric-ca-server init -b admin2:adminpw2 -u http://admin:adminpw@localhost:7054 --home ./intermediaca2
#vi ./intermediaca2/fabric-ca-server-config.yaml
修改port为7056
#fabric-ca-server start -b admin2:adminpw2 -u http://admin:adminpw@localhost:7054 --home ./intermediaca2 --cfg.affiliations.allowremove --cfg.identities.allowremove
【docker】方式运行
拷贝文件docker-intermediaca2.yml到ca-server目录
#docker-compose -f docker-intermediaca2.yaml up
#vi ./intermediaca2/fabric-ca-server-config.yaml
修改port为7056
#docker-compose -f docker-intermediaca2.yaml up
步骤二:为org1.example.com准备msp
#fabric-ca-client enroll -M ./crypto-config/peerOrganizations/org1.example.com/msp -u http://admin2:adminpw2@localhost:7056 --home ./fabric-ca-client
#fabric-ca-client affiliation list -M ./crypto-config/peerOrganizations/org1.example.com/msp -u http://admin2:adminpw2@localhost:7056 --home ./fabric-ca-client
#fabric-ca-client affiliation remove --force org1 -M ./crypto-config/peerOrganizations/org1.example.com/msp -u http://admin2:adminpw2@localhost:7056 --home ./fabric-ca-client
#fabric-ca-client affiliation remove --force org2 -M ./crypto-config/peerOrganizations/org1.example.com/msp -u http://admin2:adminpw2@localhost:7056 --home ./fabric-ca-client
#fabric-ca-client affiliation add com -M ./crypto-config/peerOrganizations/org1.example.com/msp -u http://admin2:adminpw2@localhost:7056 --home ./fabric-ca-client
#fabric-ca-client affiliation add com.example -M ./crypto-config/peerOrganizations/org1.example.com/msp -u http://admin2:adminpw2@localhost:7056 --home ./fabric-ca-client
#fabric-ca-client affiliation add com.example.org1 -M ./crypto-config/peerOrganizations/org1.example.com/msp -u http://admin2:adminpw2@localhost:7056 --home ./fabric-ca-client
步骤三:注册org1.example.com的管理员Admin@org1.example.com
#fabric-ca-client register --id.name Admin@org1.example.com --id.type client --id.affiliation "com.example.org1" --id.attrs '"hf.Registrar.Roles=client,orderer,peer,user","hf.Registrar.DelegateRoles=client,orderer,peer,user",hf.Registrar.Attributes=*,hf.GenCRL=true,hf.Revoker=true,hf.AffiliationMgr=true,hf.IntermediateCA=true,role=admin:ecert' --id.secret=123456 -M ./crypto-config/peerOrganizations/org1.example.com/msp -u http://admin2:adminpw2@localhost:7056 --home ./fabric-ca-client
#fabric-ca-client enroll -u http://Admin@org1.example.com:123456@localhost:7056 -M ./crypto-config/peerOrganizations/org1.example.com/users/Admin@org1.example.com/msp --home ./fabric-ca-client
#mkdir ./fabric-ca-client/crypto-config/peerOrganizations/org1.example.com/users/Admin@org1.example.com/msp/admincerts
#cp ./fabric-ca-client/crypto-config/peerOrganizations/org1.example.com/users/Admin@org1.example.com/msp/signcerts/cert.pem ./fabric-ca-client/crypto-config/peerOrganizations/org1.example.com/users/Admin@org1.example.com/msp/admincerts
#mkdir ./fabric-ca-client/crypto-config/peerOrganizations/org1.example.com/msp/admincerts
#cp ./fabric-ca-client/crypto-config/peerOrganizations/org1.example.com/users/Admin@org1.example.com/msp/signcerts/cert.pem ./fabric-ca-client/crypto-config/peerOrganizations/org1.example.com/msp/admincerts
步骤四:为peer0.org1.example.com准备msp
#fabric-ca-client register --id.name peer0.org1.example.com --id.type peer --id.affiliation "com.example.org1" --id.attrs '"role=peer",ecert=true' --id.secret=123456 -M ./crypto-config/peerOrganizations/org1.example.com/msp -u http://admin2:adminpw2@localhost:7056 --home ./fabric-ca-client
#fabric-ca-client enroll -u http://peer0.org1.example.com:123456@localhost:7056 -M ./crypto-config/peerOrganizations/org1.example.com/peers/peer0.org1.example.com/msp --home ./fabric-ca-client
#mkdir ./fabric-ca-client/crypto-config/peerOrganizations/org1.example.com/peers/peer0.org1.example.com/msp/admincerts
#cp ./fabric-ca-client/crypto-config/peerOrganizations/org1.example.com/users/Admin@org1.example.com/msp/signcerts/cert.pem ./fabric-ca-client/crypto-config/peerOrganizations/org1.example.com/peers/peer0.org1.example.com/msp/admincerts
步骤五:为peer1.org1.example.com准备msp
#fabric-ca-client register --id.name peer1.org1.example.com --id.type peer --id.affiliation "com.example.org1" --id.attrs '"role=peer",ecert=true' --id.secret=123456 -M ./crypto-config/peerOrganizations/org1.example.com/msp -u http://admin2:adminpw2@localhost:7056 --home ./fabric-ca-client
#fabric-ca-client enroll -u http://peer1.org1.example.com:123456@localhost:7056 -M ./crypto-config/peerOrganizations/org1.example.com/peers/peer1.org1.example.com/msp --home ./fabric-ca-client
#mkdir ./fabric-ca-client/crypto-config/peerOrganizations/org1.example.com/peers/peer1.org1.example.com/msp/admincerts
#cp ./fabric-ca-client/crypto-config/peerOrganizations/org1.example.com/users/Admin@org1.example.com/msp/signcerts/cert.pem ./fabric-ca-client/crypto-config/peerOrganizations/org1.example.com/peers/peer1.org1.example.com/msp/admincerts
4. 运行和配置IntermediaCA3
步骤一:启动 ca
#cd /opt/gopath/src/github.com/hyperledger/fabric-ca/bin/ca-server
#fabric-ca-server init -b admin3:adminpw3 -u http://admin:adminpw@localhost:7054 --home ./intermediaca3
#vi ./intermediaca3/fabric-ca-server-config.yaml
修改port为7057
#fabric-ca-server start -b admin3:adminpw3 -u http://admin:adminpw@localhost:7054 --home ./intermediaca3 --cfg.affiliations.allowremove --cfg.identities.allowremove
【docker】方式运行
拷贝文件docker-intermediaca3.yml到ca-server目录
#docker-compose -f docker-intermediaca3.yaml up
#vi ./intermediaca3/fabric-ca-server-config.yaml
修改port为7057
#docker-compose -f docker-intermediaca3.yaml up
步骤二:为org2.example.com准备msp
#fabric-ca-client enroll -M ./crypto-config/peerOrganizations/org2.example.com/msp -u http://admin3:adminpw3@localhost:7057 --home ./fabric-ca-client
#fabric-ca-client affiliation list -M ./crypto-config/peerOrganizations/org2.example.com/msp -u http://admin3:adminpw3@localhost:7057 --home ./fabric-ca-client
#fabric-ca-client affiliation remove --force org1 -M ./crypto-config/peerOrganizations/org2.example.com/msp -u http://admin3:adminpw3@localhost:7057 --home ./fabric-ca-client
#fabric-ca-client affiliation remove --force org2 -M ./crypto-config/peerOrganizations/org2.example.com/msp -u http://admin3:adminpw3@localhost:7057 --home ./fabric-ca-client
#fabric-ca-client affiliation add com -M ./crypto-config/peerOrganizations/org2.example.com/msp -u http://admin3:adminpw3@localhost:7057 --home ./fabric-ca-client
#fabric-ca-client affiliation add com.example -M ./crypto-config/peerOrganizations/org2.example.com/msp -u http://admin3:adminpw3@localhost:7057 --home ./fabric-ca-client
#fabric-ca-client affiliation add com.example.org2 -M ./crypto-config/peerOrganizations/org2.example.com/msp -u http://admin3:adminpw3@localhost:7057 --home ./fabric-ca-client
步骤三:注册org2.example.com的管理员Admin@org2.example.com
#fabric-ca-client register --id.name Admin@org2.example.com --id.type client --id.affiliation "com.example.org2" --id.attrs '"hf.Registrar.Roles=client,orderer,peer,user","hf.Registrar.DelegateRoles=client,orderer,peer,user",hf.Registrar.Attributes=*,hf.GenCRL=true,hf.Revoker=true,hf.AffiliationMgr=true,hf.IntermediateCA=true,role=admin:ecert' --id.secret=123456 -M ./crypto-config/peerOrganizations/org2.example.com/msp -u http://admin3:adminpw3@localhost:7057 --home ./fabric-ca-client
#fabric-ca-client enroll -u http://Admin@org2.example.com:123456@localhost:7057 -M ./crypto-config/peerOrganizations/org2.example.com/users/Admin@org2.example.com/msp --home ./fabric-ca-client
#mkdir ./fabric-ca-client/crypto-config/peerOrganizations/org2.example.com/users/Admin@org2.example.com/msp/admincerts
#cp ./fabric-ca-client/crypto-config/peerOrganizations/org2.example.com/users/Admin@org2.example.com/msp/signcerts/cert.pem ./fabric-ca-client/crypto-config/peerOrganizations/org2.example.com/users/Admin@org2.example.com/msp/admincerts
#mkdir ./fabric-ca-client/crypto-config/peerOrganizations/org2.example.com/msp/admincerts
#cp ./fabric-ca-client/crypto-config/peerOrganizations/org2.example.com/users/Admin@org2.example.com/msp/signcerts/cert.pem ./fabric-ca-client/crypto-config/peerOrganizations/org2.example.com/msp/admincerts
步骤四:为peer0.org2.example.com准备msp
#fabric-ca-client register --id.name peer0.org2.example.com --id.type peer --id.affiliation "com.example.org2" --id.attrs '"role=peer",ecert=true' --id.secret=123456 -M ./crypto-config/peerOrganizations/org2.example.com/msp -u http://admin3:adminpw3@localhost:7057 --home ./fabric-ca-client
#fabric-ca-client enroll -u http://peer0.org2.example.com:123456@localhost:7057 -M ./crypto-config/peerOrganizations/org2.example.com/peers/peer0.org2.example.com/msp --home ./fabric-ca-client
#mkdir ./fabric-ca-client/crypto-config/peerOrganizations/org2.example.com/peers/peer0.org2.example.com/msp/admincerts
#cp ./fabric-ca-client/crypto-config/peerOrganizations/org2.example.com/users/Admin@org2.example.com/msp/signcerts/cert.pem ./fabric-ca-client/crypto-config/peerOrganizations/org2.example.com/peers/peer0.org2.example.com/msp/admincerts
步骤五:为peer1.org2.example.com准备msp
#fabric-ca-client register --id.name peer1.org2.example.com --id.type peer --id.affiliation "com.example.org2" --id.attrs '"role=peer",ecert=true' --id.secret=123456 -M ./crypto-config/peerOrganizations/org2.example.com/msp -u http://admin3:adminpw3@localhost:7057 --home ./fabric-ca-client
#fabric-ca-client enroll -u http://peer1.org2.example.com:123456@localhost:7057 -M ./crypto-config/peerOrganizations/org2.example.com/peers/peer1.org2.example.com/msp --home ./fabric-ca-client
#mkdir ./fabric-ca-client/crypto-config/peerOrganizations/org2.example.com/peers/peer1.org2.example.com/msp/admincerts
#cp ./fabric-ca-client/crypto-config/peerOrganizations/org2.example.com/users/Admin@org2.example.com/msp/signcerts/cert.pem ./fabric-ca-client/crypto-config/peerOrganizations/org2.example.com/peers/peer1.org2.example.com/msp/admincerts
HyperLedger Fabric ca 1.2 正式环境部署的更多相关文章
- HyperLedger Fabric 1.4 kafka生产环境部署(11.1)
11.1 Kafka模式简介 上一章介绍的Solo模式只存在一个排序(orderer)服务,是一种中心化结构,一旦排序(orderer)服务出现了问题,整个区块链网络将会崩溃,为了能在正式 ...
- Hyperledger Fabric (1.0)环境部署 chaincode【转】
三.测试Fabric 其实我们在前面运行./network_setup.sh up的时候系统已经运行了一个Example02的ChainCode测试,部署上去的ChainCodeName是mycc,所 ...
- Hyperledger Fabric CA的命令行用法
介绍Hyperledger Fabric CA的命令行方式简单用法 Hyperledger Fabric CA由server和client两部分组成. 设置两个环境变量 export FABRIC_C ...
- Hyperledger Fabric CA User’s Guide——概述(二)
概述 下面的图表说明了如何将Hyperledger Fabric CA与总体的Hyperledger Fabric结构相匹配. 有两种方式与一种Hyperledger Fabric CA服务器进行交互 ...
- Hyperledger Fabric CA User’s Guide——CA用户指南(一)
Fabric CA用户指南 Hyperledger Fabric CA是一种用于Hyperledger Fabric的认证机构(CA). 它提供了如下特性: 登记身份(注册ID),或者连接到作为用户注 ...
- Hyperledger fabric 1.3版本的安装部署(原创多机多Orderer部署
首先,我们在安装前,要考虑一个问题 Hyperledger Fabric,通过指定的节点进行背书授权,才能完成交易的存储 延伸开来,就是为了实现容错.高并发.易扩展,需要zookeeper来选择排序引 ...
- ubuntu16.04 HyperLedger Fabric 1.2.0 开发环境搭建
安装准备 1. 安装git.cRUL.gcc/g++和make $ sudo apt-get update $ sudo apt-get install build-essential git cur ...
- Hyperledger Fabric CA User’s Guide——开始(三)
Fabric CA User’s Guide——开始 先决条件 安装Go 1.9+ 设置正确的GOPATH环境变量 安装了libtool和libtdhl-dev包 下面是在Ubuntu上安装libto ...
- HyperLedger Fabric 1.4 单机单节点部署(10.2)
单机单节点指在一台电脑上部署一个排序(Orderer)服务.一个组织(Org1),一个节点(Peer,属于Org1),然后运行官方案例中的example02智能合约例子,实现转财交易和查询功能.单机单 ...
随机推荐
- JavaScript 中 call,apply 和 bind
call and apply 改变函数内部this的指向(即函数执行时所在的作用域),然后在所指定的作用域中,调用该函数. function test() {} test() == test.ca ...
- oracle笔记2-多表查询和子查询
--查询出当前用户下的所有表 select table_name from user_tables; --执行顺序原则: from where group by having select ...
- Design Pattern ->Prototype
Layering & Contract Philosophy With additional indirection Prototype The example code is as foll ...
- python模块详解 random os
random模块 常用方法 random.random() 随机产生一个小于1的浮点数 import random print(random.random()) #0.4153761818276826 ...
- 屏蔽各类弹窗广告(WPS、智能云输入法)
托盘中的广告“领取双11红包,最高1111元”的罪魁祸首是“智能云输入法” 广告在托盘中闪动: 结束SCSkinInst.exe后,托盘中的广告消失: 智能云输入法的安装路径可参考: C:\Progr ...
- Educational Codeforces Round 14 - F (codeforces 691F)
题目链接:http://codeforces.com/problemset/problem/691/F 题目大意:给定n个数,再给m个询问,每个询问给一个p,求n个数中有多少对数的乘积≥p 数据范围: ...
- mysql主从分离
1.工具: 两台机器 master:192.168.0.1 slave:192.168.0.2 2.master的配置 找到mysql的配置文件,一般centos的是/etc/my.cnf,ubunt ...
- Poj(2421),Prim最小生成树
题目链接:http://poj.org/problem?id=2421 最小生成树的变形,有的村庄已经连接了,就直接把他们的权值赋为0,一样的做最小生成树,Prim算法. #include <s ...
- python-一切事物都是对象
python:一切事物都是对象 开始接触python,在里面有一句话“一切事物都是对象”,那么如何来理解这句话呢,下面举简单的例子: a=1 b='hello't=(11,22,33) list1=[ ...
- map和set的遍历
map: 1.通过获取Entry: Entry的iterator for(Map.Entry<Float,String> entry : map.entrySet()) { System ...