SpringBoot2.x入门:使用MyBatis
这是公众号《Throwable文摘》发布的第25篇原创文章,收录于专辑《SpringBoot2.x入门》。
前提
这篇文章是《SpringBoot2.x入门》专辑的第8篇文章,使用的SpringBoot版本为2.3.1.RELEASE,JDK版本为1.8。
SpringBoot项目引入MyBatis一般的套路是直接引入mybatis-spring-boot-starter或者使用基于MyBatis进行二次封装的框架例如MyBatis-Plus或者tk.mapper等,但是本文会使用一种更加原始的方式,单纯依赖org.mybatis:mybatis和org.mybatis:mybatis-spring把MyBatis的功能整合到SpringBoot中,Spring(Boot)使用的是微内核架构,任何第三方框架或者插件都可以按照本文的思路融合到该微内核中。
引入MyBatis依赖
编写本文的时候(2020-07-18)org.mybatis:mybatis的最新版本是3.5.5,而org.mybatis:mybatis-spring的最新版本是2.0.5,在使用BOM管理SpringBoot版本的前提下,引入下面的依赖:
<dependency>

    <groupId>org.springframework.boot</groupId>

    <artifactId>spring-boot-starter-web</artifactId>

</dependency>

<dependency>

    <groupId>org.springframework.boot</groupId>

    <artifactId>spring-boot-starter-jdbc</artifactId>

</dependency>

<dependency>

    <groupId>org.mybatis</groupId>

    <artifactId>mybatis</artifactId>

    <version>3.5.5</version>

</dependency>

<dependency>

    <groupId>org.mybatis</groupId>

    <artifactId>mybatis-spring</artifactId>

    <version>2.0.5</version>

</dependency>
注意的是低版本的MyBatis如果需要使用JDK8的日期时间API,需要额外引入mybatis-typehandlers-jsr310依赖,但是某个版本之后mybatis-typehandlers-jsr310中的类已经移植到org.mybatis:mybatis中作为内建类,可以放心使用JDK8的日期时间API。
添加MyBatis配置
MyBatis的核心模块是SqlSessionFactory与MapperScannerConfigurer。前者可以使用SqlSessionFactoryBean,功能是为每个SQL的执行提供SqlSession和加载全局配置或者SQL实现的XML文件,后者是一个BeanDefinitionRegistryPostProcessor实现,主要功能是主动通过配置的基础包(Base Package)中递归搜索Mapper接口(这个算是MyBatis独有的扫描阶段,务必指定明确的扫描包,否则会因为效率太低导致启动阶段耗时增加),并且把它们注册成MapperFactoryBean(简单理解为接口动态代理实现添加到方法缓存中,并且委托到IOC容器,此后可以直接注入Mapper接口),注意这个BeanFactoryPostProcessor的回调优先级极高,在自动装配@Autowired族注解或者@ConfigurationProperties属性绑定处理之前已经回调,因此在处理MapperScannerConfigurer的属性配置时候绝对不能使用@Value或者自定义前缀属性Bean进行自动装配,但是可以从Environment中直接获取。
这里添加一个自定义属性前缀mybatis,用于绑定配置文件中的属性到MyBatisProperties类中:
@ConfigurationProperties(prefix = "mybatis")

@Data

public class MyBatisProperties {

    private String configLocation;

    private String mapperLocations;

    private String mapperPackages;

    private static final ResourcePatternResolver RESOLVER = new PathMatchingResourcePatternResolver();

    /**

     * 转化Mapper映射文件为Resource

     */

    public Resource[] getMapperResourceArray() {

        if (!StringUtils.hasLength(mapperLocations)) {

            return new Resource[0];

        }

        List<Resource> resources = new ArrayList<>();

        String[] locations = StringUtils.commaDelimitedListToStringArray(mapperLocations);

        for (String location : locations) {

            try {

                resources.addAll(Arrays.asList(RESOLVER.getResources(location)));

            } catch (IOException e) {

                throw new IllegalArgumentException(e);

            }

        }

        return resources.toArray(new Resource[0]);

    }

}
接着添加一个MybatisAutoConfiguration用于配置SqlSessionFactory:
@Configuration

@EnableConfigurationProperties(value = {MyBatisProperties.class})

@ConditionalOnClass({SqlSessionFactory.class, SqlSessionFactoryBean.class})

@RequiredArgsConstructor

public class MybatisAutoConfiguration {

    private final MyBatisProperties myBatisProperties;

    @Bean

    public SqlSessionFactoryBean sqlSessionFactoryBean(DataSource dataSource) {

        SqlSessionFactoryBean bean = new SqlSessionFactoryBean();

        bean.setDataSource(dataSource);

        // 其实核心配置就是这两项,其他TypeHandlersPackage、TypeAliasesPackage等等自行斟酌是否需要添加

        bean.setConfigLocation(new ClassPathResource(myBatisProperties.getConfigLocation()));

        bean.setMapperLocations(myBatisProperties.getMapperResourceArray());

        return bean;

    }

    /**

     * 事务模板,用于编程式事务 - 可选配置

     */

    @Bean

    @ConditionalOnMissingBean

    public TransactionTemplate transactionTemplate(PlatformTransactionManager platformTransactionManager) {

        return new TransactionTemplate(platformTransactionManager);

    }

    /**

     * 数据源事务管理器 - 可选配置

     */

    @Bean

    @ConditionalOnMissingBean

    public PlatformTransactionManager platformTransactionManager(DataSource dataSource) {

        return new DataSourceTransactionManager(dataSource);

    }

}
一般情况下,启用事务需要定义PlatformTransactionManager的实现,而TransactionTemplate适用于编程式事务(和声明式事务@Transactional区别,编程式更加灵活)。上面的配置类中只使用了两个属性,而mybatis.mapperPackages将用于MapperScannerConfigurer的加载上。添加MapperScannerRegistrarConfiguration如下:
@Configuration

public class MapperScannerRegistrarConfiguration {

    public static class AutoConfiguredMapperScannerRegistrar implements

            BeanFactoryAware, EnvironmentAware, ImportBeanDefinitionRegistrar {

        private Environment environment;

        private BeanFactory beanFactory;

        @Override

        public void setBeanFactory(@NonNull BeanFactory beanFactory) throws BeansException {

            this.beanFactory = beanFactory;

        }

        @Override

        public void setEnvironment(@NonNull Environment environment) {

            this.environment = environment;

        }

        @Override

        public void registerBeanDefinitions(@NonNull AnnotationMetadata importingClassMetadata,

                                            @NonNull BeanDefinitionRegistry registry) {

            BeanDefinitionBuilder builder = BeanDefinitionBuilder.genericBeanDefinition(MapperScannerConfigurer.class);

            builder.addPropertyValue("processPropertyPlaceHolders", true);

            StringJoiner joiner = new StringJoiner(ConfigurableApplicationContext.CONFIG_LOCATION_DELIMITERS);

            // 这里使用了${mybatis.mapperPackages},否则会使用AutoConfigurationPackages.get(this.beanFactory)获取项目中自定义配置的包

            String mapperPackages = environment.getProperty("mybatis.mapperPackages");

            if (null != mapperPackages) {

                String[] stringArray = StringUtils.commaDelimitedListToStringArray(mapperPackages);

                for (String pkg : stringArray) {

                    joiner.add(pkg);

                }

            } else {

                List<String> packages = AutoConfigurationPackages.get(this.beanFactory);

                for (String pkg : packages) {

                    joiner.add(pkg);

                }

            }

            builder.addPropertyValue("basePackage", joiner.toString());

            BeanWrapper beanWrapper = new BeanWrapperImpl(MapperScannerConfigurer.class);

            Stream.of(beanWrapper.getPropertyDescriptors())

                    .filter(x -> "lazyInitialization".equals(x.getName())).findAny()

                    .ifPresent(x -> builder.addPropertyValue("lazyInitialization",

                            "${mybatis.lazyInitialization:false}"));

            registry.registerBeanDefinition(MapperScannerConfigurer.class.getName(), builder.getBeanDefinition());

        }

    }

    @Configuration

    @Import(AutoConfiguredMapperScannerRegistrar.class)

    @ConditionalOnMissingBean({MapperFactoryBean.class, MapperScannerConfigurer.class})

    public static class MapperScannerRegistrarNotFoundConfiguration {

    }

}
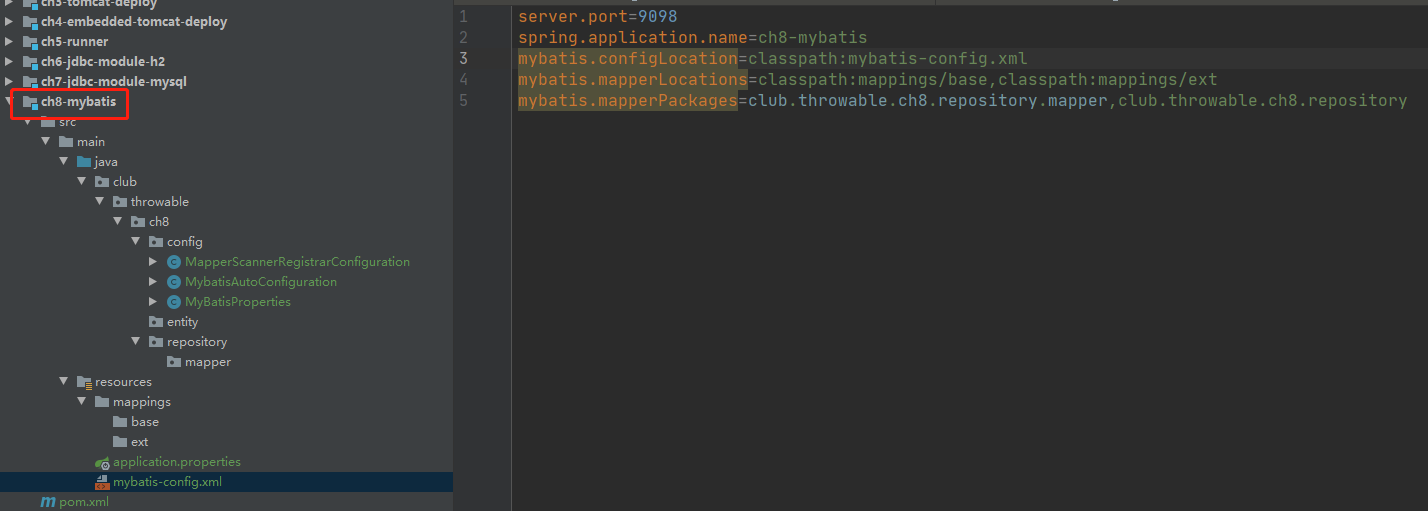
到此基本的配置Bean已经定义完毕,接着需要添加配置项。一般一个项目的MyBatis配置是相对固定的,可以直接添加在主配置文件application.properties中:
server.port=9098

spring.application.name=ch8-mybatis

mybatis.configLocation=mybatis-config.xml

mybatis.mapperLocations=classpath:mappings/base,classpath:mappings/ext

mybatis.mapperPackages=club.throwable.ch8.repository.mapper,club.throwable.ch8.repository
个人喜欢在resource/mappings目录下定义base和ext两个目录,base目录用于存在MyBatis生成器生成的XML文件,这样就能在后续添加了表字段之后直接重新生成和覆盖base目录下对应的XML文件即可。同理,在项目的源码包下建repository/mapper,然后Mapper类直接存放在repository/mapper目录,DAO类存放在repository目录,MyBatis生成器生成的Mapper类可以直接覆盖repository/mapper目录中对应的类。
resources目录下添加一个MyBatis的全局配置文件mybatis-config.xml:
<?xml version="1.0" encoding="UTF-8"?>

<!DOCTYPE configuration PUBLIC "-//mybatis.org//DTD Config 3.0//EN" "http://mybatis.org/dtd/mybatis-3-config.dtd">

<configuration>

    <settings>

        <!--下划线转驼峰-->

        <setting name="mapUnderscoreToCamelCase" value="true"/>

        <!--未知列映射忽略-->

        <setting name="autoMappingUnknownColumnBehavior" value="NONE"/>

    </settings>

</configuration>
项目目前的基本结构如下:
使用Mybatis
为了简单起见,这里使用h2内存数据库进行演示。添加h2的依赖:
<dependency>

    <groupId>com.h2database</groupId>

    <artifactId>h2</artifactId>

    <version>1.4.200</version>

</dependency>
resources目录下添加一个schema.sql和data.sql:
// resources/schema.sql

drop table if exists customer;

create table customer

(

    id            bigint generated by default as identity,

    customer_name varchar(32),

    age           int,

    create_time   timestamp default current_timestamp,

    edit_time     timestamp default current_timestamp,

    primary key (id)

);

// resources/data.sql

INSERT INTO customer(customer_name,age) VALUES ('doge', 22);

INSERT INTO customer(customer_name,age) VALUES ('throwable', 23);
添加对应的实体类club.throwable.ch8.entity.Customer:
@Data

public class Customer {

    private Long id;

    private String customerName;

    private Integer age;

    private LocalDateTime createTime;

    private LocalDateTime editTime;

}
添加Mapper和DAO类:
// club.throwable.ch8.repository.mapper.CustomerMapper

public interface CustomerMapper {

}

// club.throwable.ch8.repository.CustomerDao

public interface CustomerDao extends CustomerMapper {

    Customer queryByName(@Param("customerName") String customerName);

}
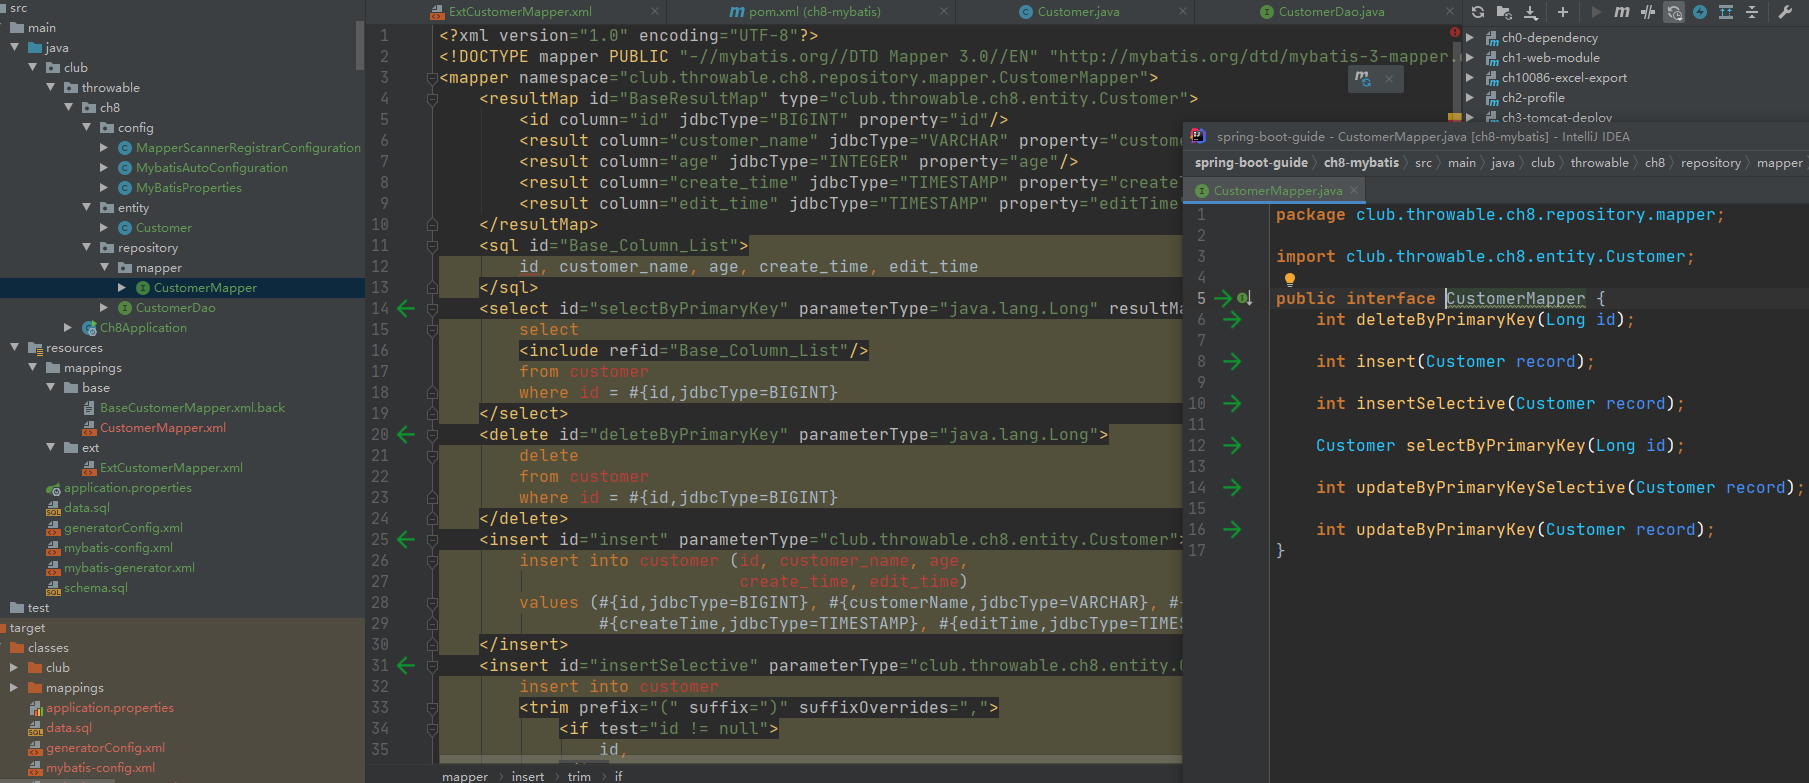
添加XML文件resource/mappings/base/BaseCustomerMapper.xml和resource/mappings/base/ExtCustomerMapper.xml:
// BaseCustomerMapper.xml

<?xml version="1.0" encoding="UTF-8"?>

<!DOCTYPE mapper PUBLIC "-//mybatis.org//DTD Mapper 3.0//EN" "http://mybatis.org/dtd/mybatis-3-mapper.dtd">

<mapper namespace="club.throwable.ch8.repository.mapper.CustomerMapper">

    <resultMap id="BaseResultMap" type="club.throwable.ch8.entity.Customer">

        <id column="id" jdbcType="BIGINT" property="id"/>

        <result column="customer_name" jdbcType="VARCHAR" property="customerName"/>

        <result column="age" jdbcType="INTEGER" property="age"/>

        <result column="create_time" jdbcType="TIMESTAMP" property="createTime"/>

        <result column="edit_time" jdbcType="TIMESTAMP" property="editTime"/>

    </resultMap>

</mapper>

// ExtCustomerMapper.xml

<?xml version="1.0" encoding="UTF-8"?>

<!DOCTYPE mapper PUBLIC "-//mybatis.org//DTD Mapper 3.0//EN" "http://mybatis.org/dtd/mybatis-3-mapper.dtd">

<mapper namespace="club.throwable.ch8.repository.CustomerDao">

    <resultMap id="BaseResultMap" type="club.throwable.ch8.entity.Customer"

               extends="club.throwable.ch8.repository.mapper.CustomerMapper.BaseResultMap">

    </resultMap>

    <select id="queryByName" resultMap="BaseResultMap">

        SELECT *

        FROM customer

        WHERE customer_name = #{customerName}

    </select>

</mapper>
细心的伙伴会发现,DAO和Mapper类是继承关系,而ext和base下对应的Mapper文件中的BaseResultMap也是继承关系
配置文件中增加h2数据源的配置:
// application.properties

spring.datasource.url=jdbc:h2:mem:db_customer;MODE=MYSQL;DB_CLOSE_DELAY=-1;DATABASE_TO_UPPER=FALSE

spring.datasource.username=root

spring.datasource.password=123456

spring.datasource.driver-class-name=org.h2.Driver

spring.h2.console.enabled=true

spring.h2.console.path=/h2-console

spring.h2.console.settings.web-allow-others=true

spring.datasource.schema=classpath:schema.sql

spring.datasource.data=classpath:data.sql
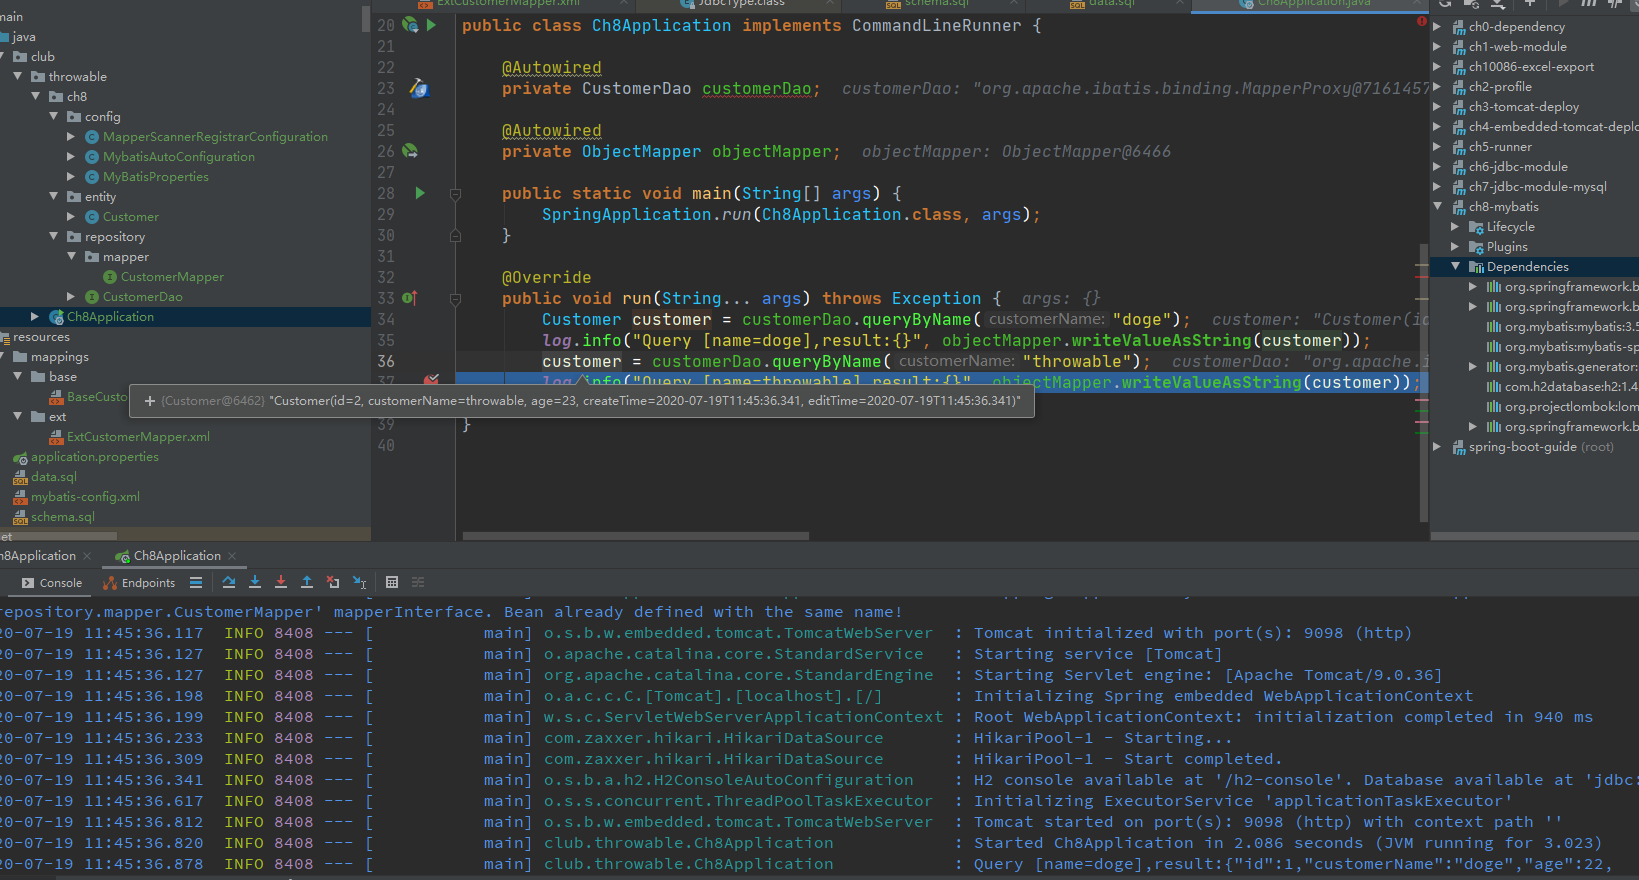
添加一个启动类进行验证:
public class Ch8Application implements CommandLineRunner {

    @Autowired

    private CustomerDao customerDao;

    @Autowired

    private ObjectMapper objectMapper;

    public static void main(String[] args) {

        SpringApplication.run(Ch8Application.class, args);

    }

    @Override

    public void run(String... args) throws Exception {

        Customer customer = customerDao.queryByName("doge");

        log.info("Query [name=doge],result:{}", objectMapper.writeValueAsString(customer));

        customer = customerDao.queryByName("throwable");

        log.info("Query [name=throwable],result:{}", objectMapper.writeValueAsString(customer));

    }

}
执行结果如下:
使用Mybatis生成器生成Mapper文件
有些时候为了提高开发效率,更倾向于使用生成器去预生成一些已经具备简单CRUD方法的Mapper文件,这个时候可以使用mybatis-generator-core。编写本文的时候(2020-07-18)mybatis-generator-core的最新版本为1.4.0,mybatis-generator-core可以通过编程式使用或者Maven插件形式使用。
这里仅仅简单演示一下Maven插件形式下使用mybatis-generator-core的方式,关于mybatis-generator-core后面会有一篇数万字的文章详细介绍此生成器的使用方式和配置项的细节。在项目的resources目录下添加一个generatorConfig.xml:
<?xml version="1.0" encoding="UTF-8"?>

<!DOCTYPE generatorConfiguration

        PUBLIC "-//mybatis.org//DTD MyBatis Generator Configuration 1.0//EN"

        "http://mybatis.org/dtd/mybatis-generator-config_1_0.dtd">

<generatorConfiguration>

    <context id="H2Tables" targetRuntime="MyBatis3">

        <property name="autoDelimitKeywords" value="true"/>

        <property name="javaFileEncoding" value="UTF-8"/>

        <property name="beginningDelimiter" value="`"/>

        <property name="endingDelimiter" value="`"/>

        <commentGenerator>

            <property name="suppressDate" value="true"/>

            <!-- 是否去除自动生成的注释 true:是 : false:否 -->

            <property name="suppressAllComments" value="true"/>

            <property name="suppressDate" value="true"/>

        </commentGenerator>

        <jdbcConnection driverClass="org.h2.Driver"

                        connectionURL="jdbc:h2:mem:db_customer;MODE=MYSQL;DB_CLOSE_DELAY=-1;DATABASE_TO_UPPER=FALSE"

                        userId="root"

                        password="123456"/>

        <javaTypeResolver>

            <property name="forceBigDecimals" value="false"/>

        </javaTypeResolver>

        <!-- 生成模型的包名和位置(实体类)-->

        <javaModelGenerator targetPackage="club.throwable.ch8.entity"

                            targetProject="src/main/java">

            <property name="enableSubPackages" value="true"/>

            <property name="trimStrings" value="false"/>

        </javaModelGenerator>

        <!-- 生成映射XML文件的包名和位置-->

        <sqlMapGenerator targetPackage="mappings.base"

                         targetProject="src/main/resources">

            <property name="enableSubPackages" value="true"/>

        </sqlMapGenerator>

        <!-- 生成DAO的包名和位置-->

        <javaClientGenerator type="XMLMAPPER"

                             targetPackage="club.throwable.ch8.repository.mapper"

                             targetProject="src/main/java">

            <property name="enableSubPackages" value="true"/>

        </javaClientGenerator>

        <table tableName="customer"

               enableCountByExample="false"

               enableUpdateByExample="false"

               enableDeleteByExample="false"

               enableSelectByExample="false">

        </table>

    </context>

</generatorConfiguration>
然后再项目的POM文件添加一个Maven插件:
<plugins>

    <plugin>

        <groupId>org.mybatis.generator</groupId>

        <artifactId>mybatis-generator-maven-plugin</artifactId>

        <version>1.4.0</version>

        <executions>

            <execution>

                <id>Generate MyBatis Artifacts</id>

                <goals>

                    <goal>generate</goal>

                </goals>

            </execution>

        </executions>

        <configuration>

            <jdbcURL>jdbc:h2:mem:db_customer;MODE=MYSQL;DB_CLOSE_DELAY=-1;DATABASE_TO_UPPER=FALSE</jdbcURL>

            <jdbcDriver>org.h2.Driver</jdbcDriver>

            <jdbcUserId>root</jdbcUserId>

            <jdbcPassword>123456</jdbcPassword>

            <sqlScript>${basedir}/src/main/resources/schema.sql</sqlScript>

        </configuration>

        <dependencies>

            <dependency>

                <groupId>com.h2database</groupId>

                <artifactId>h2</artifactId>

                <version>1.4.200</version>

            </dependency>

        </dependencies>

    </plugin>

</plugins>
笔者发现这里必须要在插件的配置中重新定义数据库连接属性和schema.sql,因为插件跑的时候无法使用项目中已经启动的h2实例,具体原因未知。
配置完毕之后,执行Maven命令:
mvn -Dmybatis.generator.overwrite=true mybatis-generator:generate -X
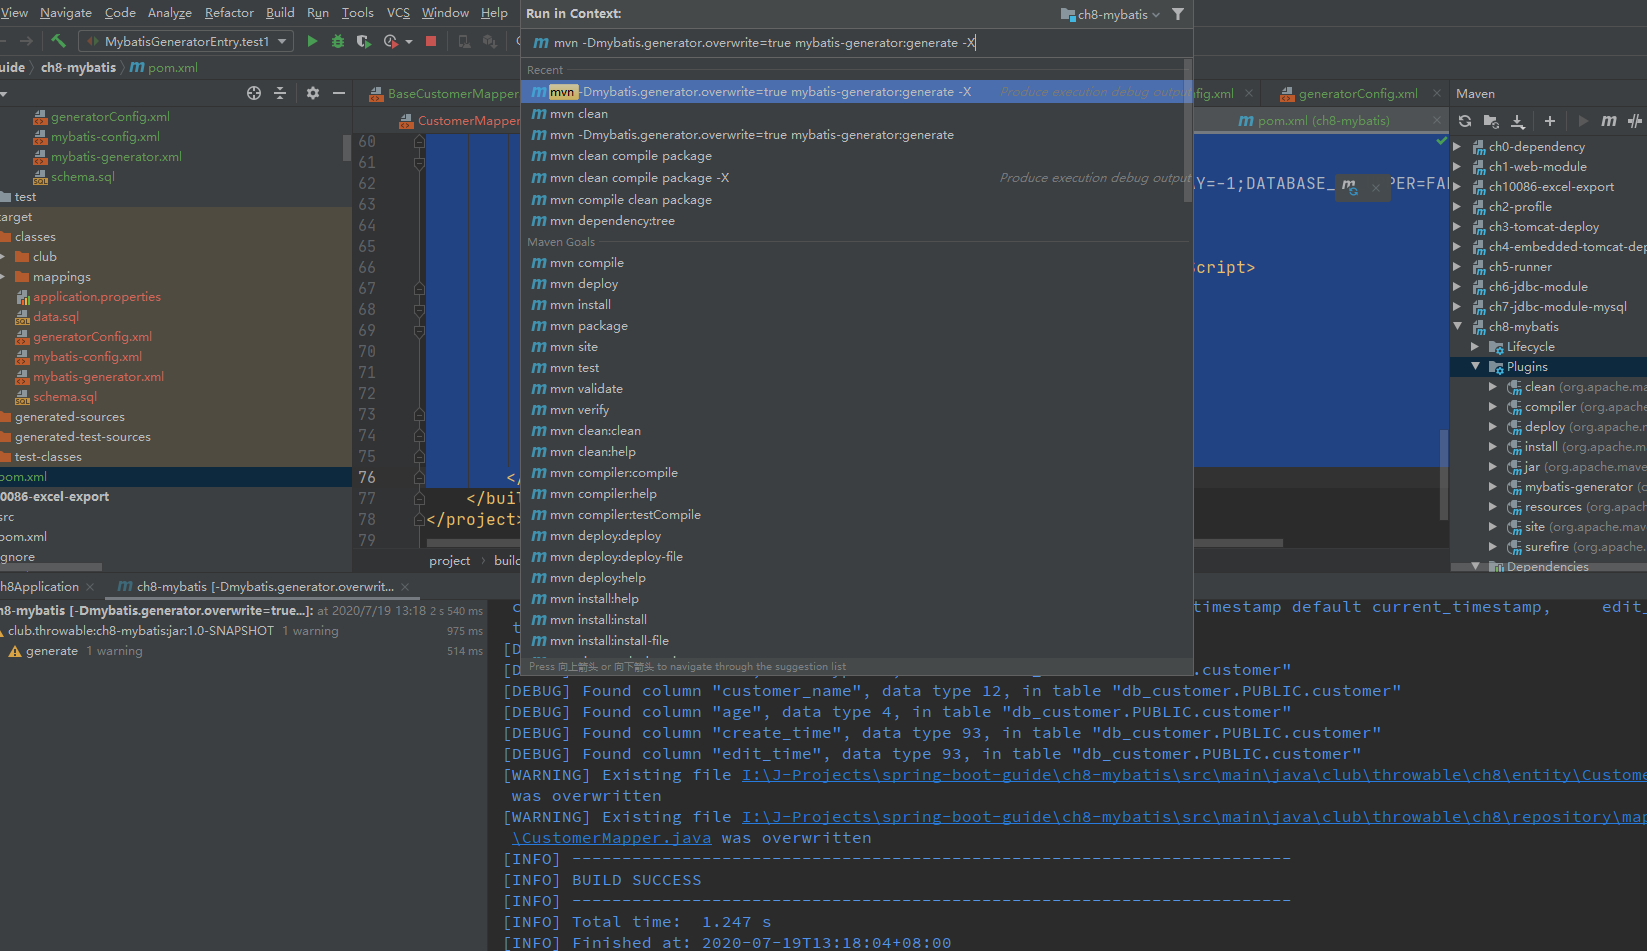
然后resource/mappings/base目录下新增了一个带有基本CRUD方法实现的CustomerMapper.xml,同时CustoemrMapper接口和Customer实体也被重新覆盖生成了。
这里把前面手动编写的BaseCustomerMapper.xml注释掉,预防冲突。另外,CustomerMapper.xml的insertSelective标签需要加上keyColumn="id" keyProperty="id" useGeneratedKeys="true"属性,用于实体insert后的主键回写。
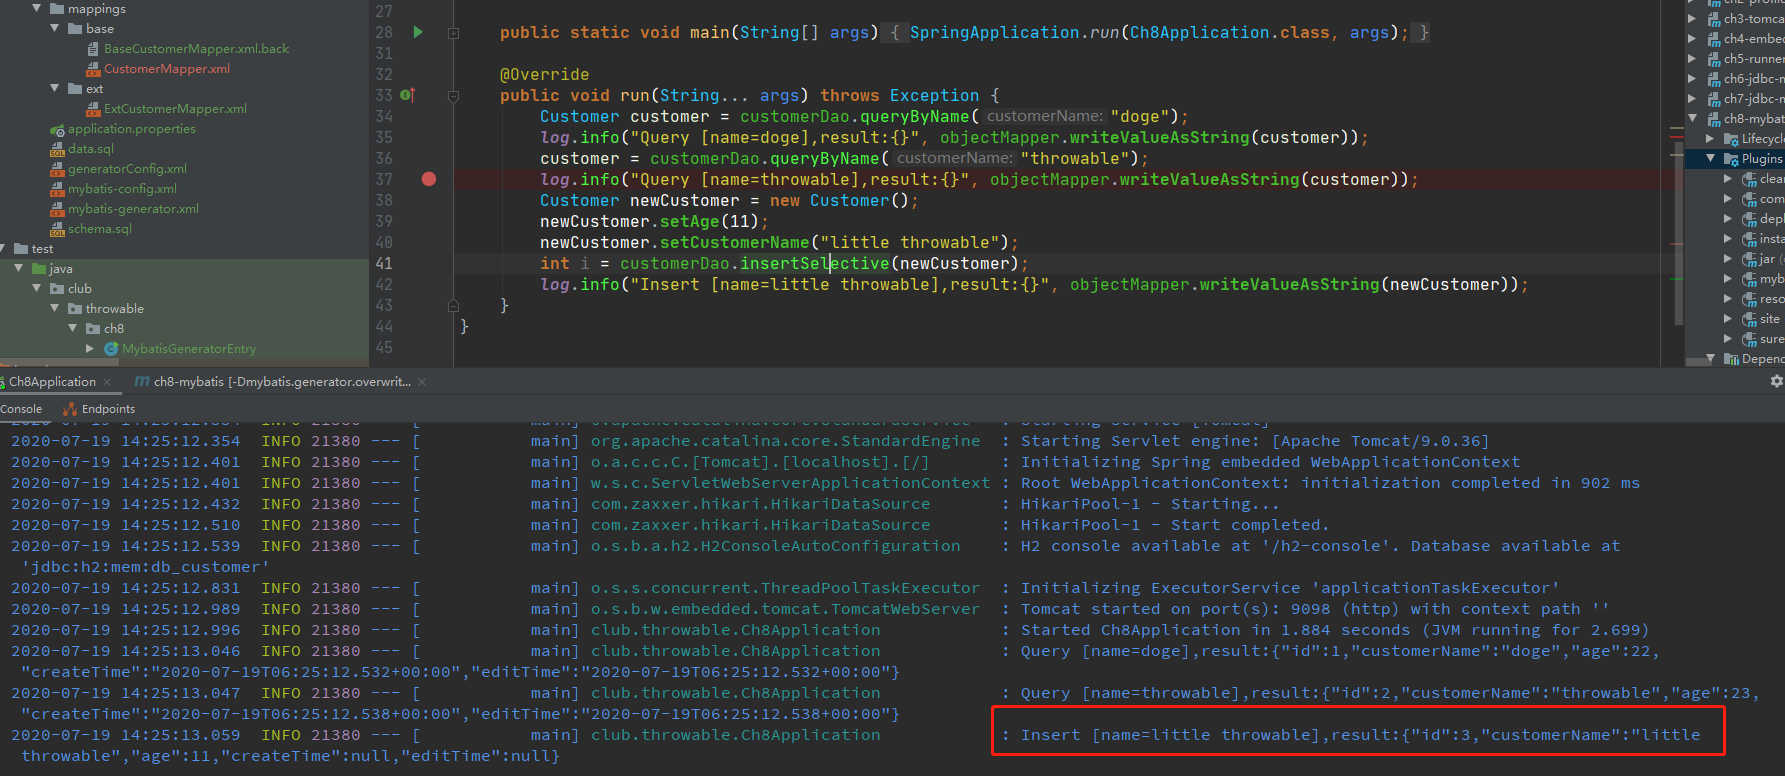
最后,修改并重启启动一下Ch8Application验证结果:
小结
这篇文章相对详细地介绍了SpringBoot项目如何使用MyBatis,如果需要连接MySQL或者其他数据库,只需要修改数据源配置和MyBatis生成器的配置文件即可,其他配置类和项目骨架可以直接复用。
本文demo仓库:
(本文完 c-2-d e-a-20200719 封面来自《秒速五厘米》)
公众号《Throwable文摘》(id:throwable-doge),不定期推送架构设计、并发、源码探究相关的原创文章:
![]()
SpringBoot2.x入门:使用MyBatis的更多相关文章
- SpringBoot2.x入门教程:理解配置文件
前提 这篇文章是<SpringBoot2.x入门>专辑的第4篇文章,使用的SpringBoot版本为2.3.1.RELEASE,JDK版本为1.8. 主要介绍SpringBoot配置文件一 ...
- JAVA入门[9]-mybatis多表关联查询
概要 本节要实现的是多表关联查询的简单demo.场景是根据id查询某商品分类信息,并展示该分类下的商品列表. 一.Mysql测试数据 新建表Category(商品分类)和Product(商品),并插入 ...
- SpringBoot2.x入门:快速创建一个SpringBoot应用
前提 这篇文章是<SpringBoot2.x入门>专辑的第2篇文章,使用的SpringBoot版本为2.3.1.RELEASE,JDK版本为1.8. 常规的套路会建议使用Spring官方提 ...
- SpringBoot2.x入门:引入web模块
前提 这篇文章是<SpringBoot2.x入门>专辑的第3篇文章,使用的SpringBoot版本为2.3.1.RELEASE,JDK版本为1.8. 主要介绍SpringBoot的web模 ...
- SpringBoot2.x入门:应用打包与启动
前提 这篇文章是<SpringBoot2.x入门>专辑的第5篇文章,使用的SpringBoot版本为2.3.1.RELEASE,JDK版本为1.8. 这篇文章分析一个偏向于运维方面的内容: ...
- SpringBoot2.x入门:使用CommandLineRunner钩子接口
前提 这篇文章是<SpringBoot2.x入门>专辑的第6篇文章,使用的SpringBoot版本为2.3.1.RELEASE,JDK版本为1.8. 这篇文章主要简单聊聊钩子接口Comma ...
- SpringBoot2.x入门教程:引入jdbc模块与JdbcTemplate简单使用
这是公众号<Throwable文摘>发布的第23篇原创文章,收录于专辑<SpringBoot2.x入门>. 前提 这篇文章是<SpringBoot2.x入门>专辑的 ...
- Springboot2.x入门——helloWorld
Springboot2.x入门--helloWorld 一.简介 1.1 Springboot简介 Spring Boot是由Pivotal团队提供的全新框架,其设计目的是用来简化新Spring应用的 ...
- java框架之SpringMVC(1)-入门&整合MyBatis
前言 SpringMVC简介 SpringMVC 是一个类似于 Struts2 表现层的框架,属于 SpringFramework 的后续产品. 学习SpringMVC的原因 SpringMVC 与 ...
随机推荐
- Docker(一)Docker概述
Docker概述 概述 Docker是供开发人员和系统管理员 使用容器构建,运行和共享应用程序的平台.使用容器来部署应用程序称为容器化.容器不是新的,但用于轻松部署应用程序的容器却是新的. 容器化越来 ...
- web安全中的session攻击
运行着个简单的demo后,打开login.jsp,使用firebug或chrome会发现,即使没有登录,我们也会有一个JSESSIONID,这是由服务器端在会话开始是通过set-cookie来设置的匿 ...
- layui动态添加的元素click等事件触发不了的解决办法
在页面加载完成时候 '.add_project' 元素是可以触发click时间的,当动态添加 '.add_project' 时候,新添加的元素却触发不了click事件,类似下面的写法: $(" ...
- 【Model Log】模型评估指标可视化,自动画Loss、Accuracy曲线图工具,无需人工参与!
1. Model Log 介绍 Model Log 是一款基于 Python3 的轻量级机器学习(Machine Learning).深度学习(Deep Learning)模型训练评估指标可视化工具, ...
- postman无法正常启动
想请教下各位大神,我电脑的postman打开之后就一直转,没法启动是怎么回事?重装了不同版本的也是同样的情况,重启电脑也没用...同样的安装包,在别的电脑上就能正常打开!有什么办法解决吗? 0 20 ...
- Pop Sequence 题解
Pop Sequence(PAT) https://www.nowcoder.com/pat/5/problem/4090 前言: PAT上一道Stack的应用题,简化版的有<信息学一本通·普及 ...
- models.py连接mysql
安装pymysql: other setting---project Interpreter---+pymysql 更改数据库 在项目名的同名文件下的settings.py中DATABASES,改成 ...
- SpringBoot启动源码及自定义starter
为什么springboot工程能够在mian方法中完成启动呢?需要大家掌握的有几个点:1.SPISPI在springboot中是去读取META-INF/spring.factories目录的配置文件内 ...
- gRPC by .net core 3.x——概念、语法、编译
什么是grpc? grpc来自大名鼎鼎的谷歌,孵化于CNCF基金会(docker.k8s同样出自这个基金会).它是一款高性能.开源.通用的rpc框架,你可以通过它来定义rpc的请求和响应.它基于htt ...
- HDFS和MR的配置和使用
一.分布式HDFS的安装和启动 ①在$HADOOP_HOME/etc/hadoop/core-site.xml文件 <configuration> <property> < ...