cobbler 无人值守-安装
环境准备
- 准备两台主机,如centos6和centos7
- centos7当作server服务器
- 关闭selinux
- 关闭防火墙
安装
cobbler包光盘里是没有的,要配置epel源,这里就说怎么配置epel源了,在yum.repos.d/目录下照葫芦画瓢就可,配置好后执行如下命令安装
yum install –y cobbler

#

#
安装成功后,我们发现它还安装了其他的服务

备注:我们搭建cobbler-系统部署需要用到httpd、tftp-server、dhcp服务,从图上可以看出它没有安装dhcp服务,所以我们要安装下dhcp服务
yum install –y dhcp

#

#
开启服务
http服务
systemctl start httpd

#开启服务

systemctl enable httpd

#设置开机自启动
tftp-server服务
systemctl start tftp

#开启服务

systemctl enable tftp

#开机自启动
cobbler服务
systemctl start cobblerd

#开启服务

systemctl enable cobblerd

#开机自启动
cobbler环境检查
执行
cobbler check

#
会出现如下提示,配置缺少的东西
1 : The 'server' field in /etc/cobbler/settings must be set to something other than localhost, or kickstarting features will not work.  This should be a resolvable hostname or IP for the boot server as reachable by all machines that will use it.

2 : For PXE to be functional, the 'next_server' field in /etc/cobbler/settings must be set to something other than 127.0.0.1, and should match the IP of the boot server on the PXE network.

3 : change 'disable' to 'no' in /etc/xinetd.d/tftp

4 : Some network boot-loaders are missing from /var/lib/cobbler/loaders, you may run 'cobbler get-loaders' to download them, or, if you only want to handle x86/x86_64 netbooting, you may ensure that you have installed a *recent* version of the syslinux package installed and can ignore this message entirely.  Files in this directory, should you want to support all architectures, should include pxelinux.0, menu.c32, elilo.efi, and yaboot. The 'cobbler get-loaders' command is the easiest way to resolve these requirements.

5 : enable and start rsyncd.service with systemctl

6 : debmirror package is not installed, it will be required to manage debian deployments and repositories

7 : The default password used by the sample templates for newly installed machines (default_password_crypted in /etc/cobbler/settings) is still set to 'cobbler' and should be changed, try: "openssl passwd -1 -salt 'random-phrase-here' 'your-password-here'" to generate new one

8 : fencing tools were not found, and are required to use the (optional) power management features. install cman or fence-agents to use them
OK 根据提示一步一步来解决
步骤一
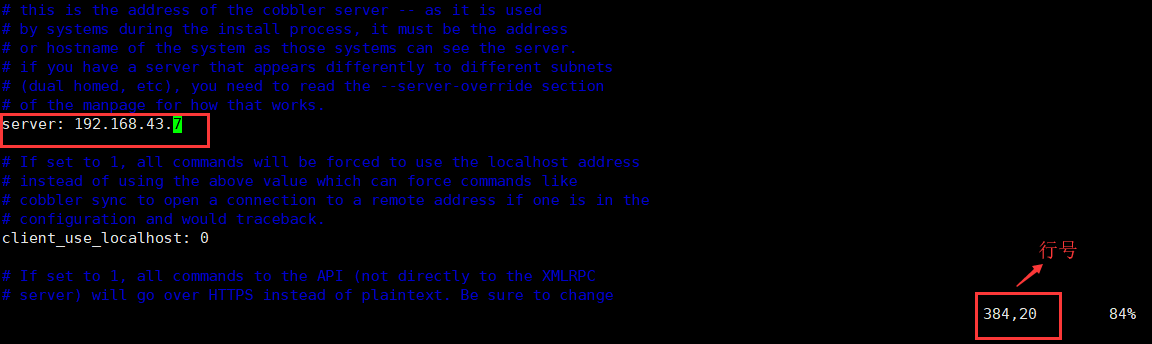
1、第一个提示:在/etc/cobbler/settings 文件中server字段必须要有一个别人可访问的IP地址,来提供网络服务,那么我们是在centos7上搭建的所以是本机地址。
①编辑配置文件
vim etc/cobbler/settings

#编辑配置文件
②刷新配置文件并环境检查
systemctl restart cobblerd

#重启服务,重新读取修改的配置文件

cobbler check

#环境检查
步骤二
#环境检查后发现少了一项,那么下面接着还是从第一项开始操作

1 : For PXE to be functional, the 'next_server' field in /etc/cobbler/settings must be set to something other than 127.0.0.1, and should match the IP of the boot server on the PXE network.

2 : change 'disable' to 'no' in /etc/xinetd.d/tftp

3 : Some network boot-loaders are missing from /var/lib/cobbler/loaders, you may run 'cobbler get-loaders' to download them, or, if you only want to handle x86/x86_64 netbooting, you may ensure that you have installed a *recent* version of the syslinux package installed and can ignore this message entirely.  Files in this directory, should you want to support all architectures, should include pxelinux.0, menu.c32, elilo.efi, and yaboot. The 'cobbler get-loaders' command is the easiest way to resolve these requirements.

4 : enable and start rsyncd.service with systemctl

5 : debmirror package is not installed, it will be required to manage debian deployments and repositories

6 : The default password used by the sample templates for newly installed machines (default_password_crypted in /etc/cobbler/settings) is still set to 'cobbler' and should be changed, try: "openssl passwd -1 -salt 'random-phrase-here' 'your-password-here'" to generate new one

7 : fencing tools were not found, and are required to use the (optional) power management features. install cman or fence-agents to use them
如上第一条:'next_server' 地址不应该是127.0.0.1
所以修改它的地址,这个地址也就是你tftp服务器所在的主机地址,我们把服务都安装在一台主机上了,所以和上面地址一样
①编辑配置文件
vim etc/cobbler/settings

#编辑配置文件

②重复步骤一中的②命令来重读配置文件与环境检查
步骤三
#环境检查后发现又少了一条,下面接这来...

1 : change 'disable' to 'no' in /etc/xinetd.d/tftp

2 : Some network boot-loaders are missing from /var/lib/cobbler/loaders, you may run 'cobbler get-loaders' to download them, or, if you only want to handle x86/x86_64 netbooting, you may ensure that you have installed a *recent* version of the syslinux package installed and can ignore this message entirely.  Files in this directory, should you want to support all architectures, should include pxelinux.0, menu.c32, elilo.efi, and yaboot. The 'cobbler get-loaders' command is the easiest way to resolve these requirements.

3 : enable and start rsyncd.service with systemctl

4 : debmirror package is not installed, it will be required to manage debian deployments and repositories

5 : The default password used by the sample templates for newly installed machines (default_password_crypted in /etc/cobbler/settings) is still set to 'cobbler' and should be changed, try: "openssl passwd -1 -salt 'random-phrase-here' 'your-password-here'" to generate new one

6 : fencing tools were not found, and are required to use the (optional) power management features. install cman or fence-agents to use them
如上第一条:提示更改/etc/xinetd.d/tftp配置文件中'disable'状态改为‘no’说白了也就是开启tftp服务
因为我们用的是centos7不需要xinetd.d了,前面已经开启了tftp服务,这步忽略,看下一个提示
第二条:在/var/lib/cobbler/loaders目录下少了一些必要的文件,用'cobbler get-loaders' 命令来获取,这时候需要主机联网下载
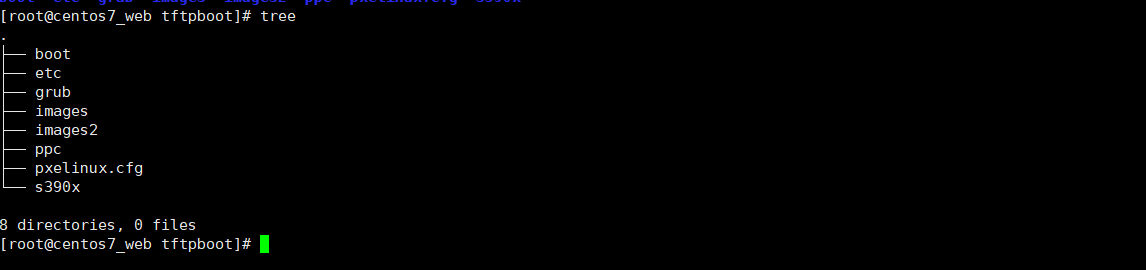
我们先来看看这个目录

①生成必要文件
cobbler get-loaders

#

#

我们知道出现的这些文件是要放在/var/lib/tftpboot/这里的,我们看下这个目录的信息
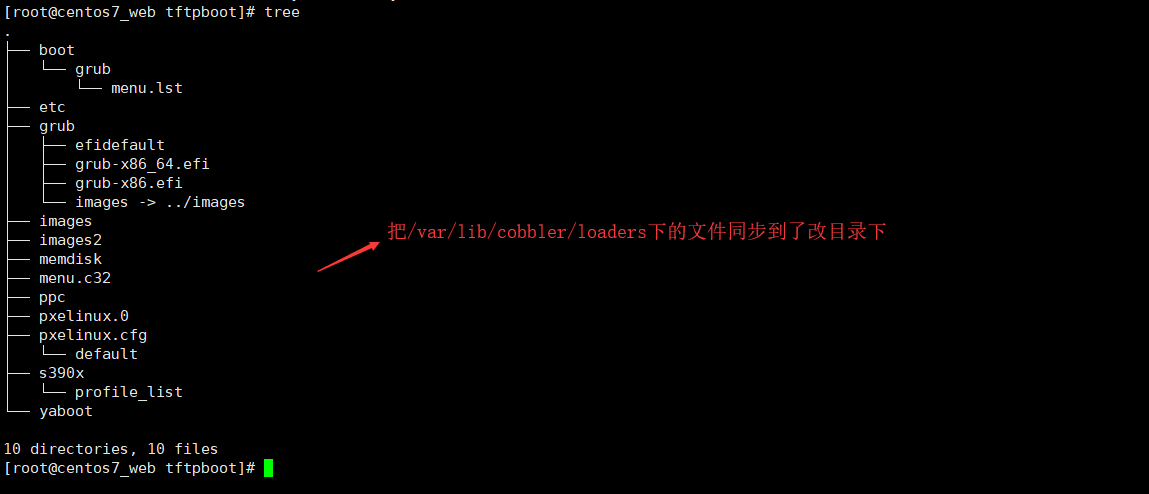
用如上环境检查中给出的提示进行同步
cobbler sync

#数据同步
再次查看下/var/lib/tftpboot目录结构
②重复步骤一中的②命令
#又少了,继续

1 : enable and start rsyncd.service with systemctl

2 : debmirror package is not installed, it will be required to manage debian deployments and repositories

3 : The default password used by the sample templates for newly installed machines (default_password_crypted in /etc/cobbler/settings) is still set to 'cobbler' and should be changed, try: "openssl passwd -1 -salt 'random-phrase-here' 'your-password-here'" to generate new one

4 : fencing tools were not found, and are required to use the (optional) power management features. install cman or fence-agents to use them
步骤四
第一条:开启rsyncd.service 服务,我们没有用这个服务,忽略
第二条:是针对debian发行版的系统配置,忽略
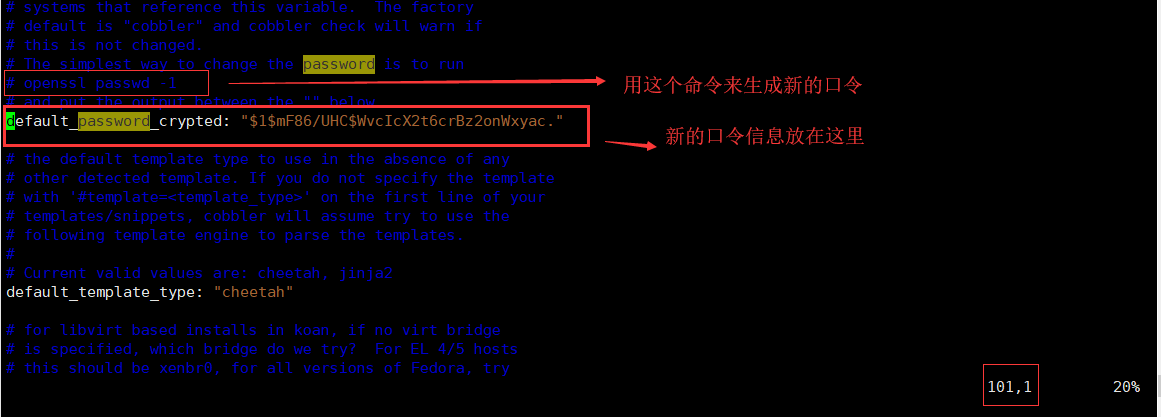
第三条:修改kickstart文件的默认口令
①编辑配置文件
vim /etc/cobbler/settings

#
②重复步骤一中的②命令
#少了一条

1 : enable and start rsyncd.service with systemctl

2 : debmirror package is not installed, it will be required to manage debian deployments and repositories

3 : fencing tools were not found, and are required to use the (optional) power management features. install cman or fence-agents to use them
如上第一、二上面说了忽略,看第三条,意思说配置电源项,和硬件有关,忽略
步骤五
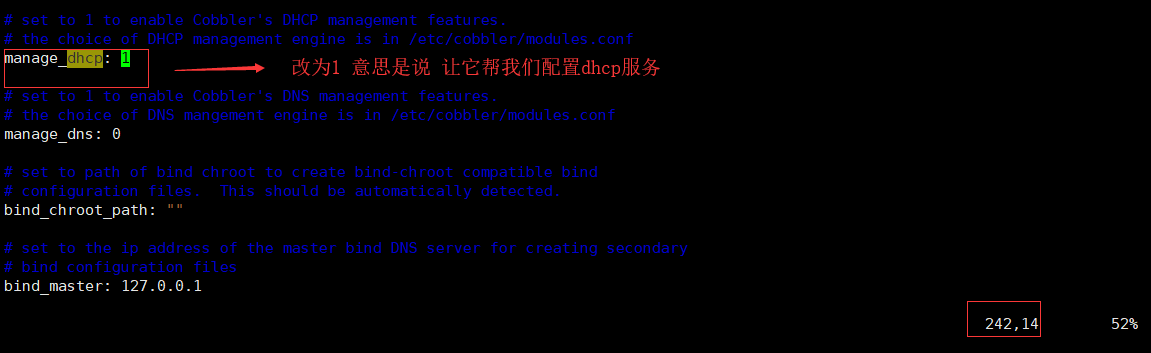
配置dhcp
①编辑配置文件
vim /etc/cobbler/settings

#
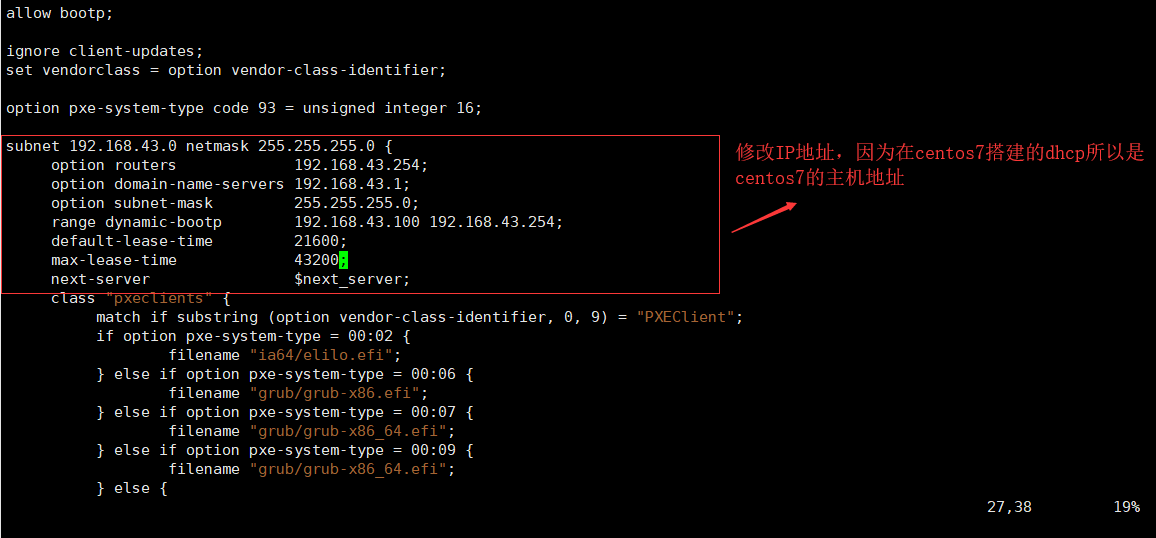
② 改cobbler提供的dhcp配置文件模板
vim /etc/cobbler/dhcp.template

#
我们先来看下dhcp配置文件

还是空的没有配置信息
②同步
systemctl restart cobblerd

#重启服务

cobbler sync

#数据同步
再来看dhcp配置文件
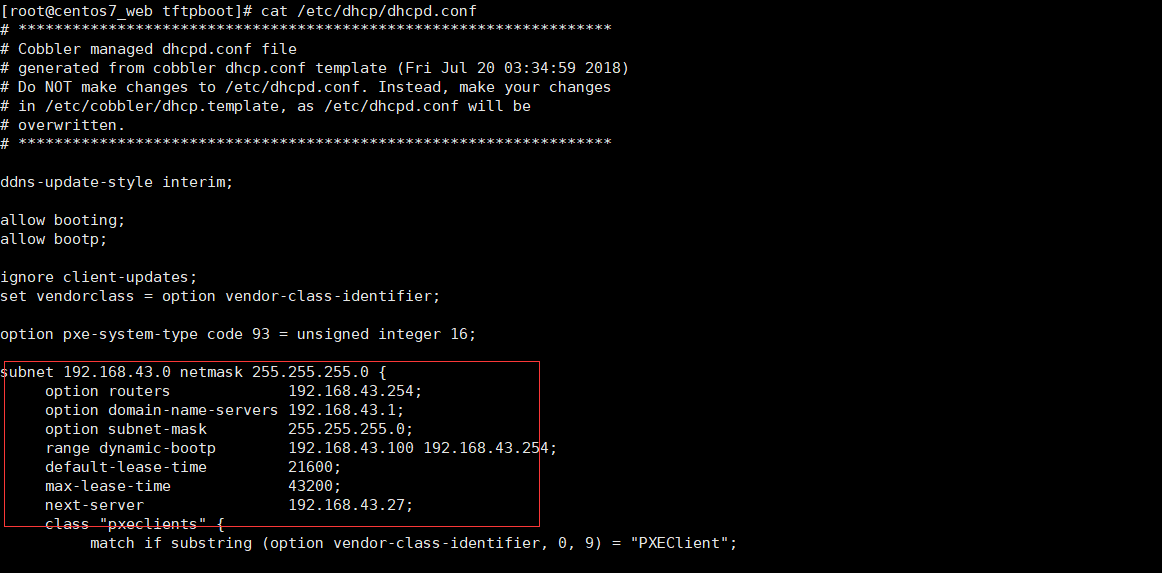
有信息了
步骤六
①开启dhcp服务
systemctl start dhcpd

#开启服务
②建立cobbler yum源-导入系统

这里我们也把centos6导入

备注:它是放在了/var/www/目录下,同时生成了一个和系统同名的kickstart文件,
自带的kickstart文件是满足不了我们的需求的,所以我们使用自己的kickstart文件,之前生成过,直接拿来用。
步骤七
①编辑ks.cfg文件(前几篇提到过怎么创建改文件)

②把ks.cfg文件放在/var/lib/cobbler/kickstarts/下

③创建启动菜单
cobbler profile add --name=Centos-7.5-x86_64-Auto --distro=Centos-7.5-x86_64 --kickstart=/var/lib/cobbler/kickstarts/ks.cfg

#

cobbler profile add --name=Centos-6.9-x86_64-Auto --distro=Centos-6.9-x86_64 --kickstart=/var/lib/cobbler/kickstarts/ks6.cfg

#

④查看启动文件default是不是有了我们创建的自定义启动项
cat /var/lib/tftpboot/pxelinux.cfg/default

#查看启动菜单

备注:也可删除不需要的启动菜单
cobbler profile remove --name=Centos-6.9-x86_64

#
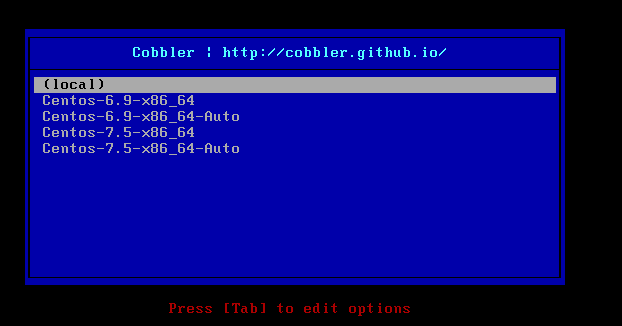
OK现在就可以用准备好的另一台主机测试了
备注:确保 http tftp dhcp 服务已开启 防火墙以关闭 selinux以关闭
成功界面
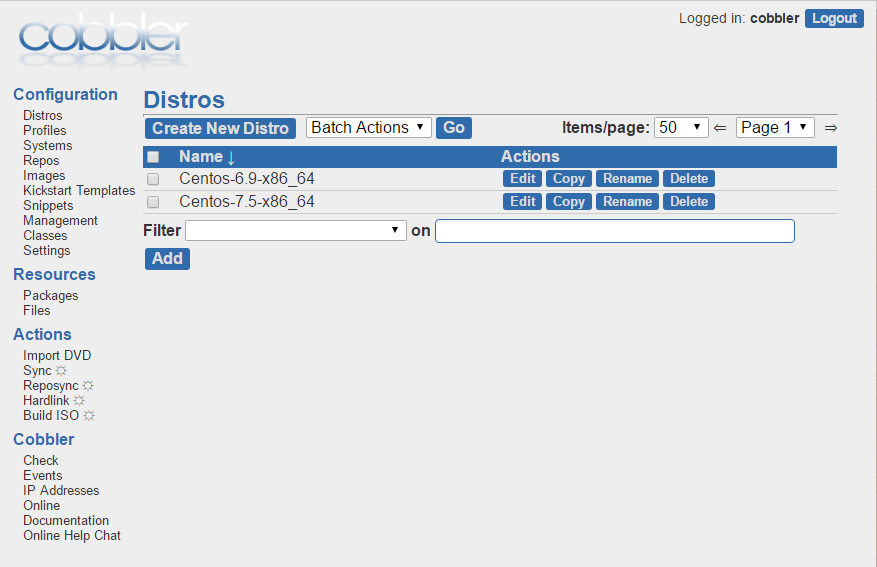
cobbler-web管理
1、首先安装包
yum install -y cobbler-web

#
2、访问
https://192.168.43.7/cobbler_web
默认账号:cobbler
默认密码:cobbler
附带过程中出现的问题
问题一:出现如下提示:

解决方案:http:改为https:访问
问题二:安装新系统的时候,出现TFTP open timeout!
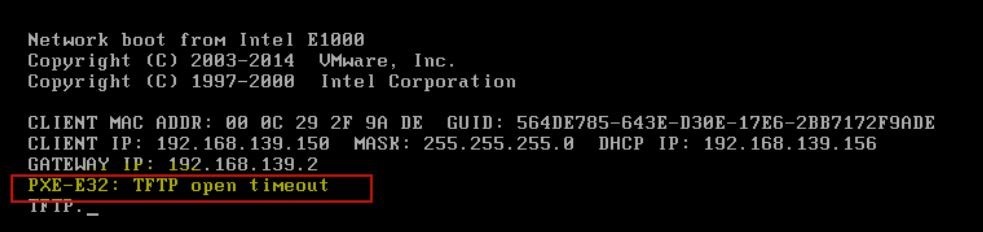
解决方案:关闭防火墙
#systemctl stop firewalld.service
#iptables –L
问题三:check环境检查的时在cobbler 候出现如下
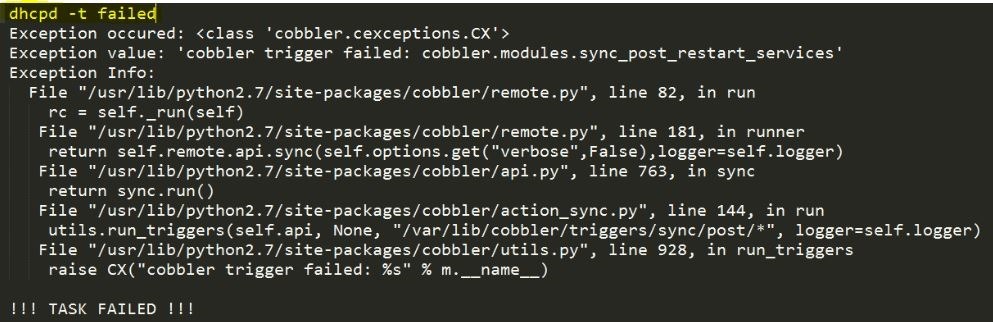
解决方案:这是ip分配错误的提示,检查配置文件IP分配段
每个人遇到的问题可能不一样,查看日志检查,tailf -10 /var/log/messages
cobbler 无人值守-安装的更多相关文章
- CentOS7.x安装cobbler无人值守安装系统
CentOS7.x cobbler无人值守安装 cobbler介绍 自打若干年前 Red Hat,推出了 Kickstart,不再需要刻了光盘一台一台地安装 Linux,只要搞定 PXE.DHCP.T ...
- (转)COBBLER无人值守安装
COBBLER无人值守安装 说在最前面的话 在看Cobbler之前请大家先看一下Kickstart无人值守安装,了解一下Cobbler的实现原理.但是Cobbler是独立的,不需要先安装Kicksta ...
- 其他综合-Cobbler无人值守安装系统 CentOS 7
Cobbler 无人值守安装系统 CentOS 7 1.实验描述 1.1 概述 作为运维,在公司经常遇到一些机械性重复工作要做,例如:为新机器装系统,一台两台机器装系统,可以用光盘.U盘等介质安装,1 ...
- 使用Cobbler无人值守安装CentOS6.5(一)
Cobbler是一个快速网络安装linux的服务,而且在经过调整也可以支持网络安装windows.该工具使用python开发,小巧轻便(才15k行代码),使用简单的命令即可完成PXE网络安装环境的配置 ...
- Cobbler无人值守安装系统
环境说明 系统版本 CentOS 6.9 x86_64 Cobbler是一款Linux安装服务器,可以快速设置网络安装环境.它粘合在一起并自动执行许多相关的Linux任务,因此部署新系统时不必在 ...
- PXE+DHCP+TFTP+Cobbler 无人值守安装centos 7
Cobbler(补鞋匠)是通过将DHCP.TFTP.DNS.HTTP等服务进行集成,创建一个中央管理节点,其可以实现的功能有配置服务,创建存储库,解压缩操作系统媒介,代理或集成一个配置管理系统,控制电 ...
- COBBLER无人值守安装
cobbler-自动安装系统 1.1 cobber简介 1.1.1 cobbler说明 Cobbler是一个Linux服务器安装的服务,可以通过网络启动(PXE)的方式来快速安装.重装物理服务器和虚拟 ...
- Cobbler无人值守安装linux系统
简介 Cobbler是一个Linux服务器安装的服务,可以通过网络启动(PXE)的方式来快速安装.重装物理服务器和虚拟机,同时还可以管理DHCP,DNS等. Cobbler可以使用命令行方式管理,也提 ...
- Cobbler——无人值守安装多种版本多种配置操作系统
Cobbler Web 图形界面也能实现类似的导入功能,可以参见下一节举了一个Cobbler Web的用法: cobbler 添加网络同步仓库(Reposync用法)
随机推荐
- bzoj 1823: [JSOI2010]满汉全席【2-SAT+tarjan】
因为每种食材只有一份,所以两个评委的如果有要求同一种食材的两种做法就是不可行,用这个来建立2-SAT模型 然后跑tarjan判可行性即可 #include<iostream> #inclu ...
- bzoj 1477: 青蛙的约会【exgcd】
列出式子是\( mx+s1\equiv nx+s2(mod L) (m-n)x+Ly=s2-s1 \),注意如果n-m<0的话,就把ac都乘-1变成正数,然后exgcd求解,最后注意x为负的话要 ...
- (九)SpringBoot整合redis框架
二:添加Redis依赖 <dependency> <groupId>org.springframework.boot</groupId> <artifactI ...
- 编译安装Apache:出现错误configure: error: mod_deflate
在进行编译安装Apache时,出现如下错误 checking whether to enable mod_deflate... configure: error: mod_deflate has be ...
- Eclipse安装svn插件的几种方式 -- 转
1.在线安装: (1).点击 Help --> Install New Software... (2).在弹出的窗口中点击add按钮,输入Name(任意)和Location(插件的URL),点击 ...
- oracle中的用户详解 【转】
oracle中的用户很多,也很令初学者费解.oracle中的帐户分为两类:一类是必需的帐户,一类是存储各种应用的帐户 用户名 密码 描述 ANONYMOUS ANONYMOUS 访问http的匿名 ...
- 单机版solr6.3和分布式solr6.3的安装部署
一.单机版的solr部署 我的是在windows下安装的,linux同理 1. 安装JDK8,并配置好环境变量,一般我们经常开发的电脑上应该都有JDk了,所以这一步可以忽略. 2. 解压solr6.3 ...
- ubuntu16.04里如何正确添加用root用户来登录图形界面(图文详解)
不多说,直接上干货! Ubuntu版本都默认不允许使用root登录,必须要改配置文件. 第一步: 首先设置root密码,利用现有管理员帐户登陆Ubuntu,在终端执行命令:sudo passwd ro ...
- Git团队协作 - 新feature的开发过程
新feature的开发过程 建议使用SmartGit,以下是命令行操作 git checkout -b dev (对于没有分支的人)新建dev分支 git pull origin dev拉取最新数据 ...
- vue-cli下配置项目访问ip和服务器ip
一.配置项目访问ip,让本次代码支持localhost以外的ip地址访问模式:修改里的host配置,代码如下. 修改完记得 "npm run dev"重启服务. 二.在本地架设服务 ...