
ElasticSearch + xpack 使用.md
ElasticSearch 是一个高可用开源全文检索和分析组件。提供存储服务,搜索服务,大数据准实时分析等。一般用于提供一些提供复杂搜索的应。我们为什么要选择 ElasticSearch ?因为它是一个准实时的搜索工具,在一般情况下延时少于一秒,它还支持物理上的水平扩展,并拥有一套分布式协调的管理功能操作比较简单,包括一些 restful 风格的API 等等,接下来我们就来进入今天的正题。
一、前期准备
1.安装 jdk1.8
yum install java
2.配置源
rpm --import https://artifacts.elastic.co/GPG-KEY-elasticsearch
配置elasticsearch
cat >/etc/yum.repos.d/elasticsearch.repo <<EOF
[elasticsearch-5.x]
name=Elasticsearch repository for 5.x packages
baseurl=https://artifacts.elastic.co/packages/5.x/yum
gpgcheck=1
gpgkey=https://artifacts.elastic.co/GPG-KEY-elasticsearch
enabled=1
autorefresh=1
type=rpm-md
EOF
配置kibana
cat >/etc/yum.repos.d/kibana.repo << EOF
[kibana-5.x]
name=Kibana repository for 5.x packages
baseurl=https://artifacts.elastic.co/packages/5.x/yum
gpgcheck=1
gpgkey=https://artifacts.elastic.co/GPG-KEY-elasticsearch
enabled=1
autorefresh=1
type=rpm-md
EOF
3、安装
yum install elasticsearch -y
yum install kibana -y
4.修改 es 配置文件
mkdir /data/es-data/logs -p
chown -R elasticsearch.elasticsearch /data/es-data/logs
[root@linux-node2 ~]# grep -v "^#" /etc/elasticsearch/elasticsearch.yml |grep -v "^$"
cluster.name: lx
node.name: linux-node2.lx.com
path.data: /data/es-data
path.logs: /data/es-data/logs
http.port: 9200
discovery.zen.ping.unicast.hosts: ["192.168.56.12", "192.168.56.14"]
discovery.zen.minimum_master_nodes: 1
5.修改内核参数
vim /etc/security/limits.conf
* soft nofile 655350
* hard nofile 655350
vim /etc/sysctl.conf
fs.file-max=655350
调整内存大小
cat /data/elasticsearch/config/jvm.options   (可设置为物理内存的一半)
-Xms8g
-Xmx8g
sysctl -w vm.max_map_count=262144
6.修改 kibana 配置文件
[root@linux-node5 elasticsearch]# grep -v "^#" /etc/kibana/kibana.yml |grep -v "^$"
server.port: 5601
server.host: "0.0.0.0"
server.name: "lx"
elasticsearch.url: "http://192.168.56.14:9200"
elasticsearch.username: "elastic"
elasticsearch.password: "changeme"
7.x-pack 破解
编辑配置文件
cat LicenseVerifier.java
package org.elasticsearch.license;
import java.nio.*;
import java.util.*;
import java.security.*;
import org.elasticsearch.common.xcontent.*;
import org.apache.lucene.util.*;
import org.elasticsearch.common.io.*;
import java.io.*;
public class LicenseVerifier
{
public static boolean verifyLicense(final License license, final byte[] encryptedPublicKeyData) {
return true;
}
public static boolean verifyLicense(final License license) {
return true;
}
}
安装 java-devel
yum install java-devel -y
编译生成LicenseVerifier.class
javac -cp "/usr/share/elasticsearch/lib/elasticsearch-5.6.4.jar:/usr/share/elasticsearch/lib/lucene-core-6.6.1.jar:/usr/share/elasticsearch/plugins/x-pack/x-pack-5.6.4.jar" LicenseVerifier.java
查看生成的LicenseVerifier.class类文件
ll LicenseVerifier.class
替换class文件
cp /usr/share/elasticsearch/plugins/x-pack/x-pack-5.6.4.jar /tmp/test
cd /tmp/test
jar xvf x-pack-5.6.4.jar
cd /tmp/test/org/elasticsearch/license
rm LicenseVerifier.class -f
cp /root/LicenseVerifier.class /tmp/test/org/elasticsearch/license/  #拷贝上文编译生成的java类文件
jar cvf x-pack-5.6.4.jar /tmp/test/*                             #压缩
\cp /tmp/test/x-pack-5.6.4.jar /usr/share/elasticsearch/plugins/x-pack/    #拷贝到原来的x-pack目录
注意:x-pack-5.6.4.jar 应该拷贝到两个 elasticsearch 集群插件,即目录 /usr/share/elasticsearch/plugins/x-pack/
重启 es 集群
systemct restart elasticsearch
获取 license 证书
https://license.elastic.co/registration
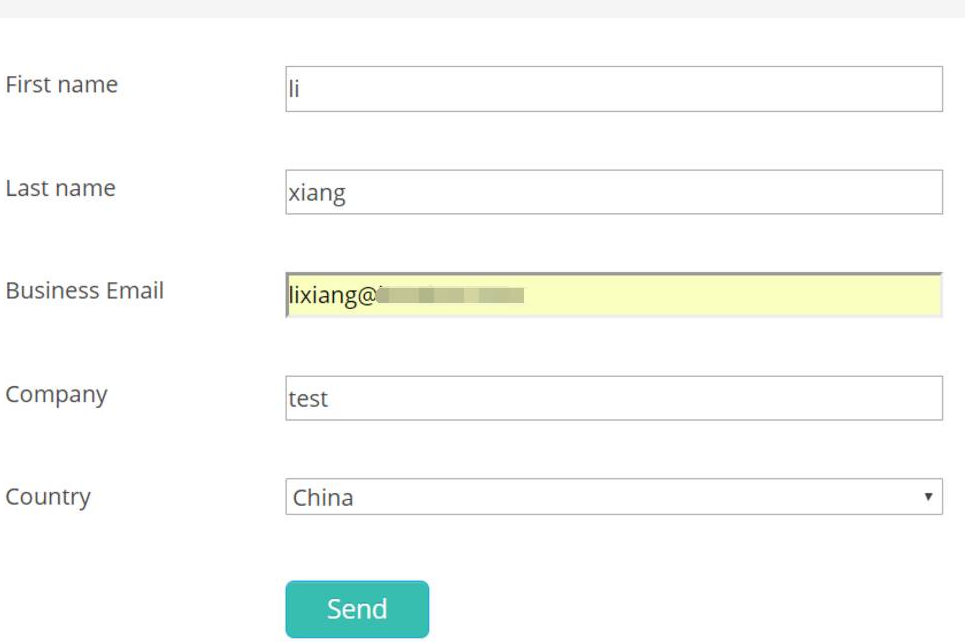
通过填写的邮件获取官方发来的邮件获取证书
cat li-xiang-d28260d9-6c96-4dd2-92dc-2f14a9787903-v5.json
{"license":{"uid":"d28260d9-6c96-4dd2-92dc-2f14a9787903","type":"platinum","issue_date_in_millis":1511740800000,"expiry_date_in_millis":1827359999000,"max_nodes":100,"issued_to":"li xiang (ceshi)","issuer":"Web Form","signature":"AAAAAwAAAA2lsE14rcZQLw3V/JuUAAABmC9ZN0hjZDBGYnVyRXpCOW5Bb3FjZDAxOWpSbTVoMVZwUzRxVk1PSmkxaktJRVl5MUYvUWh3bHZVUTllbXNPbzBUemtnbWpBbmlWRmRZb25KNFlBR2x0TXc2K2p1Y1VtMG1UQU9TRGZVSGRwaEJGUjE3bXd3LzRqZ05iLzRteWFNekdxRGpIYlFwYkJiNUs0U1hTVlJKNVlXekMrSlVUdFIvV0FNeWdOYnlESDc3MWhlY3hSQmdKSjJ2ZTcvYlBFOHhPQlV3ZHdDQ0tHcG5uOElCaDJ4K1hob29xSG85N0kvTWV3THhlQk9NL01VMFRjNDZpZEVXeUtUMXIyMlIveFpJUkk2WUdveEZaME9XWitGUi9WNTZVQW1FMG1DenhZU0ZmeXlZakVEMjZFT2NvOWxpZGlqVmlHNC8rWVVUYzMwRGVySHpIdURzKzFiRDl4TmM1TUp2VTBOUlJZUlAyV0ZVL2kvVk10L0NsbXNFYVZwT3NSU082dFNNa2prQ0ZsclZ4NTltbU1CVE5lR09Bck93V2J1Y3c9PQAAAQBE870HCp9jTj22SVdEP2uAFLF6ikLdDJFtSlbHuYOki6rPtWxIcw8y+WWpPUT5e8lYZw0GkB8CYT5hFLXZTrBqTsNbYRZ3ABdHS1BnKBlkfE4PPcvnTTt4HtBCawNHaW0BNWQ2BA2fFj6zX3HyYJ8q5OaQk/il0t5f/TkIuf0yo3Y/F3rzDIXOHieBFnVvfG3EpNB4lo+G+e6vPMeOW86PsF9eKvQ24nucGDK3S4WSpwxbP1gZFuTdmE9zDguJhRHrtJ6k//A/Q0Fbo8gFntWgHNp+1OJEklH+VBBZUWo17UMGnjjxDrGlLTZcsz2BPmk7mC7e8gBQY4z7zJ/SgnsU","start_date_in_millis":1511740800000}}
此证书的时间为1年使用时间,你可以通过下面网站进行换算http://tool.chinaz.com/Tools/unixtime.aspx,目前我申请了一个10 年的时间
将 "type":"basic" 替换为 "type":"platinum"    # 基础班变更为铂金版
将 "expiry_date_in_millis":1543363199999 替换为 "expiry_date_in_millis":1827359999000 # 1年变为10年
查看当前的 license
curl -XGET -u elastic:changeme 'http://127.0.0.1:9200/_license'
{
  "license" : {
    "status" : "active",
    "uid" : "21389992-4010-4d2c-917b-94b4e3d5a1dc",
    "type" : "trial",
    "issue_date" : "2017-11-27T05:12:27.999Z",
    "issue_date_in_millis" : 1511759547999,
    "expiry_date" : "2017-12-27T05:12:27.999Z",
    "expiry_date_in_millis" : 1514351547999,
    "max_nodes" : 1000,
    "issued_to" : "lx",
    "issuer" : "elasticsearch",
    "start_date_in_millis" : -1
  }
}
替换 license
curl -XPUT -u elastic:changeme 'http://127.0.0.1:9200/_xpack/license?acknowledge=true' -d @li-xiang-d28260d9-6c96-4dd2-92dc-2f14a9787903-v5.json
重启 es 集群
systemctl restart elasticsearch
查看 license
[root@linux-node5 license]# curl -XGET -u elastic:changeme 'http://127.0.0.1:9200/_license'
{
  "license" : {
    "status" : "active",
    "uid" : "d28260d9-6c96-4dd2-92dc-2f14a9787903",
    "type" : "platinum",
    "issue_date" : "2017-11-27T00:00:00.000Z",
    "issue_date_in_millis" : 1511740800000,
    "expiry_date" : "2027-11-27T23:59:59.000Z",
    "expiry_date_in_millis" : 1827359999000,
    "max_nodes" : 100,
    "issued_to" : "li xiang (ceshi)",
    "issuer" : "Web Form",
    "start_date_in_millis" : 1511740800000
  }
}
二、配置 X- Pack 告警
本文配置 X- Pack 告警是通过 filebeat 收集 Nginx 的日志来做的模拟
配置邮件报警
1.安装 Nginx
2.给 Nginx 配置 json 格式的数据
log_format json '{"@timestamp":"$time_iso8601",'
               '"@version":"1",'
               '"client":"$remote_addr",'
               '"url":"$uri",'
               '"status":"$status",'
               '"domain":"$host",'
               '"host":"$server_addr",'
               '"size":$body_bytes_sent,'
               '"responsetime":$request_time,'
               '"referer": "$http_referer",'
               '"ua": "$http_user_agent"'
               '}';
    access_log  logs/access.log  json;
3.安装 filebeta
安装
yum install -y filebeta
配置filebeta
[root@linux-node4 filebeat]# grep -v "^  #" filebeat.yml|grep -v "^$"|grep -v "^#"
filebeat.prospectors:
- input_type: log
  paths:
    - /usr/local/nginx/logs/access.log
  json.keys_under_root: true
  json.overwrite_keys: true
output.elasticsearch:
  hosts: ["localhost:9200"]
  username: "elastic"
  password: "changeme"
参考网址:https://www.elastic.co/guide/en/beats/filebeat/current/configuration-filebeat-options.html#config-json
http://www.iyunw.cn/archives/filebeat-shou-ji-json-ge-shi-de-nginx-ri-zhi-fa-song-gei-elasticsearch/
启动filebeta服务
systemctl status filebeat.service
这里默认进入 es 的索引是 filebeat-{%}
4.登陆 kibana 添加索引

5.模拟一些 404 的页面,让其展示
for i in {1..1000};do curl http://192.168.56.14:/lx-0$i;sleep 1;done

6.添加报警触发器(收集每分钟内超过访问状态大于 400 且个数超过 20 报警)
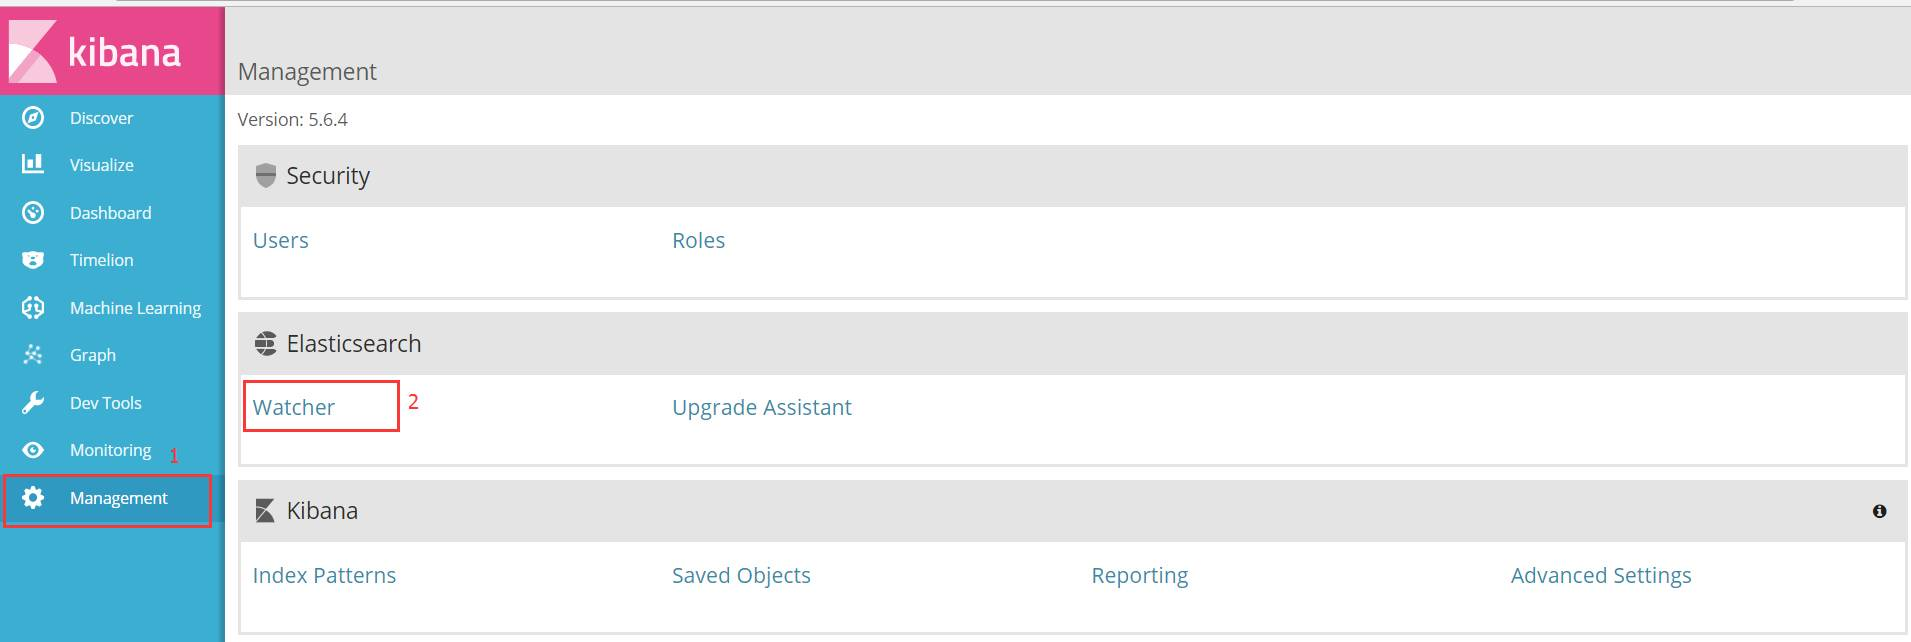
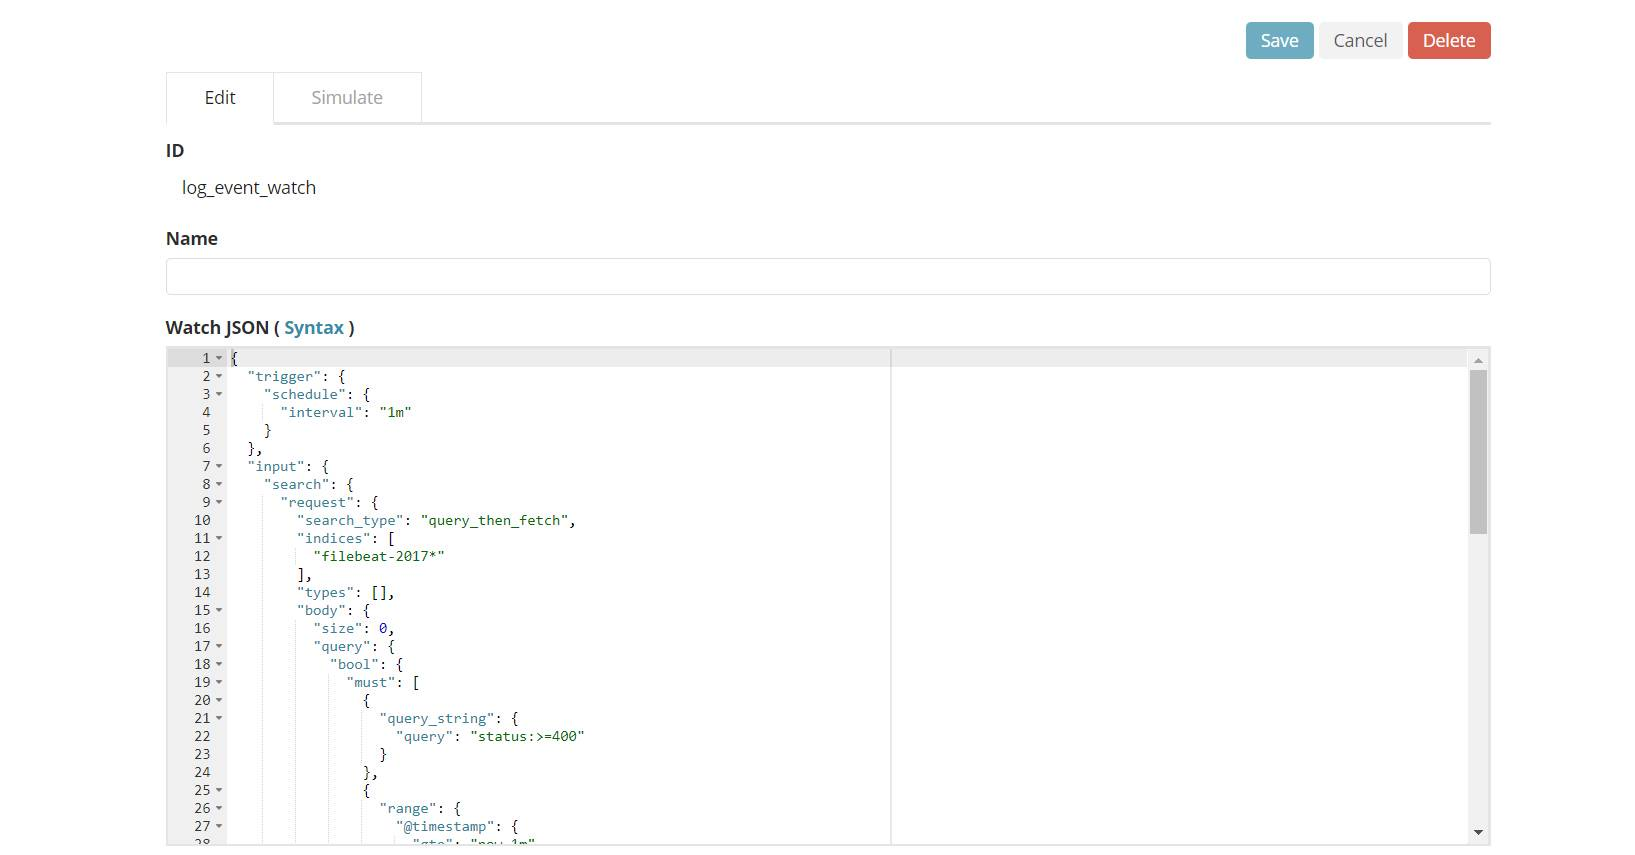
三、Watch JSON
{
  "trigger": {
    "schedule": {
      "interval": "1m"
    }
  },
  "input": {
    "search": {
      "request": {
        "search_type": "query_then_fetch",
        "indices": [
          "filebeat-2017*"
        ],
        "types": [],
        "body": {
          "size": 0,
          "query": {
            "bool": {
              "must": [
                {
                  "query_string": {
                    "query": "status:>=400"
                  }
                },
                {
                  "range": {
                    "@timestamp": {
                      "gte": "now-1m"
                    }
                  }
                }
              ]
            }
          },
          "sort": [
            {
              "@timestamp": {
                "order": "desc"
              }
            }
          ]
        }
      }
    }
  },
  "condition": {
    "compare": {
      "ctx.payload.hits.total": {
        "gt": 20
      }
    }
  },
  "actions": {
    "elasticsearch": {
      "throttle_period_in_millis": 60000,
      "email": {
        "profile": "outlook",
        "attachments": {
          "attached_data": {
            "data": {
              "format": "json"
            }
          }
        },
        "priority": "high",
        "to": [
          "lixiang@xxxxx.com"
        ],
        "subject": "Nginx {{ctx.payload.hits.total}} errors",
        "body": {
          "text": "nginx 404 错误过多,请注意查看"
        }
      }
    }
  }
}
7.这一步特别重要需要在 ES 配置文件设置否则无法报警(因为我公司使用的是 Exchange 客户端)
xpack.notification.email.account:
    exchange_account:
        profile: outlook
        email_defaults:
            from: warning@xxxxx.com
        smtp:
            auth: true
            starttls.enable: true
            host: smtp.partner.outlook.cn
            port: 587
            user: 123@xxxxxx.com
            password: 233g@123
参考网址:https://www.elastic.co/guide/en/x-pack/5.6/actions-email.html #邮件设置
8. 查看邮件报警状态以及 kibana 中的状态
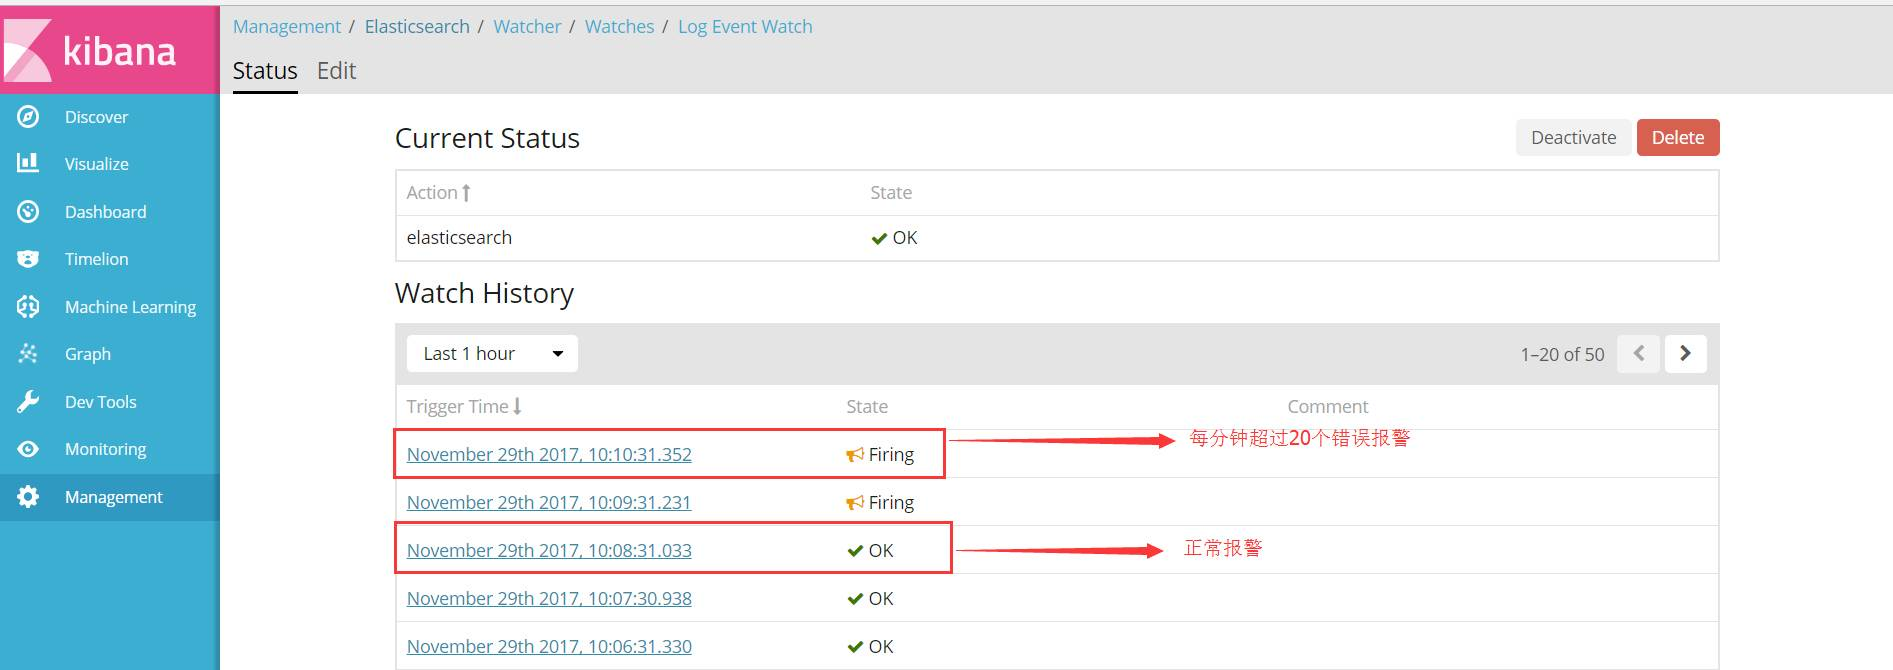
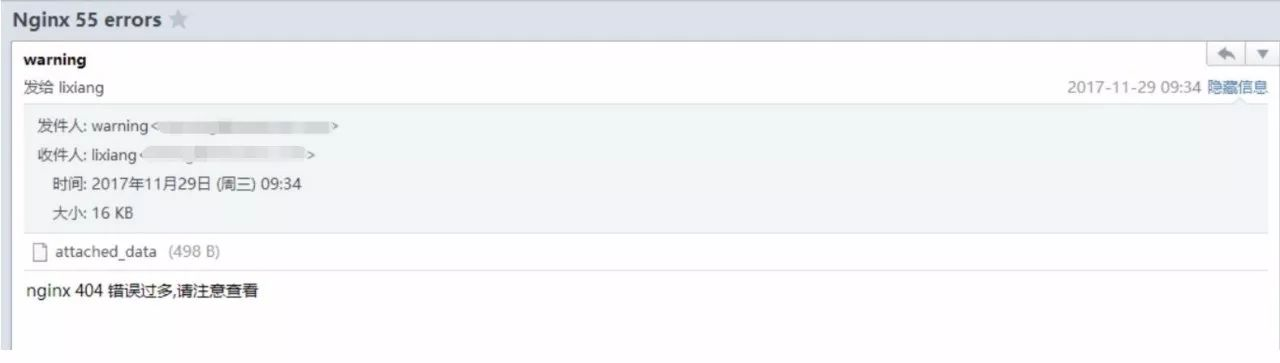
对于上面的内容大家可以参看下面的 url 来了解其中的含义
参考网址:
https://www.elastic.co/guide/en/x-pack/5.6/xpack-alerting.html 对集群和索引事件的警告 Xpack document
四、配置 Webhook 报警
对于 webhook 的报警,我们需要前期做一下工作需要了解一个东西 web.py,具体 URL 链接大家可以访问这个地方 http://webpy.org/tutorial3.zh-cn#starting
1.用 web.py 启动一个 webhook 的监听
[root@linux-node5 ~]# cat webhooks.py
#!/usr/bin/evn python
# -*- coding:utf-8 -*-
import web
import os
import demjson
import sys
reload(sys)
sys.setdefaultencoding( "utf-8" )
urls = (
    '/log_event_watch','abc',
)
class abc:
    def POST(self):
        data = web.data()
        print data
        cmd = '''curl -G -v "http://abc.com/abc/" --data "user=lixiang" --data "media=all" --data-urlencode "subject=test" --data-urlencode "message=%s"''' %(data)
        os.system(cmd)
if __name__ == "__main__":
    app = web.application(urls, globals())
    app.run()
运行 python webhooks.py 9000
注意 :urls,因为我的 Watcher ID 为 "log_event_watch"
2.再次回到我们的 kibana 界面, "Management"->"Edit"
查看 Watches
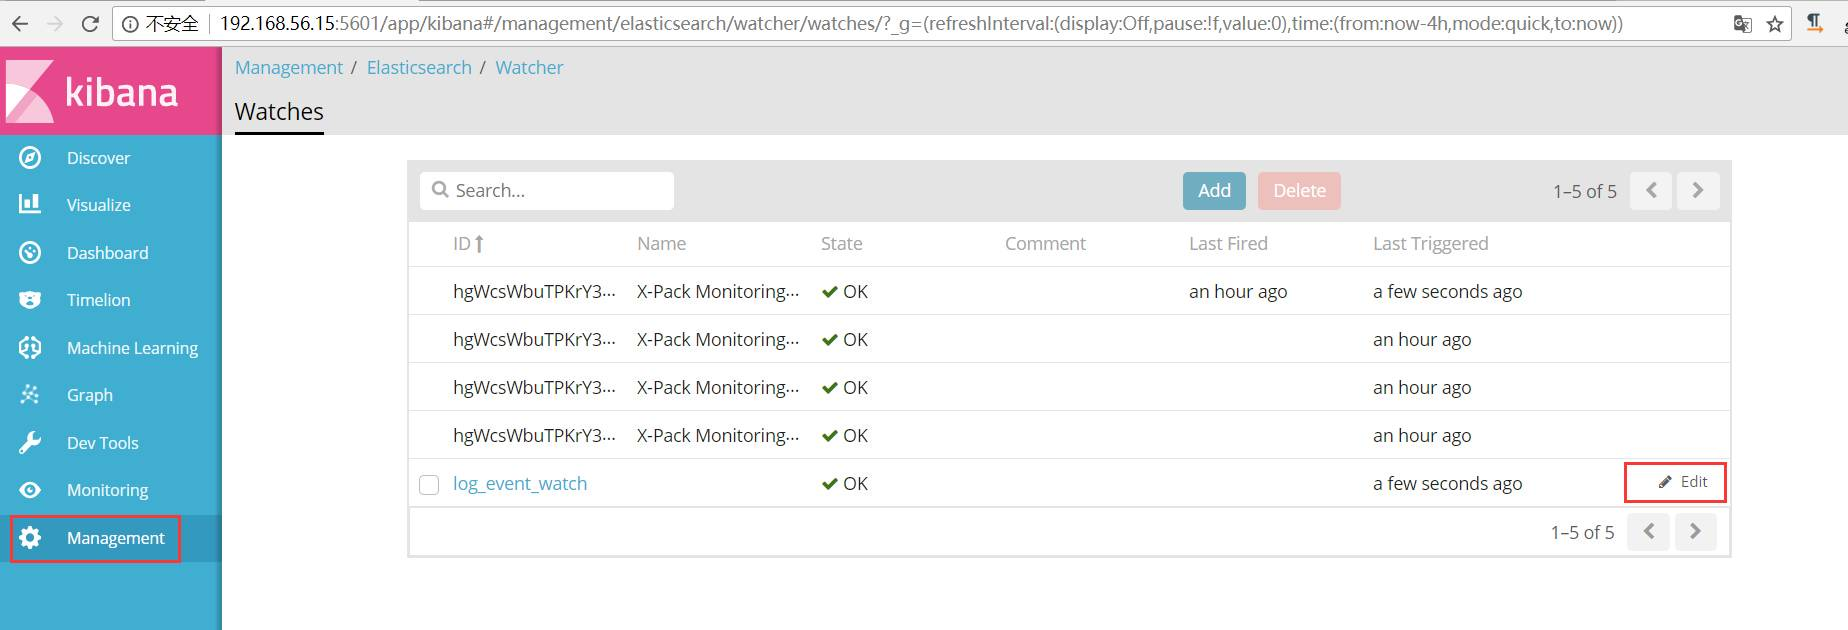
查看 Wathch Json 内容
{
  "trigger": {
    "schedule": {
      "interval": "1m"
    }
  },
  "input": {
    "search": {
      "request": {
        "search_type": "query_then_fetch",
        "indices": [
          "nginx_access*"
        ],
        "types": [],
        "body": {
          "size": 0,
          "query": {
            "bool": {
              "must": [
                {
                  "query_string": {
                    "query": "status:>=400"
                  }
                },
                {
                  "range": {
                    "@timestamp": {
                      "gte": "now-1m"
                    }
                  }
                }
              ]
            }
          },
          "sort": [
            {
              "@timestamp": {
                "order": "desc"
              }
            }
          ]
        }
      }
    }
  },
  "condition": {
    "compare": {
      "ctx.payload.hits.total": {
        "gt": 5
      }
    }
  },
  "actions": {
    "email": {
      "throttle_period_in_millis": 60000,
      "email": {
        "profile": "outlook",
        "attachments": {
          "attached_data": {
            "data": {
              "format": "json"
            }
          }
        },
        "priority": "high",
        "to": [
          "lixiang@xxxxx.com"
        ],
        "subject": "Nginx {{ctx.payload.hits.total}} errors",
        "body": {
          "text": "nginx 404 错误过多,请注意查看"
        }
      }
    },
    "webhook": {
      "condition": {
        "compare": {
          "ctx.payload.hits.total": {
            "gt": 5
          }
        }
      },
      "webhook": {
        "scheme": "http",
        "host": "192.168.56.15",
        "port": 9000,
        "method": "post",
        "path": "/{{watch_id}}",
        "params": {},
        "headers": {},
        "body": "Encountered {{ctx.payload.hits.total}} errors"
      }
    }
  }
}
3.模拟触发报警
for i in {1..200};do curl http://192.168.56.14:/lx-0$i;sleep 2;done
4.查看结果,这里就不贴出来了(微信,短信,邮件都能收到报警)
5.这就是实现报警消息附带 URL 地址
官方参考网址:
https://www.elastic.co/guide/en/x-pack/5.6/watcher-getting-started.html
ElasticSearch + xpack 使用.md的更多相关文章
- ElasticSearch + xpack 使用
ElasticSearch 是一个高可用开源全文检索和分析组件.提供存储服务,搜索服务,大数据准实时分析等.一般用于提供一些提供复杂搜索的应.我们为什么要选择 ElasticSearch ?因为它是一 ...
- Elasticsearch+x-pack认证license过期处理
介绍: x-pack是Elasticsearch中的一个plugin,主要功能是实现认证功能 报错: 类似下面这样的报错,是因为licese过期导致的 解决: 1.首先去Elasticsearch的官 ...
- elasticsearch x-pack
elasticsearch-plugin.bat install x-pack D:\elasticsearch-5.5.3\bin>elasticsearch-plugin.bat insta ...
- 在Linux上安装Elasticsearch Head工具.md
在Linux上安装Elasticsearch Head工具 1.修改elasticsearch的参数 编辑elasticsearch的配置文件elasticsearch.yml $ vim /data ...
- elasticsearch x-pack license过期
1.注册一个新的license,每一项都要填写,每次可以使用一年,一年到期后再来注册一个新的 2.更新license (官方文档:https://www.elastic.co/guide/en/x-p ...
- Spring Data Elasticsearch 和 x-pack 用户名/密码验证连接
Elasticsearch Java API 客户端连接 一个是TransportClient,一个是NodeClient,还有一个XPackTransportClient TransportClie ...
- 申请elasticsearch中x-pack插件许可证及授权
前提: ES主机中elasticsearch x-pack插件许可证申请使用期限为1年,到期后x-pack插件将不再可用,重启elasticsearch服务后日志会提示一下警告,如图所 ...
- ElasticSearch 5学习(3)——单台服务器部署多个节点
一般情况下单台服务器只会部署一个ElasticSearch node,但是在学习过程中,很多情况下会需要实现ElasticSearch的分布式效果,所以需要启动多个节点,但是学习开发环境(不想开多个虚 ...
- zabbix监控Elasticsearch集群
本节以 zabbix 为例,介绍如何使用监控系统完成 Elasticsearch 的监控报警. github 上有好几个版本的 ESZabbix 仓库,都源自 Elastic 公司员工 unterge ...
随机推荐
- Linux 学习记录 三(Vim 文书编辑器).
所有的Unix Like系统都会内建vi文书编辑器,其他的文书编辑器不一定存在,vim是vi的升级版,具有程序编辑的能力,可以主动的以字体颜色辨别语法的正确性,方便程序设计.vim 里 ...
- 公牛与状压dp
T1 疾病管理 裸得不能再裸的状压dp 不过数据范围骗人 考试时k==0的点没过 我也很无奈呀qwq #include<iostream> #include<cstdio> # ...
- tar --打包和压缩
tar 参考链接 作用:为linux的文件和目录创建档案,也可以在档案中改变文件,或者向档案中加入新的文件即用来压缩和解压文件.tar本身不具有压缩功能.他是调用压缩功能实现的 语法:tar[必要参 ...
- calling c++ from golang with swig--windows dll (四)
calling c++ from golang with swig--windows dll 四 前面讲述了windows环境下golang如何通过swig调用C++ dll.由于编译c++代码使用了 ...
- Linux命令每日一个
2014-3-31 1:39 (1)tree linux以树状的结构显示当前目录及其包含的子目录下的文件 #apt-get install tree #tree //在当前目录下直接使用该命令即可 ...
- mysql 编写存储过程
先看例子: 1.delimiter $$2.drop procedure if exists`test_procedure` $$3.create procedure test_procedure(I ...
- 巧用php中的array_filter()函数去掉多维空值
一直一维array_filter() 函数只能去除一维数组,其实这个函数也能去除多维数组: $arr =[ '0'=>array(), '1'=>'false', '2'=>'tes ...
- 数组a[n]中存放1-n中的n-1个数,给出算法找出重复的那一个数
问题描述: 数组a[n]中存放1-n中的n-1个数,给出算法找出重复的那一个数. 算法一: 对数组a[n]进行冒泡排序,如果冒泡所得的最值和前一个最值相等,则该最值为重复的数. 分析: 该算法时间复杂 ...
- WebDriver的等待方式
/* * 1.线程休眠 * 2.隐式等待 * 3.显示等待 * */ package com.sfwork; import java.util.concurrent.TimeUnit; import ...
- iOS开发系列
因为最近面试了一些人,校招.初中级.高级.架构师,各种级别的,发现大家水平差异很大,有的高级的工程师很多问题都回答不上来,所以想梳理下iOS的知识点,写成一个系列,如果时间允许的话,会录制成视频放到网 ...