
Rendering Transparent 3D Surfaces in WPF with C#(转载)
Rendering Transparent 3D Surfaces in WPF with C#
The primary problems that arise when rendering semi-transparent 3d objects in Windows Presentation Foundation have to do with false z-buffer occlusions. Specifically, when a transparent surface or polygon is rendered, it sets the z-buffer depth values to block objects that are behind it from being rendered, even though they should show through the transparent layer.
In WPF with C#, the z-buffer is not accessible. So, it can not be disabled during transparent rendering. Instead, we must render the transparent objects last so that they are layered over the rest of the scene and the objects behind them show through.
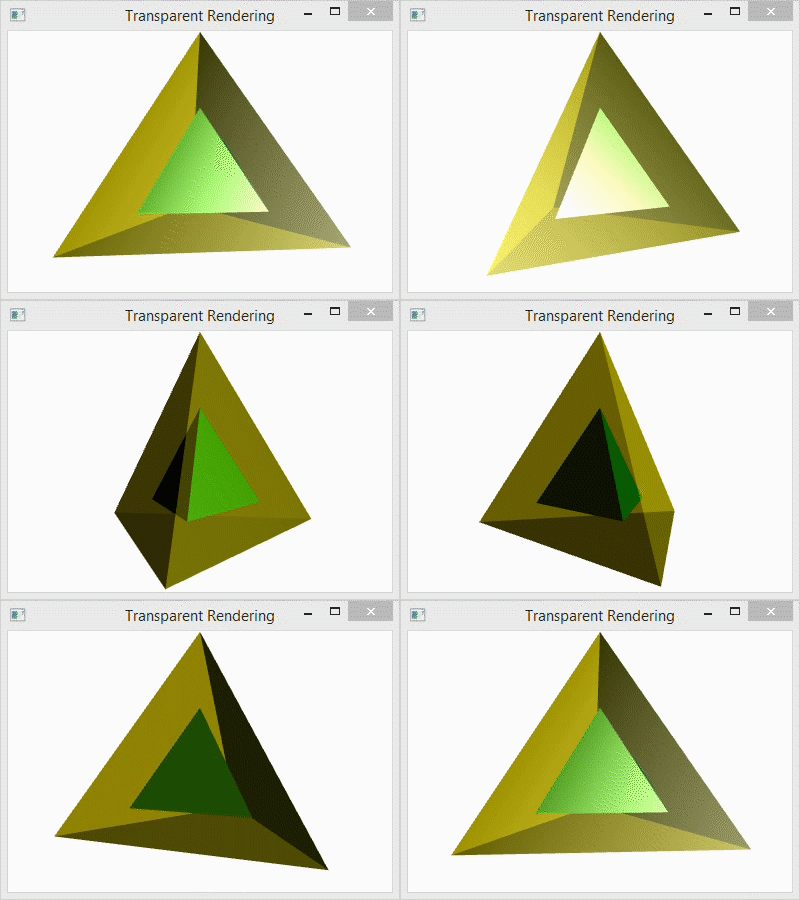
Below, I have a program for the single code file that I used to generate the spinning, transparent tetrahedron shown above. The C# project that I used is a simple Console Application project with the libraries PresentationCore,PresentationFramework, and WindowsBase references added to it as I showed in a prior post: Using WPF in a C# Console Application. The Main() function creates the Window for the program and calls TransparentScene() to do all of the rendering.
Inside the function TransparentScene(), I create the camera, the light, the animated rotation transformation, the tetrahedron geometry, and then use that geometry to specify three tetrahedrons. The first tetrahedron is called the Inner Tetrahedronbecause it is scaled to fit inside the others. The second tetrahedron is called the Outer Tetrahedron and is semi-transparent. The third tetrahedron is also part of the Outer Tetrahedron, but consists of the opaque back faces. Note that it only makes sense to render the back faces because the front faces are semi-transparent. Otherwise, the back would not be visible.
At the end the code, I use the following lines to add the tetrahedrons to the scene:
            qModelGroup.Children.Add(qBackGeometry);

            qModelGroup.Children.Add(qInnerGeometry);

            qModelGroup.Children.Add(qOuterGeometry);
Notice that the transparent “Outer Geometry” layer is added last. This is necessary to avoid false occlusions.
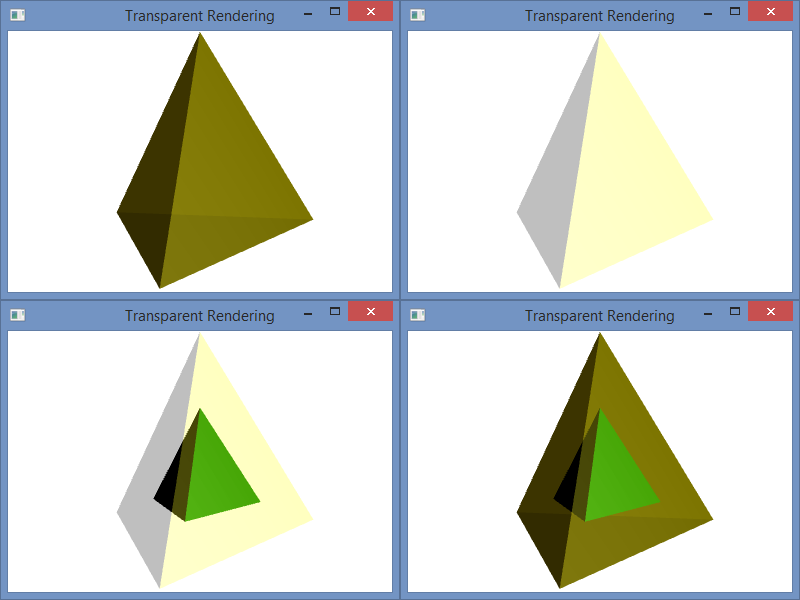
For comparison, I have included the image below with four different arrangements. The first (top-left) shows the scene with the transparent outer layer added before the inner and after the back. The second (top-right) shows the transparent outer layer added before both the inner and the back layers. The third (bottom-left) shows the transparent layer added before the back and after the inner layer. The last (bottom-right) shows the scene with the transparent layer added last as it is in the code.
Program.cs
using System;

using System.Windows;

using System.Windows.Controls;

using System.Windows.Media;

using System.Windows.Media.Media3D;

using System.Windows.Media.Animation;

namespace WpfTransparent {

    class Program {

        [STAThread]

        static void Main(string[] args) {

            Window qWindow = new Window();

            qWindow.Title = "Transparent Rendering";

            qWindow.Width = 400;

            qWindow.Height = 300;

            qWindow.Content = TransparentScene();

            qWindow.ShowDialog();

        }

        static Viewport3D TransparentScene() {

            // Define the camera

            PerspectiveCamera qCamera = new PerspectiveCamera();

            qCamera.Position = new Point3D(0, .25, 2.25);

            qCamera.LookDirection = new Vector3D(0, -.05, -1);

            qCamera.UpDirection = new Vector3D(0, 1, 0);

            qCamera.FieldOfView = 60;

            // Define a lighting model

            DirectionalLight qLight = new DirectionalLight();

            qLight.Color = Colors.White;

            qLight.Direction = new Vector3D(-0.5, -0.25, -0.5);

            // Define the animated rotation transformation

            RotateTransform3D qRotation =

                new RotateTransform3D(new AxisAngleRotation3D(new Vector3D(0, 1, 0), 1));

            DoubleAnimation qAnimation = new DoubleAnimation();

            qAnimation.From = 1;

            qAnimation.To = 361;

            qAnimation.Duration = new Duration(TimeSpan.FromMilliseconds(5000));

            qAnimation.RepeatBehavior = RepeatBehavior.Forever;

            qRotation.Rotation.BeginAnimation(AxisAngleRotation3D.AngleProperty, qAnimation);

            // Define the geometry

            const double kdSqrt2 = 1.4142135623730950488016887242097;

            const double kdSqrt6 = 2.4494897427831780981972840747059;

            // Create a collection of vertex positions

            Point3D[] qaV = new Point3D[4]{

                new Point3D(0.0, 1.0, 0.0),

                new Point3D(2.0 * kdSqrt2 / 3.0, -1.0 / 3.0, 0.0),

                new Point3D(-kdSqrt2 / 3.0, -1.0 / 3.0, -kdSqrt6 / 3.0),

                new Point3D(-kdSqrt2 / 3.0, -1.0 / 3.0, kdSqrt6 / 3.0)};

            Point3DCollection qPoints = new Point3DCollection();

            // Designate Vertices

            // My Scheme (0, 1, 2), (1, 0, 3), (2, 3, 0), (3, 2, 1)

            for (int i = 0; i < 12; ++i) {

                if ((i/3) % 2 == 0) {

                    qPoints.Add(qaV[i%4]);

                } else {

                    qPoints.Add(qaV[(i*3)%4]);

                }

            }

            // Designate Triangles

            Int32Collection qTriangles = new Int32Collection();

            for (int i = 0; i < 12; ++i ) {

                qTriangles.Add(i);

            }

            Int32Collection qBackTriangles = new Int32Collection();

            // Designate Back Triangles in the opposite orientation

            for (int i = 0; i < 12; ++i) {

                qBackTriangles.Add(3 * (i / 3) + (2 * (i % 3) % 3));

            }

            // Inner Tetrahedron: Define the mesh, material and transformation.

            MeshGeometry3D qFrontMesh = new MeshGeometry3D();

            qFrontMesh.Positions = qPoints;

            qFrontMesh.TriangleIndices = qTriangles;

            GeometryModel3D qInnerGeometry = new GeometryModel3D();

            qInnerGeometry.Geometry = qFrontMesh;

            // *** Material ***

            DiffuseMaterial qDiffGreen =

                new DiffuseMaterial(new SolidColorBrush(Color.FromArgb(255, 0, 128, 0)));

            SpecularMaterial qSpecWhite = new

                SpecularMaterial(new SolidColorBrush(Color.FromArgb(255, 255, 255, 255)), 30.0);

            MaterialGroup qInnerMaterial = new MaterialGroup();

            qInnerMaterial.Children.Add(qDiffGreen);

            qInnerMaterial.Children.Add(qSpecWhite);

            qInnerGeometry.Material = qInnerMaterial;

            // *** Transformation ***

            ScaleTransform3D qScale = new ScaleTransform3D(new Vector3D(.5, .5, .5));

            Transform3DGroup myTransformGroup = new Transform3DGroup();

            myTransformGroup.Children.Add(qRotation);

            myTransformGroup.Children.Add(qScale);

            qInnerGeometry.Transform = myTransformGroup;

            // Outer Tetrahedron (semi-transparent) : Define the mesh, material and transformation.

            GeometryModel3D qOuterGeometry = new GeometryModel3D();

            qOuterGeometry.Geometry = qFrontMesh;

            // *** Material ***

            DiffuseMaterial qDiffTransYellow =

                new DiffuseMaterial(new SolidColorBrush(Color.FromArgb(64, 255, 255, 0)));

            SpecularMaterial qSpecTransWhite =

                new SpecularMaterial(new SolidColorBrush(Color.FromArgb(128, 255, 255, 255)), 30.0);

            MaterialGroup qOuterMaterial = new MaterialGroup();

            qOuterMaterial.Children.Add(qDiffTransYellow);

            qOuterMaterial.Children.Add(qSpecTransWhite);

            qOuterGeometry.Material = qOuterMaterial;

            // *** Transformation ***

            qOuterGeometry.Transform = qRotation;

            // Outer Tetrahedron (solid back) : Define the mesh, material and transformation.

            MeshGeometry3D qBackMesh = new MeshGeometry3D();

            qBackMesh.Positions = qPoints;

            qBackMesh.TriangleIndices = qBackTriangles;

            GeometryModel3D qBackGeometry = new GeometryModel3D();

            qBackGeometry.Geometry = qBackMesh;

            // *** Material ***

            DiffuseMaterial qDiffBrown =

                new DiffuseMaterial(new SolidColorBrush(Color.FromArgb(255, 200, 175, 0)));

            qBackGeometry.Material = qDiffBrown;

            // *** Transformation ***

            qBackGeometry.Transform = qRotation;

            // Collect the components

            Model3DGroup qModelGroup = new Model3DGroup();

            qModelGroup.Children.Add(qLight);

            qModelGroup.Children.Add(qBackGeometry);

            qModelGroup.Children.Add(qInnerGeometry);

            qModelGroup.Children.Add(qOuterGeometry);

            ModelVisual3D qVisual = new ModelVisual3D();

            qVisual.Content = qModelGroup;

            Viewport3D qViewport = new Viewport3D();

            qViewport.Children.Add(qVisual);

            qViewport.Camera = qCamera;

            return qViewport;

        }

    }

}
Rendering Transparent 3D Surfaces in WPF with C#(转载)的更多相关文章
- WPF拖动总结[转载]
WPF拖动总结 这篇博文总结下WPF中的拖动,文章内容主要包括: 1.拖动窗口 2.拖动控件 Using Visual Studio 2.1thumb控件 2.2Drag.Drop(不连续,没有中 ...
- WPF阴影效果(DropShadowEffect)(转载)
<TextBlock Text="阴影效果" FontSize="32"> <TextBlock.Effect> <DropSha ...
- WPF 3D 知识点大全以及实例
引言 现在物联网概念这么火,如果监控的信息能够实时在手机的客服端中以3D形式展示给我们,那种体验大家可以发挥自己的想象. 那生活中我们还有很多地方用到这些,如上图所示的Kinect 在医疗上的应用,当 ...
- 3D开发基础知识和简单示例
引言 现在物联网概念这么火,如果监控的信息能够实时在手机的客服端中以3D形式展示给我们,那种体验大家可以发挥自己的想象. 那生活中我们还有很多地方用到这些,如上图所示的Kinect 在医疗上的应用,当 ...
- 优化WPF 3D性能
Maximize WPF 3D Performance .NET Framework 4.5 As you use the Windows Presentation Foundation (WPF ...
- WPF 3D 常用类(1)
原文:WPF 3D 常用类(1) 几何数据相关类 Geometry3D 抽象类, 用于定义物体的几何数据, 可用于计算HitTest和BoundingBox MeshGeometry3D Geomet ...
- WPF中反转3D列表项
原文:WPF中反转3D列表项 WPF中反转3D列表项 周银辉记得在苹果电脑中有一个很酷的 ...
- WPF 3D 小小小小引擎 - ·WPF 3D变换应用
原文:WPF 3D 小小小小引擎 - ·WPF 3D变换应用 WPF可以提供的3D模型使我们可以轻松地创建3D实体,虽然目前来看还很有一些性能上的问题,不过对于一些简单的3D应用应该是可取的,毕竟其开 ...
- WPF换肤之八:创建3D浏览效果
原文:WPF换肤之八:创建3D浏览效果 上节中,我们展示了WPF中的异步以及界面线程交互的方式,使得应用程序的显示更加的流畅.这节我们主要讲解如何设计一个具有3D浏览效果的天气信息浏览器. 效果显示 ...
随机推荐
- 筛1-n中每个数的因子(nlogn)
void get_div() //筛因子 { ; i<maxn; i++) for(int j=i; j<maxn; j+=i) dx[j].push_back(i); }
- 7月19日Docker&Kubernetes技术沙龙总结 - DockOne.io
7月19日Docker&Kubernetes技术沙龙总结 - DockOne.io undefined
- hdu 4712 (随机算法)
第一次听说随机算法,在给的n组数据间随机取两个组比较,当随机次数达到一定量时,答案就出来了. #include<stdio.h> #include<stdlib.h> #inc ...
- android设备连接不上电脑的解决方法
先检查手机usb调试是否开启,已经开启还是连不上按照以下步骤操作: 1. 打开cmd,输入adb devices 查看设备是否连接 2.服务未启动,先杀掉服务:adb kill-server 3.启 ...
- 学习:Linux基础知识<一>
>>硬盘分区模式 硬盘分区模式一般如下: -- / (根目录) -- /usr (操作系统) --/home (用户信息) -- /var (默认服务器的登录文件,邮件与WW ...
- 8个必备的PHP功能开发
这篇文章主要介绍了8个必备的PHP功能开发,需要的朋友可以参考下 PHP开发的程序员应该清楚,PHP中有很多内置的功能,掌握了它们,可以帮助你在做PHP开发时更加得心应手,本文将分享8个开发必备的PH ...
- Ajax 表单验证 实现代码
兼容: opera 9.6 + chrome 2.0 + FF 3 + IE 6 效果:一边输入一边实现验证 image 环境:ruby 1.8.6 + rails 2.1.0 + windows 核 ...
- Chrome/Chromium HTML5 video 视频播放硬件加速
Chromium站点上有个大致的框图.描写叙述了Chromium的video在各个平台 - 包含Android - 上是怎样使用硬件资源来做视频编解码加速的: 而依据Android Kitkat上的C ...
- window mac iPhone 三种比较相似的字体
win: 华文黑体 mac:stheiti iphone:heitisc-light heitisc-medium
- Java Interview Reference Guide--reference
Part 1 http://techmytalk.com/2014/01/24/java-interview-reference-guide-part-1/ Posted on January 24, ...