
Gtest:事件
前言
有时候在测试的时候,我们会在测试前做一些初始化活动,和测试后做一些清理工作,gtest提供了多种事件机制,非常方便我们在案例之前或之后做一些操作。总结一下gtest的事件一共有3种:
- 全局的,所有案例执行前后。
- TestSuite级别的,在某一批案例中第一个案例前,最后一个案例执行后。
- TestCase级别的,每个TestCase前后。
接下来按照倒叙3→2→1介绍如何使用事件机制
TestCase事件
TestCase事件是挂在每个案例执行前后的,实现方式和上面的几乎一样,不过需要实现的是SetUp方法和TearDown方法:
1. SetUp()方法在每个TestCase之前执行
2. TearDown()方法在每个TestCase之后执行
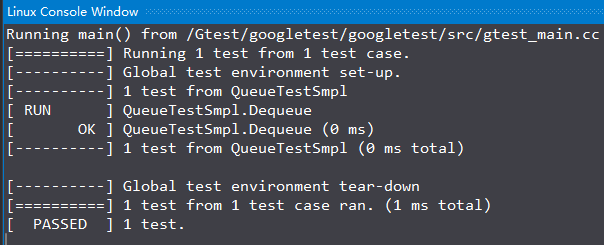
演示代码(Linux环境)
main.cpp
#include "sample-inl.h"

#include "gtest/gtest.h"

namespace {

    class QueueTestSmpl : public testing::Test {

    protected:

        virtual void SetUp() {

            //q0_.Enqueue(1);

            q1_.Enqueue();

            q1_.Enqueue();

            q2_.Enqueue();

        }

        virtual void TearDown() {

        }

        static int Double(int n) {

            return  * n;

        }

        // A helper function for testing Queue::Map().

        void MapTester(const Queue<int> * q) {

            // Creates a new queue, where each element is twice as big as the

            // corresponding one in q.

            const Queue<int> * const new_q = q->Map(Double);

            // Verifies that the new queue has the same size as q.

            ASSERT_EQ(q->Size(), new_q->Size());

            // Verifies the relationship between the elements of the two queues.

            for (const QueueNode<int>*n1 = q->Head(), *n2 = new_q->Head();

                n1 != nullptr; n1 = n1->next(), n2 = n2->next()) {

                EXPECT_EQ( * n1->element(), n2->element());

            }

            delete new_q;

        }

        // Declares the variables your tests want to use.

        Queue<int> q0_;

        Queue<int> q1_;

        Queue<int> q2_;

    };

    // Tests Dequeue().

    TEST_F(QueueTestSmpl, Dequeue) {

        int * n = q0_.Dequeue();

        EXPECT_TRUE(n == nullptr);

        n = q1_.Dequeue();

        ASSERT_TRUE(n != nullptr);

        EXPECT_EQ(, *n);

        EXPECT_EQ(1u, q1_.Size());

        delete n;

        n = q1_.Dequeue();

        ASSERT_TRUE(n != nullptr);

        EXPECT_EQ(, *n);

        EXPECT_EQ(0u, q1_.Size());

        delete n;

        n = q2_.Dequeue();

        ASSERT_TRUE(n != nullptr);

        EXPECT_EQ(, *n);

        EXPECT_EQ(0u, q2_.Size());

        delete n;

    }

}  // namespace
sample-inl.h
#ifndef GTEST_SAMPLES_SAMPLE_INL_H_

#define GTEST_SAMPLES_SAMPLE_INL_H_

#include <stddef.h>

template <typename E>  // E is the element type

class Queue;

template <typename E>  // E is the element type

class QueueNode {

    friend class Queue<E>;

public:

    // Gets the element in this node.

    const E& element() const { return element_; }

    // Gets the next node in the queue.

    QueueNode* next() { return next_; }

    const QueueNode* next() const { return next_; }

private:

    // Creates a node with a given element value.  The next pointer is

    // set to NULL.

    explicit QueueNode(const E& an_element)

        : element_(an_element), next_(nullptr) {}

    // We disable the default assignment operator and copy c'tor.

    const QueueNode& operator = (const QueueNode&);

    QueueNode(const QueueNode&);

    E element_;

    QueueNode* next_;

};

template <typename E>  // E is the element type.

class Queue {

public:

    // Creates an empty queue.

    Queue() : head_(nullptr), last_(nullptr), size_() {}

    // D'tor.  Clears the queue.

    ~Queue() { Clear(); }

    // Clears the queue.

    void Clear() {

        if (size_ > ) {

            // 1. Deletes every node.

            QueueNode<E>* node = head_;

            QueueNode<E>* next = node->next();

            for (; ;) {

                delete node;

                node = next;

                if (node == nullptr) break;

                next = node->next();

            }

            // 2. Resets the member variables.

            head_ = last_ = nullptr;

            size_ = ;

        }

    }

    size_t Size() const { return size_; }

    QueueNode<E>* Head() { return head_; }

    const QueueNode<E>* Head() const { return head_; }

    QueueNode<E>* Last() { return last_; }

    const QueueNode<E>* Last() const { return last_; }

    void Enqueue(const E& element) {

        QueueNode<E>* new_node = new QueueNode<E>(element);

        if (size_ == ) {

            head_ = last_ = new_node;

            size_ = ;

        }

        else {

            last_->next_ = new_node;

            last_ = new_node;

            size_++;

        }

    }

    E* Dequeue() {

        if (size_ == ) {

            return nullptr;

        }

        const QueueNode<E>* const old_head = head_;

        head_ = head_->next_;

        size_--;

        if (size_ == ) {

            last_ = nullptr;

        }

        E* element = new E(old_head->element());

        delete old_head;

        return element;

    }

    template <typename F>

    Queue* Map(F function) const {

        Queue* new_queue = new Queue();

        for (const QueueNode<E>* node = head_; node != nullptr;

            node = node->next_) {

            new_queue->Enqueue(function(node->element()));

        }

        return new_queue;

    }

private:

    QueueNode<E>* head_;  // The first node of the queue.

    QueueNode<E>* last_;  // The last node of the queue.

    size_t size_;  // The number of elements in the queue.

    // We disallow copying a queue.

    Queue(const Queue&);

    const Queue& operator = (const Queue&);

};

#endif  // GTEST_SAMPLES_SAMPLE3_INL_H_
TestSuite事件
这个相对来说比较简单,相对上面的实现就是替换成静态的SetUpTestCase,代码
class FooTest : public testing::Test {

 protected:

 //准备资源

  static void SetUpTestCase() {

    shared_resource_ = new ;

  }

  //释放资源

  static void TearDownTestCase() {

    delete shared_resource_;

    shared_resource_ = NULL;

  }

  // 资源

  static T* shared_resource_;

};
全局事件
也是很简单的,就是继承于testing::Environment而已。
class FooEnvironment: public testing::Environment

{

    public:

        virtual void SetUp()

        {

            printf("Environment SetUp!\n");

            a = 100;

        }

        virtual void TearDown()

        {

            printf("Environment TearDown!\n");

        }

        int a;     //共享数据

};

FooEnvironment* foo_env;  //对象指针声明

TEST(firstTest, first)    //访问共享数据并改变它的值

{

    printf("in the firstTest, foo_env->p is %d\n", foo_env->a);

    foo_env->a ++;

}

TEST(secondTest, second)  //访问共享数据

{

    printf("in the secondTest, foo_env->p is %d\n", foo_env->a);

}

int main(int argc, char* argv[])

{

    foo_env = new FooEnvironment;

    testing::AddGlobalTestEnvironment(foo_env);     //注册

    testing::InitGoogleTest(&argc, argv);

    return RUN_ALL_TESTS();

}
Gtest:事件的更多相关文章
- JNI详解---从不懂到理解
转载:https://blog.csdn.net/hui12581/article/details/44832651 Chap1:JNI完全手册... 3 Chap2:JNI-百度百科... 11 C ...
- gtest 三种事件机制
前言: 1.首先说明gtest中事件的结构层次: 测试程序:一个测试程序只有一个main函数,也可以说是一个可执行程序是一个测试程序.该级别的事件机制会在程序的开始和结束执行. 测试套件:代表一个测试 ...
- gTest详解
1. 安装使用 1.1 安装 在https://code.google.com/p/googletest/ 下载源码 进入msvc, 注意编译方式, 如果是dll, 选择 gtest-md 编译生成l ...
- 白盒测试之gtest第一个demo
认识gtest工具后,关于它的使用,下面将用一个demo程序演示一下gtest的用法以及成果展示. 一.需要测试的C++代码: #include "myfunction.h" // ...
- gtest框架使用
gtest文档说明: 由于公司单元测试的需要,自己花了大半天时间下载了一个gtest框架,使用了一些测试例子,总览了coderzh的玩转gtest测试框架,又看了几篇gtest博客,写下了以下内容,作 ...
- gtest的安装和测试[good]
一.前言 本篇将介绍一些gtest的基本使用,包括下载,安装,编译,建立我们第一个测试Demo工程,以及编写一个最简单的测试案例. 二.下载 如果不记得网址, 直接在google里搜gtest,第一个 ...
- gtest简短,简单易用
gtest它是一种跨平台的(Liunx.Mac OS X.Windows.Cygwin.Windows CE and Symbian)的C++测试框架.有google该公司宣布. gtest台上为编写 ...
- gtest框架
解析gtest框架运行机制 1.前言 Google test是一款开源的白盒单元测试框架,据说目前在Google内部已在几千个项目中应用了基于该框架的白盒测试. 最近的工作是在搞一个基于gtest ...
- 简单易懂的单元测试框架-gtest(二)
简介 事件机制用于在案例运行前后添加一些操作(相当于挂钩函数).目前,gtest提供了三种等级的事件,分别: 全局级,所有案例执行的前后 TestSuite级,某一个案例集的前后 TestCa ...
随机推荐
- nginx 分离配置文件 conf.d和default.conf
1. 在 nginx.conf 文件中引用 conf.d 下的所有配置文件 #在http配置节的末尾添加配置引用 http { ... #gzip on; include /etc/nginx/con ...
- CentOS上安装配置RabbitMQ Server
1. 安装Erlang 由于rabbitmq是基于erlang语言开发的,所以必须先安装erlang. curl -s https://packagecloud.io/install/reposito ...
- ETF计算公式:IOPV
IOPV=(申购.赎回清单中必须现金替代的替代金额+申购.赎回清单中退补现金替代成份证券的数量与最新成交价相乘之和+申购.赎回清单中可以现金替代成份证券的数量与最新成交价相乘之和+申购.赎回清单中禁止 ...
- cordova调用第三方应用
cordova 帮助webapp 达到调用原生系统的功能 项目需求:在项目中调用系统中含有的第三方地图应用 需求其实分为两步: 1. 查找本地地图应用 2.成功调起本地应用 首先需要安装两个插件,安装 ...
- APT33追踪思路
APT33组织主要针对石油和航空业,这个组织使用了大约十二个命令与控制服务器(C&C)针对性的对目标攻击.APT33也一直在做定点针对性攻击.比如近两年来,该组织利用一位欧洲高级政治人物(该国 ...
- Node.js实现PC端类微信聊天软件(一)
Github StackChat 技术栈 写这个软件StackChat的主要目的是巩固练习Node和对React的实践,也是为了学习东西,所以选用了这些自己还没在项目里使用过的技术,边学变写 Elec ...
- initramfs文件系统制作
源码下载:https://busybox.net/downloads/ 源码版本:busybox-1.30.0.tar.bz2 [ 源码编译步骤 ] make menuconfig ARCH= COM ...
- 五、Spring中的@Import注解
一.使用@Import注解导入组件 @Import注解的作用是给容器中导入组件,回顾下我们给容器中导入组件的方式,可以通过Spring的xm配置方式,可以通过注解,如@Component等,也可以通过 ...
- Linux下将.Asp Core 部署到 Docker容器中
我们来部署一个简单的例子: 将一个简单的.Aps Core项目部署到Docker容器中并被外网访问 说明: 下面的步骤都是建立在宿主服务器系统已经安装配置过Docker容器,安装Docker相对比较简 ...
- IDEA界面太丑??尝试一下这几个风格
>>>>>>>>>>原文地址<<<<<<<<<< >>>> ...