
MSYS2 编译环境配置
博客转载自:https://medium.com/@fzubair/carnd-term2-gcc-setup-on-windows-287e1fd36845
2018/6/2 — mingw32/cmake doesn’t work in the latest msys2. Have added step 7 to use “cmake” installed from cmake.org instead
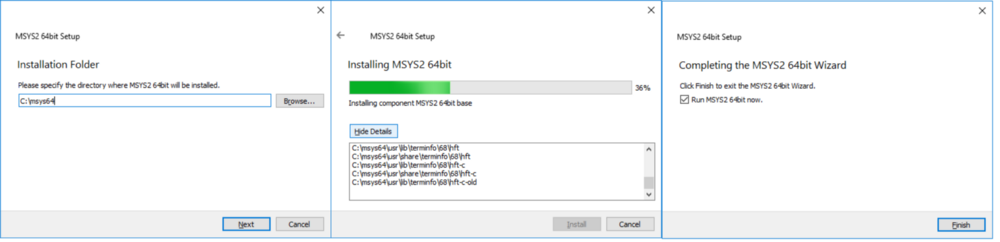
- Download latest msys2 installer from https://www.msys2.org/ (orjust download this version http://repo.msys2.org/distrib/x86_64/msys2-x86_64-20180531.exe)
- Run the installer, keep c:\msys64 as default, when it finishes, choose “Run MSYS now”
When the command prompt window opens type:
pacman -Syu //更新系统

A message will appear to close the terminal window. Close the window. (it might take long to close, and you might even have to kill it)
Note: Depending on the version you download from msys2, it might say everything is up to date, just continue.
3. Change home location by opening c:\msys64\etc\nsswitch.conf in any editor and change db_home to:
db_home: windows desc //将home定位到windows的home,不修改则在/home/username
4. Open MSYS2 MinGW 32bit and this time write:
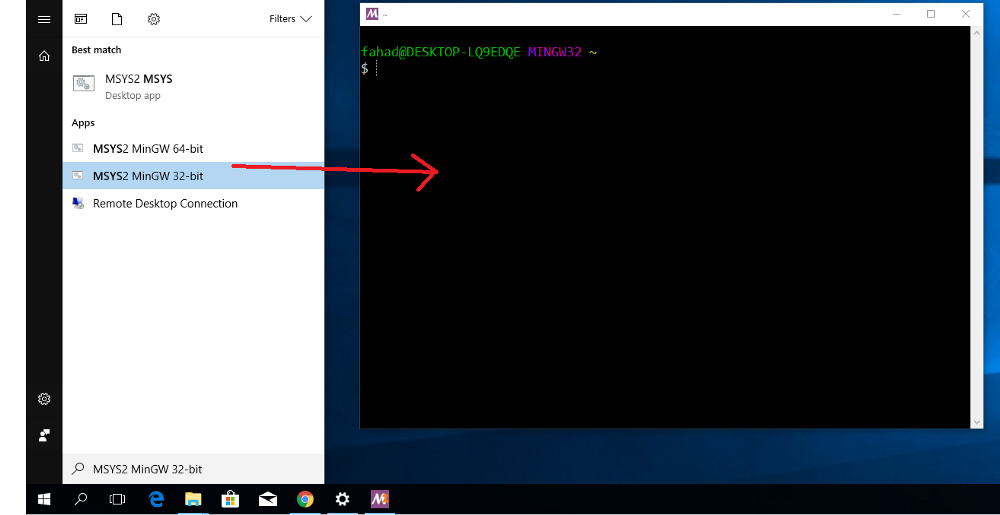
pacman -Su //
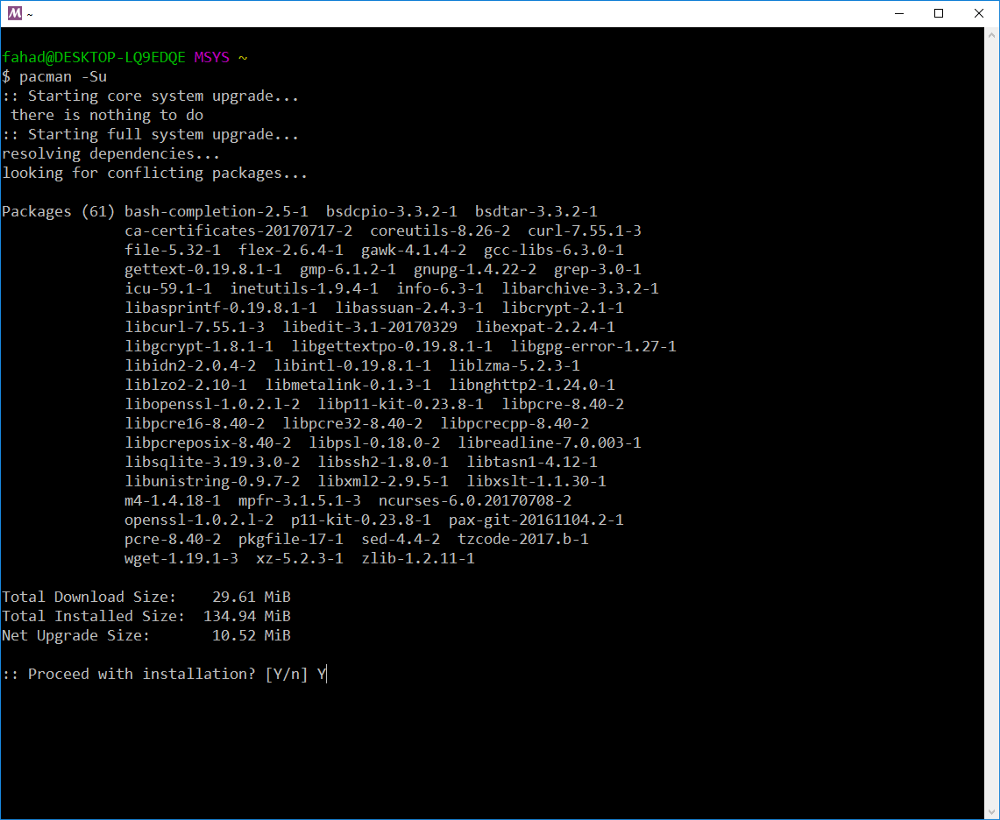
Note: Depending on the version you downloaded, it might say everything is up to date, so you can just continue. 可能下载速度很慢,可以通过更换源解决,方案参考 MSYS2 更换国内源
5.Download gcc-5.4
http://repo.msys2.org/mingw/i686/mingw-w64-i686-gcc-libs-5.4.0-1-any.pkg.tar.xz
http://repo.msys2.org/mingw/i686/mingw-w64-i686-gcc-libgfortran-5.4.0-1-any.pkg.tar.xz
http://repo.msys2.org/mingw/i686/mingw-w64-i686-gcc-5.4.0-1-any.pkg.tar.xz
http://repo.msys2.org/mingw/i686/mingw-w64-i686-gcc-fortran-5.4.0-1-any.pkg.tar.xz
http://repo.msys2.org/mingw/i686/mingw-w64-i686-gdb-7.11.1-4-any.pkg.tar.xz
或者使用以命令安装Toolchain
pacman -Syu mingw-w64-i686-toolchain
6.Install gcc / other packages:
$ cd ~/Downloads

$ pacman -U mingw-w64-i686-gcc-libgfortran-5.4.0-1-any.pkg.tar.xz mingw-w64-i686-gcc-libs-5.4.0-1-any.pkg.tar.xz mingw-w64-i686-gcc-5.4.0-1-any.pkg.tar.xz
mingw-w64-i686-gdb-7.11.1-4-any.pkg.tar.xz mingw-w64-i686-gcc-fortran-5.4.0-1-any.pkg.tar.xz

$ pacman -S mingw-w64-i686-make git make tar unzip patch automake autoconf mingw-w64-i686-python2 mingw-w64-i686-python2-matplotlib mingw-w64-i686-python2-pip
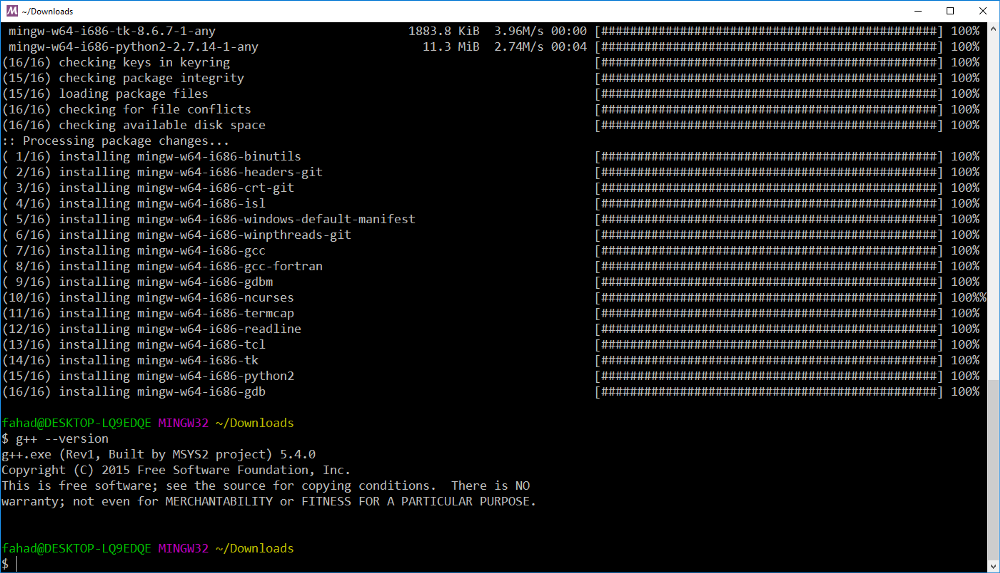
Confirm gcc is working:
g++ --version
7. Make sure you have cmake installed. If not, install cmake from https://cmake.org (or just install this version https://cmake.org/files/v3.11/cmake-3.11.3-win64-x64.msi)
Projects
Build uWebSockets for Mingw.
git clone https://github.com/drganjoo/uWebSockets.git

cd uWebSockets

git checkout carnd-mingw

mkdir build

cd build

"C:\Program Files\CMake\bin\cmake" -G "MSYS Makefiles" ..

make

make install

- ExtendedEKF
git clone https://github.com/udacity/CarND-Extended-Kalman-Filter-Project.git
Download the changed CMakeLists.txt or you can make the following changes to CMakeLists.txt file yourself:
Towards the bottom of the file add:
....

target_link_libraries(ExtendedKF z ssl uv uWS)

if (MINGW)

    target_link_libraries(ExtendedKF ws2_32)

endif()
Changed main.cpp to make it work on Windows:
Line #175, currently says:
if (h.listen(port))
Change this to (this change will work on Linux / MacOS as well, so you can submit your code with this change in it):
if (h.listen("127.0.0.1", port))
Build project:
mkdir build

cd build

"C:\Program Files\CMake\bin\cmake" -G "MSYS Makefiles" ..

make
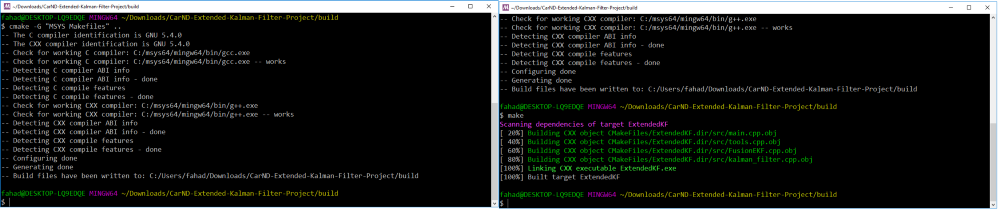
If you want to run it, you need to provide return values in tools.cpp otherwise the program will crash. Open src/tools.cpp and write the following for time being:
VectorXd Tools::CalculateRMSE(const vector<VectorXd> &estimations,

	const vector<VectorXd> &ground_truth) {

	/**

	TODO:

	* Calculate the RMSE here.

	*/

VectorXd temp(4);

	temp << 1, 2, 3, 4;

	return temp;

}

MatrixXd Tools::CalculateJacobian(const VectorXd& x_state) {

	/**

	TODO:

	* Calculate a Jacobian here.

	*/

MatrixXd temp(3,4);

	return temp;

}
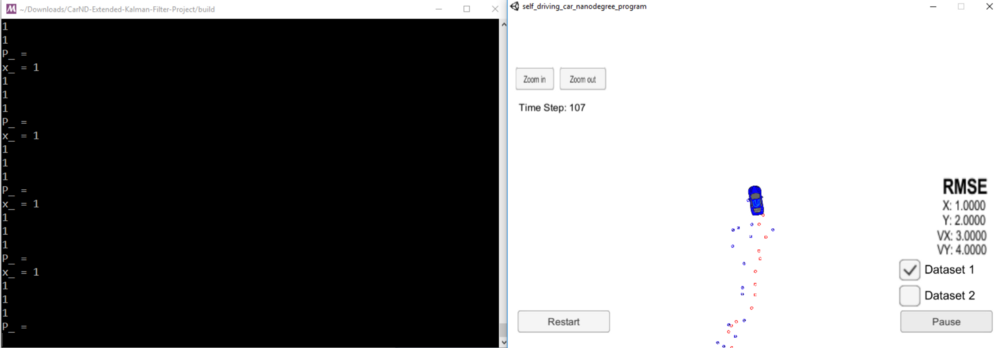
Run the simulator and you should be able to see the 1,2,3,4 being sent to the simulator:
2.Unscented Kalman Filter Project
git clone https://github.com/udacity/CarND-Unscented-Kalman-Filter-Project.git
Download the changed CMakeLists.txt or you can make the following changes to CMakeLists.txt file yourself:
Towards the bottom of the file add:
....

target_link_libraries(UnscentedKF z ssl uv uWS)

if (MINGW)

    target_link_libraries(UnscentedKF ws2_32)

endif()
Changed main.cpp to make it work on Windows:
Line #178, currently says:
if (h.listen(port))
Change this to (this works on Linux / MacOS as well):
if (h.listen(“127.0.0.1”, port))
Build project:
mkdir build

cd build

cmake -G "MSYS Makefiles" ..

make
3. CarND-MPC-Quizes:
Open MinGW32 Shell (Start->MSYS MinGW32)
$ git clone https://github.com/udacity/CarND-MPC-Quizzes.git

$ cd CarND-MPC-Quizzes

$ wget https://www.coin-or.org/download/source/Ipopt/Ipopt-3.12.8.zip

$ unzip Ipopt-3.12.8.zip
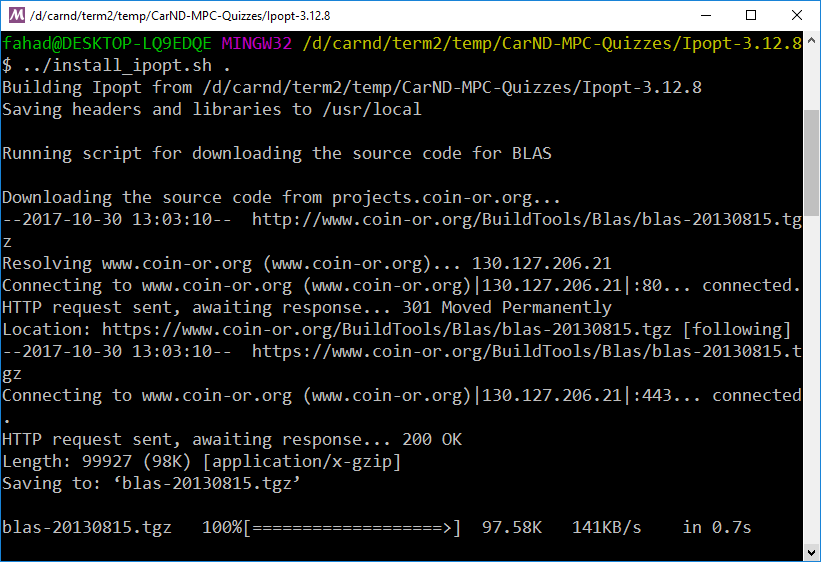
Install ipopt from the shell:
$ cd Ipopt-3.12.8/

$ ../install_ipopt.sh .

$ cd ..
Install cppad:
$ wget https://www.coin-or.org/download/source/CppAD/cppad-20180000.0.gpl.tgz

$ tar xvzf cppad-20180000.0.gpl.tgz

$ cd cppad-20180000.0

$ mkdir build && cd build

$ "C:\Program Files\CMake\bin\cmake" -G "MSYS Makefiles" -D cppad_prefix=/c/msys64/usr/local ..

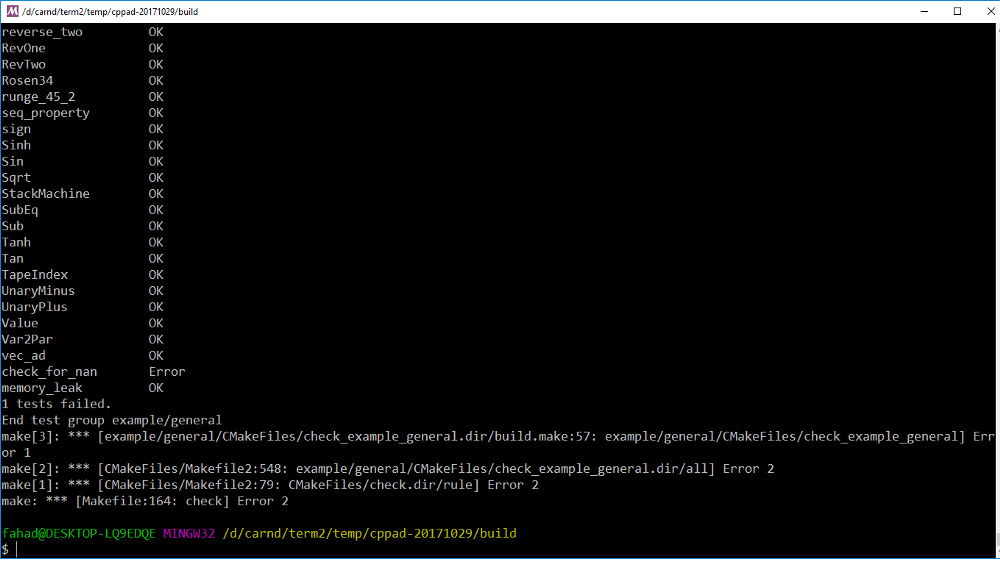
$ make check
One test will fail, but you can ignore it:
$ make install

$ cd ../..
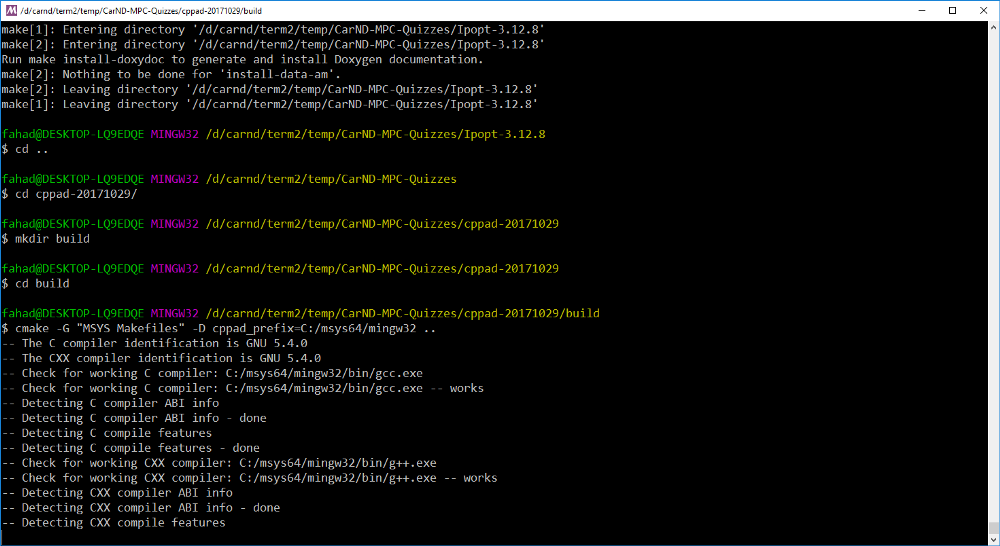
3a) CarND-MPC-Quizzes/global_kinematic_model
Add on top of main.cpp:
// In this quiz you'll implement the global kinematic model.

#define _USE_MATH_DEFINES

#include <math.h>

....
To build:
make build

cd build

"C:\Program Files\CMake\bin\cmake" -G "MSYS Makefiles" ..

make
3b) CarND-MPC-Quizes/mpc_to_line
Change CMakeLists.txt (or Download)
if(MINGW)

set(CMAKE_CXX_USE_RESPONSE_FILE_FOR_INCLUDES 0)

endif()

add_executable(mpc ${sources})

if(${CMAKE_SYSTEM_NAME} MATCHES "Linux")

target_link_libraries(mpc ipopt python2.7)

elseif (MINGW)

target_link_libraries(mpc ipopt coinasl coinblas coinasl coinmumps coinlapack gfortran ws2_32 python2.7)

else()

target_link_libraries(mpc ipopt python27 )

endif()
Build:
mkdir build

cd build

"C:\Program Files\CMake\bin\cmake" -G "MSYS Makefiles" ..

make

./mpc

If you get an error regarding python, set the following environment variables and then run mpc.exe again
$ export PYTHONPATH=/mingw32/bin:/mingw32/lib/python2.7/site-packages:/mingw32/lib/python2.7/lib-dynload:/mingw32/lib/python2.7

$ export PYTHONHOME=/mingw32/bin
3c) CarND-MPC-Quizes/polyfit
mkdir build

cd build

"C:\Program Files\CMake\bin\cmake" -G "MSYS Makefiles" ..

make
4) CarND-MPC-Project
git clone https://github.com/udacity/CarND-MPC-Project.git
Towards the bottom, make following changes to CMakeLists.txt (or Download):
if(MINGW)

set(CMAKE_CXX_USE_RESPONSE_FILE_FOR_INCLUDES 0)

set(CMAKE_CXX_USE_RESPONSE_FILE_FOR_LIBRARIES 0)

endif()

target_link_libraries(mpc ipopt z ssl uv uWS)

if (MINGW)

    target_link_libraries(mpc ipopt coinasl coinblas coinasl coinmumps coinlapack gfortran ws2_32)

endif()
Changed main.cpp to make it work on Windows:
Line #1: Add the following:
#define _USE_MATH_DEFINES

#include <math>

...
Line #179, currently says:
if (h.listen(port))
Change this to (this works on Linux / MacOS as well):
if (h.listen(“127.0.0.1”, port))
Build project:
mkdir build

cd build

"C:\Program Files\CMake\bin\cmake" -G "MSYS Makefiles" ..

make
CLion Setup
Configure->Settings, under Build, Execution, Deployment set MinGW folder:
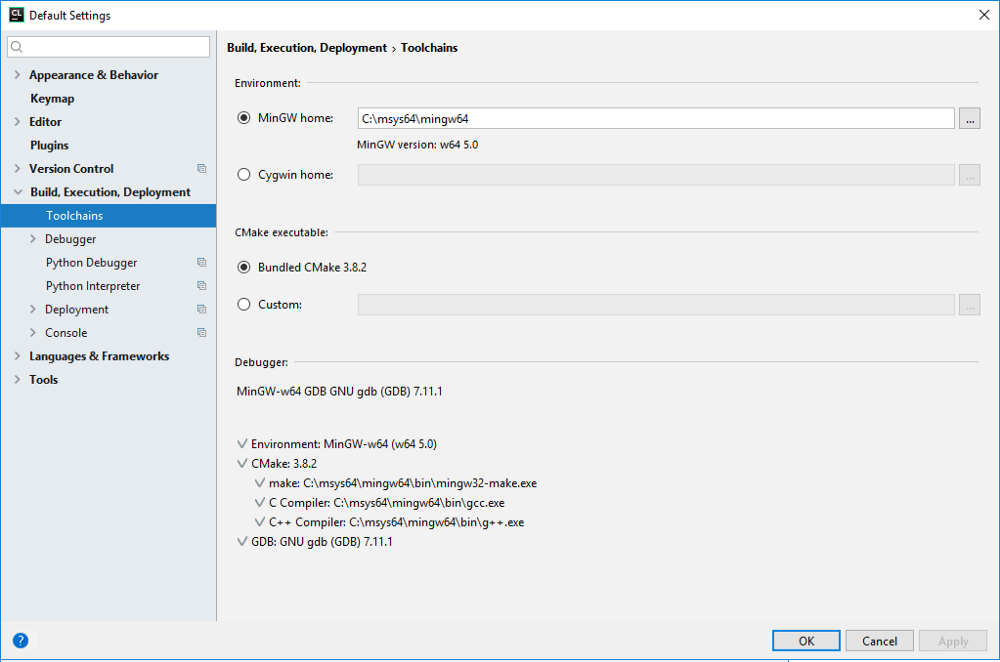
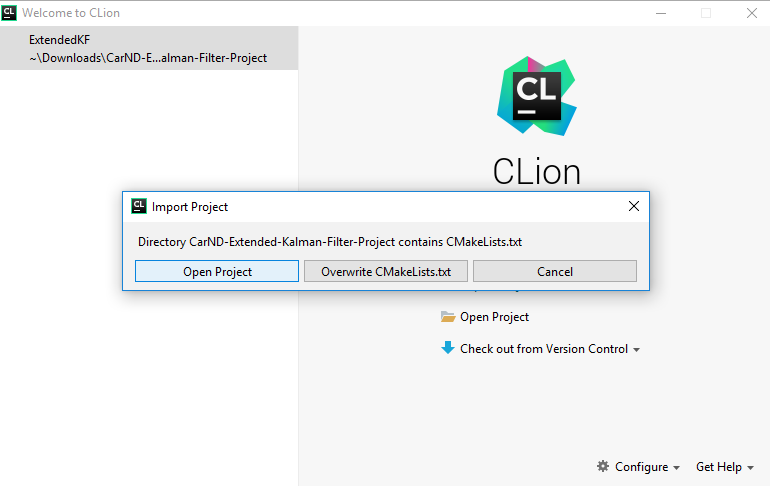
You can open project using ‘Import Project from Sources’ and choosing the root folder of the project e.g. ‘CarND-Extended-Kalman-Filter-Project’. Just choose Open Project instead of ‘Overwrite CMakeLists.txt’
If you want to debug, then you can either:
- Set the working directory to c:/msys64/mingw32/bin. In CLion IDE, choose Run →Edit Configuration
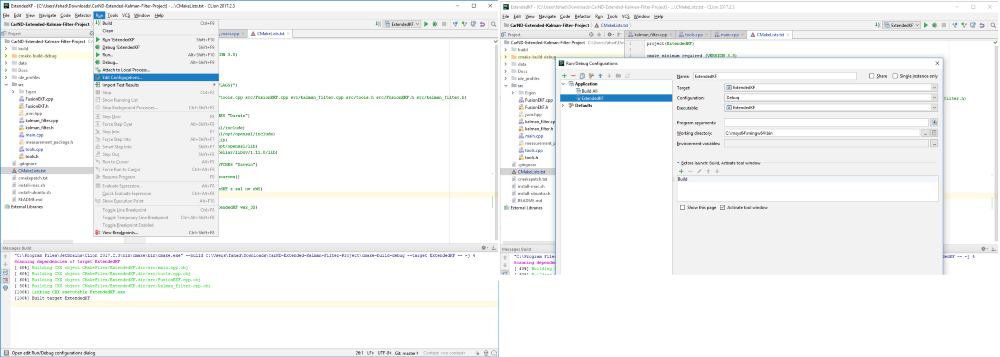
OR you can add c:/msys64/ming32/bin to System Path using environment variables

MSYS2 编译环境配置的更多相关文章
- linux内核编译环境配置
linux内核编译环境配置 如果不是编译内核,只需要安装与内核相匹配的kernel-devel开发包即可.即是/lib/modules/`uname -r`/build -> /usr/src/ ...
- Syslinux编译环境配置简要步骤
由于毕业设计要做一个加密U盘的LINUX,需要修改一sysylinux引导程序,在网上很少有关于syslinux编译环境配置的文章,在此简要总结一下,发出来共享. 需要的软件: 1. vmware ...
- Android编译环境配置
Android编译环境配置 网上关于Android编译环境配置的整理资料有不少,经整理亲测后,希望能给需要的亲们提供帮助. 主要分为四步: 1.安装JDK(Java Standard Edition ...
- mac OS(OS X)的OI编译环境配置指南
编译环境:gdb+Atom 如何安装gdb: http://logic0.blog.163.com/blog/static/1889281462014183271283/ Atom下载地址: ht ...
- Android编译环境配置(Ubuntu 14.04)
常识:编译Android源代码需要在Linux系统环境下进行... 在Linux中,开发Android环境包括以下需求:Git.repo.JDK(现在一般使用OpenJDK)等:其中,Git用于下载源 ...
- Berkeley DB (VC6.0 编译环境配置)
操作系统:winxp VC环境:VC6.0 必需文件:Berkeley DB安装文件(db-.msi) 下载地址:http://www.oracle.com/technology/software/p ...
- OpenCL编译环境配置(VS+Nvidia)
英伟达的显卡首先要下载安装CUDA开发包,可以参考这里的步骤: VS2015编译环境下CUDA安装配置 安装好CUDA之后,OpenCL的配置就已经完成了80%了,剩下的工作就是把OpenCL的路 ...
- Android代码编译环境配置 “Gerrit和Git环境配置”
Gerrit和Git环境配置可以参考<git&gerrit操作指导> 步骤1. 先在Gerrit中创建新的账户: 步骤2. 在新的客户端上生成密钥(可以使用的是生成的公钥): 步骤 ...
- 关于Sublime text 的PHP编译环境配置的问题
前一段时间终于装上了传说中的代码编辑神器====>Sublime Text ,一打开便爱不释手,于是在网上找PHP的配置方案和插件,所有的一切都搞定了,可就是编译的时候没有显示,也没有提示,熬了 ...
随机推荐
- 【转】Jperf2.0下载及使用方法介绍
iPerf图形化工具Jperf图文使用教程 在前文介绍iPerf时,我们就提到了Jperf这款软件,因为iPerf没有图形界面,操作起来不是太方便,而Jperf则是将iPerf命令行图形化的JAV ...
- PHP开启慢日志查询
1.找到php-fpm.conf文件 2.去掉request_slowlog_timeout前面的分号,并设置时间.如:request_slowlog_timeout=5表示超过5秒的 慢日志文件位置 ...
- PAT甲级1010踩坑记录(二分查找)——10测试点未过待更新
题目分析: 首先这题有很多的坑点,我在写完之后依旧还有第10个测试点没有通过,而且代码写的不优美比较冗长勿喷,本篇博客用于记录写这道题的一些注意点 1.关于两个不同进制的数比大小一般采用将两个数都转化 ...
- 项目Beta冲刺(团队)——凡事预则立
项目Beta冲刺(团队)--凡事预则立 格式描述 课程名称:软件工程1916|W(福州大学) 作业要求:项目Beta冲刺(团队) 团队名称:为了交项目干杯 作业目标:Beta冲刺前对冲刺阶段的总体规划 ...
- Linux CentOS7.x安装docker全过程
1.在安装docker之前,首先使用yum -y remove docker命令移除系统中已有的旧版本的docker yum -y remove docker 这里显示该系统没有安装过docker: ...
- html5添加视频为背景自动播放
客户想做个打开官网自动播放一段视频,楼主使用了video标签,即下面的代码:: 于是我在video标签上添加了属性 autoplay=“autoplay” loop=“loop” 然而通过地址栏进去的 ...
- 【Servlet】基于Jsp的微信Oauth2认证
作者:yongh701 挂载到微信服务器上的应用程序,能够通过微信Oauth2认证,能够抓取到用户的微信信息,当然,你首先要通过微信的帐号资质审核. 一.基本思想 二.基本过程 1.登陆微信的公众平台 ...
- Spark Partition
分区的意义 Spark RDD 是一种分布式的数据集,由于数据量很大,因此它被切分成不同分区并存储在各个Worker节点的内存中.从而当我们对RDD进行操作时,实际上是对每个分区中的数据并行操作.Sp ...
- vue解决大文件断点续传
一.概述 所谓断点续传,其实只是指下载,也就是要从文件已经下载的地方开始继续下载.在以前版本的HTTP协议是不支持断点的,HTTP/1.1开始就支持了.一般断点下载时才用到Range和Content- ...
- 通过USB 2.0电缆手动设置内核模式调试
Windows的调试工具支持通过USB 2.0电缆进行内核调试.本文介绍如何手动设置USB 2.0调试.通过USB 2.0电缆进行调试需要以下硬件: USB 2.0调试电缆.此电缆不是标准USB 2. ...