添加Usb3.0驱动到win7/8/10的usb安装光盘
文章中所有需要使用到的软件和资源在文章末尾的网盘连接中有下载
Run the DISM GUI Tool
Right-click on DISM GUI.exe and select Run as Administrator. Follow these steps:
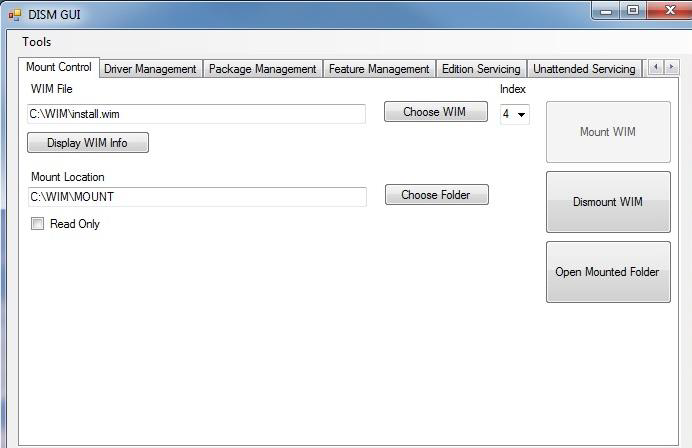
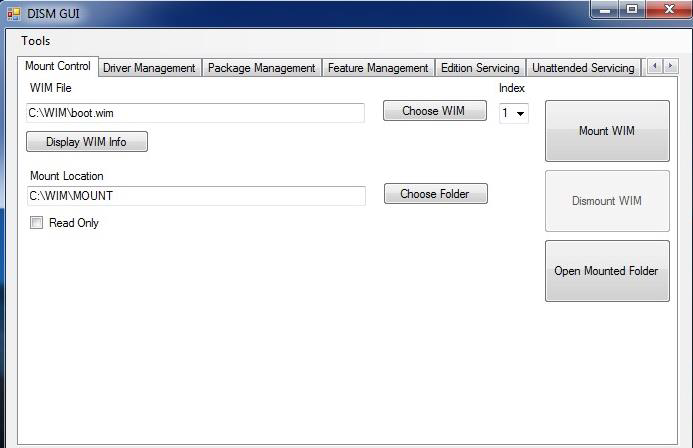
1. Mount install.wim Image
a) On the Mount Control tab, click the Choose WIM button.
b) Navigate to where you copied install.wim (C:\WIM, for example) and click Open.
c) Choose the index number for the version of Windows 7 you have from the drop-down list under Index.
1 = Home Basic
2 = Home Premium
3 = Professional
4 = Ultimate
(ps:windows这部分的索引可以无视)
d) Click the Choose Folder button for the Mount Location. Browse to the proper folder (C:\WIM\MOUNT, for example) and click OK.
e) Verify the Read Only checkbox is clear and click the Mount WIM button.(ps:注意Read Only按钮需要取消勾选)
The mounting process may take a few minutes, depending upon the speed of the Admin system and the size of the install.wim file.
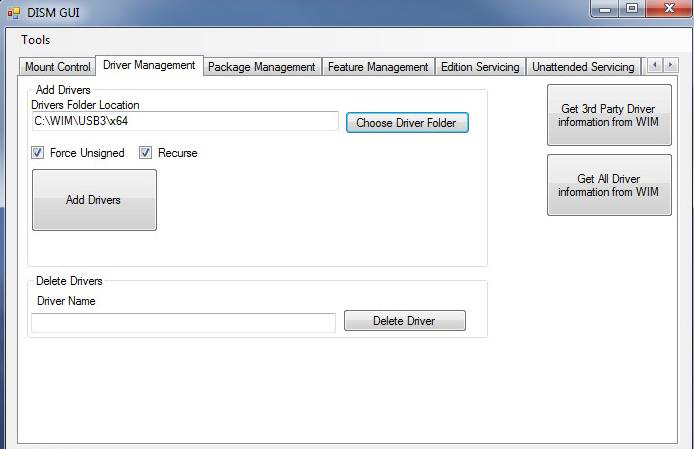
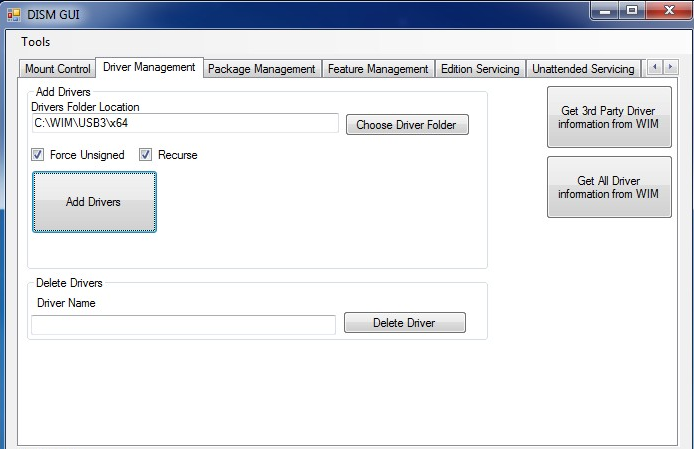
2. Add USB 3.0 Drivers to install.wim Image
a) On the Driver Management tab, click the Choose Driver Folder button.
b) Select the location of your USB 3.0 drivers and click OK.
c) Verify the Recurse checkbox is selected.
d) If your drivers are unsigned or reported to be unsigned, select the Force Unsigned checkbox.(如果不是第三方未签名的驱动Force Unsigned按钮不需要勾选)
e) Click the Add Drivers button.
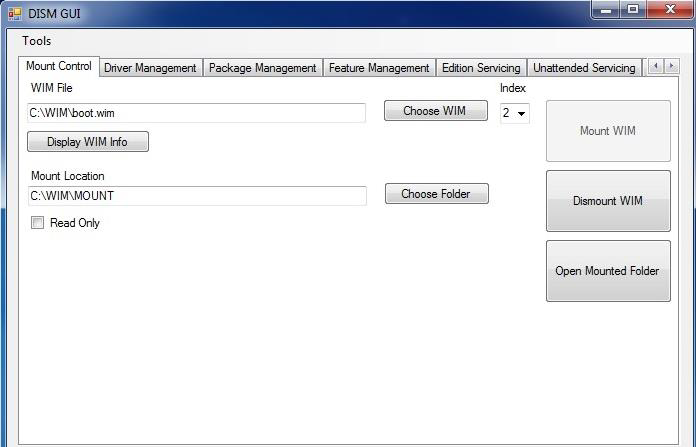
3. Commit Changes to install.wim Image and Unmount
a) On the Mount Control tab, click the Dismount WIM button.
b) Select Yes to commit the changes. This may take a few minutes.

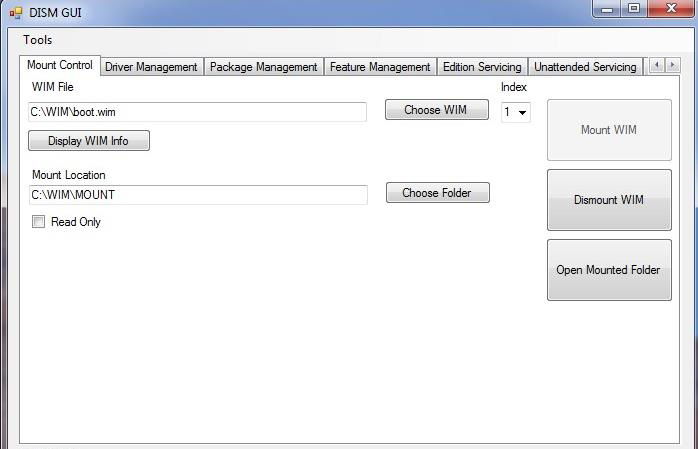
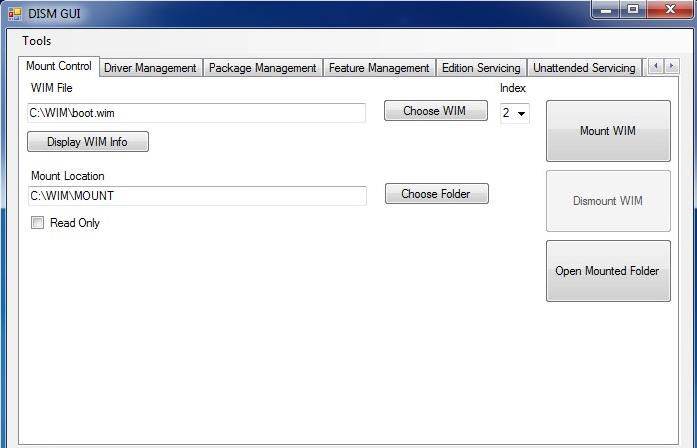
4. Mount boot.wim Image Index 1 (Windows PE)
a) On the Mount Control tab, click the Choose WIM button.
b) Navigate to where you copied boot.wim (C:\WIM in the example) and click Open.
c) Choose index number 1 (for Windows PE) from the drop-down list under Index.
d) The Mount Location should still contain the appropriate folder. If not, click the Choose Folder button for the Mount Location. Browse to the proper folder (C:\WIM\MOUNT, for example) and click OK.
e) Verify the Read Only checkbox is clear and click the Mount WIM button.
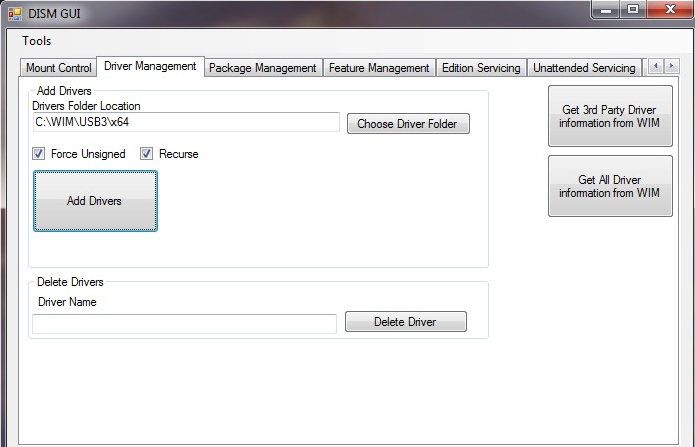
5. Add USB 3.0 Drivers to boot.wim Image
a) On the Driver Management tab, all options should still be set up from adding them to the previous image. If not, click the Choose Driver Folder button. Select the location of your USB 3.0 drivers and click OK.
b) Verify the Recurse checkbox is selected.
c) If your drivers are unsigned or reported to be unsigned, select the Force Unsigned checkbox.
d) Click the Add Drivers button.
6. Commit Changes to boot.wim Image and Unmount
a) On the Mount Control tab, click the Dismount WIM button.
b) Select Yes to commit the changes. This will take about 30 seconds to finish.
7. Mount boot.wim Image Index 2 (Windows Setup)
a) On the Mount Control tab, you should see boot.wim still listed as the WIM file from the previous step. If not, click the Choose WIM button. Navigate to where you copied boot.wim (C:\WIM, for example) and click Open.
b) Choose index number 2 (for Windows Setup) from the drop-down list under Index.
c) The Mount Location should still contain the appropriate folder. If not, click the Choose Folder button for the Mount Location. Browse to the proper folder (C:\WIM\MOUNT, for example) and click OK.
d) Verify the Read Only checkbox is clear and click the Mount WIM button.
8. Add USB 3.0 Drivers to boot.wim Image
a) On the Driver Management tab, all options should still be set up from adding them to the previous image. If not, click the Choose Driver Folder button. Select the location of your USB 3.0 drivers and click OK.
b) Verify the Recurse checkbox is selected.
c) If your drivers are unsigned or reported to be unsigned, select the Force Unsigned checkbox.
d) Click the Add Drivers button.
9. Commit Changes to boot.wim Image and Unmount
a) On the Mount Control tab, click the Dismount WIM button.
b) Select Yes to commit the changes. This will take about 30 seconds to finish.
10. Copy Modified WIM files Back to the USB Flash Drive Installer
a) Copy the newly-modified install.wim and boot.wim files back to the \sources directory of the Windows 7 USB Flash Drive Installer, overwriting the original files.
b) Eject and remove the USB Flash Drive from the Admin system.
链接:https://pan.baidu.com/s/1ZASrZC0AykafdrrMUnb50g 密码:1xoz
添加Usb3.0驱动到win7/8/10的usb安装光盘的更多相关文章
- 如何向 Windows 7 镜像中添加 USB3.0 驱动
如何向 Windows 7 镜像中添加 USB3.0 驱动 1. Microsoft 在 Windows 7 的安装光盘并没有集成各个厂商的 USB3.0 驱动,可 以使用下面方法添加 USB3.0 ...
- win7添加usb3.0驱动(错误代码1392,文件或目录损坏且无法读取)
Win7添加usb3.0驱动 之前一直按照网上的方法执行dism命令挂载时,总是失败,错误代码1392,显示原因是文件或目录损坏且无法读取.这个错误以前在装机时老是出现导致系统安装不成功,在BIOS中 ...
- win7原版映像中添加usb3.0驱动
最近用软碟通制作了一个win7原版映像,但是在装新系统的时候发现了一个问题,进入安装界面后,显示没有找到驱动器,但是明明是差了U盘的,通过“shift+f12”调出命令行窗口,输入disk list命 ...
- 给windows 7安装文件添加USB3.0驱动
给Air安装win7进入语言与区域选择之后,发现键盘触摸板都失灵. 原因:新款的 Macbook Air 2013 因为使用了 USB3.0 端口键盘和触摸板设备,所以在安装 Windows 7 ...
- Windows OS添加USB3.0驱动!
原因:现在的win7.win2008等一些早期的系统在安装时无法使USB鼠标和键盘... 1. 素材(dism64工具.UltraISO工具.U盘一个) 2. 先使用UltrISO工具制作一个wi ...
- Windows 7原版映像中添加usb3.0驱动
最近用软碟通制作了一个win7原版映像,但是在装新系统的时候发现了一个问题,进入安装界面后,显示没有找到驱动器,但是明明是差了U盘的,通过“shift+f12”调出命令行窗口,输入disk list命 ...
- 如何在Win7安装U盘中加入USB3.0驱动的支持
U盘安装系统出现鼠标键盘不能使用,在intel六代处理器平台,安装过程中会出现安装原生镜像不能识别或者鼠标键盘不能使用等情况,可以参考以下方法进行. 风险提示:重装或升级系统会导致系统盘数据丢失,建议 ...
- U盘安装Win7系统,遇到硬盘鼠标键盘失灵等情况,如何安装U盘中加入USB3.0驱动的支持
U盘安装系统出现鼠标键盘不能使用,在intel六代处理器平台,安装过程中会出现安装原生镜像不能识别或者鼠标键盘不能使用等情况,可以参考以下方法进行. 风险提示:重装或升级系统会导致系统盘数据丢失,建议 ...
- 关于在win7内集成usb3.0驱动。
mac air 装了win7但是折腾良久还是无法升级,只能是重新安装. 很蛋疼.bootcamp 老是找不到驱动.只能是手动分区后U盘引导安装. 驱动的下载,直接在Os x 下用bootcamp 下载 ...
随机推荐
- NPM 包管理工具详解,使用教程
NPM 包管理工具 1.1 定义:什么是 NPM NPM 全称 Node Package Manager,它是 JavaScript 的包管理工具, 并且是 Node.js 平台的默认包管理工具.通过 ...
- fatal: HttpRequestException encountered
报错:fatal: HttpRequestException encountered 解决方法 Github 禁用了TLS v1.0 and v1.1,必须更新Windows的git凭证管理器,才行. ...
- 修改 div 的滚动条的样式
修改 div 的滚动条的样式 需要用到浏览器专属的伪元素,没有万能的办法,支持的浏览器不是很多. 假设有一个(你已经)设好宽高.定好位的 div, <div class="group- ...
- 使用Arduino Nano驱动Lora模块
使用Arduino Nano驱动Lora模块 为什么选用Lora 射频通信芯片有很多种,但是一般在同样功耗下,距离没有Lora远;同等范围下,没有Lora节能. Lora通信只适用于低速率,高延时的场 ...
- windows 2008r2+php5.6.28搭建详细过程
安装IIS7 1.打开服务器管理器(开始-计算机-右键-管理-也可以打开),添加角色 直接下一步 勾选Web服务器(IIS),下一步,有个注意事项继续下一步(这里我就不截图了) 勾选ASP.NET会弹 ...
- Linux-redis安装以及客户端搭建
redis安装: 下载redis数据库,网址:redis官网 将文件放到home或者其他文件夹,cd到文件夹 执行 tar zxvf redis-4.0.2.tar.gz //解压文件 执行make进 ...
- 吴裕雄--天生自然HADOOP操作实验学习笔记:hbase的javaAPI应用
实验目的 进一步了解hbase的操作 熟悉使用IDEA进行java开发 熟悉hbase的javaAPI 实验原理 前面已经了解通过hbase的shell操作hbase,确实比较难以使用,另外通过hiv ...
- Next.js 配置接口跨域代理转发
使用 create-next-app 创建的 Next.js 项目配置接口跨域代理转发需要用到 custom server 功能. 先安装好 express 和 http-proxy-middlewa ...
- javaSE学习笔记(11)--- Map
javaSE学习笔记(11)--- Map 1.Map集合 现实生活中,我们常会看到这样的一种集合:IP地址与主机名,身份证号与个人,系统用户名与系统用户对象等,这种一一对应的关系,就叫做映射.Jav ...
- C++->10.3.2-3,使用文件流类录入数据,并统计行数
题目:建立一个文本文件,从键盘录入一篇短文存放在该文件中短文由若干行构成,每行不超过80个字符,并统计行数. /* #include<iostream.h>#include<stdl ...