
SpringBoot缓存 --(一)EhCache2.X
简介:
Spring 3.1中开始对缓存提供支持,核心思路是对方法的缓存,当开发者调用一个方法时,将方法的参数和返回值作为key/value缓存起来,当再次调用该方法时,如果缓存中有数据,就直接从缓存中获取,否则再去执行该方法。但是,Spring 中并未提供缓存的实现,而是提供了-套缓存API,开发者可以自由选择缓存的实现。
目前Spring Boot支持的缓存有如下几种::
JCache (JSR-107)
EhCache 2.x
Hazelcast
Infinispan
Couchbase
Redis
Caffeine
Simple
使用:
pom.xml
 <dependency>

            <groupId>org.springframework.boot</groupId>

            <artifactId>spring-boot-starter-cache</artifactId>

        </dependency>

        <dependency>

            <groupId>org.springframework.boot</groupId>

            <artifactId>spring-boot-starter-web</artifactId>

        </dependency>

        <dependency>

            <groupId>net.sf.ehcache</groupId>

            <artifactId>ehcache</artifactId>

        </dependency>

        <dependency>

            <groupId>org.springframework.boot</groupId>

            <artifactId>spring-boot-starter-data-redis</artifactId>

        </dependency>
Encache配置文件:ehcache.xml
这是一个常规的Ehcache 配置文件,提供了两个缓存策略,一个是默认的,另一个名为book _cache。
其中,name表示缓存名称:
maxElementsInMemory 表示缓存最大个数:
etemal 表示缓存对象是否永久有效,一旦设置了永久有效,timcout 将不起作用:
timeToldleSeconds 表示缓存对象在失效前的允许闲置时间(单位:秒),当etermal对象不是永久有效时,该属性才生效:
timeToLiveSeconds表示缓存对象在失效前允许存活的时间(单位:秒),当eternal-false对象不是永久有效时,该属性才生效:
overflowToDisk 表示当内存中的对象数量达到maxElementsInMemory时,Eheache 是否将对象写到磁盘中:
diskxpiryTheadntervalseconds 表示磁盘失效线程运行时间间隔。
<ehcache>

    <diskStore path="java.io.tmpdir/cache"/>

    <defaultCache

            maxElementsInMemory="10000"

            eternal="false"

            timeToIdleSeconds="120"

            timeToLiveSeconds="120"

            overflowToDisk="false"

            diskPersistent="false"

            diskExpiryThreadIntervalSeconds="120"

    />

    <cache name="book_cache"

           maxElementsInMemory="10000"

           eternal="true"

           timeToIdleSeconds="120"

           timeToLiveSeconds="120"

           overflowToDisk="true"

           diskPersistent="true"

           diskExpiryThreadIntervalSeconds="10"/>

</ehcache>
开启缓存:@EnableCaching注解
@SpringBootApplication

@EnableCaching

public class CacheApplication {

    public static void main(String[] args) {

        SpringApplication.run(CacheApplication.class, args);

    }

}
创建实体类和service
public class Book implements Serializable {

    private Integer id;

    private String name;

    private String author;

。。。。。

}
@Service

@CacheConfig(cacheNames = "book_cache")

public class BookDao {

    @Autowired

    MyKeyGenerator myKeyGenerator;

    @Cacheable(keyGenerator = "myKeyGenerator")

    public Book getBookById(Integer id) {

        System.out.println("getBookById");

        Book book = new Book();

        book.setId(id);

        book.setName("三国演义");

        book.setAuthor("罗贯中");

        return book;

    }

    @CachePut(key = "#book.id")

    public Book updateBookById(Book book) {

        System.out.println("updateBookById");

        book.setName("三国演义2");

        return book;

    }

    @CacheEvict(key = "#id")

    public void deleteBookById(Integer id) {

        System.out.println("deleteBookById");

    }

}
在Service层上添加@CacheConfig注解指明使用的缓存的名字,这个配置可选,若不使用@CacheConfig注解,则直接在@Cacheable注解中指明缓存名字。
在getBookById方法上添加@Cacheable注解表示对该方法进行缓存,默认情况下,缓存的key是方法的参数,缓存的value是方法的返回值。当开发者在其他类中调用该方法时,首先会根据调用参数查看缓存中是否有相关数据,若有,则直接使用缓存数据,该方法不会执行,否则执行该方法,执行成功后将返回值缓存起来,但若是在当前类中调用该方法,则缓存不会生效
@Cacheable注解中还有一个属性condition用来描述缓存的执行时机,例如@Cacheable(condition= "#id%2= =0")表示当id对2取模为0时才进行缓存,否则不缓存。
如果开发者不想使用默认的key,也可以自定义key,key = "#book.id"表示缓存的key为参数book对象中id 的值,key = "#id"表示缓存的key为参数id.
除了这种使用参数定义key的方式之外,Spring 还提供了一个root对象用来生成key,如表。
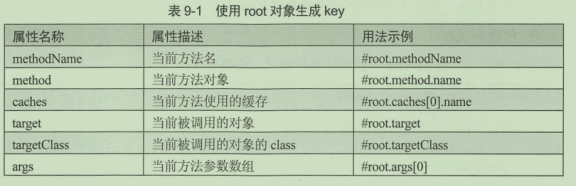
@CachePut注解一般用于数据更新方法上,与@Cacheable 注解不同,添加了@CachePut注解的方法每次在执行时都不去检查缓存中是否有数据,而是直接执行方法,然后将方法的执行结果缓存起来,如果该key对应的数据已经被缓存起来了,就会覆盖之前的数据,这样可以避免再次加载数据时获取到脏数据。同时,@CachePut具有和@Cacheable类似的属性,这里不再赘述。
@CacheEvict注解一般用于删除方法上,表示移除一个key对应的缓存。@CacheEvict注解有两个特殊的属性: allEntries和beforeInvocation, 其中allEntries表示是否将所有的缓存数据都移除,默认为false, beforeInvocation表示是否在方法执行之前移除缓存中的数据,默认为false,即在方法执行之后移除缓存中的数据。
测试:
@RunWith(SpringRunner.class)

@SpringBootTest

public class CacheApplicationTests {

    @Autowired

    BookDao bookDao;

    @Test

    public void contextLoads() {

        bookDao.getBookById(1);

        bookDao.getBookById(1);

        bookDao.deleteBookById(1);

        Book b3 = bookDao.getBookById(1);

        System.out.println("b3:"+b3);

        Book b = new Book();

        b.setName("三国演义");

        b.setAuthor("罗贯中");

        b.setId(1);

        bookDao.updateBookById(b);

        Book b4 = bookDao.getBookById(1);

        System.out.println("b4:"+b4);

    }

}
控制台:
getBookById
deleteBookById
getBookById
b3:Book{id=1, name='三国演义', author='罗贯中'}
updateBookById b4:Book{id=1, name='三国演义', author='罗贯中'}
SpringBoot缓存 --(一)EhCache2.X的更多相关文章
- SpringBoot缓存之redis--最简单的使用方式
第一步:配置redis 这里使用的是yml类型的配置文件 mybatis: mapper-locations: classpath:mapping/*.xml spring: datasource: ...
- spring boot学习(十三)SpringBoot缓存(EhCache 2.x 篇)
SpringBoot 缓存(EhCache 2.x 篇) SpringBoot 缓存 在 Spring Boot中,通过@EnableCaching注解自动化配置合适的缓存管理器(CacheManag ...
- SpringBoot缓存管理(二) 整合Redis缓存实现
SpringBoot支持的缓存组件 在SpringBoot中,数据的缓存管理存储依赖于Spring框架中cache相关的org.springframework.cache.Cache和org.spri ...
- springboot缓存开发
前言:缓存在开发中是一个必不可少的优化点,近期在公司的项目重构中,关于缓存优化了很多点,比如在加载一些数据比较多的场景中,会大量使用缓存机制提高接口响应速度,简介提升用户体验.关于缓存,很多人对它都是 ...
- springboot缓存的使用
spring针对各种缓存实现,抽象出了CacheManager接口,用户使用该接口处理缓存,而无需关心底层实现.并且也可以方便的更改缓存的具体实现,而不用修改业务代码.下面对于在springboot中 ...
- springboot缓存及连接池配置
参见https://coding.imooc.com/lesson/117.html#mid=6412 1.springboot的springweb自己默认以及配置好了缓存,只需要在主文件(XxxAp ...
- SpringBoot 缓存注解 与EhCache的使用
在SpringBoot工程中配置EhCache缓存 1.在src/main/resources下新建ehcache.xml文件 eternal=true //缓存永久有效,false相反 maxEle ...
- SpringBoot 缓存模块
默认的缓存配置 在诸多的缓存自动配置类中, SpringBoot默认装配的是SimpleCacheConfigguration, 他使用的CacheManager是 CurrentMapCacheMa ...
- 转载-springboot缓存开发
转载:https://www.cnblogs.com/wyq178/p/9840985.html 前言:缓存在开发中是一个必不可少的优化点,近期在公司的项目重构中,关于缓存优化了很多点,比如在加载 ...
随机推荐
- Java容器解析系列(11) HashMap 详解
本篇我们来介绍一个最常用的Map结构--HashMap 关于HashMap,关于其基本原理,网上对其进行讲解的博客非常多,且很多都写的比较好,所以.... 这里直接贴上地址: 关于hash算法: Ha ...
- 矩阵matrix变换的用法(css3属性transform: matrix)
参数 2D矩阵的表示 matrix(a,b,c,d,e,f),其中6个参数在矩阵的分布: -- -- | a c e | | b d f | | 0 0 1 | -- -- 在CSS3中矩阵的原始值是 ...
- tf.keras遇见的坑:Output tensors to a Model must be the output of a TensorFlow `Layer`
经过网上查找,找到了问题所在:在使用keras编程模式是,中间插入了tf.reshape()方法便遇到此问题. 解决办法:对于遇到相同问题的任何人,可以使用keras的Lambda层来包装张量流操作, ...
- Typora常用快捷键
目录 无序列表:输入-之后输入空格 有序列表:输入数字+"."之后输入空格 任务列表:-[空格]空格 文字 标题:ctrl+数字 表格:ctrl+t 生成目录:按回车 选中一整行: ...
- webpack入门系列2
前面介绍了使用webpack做最基础的打包,接下来讲讲webpack的进阶. 1.使用 webpack 构建本地服务器: 想不想让你的浏览器监听你的代码的修改,并自动刷新显示修改后的结果,其实Webp ...
- 6.场景4:使用VRRP(L3HA)和Open vSwitch提供高可用性
此场景描述了使用ML2插件和Open vSwitch(OVS)实现OpenStack网络服务的高可用性实现. 该高可用性实施方案增加了以下情景:带有虚拟路由器冗余协议(VRRP)的Open vSwit ...
- 介绍Netty
介绍Netty 概述 Netty是由JBOSS提供的一个java开源框架,现为 Github上的独立项目.Netty提供异步的.事件驱动的网络应用程序框架和工具,用以快速开发高性能.高可靠性的网络服务 ...
- nginx 源码编译 用OPENSSL源码 开启 SSL
./configure --prefix=/usr/local/nginx --with-openssl=/home/uniqs/thirdparty/openssl/openssl-1.1.1d - ...
- ubuntu16.04+Pangolin安装
学习视觉Slam十四讲到第三章的可视化演示的时候需要Panglolin的使用,因此在Githup上下载了安装包:https://github.com/stevenlovegrove/Pangolin ...
- Grafana & Graphite & Collectd:监控系统
简介 监控是运维工作中的一个重要组成部分,今天介绍一套新的监控工具,方便好用,扩展性强,这套工具有三个组件,Grafana & Graphite & Collectd: Grafana ...