Spring整合Dubbo框架
Dubbo作为一个RPC框架,其最核心的功能就是要实现跨网络的远程调用。演示过程创建两个小工程,一个作为服务的提供者,一个作为服务的消费者。通过Dubbo来实现服务消费者远程调用服务提供者的方法。
dubbo 的使用需要一个注册中心,这里以Zookeeper为例来演示
1.Dubbo架构
Dubbo架构图(Dubbo官方提供)如下:

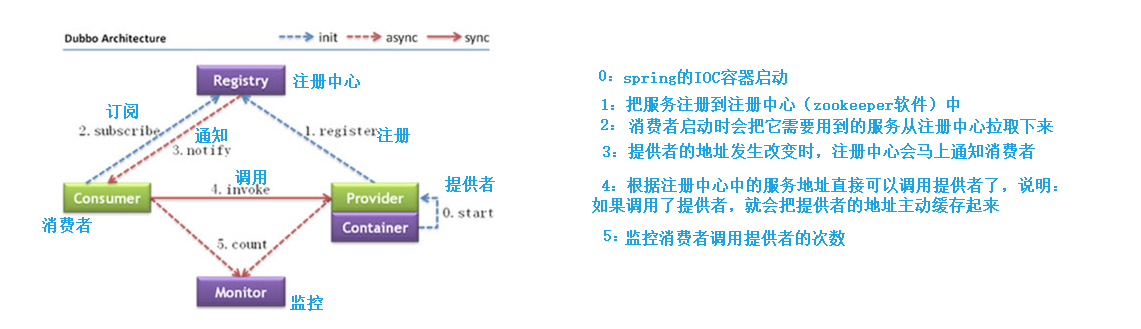
节点角色说明:
| 节点 | 角色名称 |
|---|---|
| Provider | 暴露服务的服务提供方 |
| Consumer | 调用远程服务的服务消费方 |
| Registry | 服务注册与发现的注册中心 |
| Monitor | 统计服务的调用次数和调用时间的监控中心 |
| Container | 服务运行容器 |
调用关系说明:
服务容器负责启动,加载,运行服务提供者。
服务提供者在启动时,向注册中心注册自己提供的服务。
服务消费者在启动时,向注册中心订阅自己所需的服务。
注册中心返回服务提供者地址列表给消费者,如果有变更,注册中心将基于长连接推送变更数据给消费者。
服务消费者,从提供者地址列表中,基于软负载均衡算法,选一台提供者进行调用,如果调用失败,再选另一台调用。
服务消费者和提供者,在内存中累计调用次数和调用时间,定时每分钟发送一次统计数据到监控中心。
2.服务提供者开发
(1) 创建maven工程(打包方式为war)dubbodemo_provider,添加依赖pom.xml代码如下
<?xml version="1.0" encoding="UTF-8"?>

<project xmlns="http://maven.apache.org/POM/4.0.0"

         xmlns:xsi="http://www.w3.org/2001/XMLSchema-instance"

         xsi:schemaLocation="http://maven.apache.org/POM/4.0.0 http://maven.apache.org/xsd/maven-4.0.0.xsd">

    <modelVersion>4.0.0</modelVersion>

    <packaging>war</packaging>

    <artifactId>dubbodemo_provider</artifactId>

  <dependencys>

  <!-- dubbo相关 -->

        <dependency>

            <groupId>com.alibaba</groupId>

            <artifactId>dubbo</artifactId>

            <version>2.6.6</version>

        </dependency>

        <!-- dubbo2.6.X以上的版本开始 2.8.4不需要 -->

        <dependency>

            <groupId>io.netty</groupId>

            <artifactId>netty-all</artifactId>

            <version>4.1.32.Final</version>

        </dependency>

        <dependency>

            <groupId>org.apache.curator</groupId>

            <artifactId>curator-framework</artifactId>

            <version>4.0.0</version>

            <exclusions>

                <exclusion>

                    <groupId>org.apache.zookeeper</groupId>

                    <artifactId>zookeeper</artifactId>

                </exclusion>

            </exclusions>

        </dependency>

        <dependency>

            <groupId>org.apache.zookeeper</groupId>

            <artifactId>zookeeper</artifactId>

            <version>3.4.7</version>

        </dependency>

        <dependency>

            <groupId>com.github.sgroschupf</groupId>

            <artifactId>zkclient</artifactId>

            <version>0.1</version>

        </dependency>

        <dependency>

            <groupId>javassist</groupId>

            <artifactId>javassist</artifactId>

            <version>3.12.1.GA</version>

        </dependency>

        <dependency>

            <groupId>com.alibaba</groupId>

            <artifactId>fastjson</artifactId>

            <version>1.2.47</version>

        </dependency>

    </dependencys>

</project>
(2) 配置web.xml文件
<?xml version="1.0" encoding="UTF-8"?>

<web-app xmlns:xsi="http://www.w3.org/2001/XMLSchema-instance"

         xmlns="http://java.sun.com/xml/ns/javaee"

         xsi:schemaLocation="http://java.sun.com/xml/ns/javaee http://java.sun.com/xml/ns/javaee/web-app_2_5.xsd"

         version="2.5">

  <!-- 监听器监听其他的spring配置文件 -->

  <context-param>

    <param-name>contextConfigLocation</param-name>

    <param-value>classpath:spring/applicationContext-provider.xml</param-value>

  </context-param>

  <listener>

    <listener-class>org.springframework.web.context.ContextLoaderListener</listener-class>

  </listener>

</web-app>
(3) 创建服务接口
package com.test.dubbo.api;

public interface HelloService {

   public String sayHello(String name);

}
(4) 创建服务实现类
package com.test.service.impl;

import com.test.dubbo.api.HelloService;

//这个service并不是spring提供的,是dubbo的service代替的

import com.alibaba.dubbo.config.annotation.Service;

@Service  //把此服务注册到zookeeper

public class HelloServiceImpl implements HelloService {

   public String sayHello(String name) {

      return "hello " + name;

   }

}
注意:服务实现类上使用的Service注解是Dubbo提供的,用于对外发布服务
(5) 在src/main/resources下创建applicationContext-provider.xml
<?xml version="1.0" encoding="UTF-8"?>

<beans xmlns="http://www.springframework.org/schema/beans"

       xmlns:xsi="http://www.w3.org/2001/XMLSchema-instance"

       xmlns:p="http://www.springframework.org/schema/p"

       xmlns:context="http://www.springframework.org/schema/context"

       xmlns:dubbo="http://code.alibabatech.com/schema/dubbo"

       xmlns:mvc="http://www.springframework.org/schema/mvc"

       xsi:schemaLocation="http://www.springframework.org/schema/beans

      http://www.springframework.org/schema/beans/spring-beans.xsd

         http://www.springframework.org/schema/mvc

         http://www.springframework.org/schema/mvc/spring-mvc.xsd

         http://code.alibabatech.com/schema/dubbo

         http://code.alibabatech.com/schema/dubbo/dubbo.xsd

         http://www.springframework.org/schema/context

         http://www.springframework.org/schema/context/spring-context.xsd">

    <!-- 当前应用名称,用于注册中心计算应用间依赖关系,注意:消费者和提供者应用名不要一样 -->

    <dubbo:application name="dubbodemo_provider" />

    <!-- 连接服务注册中心zookeeper ip为zookeeper所在服务器的ip地址-->

    <dubbo:registry address="zookeeper://127.0.0.1:2181"/>

    <!-- 注册  协议和port   端口默认是20880 -->

    <dubbo:protocol name="dubbo" port="20881"></dubbo:protocol>

    <!-- 扫描指定包,加入@Service注解的类会被发布为服务  -->

    <dubbo:annotation package="com.test.service.impl" />

</beans>
6)启动服务 也就是把spring容器启动即可
可以用tomcat启动项目
也可以用main方法加载spring配置文件,也就是启动了spring容器
在com.itheima包下创建一个DemoProvider类来启动spring容器,代码如下
package com.test;

import org.springframework.context.support.ClassPathXmlApplicationContext;

import java.io.IOException;

public class DemoProvider {

    public static void main(String[] args) throws IOException {

//        加载配置文件,启动容器

        ClassPathXmlApplicationContext app = new ClassPathXmlApplicationContext("classpath:spring/applicationContext-provider.xml");

        app.start();

        System.in.read(); //等待控制台回车。如果不回车就一直卡这儿不继续

    }

}
3.服务消费者开发
开发步骤:
(1) 创建maven工程(打包方式为war)dubbodemo_consumer,pom.xml配置和上面服务提供者相同
(2) 配置web.xml文件
<?xml version="1.0" encoding="UTF-8"?>

<web-app xmlns:xsi="http://www.w3.org/2001/XMLSchema-instance"

         xmlns="http://java.sun.com/xml/ns/javaee"

         xsi:schemaLocation="http://java.sun.com/xml/ns/javaee http://java.sun.com/xml/ns/javaee/web-app_2_5.xsd"

         version="2.5">

  <servlet>

    <servlet-name>springmvc</servlet-name>

    <servlet-class>org.springframework.web.servlet.DispatcherServlet</servlet-class>

    <!-- 指定加载的配置文件 ,通过参数contextConfigLocation加载-->

    <init-param>

      <param-name>contextConfigLocation</param-name>

      <param-value>classpath:spring/springmvc.xml</param-value>

    </init-param>

  </servlet>

  <servlet-mapping>

    <servlet-name>springmvc</servlet-name>

    <url-pattern>*.do</url-pattern>

  </servlet-mapping>

</web-app>
(3) 将服务提供者工程中的HelloService接口复制到当前工程
(4) 编写Controller
package com.test.controller;

import com.alibaba.dubbo.config.annotation.Reference;

import com.itheima.dubbo.api.HelloService;

import org.springframework.stereotype.Controller;

import org.springframework.web.bind.annotation.RequestMapping;

import org.springframework.web.bind.annotation.ResponseBody;

@Controller

@RequestMapping("/demo")

public class HelloController {

   @Reference//这里使用dubbo提供的,用来代替@Autowired来注入服务

   private HelloService helloService;

   @RequestMapping("/hello")

   @ResponseBody

   public String getName(String name){

      //远程调用

      String result = helloService.sayHello(name);

      System.out.println(result);

      return result;

   }

}
注意:Controller中注入HelloService使用的是Dubbo提供的@Reference注解
(5) 在src/main/resources下创建spring文件夹,再创建springmvc.xml文件
<?xml version="1.0" encoding="UTF-8"?>

<beans xmlns="http://www.springframework.org/schema/beans"

       xmlns:xsi="http://www.w3.org/2001/XMLSchema-instance"

       xmlns:aop="http://www.springframework.org/schema/aop"

       xmlns:dubbo="http://code.alibabatech.com/schema/dubbo"

       xmlns:context="http://www.springframework.org/schema/context"

       xmlns:mvc="http://www.springframework.org/schema/mvc"

       xsi:schemaLocation="http://www.springframework.org/schema/beans http://www.springframework.org/schema/beans/spring-beans.xsd

        http://www.springframework.org/schema/mvc http://www.springframework.org/schema/mvc/spring-mvc.xsd

        http://www.springframework.org/schema/aop http://www.springframework.org/schema/aop/spring-aop.xsd

        http://code.alibabatech.com/schema/dubbo http://code.alibabatech.com/schema/dubbo/dubbo.xsd

        http://www.springframework.org/schema/context http://www.springframework.org/schema/context/spring-context.xsd">

		<!--spring的扫描包,扫描的是spring的注解-->

    <context:component-scan base-package="cn.test"/>

    <!--告诉zookeeper 当前项目是哪个-->

    <dubbo:application name="dubbodemo_consumer"/>

    <!--链接注册中心-->

    <dubbo:registry address="zookeeper://127.0.0.1:2181"/>

    <!--注解扫描 扫描的是dubbo的 @Reference注解-->

    <dubbo:annotation package="cn.test"/>

    <!--    timeout:每次请求都会等待3秒  retries失败后重试次数-->

    <dubbo:consumer timeout="3000" retries="0"/>

</beans>
dubbo的使用小demo已经完成。大家可以尝试一下
Spring整合Dubbo框架的更多相关文章
- (八)整合 Dubbo框架 ,实现RPC服务远程调用
整合 Dubbo框架 ,实现RPC服务远程调用 1.Dubbo框架简介 1.1 框架依赖 1.2 核心角色说明 2.SpringBoot整合Dubbo 2.1 核心依赖 2.2 项目结构说明 2.3 ...
- 【Spring】Spring系列7之Spring整合MVC框架
7.Spring整合MVC框架 7.1.web环境中使用Spring 7.2.整合MVC框架 目标:使用Spring管理MVC的Action.Controller 最佳实践参考:http://www. ...
- 【SSH框架】系列之 Spring 整合 Hibernate 框架
1.SSH 三大框架整合原理 Spring 与 Struts2 的整合就是将 Action 对象交给 Spring 容器来负责创建. Spring 与 Hibernate 的整合就是将 Session ...
- spring整合dubbo[单机版]
Spring整合Dubbo,这个是用xml配置的 (方式一) 来梳理下步骤: 1. 安装zookeeper,在进行简单配置[这里使用单机模式,不用集群] 2. 创建maven项目,构建项目结构 3. ...
- Spring整合EHCache框架
在Spring中使用缓存可以有效地避免不断地获取相同数据,重复地访问数据库,导致程序性能恶化. 在Spring中已经定义了缓存的CacheManager和Cache接口,只需要实例化便可使用. Spr ...
- Spring整合Struts2框架的第二种方式(Action由Spring框架来创建)(推荐大家来使用的)
1. spring整合struts的基本操作见我的博文:https://www.cnblogs.com/wyhluckdog/p/10140588.html,这里面将spring与struts2框架整 ...
- Spring整合Struts2框架的第一种方式(Action由Struts2框架来创建)。在我的上一篇博文中介绍的通过web工厂的方式获取servcie的方法因为太麻烦,所以开发的时候不会使用。
1. spring整合struts的基本操作见我的上一篇博文:https://www.cnblogs.com/wyhluckdog/p/10140588.html,这里面将spring与struts2 ...
- spring整合shiro框架
上一篇文章已经对shiro框架做了一定的介绍,这篇文章讲述使用spring整合shiro框架,实现用户认证已经权限控制 1.搭建环境 这里不在赘述spring环境的搭建,可以简单的搭建一个ssm框架, ...
- Spring Boot 2 整合 Dubbo 框架 ,实现 RPC 服务远程调用
一.Dubbo框架简介 1.框架依赖 图例说明: 1)图中小方块 Protocol, Cluster, Proxy, Service, Container, Registry, Monitor 代 ...
随机推荐
- Linux 进程间通信 无名管道(pipe)
无名管道: 1)只能用于具有亲缘关系的进程之间的通信(无名管道是某一个进程创建的,不像普通文件有路径,在文件系统中是不可见的,其他进程要想打开,只能通过继承的方式去打开) 2)半双工的通信模式,具有固 ...
- bzoj1009题解
[解题思路] 先KMP出fail数组,再用fail数组求出M[i][j],表示上一次匹配到第i位,这次可以遇到多少种不同的字符,使之转而匹配到第j位. 设集合S=[1,m]∩N 又设f[i][j]表示 ...
- lua的运算符
1.赋值运算符 --赋值 str="helllo".."world" print(str) a,b=10,20 print(a,b) c,d,e=1,2 pri ...
- luoguP4768 [NOI2018]归程
传送门 kruskal重构树: kruskal合并两个联通块时合并的边一定是联通块中权值最大的边,小于等于这条边的边所能联通的所有点在这个联通块中. 在合并两个联通块的时候新建一个点作为两个联通块代表 ...
- prop不同数据类型设置默认值
vue prop 会接收不同的数据类型,这里列出了 常用的数据类型的设置默认值的写法,其中包含: Number, String, Boolean, Array, Function, Object ...
- Java-javaFx库运用-自动弹跳的球
(1)定义一个名为BallPane的类,用于显示一个弹动的球: (2)定义一个名为BounceBallControl的类,用来使用鼠标动作控制弹球,当鼠标按下的时候动画暂停,当鼠标释放的时候动画恢复执 ...
- C#-Api:身份证识别
ylbtech-C#-Api:身份证识别 通过POST上传base64格式的图片内容,可识别二代身份证.驾照.行驶证.军官证.中华人民共和国往来港澳通行证.台湾居民往来大陆通行证.大陆居民往来台湾通行 ...
- C89,C99: C数组&结构体&联合体快速初始化
1. 背景 C89标准规定初始化语句的元素以固定顺序出现,该顺序即待初始化数组或结构体元素的定义顺序. C99标准新增指定初始化(Designated Initializer),即可按照任意顺序对数组 ...
- 【集合框架】JDK1.8源码分析之HashMap
一.前言 在分析jdk1.8后的HashMap源码时,发现网上好多分析都是基于之前的jdk,而Java8的HashMap对之前做了较大的优化,其中最重要的一个优化就是桶中的元素不再唯一按照链表组合,也 ...
- 20140331 HOG代码调试 Boost库安装
1.CUDAHOG代码调试 错误1: 错误提示:(main.obj : error LNK2019: 无法解析的外部符号 "public: __thiscall cudaHOG::cudaH ...