Android 手机卫士--导航界面3、4和功能列表界面跳转逻辑处理
刚刚花了一点时间,将导航界面3、4的布局和相应的跳转逻辑写了一下:
Setup3Activity代码如下:
/**

 * Created by wuyudong on 2016/10/10.

 */

public class Setup3Activity extends Activity{

    @Override

    protected void onCreate(Bundle savedInstanceState) {

        super.onCreate(savedInstanceState);

        setContentView(R.layout.activity_setup3);

    }

    public void nextPage(View view) {

        Intent intent = new Intent(getApplicationContext(), Setup4Activity.class);

        startActivity(intent);

        finish();

    }

    public void prePage(View view) {

        Intent intent = new Intent(getApplicationContext(), Setup2Activity.class);

        startActivity(intent);

        finish();

    }

}
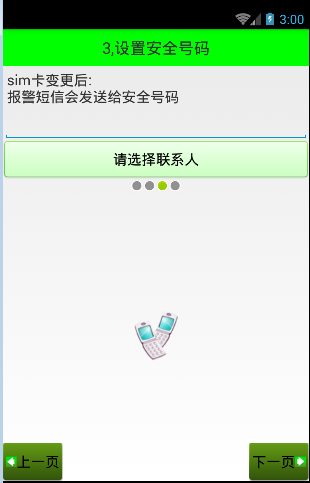
对应的布局文件activity_setup3.xml:
<?xml version="1.0" encoding="utf-8"?>

<LinearLayout xmlns:android="http://schemas.android.com/apk/res/android"

    android:layout_width="match_parent"

    android:layout_height="match_parent"

    android:orientation="vertical">

    <TextView

        style="@style/TitleStyle"

        android:text="3.设置安全号码" />

    <TextView

        android:layout_width="wrap_content"

        android:layout_height="wrap_content"

        android:textColor="#000"

        android:textSize="18sp"

        android:layout_margin="5dp"

        android:text="sim卡变更后\n就会发送报警短信安全号码" />

    <EditText

        android:layout_width="match_parent"

        android:layout_height="wrap_content"

        android:id="@+id/et_phone_number"

        android:hint="请输入电话号码"

        />

    <Button

        android:layout_width="match_parent"

        android:layout_height="wrap_content"

        android:id="@+id/bt_select_number"

        android:text="选择联系人"

        android:background="@drawable/selector_number_btn"

        />

    <!-- 让内部点的空间水平居中 -->

    <LinearLayout

        android:layout_width="match_parent"

        android:layout_height="wrap_content"

        android:gravity="center_horizontal">

        <ImageView

            android:layout_width="wrap_content"

            android:layout_height="wrap_content"

            android:background="@android:drawable/presence_invisible" />

        <ImageView

            android:layout_width="wrap_content"

            android:layout_height="wrap_content"

            android:background="@android:drawable/presence_invisible" />

        <ImageView

            android:layout_width="wrap_content"

            android:layout_height="wrap_content"

            android:background="@android:drawable/presence_online" />

        <ImageView

            android:layout_width="wrap_content"

            android:layout_height="wrap_content"

            android:background="@android:drawable/presence_invisible" />

    </LinearLayout>

    <RelativeLayout

        android:layout_width="match_parent"

        android:layout_height="match_parent">

        <!-- 图片选择器,在选中和未选中的过程中,切换展示图片 -->

        <Button style="@style/preBtn" />

        <Button style="@style/nextBtn" />

        <ImageView

            android:layout_width="wrap_content"

            android:layout_height="wrap_content"

            android:background="@drawable/phone"

            android:layout_centerVertical="true"

            android:layout_centerHorizontal="true" />

    </RelativeLayout>

</LinearLayout>
Setup4Activity代码如下:
/**

 * Created by wuyudong on 2016/10/10.

 */

public class Setup4Activity extends Activity{

    @Override

    protected void onCreate(Bundle savedInstanceState) {

        super.onCreate(savedInstanceState);

        setContentView(R.layout.activity_setup4);

    }

   public void nextPage(View view) {

        Intent intent = new Intent(getApplicationContext(), SetupOverActivity.class);

        startActivity(intent);

        finish();

        SpUtil.putBoolean(this, ConstantValue.SETUP_OVER, true);

    }

    public void prePage(View view) {

        Intent intent = new Intent(getApplicationContext(), Setup3Activity.class);

        startActivity(intent);

        finish();

    }

}
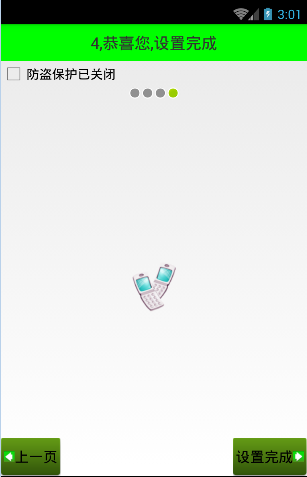
对应的布局文件activity_setup4.xml:
<?xml version="1.0" encoding="utf-8"?>

<LinearLayout xmlns:android="http://schemas.android.com/apk/res/android"

    android:layout_width="match_parent"

    android:layout_height="match_parent"

    android:orientation="vertical">

    <TextView

        style="@style/TitleStyle"

        android:text="4.恭喜您,设置完成" />

    <CheckBox

        android:layout_width="wrap_content"

        android:layout_height="wrap_content"

        android:text="防盗保护已关闭"

        />

    <!-- 让内部点的空间水平居中 -->

    <LinearLayout

        android:layout_width="match_parent"

        android:layout_height="wrap_content"

        android:gravity="center_horizontal">

        <ImageView

            android:layout_width="wrap_content"

            android:layout_height="wrap_content"

            android:background="@android:drawable/presence_invisible" />

        <ImageView

            android:layout_width="wrap_content"

            android:layout_height="wrap_content"

            android:background="@android:drawable/presence_invisible" />

        <ImageView

            android:layout_width="wrap_content"

            android:layout_height="wrap_content"

            android:background="@android:drawable/presence_invisible" />

        <ImageView

            android:layout_width="wrap_content"

            android:layout_height="wrap_content"

            android:background="@android:drawable/presence_online" />

    </LinearLayout>

    <RelativeLayout

        android:layout_width="match_parent"

        android:layout_height="match_parent">

        <ImageView

            android:layout_width="wrap_content"

            android:layout_height="wrap_content"

            android:layout_centerInParent="true"

            android:background="@drawable/phone" />

        <!-- 图片选择器,在选中和未选中的过程中,切换展示图片 -->

        <Button style="@style/preBtn" />

        <Button style="@style/nextBtn"

            android:text="设置完成"

            />

    </RelativeLayout>

</LinearLayout>
Android 手机卫士--导航界面3、4和功能列表界面跳转逻辑处理的更多相关文章
- Android 手机卫士--导航界面1的布局编写
本文地址:http://www.cnblogs.com/wuyudong/p/5943005.html,转载请注明出处. 本文实现导航界面1的布局的实现,效果如下图所示: 首先分析所使用的布局样式: ...
- Android 手机卫士--导航界面2
本文地址:http://www.cnblogs.com/wuyudong/p/5947504.html,转载请注明出处. 在之前的文章中,实现了导航界面1布局编写与相关的逻辑代码,如下图所示: 点击“ ...
- Android 手机卫士--导航界面4的业务逻辑
本文实现导航界面4的业务逻辑,导航界面4的界面如下: 本文地址:http://www.cnblogs.com/wuyudong/p/5952640.html,转载请注明出处. 相应的代码如下: pri ...
- Android 手机卫士--参照文档编写选择器
本文来实现<Android 手机卫士--导航界面1的布局编写>中的图片选择器部分的代码. 本文地址:http://www.cnblogs.com/wuyudong/p/5944356.ht ...
- Android 手机卫士--设置界面&功能列表界面跳转逻辑处理
在<Android 手机卫士--md5加密过程>中已经实现了加密类,这里接着实现手机防盗功能 本文地址:http://www.cnblogs.com/wuyudong/p/5941959. ...
- Android 手机卫士--确认密码对话框编写
本文接着实现“确认密码”功能,也即是用户以前设置过密码,现在只需要输入确认密码 本文地址:http://www.cnblogs.com/wuyudong/p/5940718.html,转载请注明出处. ...
- Android 手机卫士--签名文件说明&包名说明
在<Android 手机卫士--打包生成apk维护到服务器>一文中,实现了新版本的apk到服务器,当打开客户端apk的时候,发现有新版本,提示更新.还实现了利用xutils工具实现了从服务 ...
- Android 手机卫士--弹出对话框
在<Android 手机卫士--解析json与消息机制发送不同类型消息>一文中,消息机制发送不同类型的信息还没有完全实现,在出现异常的时候,应该弹出吐司提示异常,代码如下: private ...
- android手机卫士、3D指南针、动画精选、仿bilibli客户端、身份证银行卡识别等源码
Android精选源码 android身份证.银行卡号扫描源码 android仿bilibili客户端 android一款3D 指南针 源码 android手机卫士app源码 android提醒应用, ...
随机推荐
- 自制文件上传JS控件,支持IE、chrome、firefox etc.
(function() { if (window.FileUpload) { return; } window.FileUpload = function (id, url) { this.id = ...
- (转)linux下和云端通讯的例程, ubuntu和openwrt下实验成功(二)
前言: 上节用纯linux的函数实现了和云端通讯, 本节开始利用传说中的神器libcurl 话说一个网络程序员对书法十分感兴趣,退休后决定在这方面有所建树. 于是花重金购买了上等的文房四宝. 一 ...
- Html5 希尔排序演示
希尔排序(Shell Sort)是插入排序的一种.也称缩小增量排序,是直接插入排序算法的一种更高效的改进版本. 如下图所示: 代码如下: <!DOCTYPE html> <html& ...
- Objective-C runtime初识
Objective-C Runtime Describes the macOS Objective-C runtime library support functions and data struc ...
- Code First Migrations
在MVC开发当中难免会对类进行修改,修改后再次运行就会出现异常,提示上下文的模型已在数据库创建后发生改变. 支持“AppContext”上下文的模型已在数据库创建后发生更改.请考虑使用 Code Fi ...
- Enterprise Solution 管理软件开发框架流程实战
1 定义模块和功能 执行系统功能(SAUTSF),在系统主文件(System Master File SAMF)模块中增加功能SAMFEM,Employee Master. 给有权限的用户组分配功能S ...
- SQL Server 复制系列(文章索引)
一.本文所涉及的内容(Contents) 本文所涉及的内容(Contents) 前言(Introduction) 复制逻辑结构图(Construction) 系列文章索引(Catalog) 总结&am ...
- ASP.NET Core真实管道详解[2]:Server是如何完成针对请求的监听、接收与响应的【上】
Server是ASP .NET Core管道的第一个节点,负责完整请求的监听和接收,最终对请求的响应同样也由它完成.Server是我们对所有实现了IServer接口的所有类型以及对应对象的统称,如下面 ...
- Javascript之自定义事件
Javascript自定义事件,其本质就是观察者模式(又称订阅/发布模式),它的好处就是将绑定事件和触发事件相互隔离开,并且可以动态的添加.删除事件. 下面通过实例,一步一步构建一个具体的Javasc ...
- 哈夫曼(huffman)树和哈夫曼编码
哈夫曼树 哈夫曼树也叫最优二叉树(哈夫曼树) 问题:什么是哈夫曼树? 例:将学生的百分制成绩转换为五分制成绩:≥90 分: A,80-89分: B,70-79分: C,60-69分: D,<60 ...