
[Forward]Visual Guide: Setting up My Sites in SharePoint 2013
Home
Architecture
Speaking
About
Navigation
Visual Guide: Setting up My Sites in SharePoint 2013
One of the SharePoint 2013 puzzle pieces which got some major improvements are My Sites, User Profiles and news feeds. This article describes step-by-step process of setting up the my site infrastructure in the SharePoint Farm.
Prerequisite for setting up My Sites is having user profiles import or sync up and running. You can read more on user profiles sync in my previous article.
When this has been configured, we can start configuring my sites:
The first step us to go create (according to the best practices) own web application for hosting my sites. Go to the central administration, Application management, “Manage web applications”
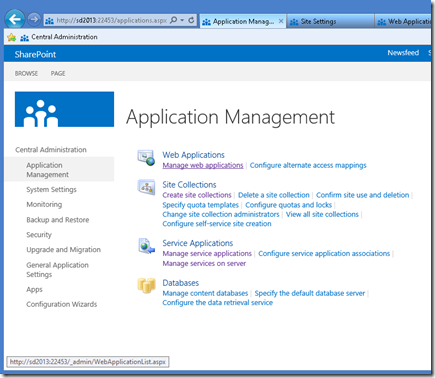
And create a dedicated web application (sd2013:101 in my example here)
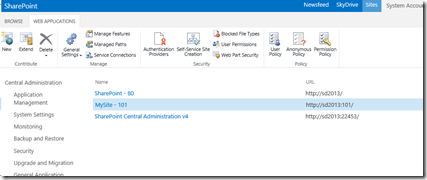
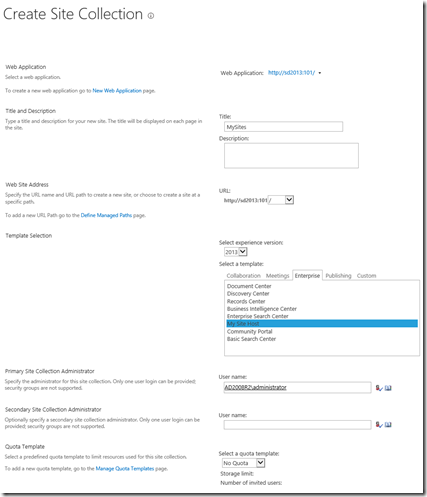
Now, the next step would be to create a site collection in the root of the newly created web application. You can of course create it inside some other managed path other than root, but since we have dedicated Web Application, root seems like an obvious choice.
Site Collection must have “2013” experience and use “My Site Host” template.
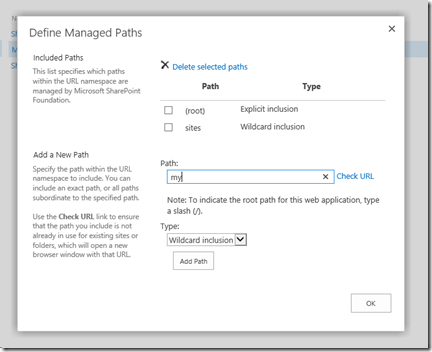
After Site Collection has been created, click on the “Managed Paths” in the web application that you created to host My Sites.
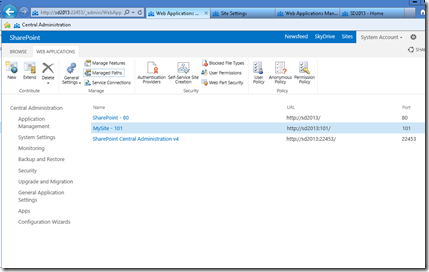
Add a new managed path with wildcard inclusion. I prefer to use “my” as the My Site managed path, but you can of course pick up anything else.
The next thing is to check service connections for the Web Application which will host my sites. Click on the “Service Connections” button to…
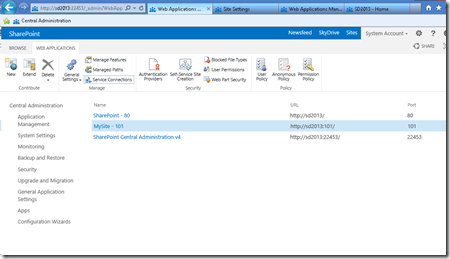
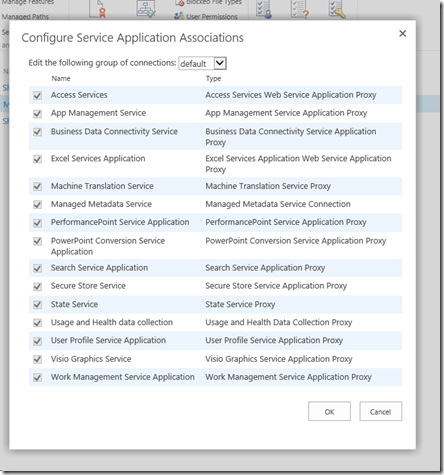
..see if right service applications are set up.
If you choose “Custom” (instead of the “Default”) in the Edit the following group of connections drop down, select any service applications to which you want to connect the web application. The most important ones re User Profile service application, the managed metadata service application, and the Search service application.
In my case, I’ll just proceed with “default”
Now it’s time to set up the self service site creation. Go back to the Web application management, chose the application that you created to host My Sites, and click on the “Self Service Site Creation” button.
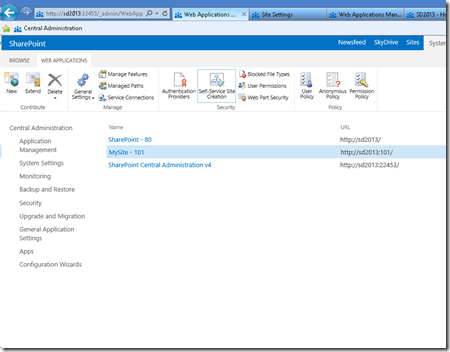
Click “On” in the “Site Collections” radio box, and enter your managed path in the “Start a Site” field (with “Prompt users to create a team site under” chosen)
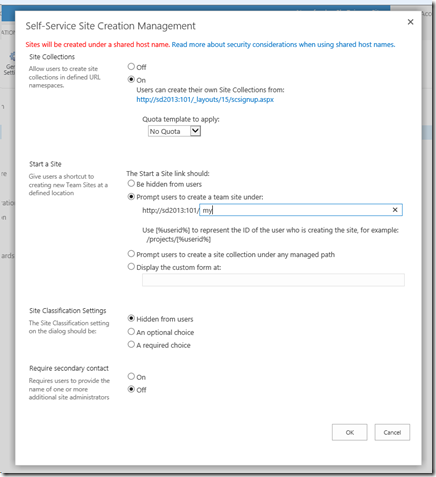
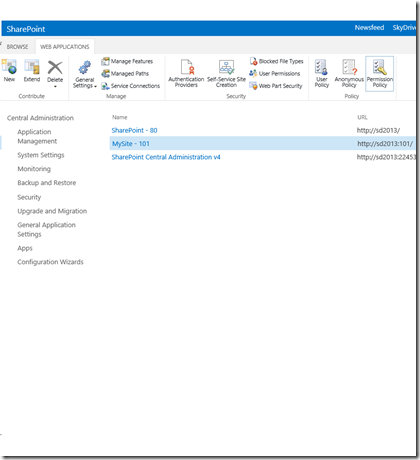
Now, the next step is to grant users permission to create new site collections (for my sites). Click on the “Permission Policy” button in the Web Application management, with the web application which hosts the my sites selected.
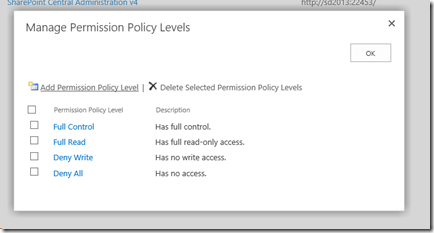
In the”Manage Permission Policy Levels”, click on the “Add Permission Policy Level”
Call it however you want (“MySite Subsite Creation” in my case), and grant the “Create Subsites” permission.
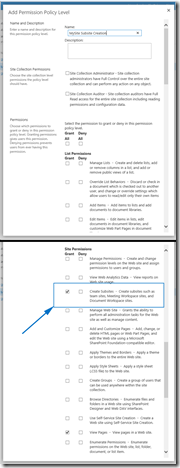
Now, the new permission policy level should appear among other policy levels…
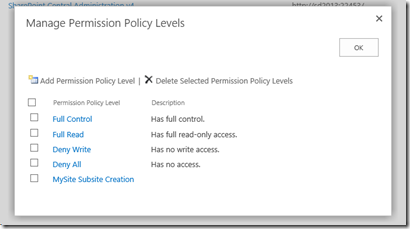
And we need to grant that policy level to the users. Click on the “Users Policy” button in the Web Application management, with the web application that you created to host My Sites selected…
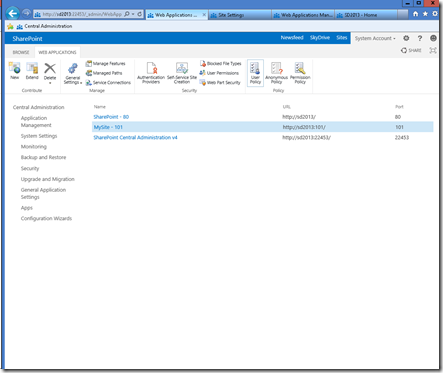
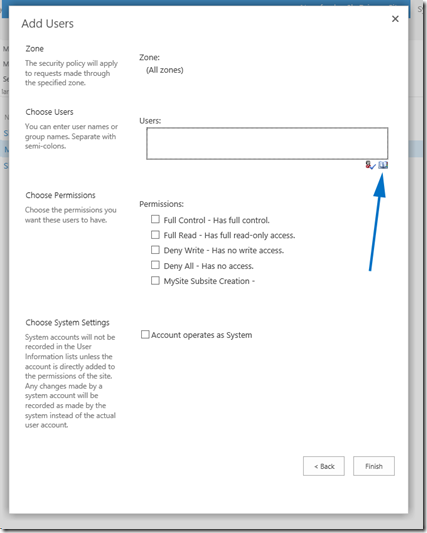
Click on the “Add users” link…
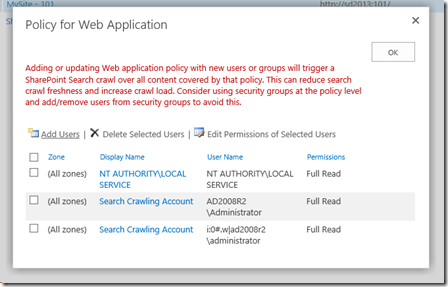
From all zones…
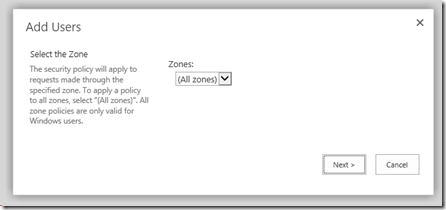
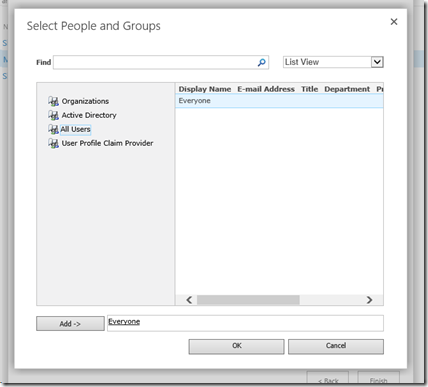
And select the users which you want to have rights to create my sites. On my case, it will be “Everyone”.
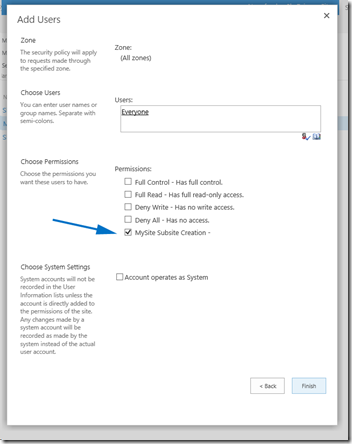
Select your newly created policy level…
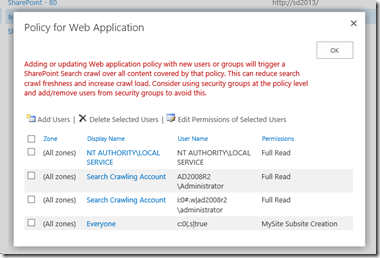
And now you should see “Everyone” with the new policy selected.
OK, everything has been set up and prepared so far. Now, finally, let’s set up the my sites. Go to the Central Administration –> Application Management, and select “Manage service applications”.
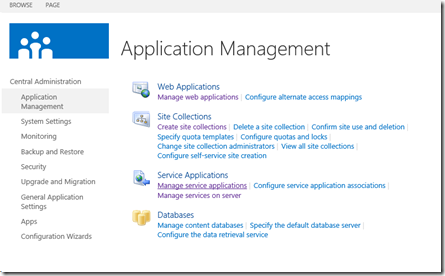
Then select the “User Profile Service Application”

In the “User Profile Service Application”, click on “Setup My Sites”
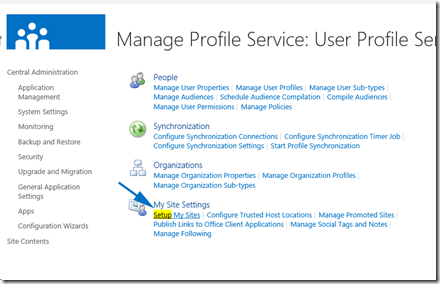
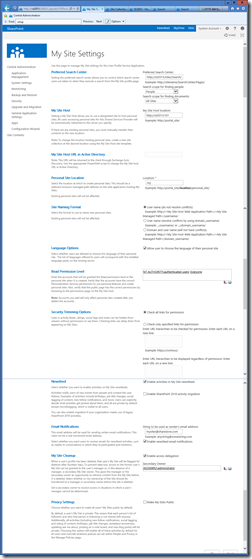
This is where you need to set up the search center, my host location (in my case – root site collection of the Web Application that serves as the host) and personal site location (managed path within the host web application – “my” in my case). Take a look at the screenshot for all the other fields (which I have used in my case):
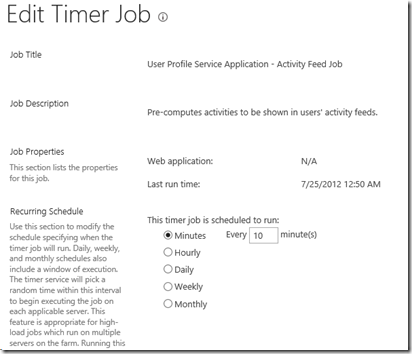
The only remaining thing would be to set up the timer job for activity feed. Go to the Central Administration –> Monitoring –>Timer Job –> Review job definitions
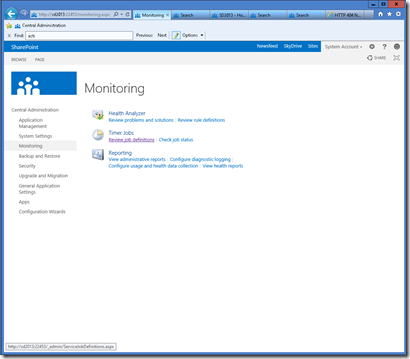
Find the “User Profile Service Application – Activity Feed Job”, and set up the activity feed sync timer according to your needs.

And, that’s it.
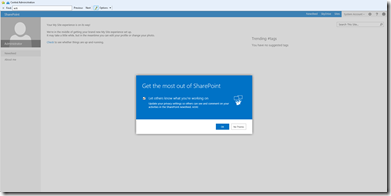
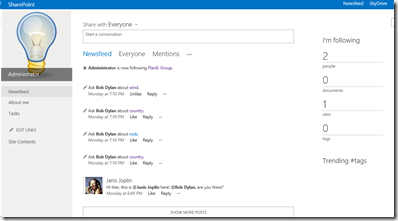
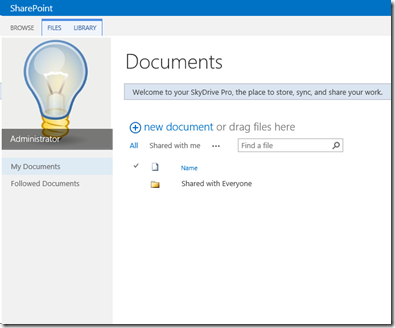
Go to the my site now, and you will be notified of my site creation for your self. Take care of your profile, follow people. Upload you private documents, share documents, follow documents – enjoy being social! 
Comments
14 comments
- ← Setting up User Profile Synchronization in SharePoint 2013
- Programmatically Creating Content Databases and Site Collections →
Leave a Reply Cancel reply
You must be logged in to post a comment.
Calendar
| M | T | W | T | F | S | S |
|---|---|---|---|---|---|---|
| « Jun | Aug » | |||||
| 1 | ||||||
| 2 | 3 | 4 | 5 | 6 | 7 | 8 |
| 9 | 10 | 11 | 12 | 13 | 14 | 15 |
| 16 | 17 | 18 | 19 | 20 | 21 | 22 |
| 23 | 24 | 25 | 26 | 27 | 28 | 29 |
| 30 | 31 | |||||

Categories
Contact
MS & Community
- 1SUG BiH
- Microsoft SharePoint
- MS Community BiH
- Nothing but SharePoint
- Planet SharePoint
- SharePoint Magazine
Quick links


[Forward]Visual Guide: Setting up My Sites in SharePoint 2013的更多相关文章
- Making the Newsfeed web part available outside of My Sites in SharePoint 2013 分类: Sharepoint 2015-07-07 19:29 4人阅读 评论(0) 收藏
The Newsfeed is a key piece in SP2013's approach to social computing. It appears on the landing page ...
- Setting up your App domain for SharePoint 2013
from:http://sharepointchick.com/archive/2012/07/29/setting-up-your-app-domain-for-sharepoint-2013.as ...
- SharePoint 2013 工作流之Visual Studio开发示例篇
SharePoint 2013引用了WF4.0 Foundation,支持使用Designer和Visio进行设计,但是功能受限,而Visual Studio可以开发功能更加丰富的工作流,下面我们简单 ...
- How to copy files between sites using JavaScript REST in Office365 / SharePoint 2013
http://techmikael.blogspot.in/2013/07/how-to-copy-files-between-sites-using.html I'm currently playi ...
- MKMapView and Zoom Levels: A Visual Guide
原帖:http://troybrant.net/blog/2010/01/mkmapview-and-zoom-levels-a-visual-guide/ So, how exactly does ...
- 隐藏SharePoint 2013 team sites里的follow按钮
cls $featureid = 'a7a2793e-67cd-4dc1-9fd0-43f61581207a'$webapps = Get-spWebApplicationforeach($webap ...
- SharePoint 2013 图文开发系列之Visual Studio 创建母版页
一直以来,对于SharePoint母版页的创建,都是使用SharePoint Designer来创建和修改的,而后接触了SharePoint 2013,发现可以使用Html文件,通过设计管理器导入,然 ...
- SharePoint 2013 配置我的网站 图文引导
博客地址:http://blog.csdn.net/FoxDave 本篇我们来讲述一下关于SharePoint中我的网站(My Sites)相关的东西. 我的网站是SharePoint 2013中面向 ...
- Integrating SharePoint 2013 with ADFS and Shibboleth
Time again to attempt to implement that exciting technology, Federation Services (Web Single Sign On ...
随机推荐
- 移植QT到ZedBoard(制作运行库镜像) 交叉编译 分类: ubuntu shell ZedBoard OpenCV 2014-11-08 18:49 219人阅读 评论(0) 收藏
制作运行库 由于ubuntu的Qt运行库在/usr/local/Trolltech/Qt-4.7.3/下,由makefile可以看到引用运行库是 INCPATH = -I/usr//mkspecs/d ...
- android 02 登录
activity_main.xml <RelativeLayout xmlns:android="http://schemas.android.com/apk/res/android& ...
- spring aop 如何切面到mvc 的controller--转载
原文:http://yjian84.iteye.com/blog/1920787 网上搜罗半天,不知道什么原因,看了源码,好像他们说的controller 是不受代理的,也对哈,不知道怎么办,于是在h ...
- Eclipse打开当前所属文件所在windows中的文件夹
1.Eclipse设置 依次展开如下菜单: Run ---- External Tools ---- External Tools Configurations 在 program 下面新 ...
- Java多线程编程<一>
怎样做到线程安全? 1.不要跨线程共享变量: 2.使状态变量为不可变的: 3.或者在任何访问状态变量的时候使用同步 同步synchronized //静态的synchronized方法从Class对象 ...
- css 选择符
css参考手册:css.doyoe.com 在css3中,不同的浏览器可能需要不同的前缀,它表示该css属性或规则尚未成为W3C标准的一部分,是浏览器的私有属性,虽然目前较新版本的浏览器都是不需要前缀 ...
- 23、Javascript DOM
DOM Document Object Model(文档对象模型)定义了html和xml的文档标准. DOM 节点树 <html> <head> <title>DO ...
- HTML设置固定页脚飘浮
Css /* 页脚 */.footSty{bottom: 0pt; margin: 0pt; position: fixed; width: 100%; z-index: 10 ! important ...
- 如何在安卓/data(而不是/data/data)目录下进行文件的读写操作
分析:Android默认是无法直接操作/data目录的,只能读写程序自己的私有目录,也就是/data/data/package name/下,默认只能操作这个目录下的文件,也就是我们想直接读写/dat ...
- Hessian(C#)介绍及使用说明
什么是Hessian? Hessian是Caucho开发的一种二进制Web Service协议.支持目前所有流行的开发平台. Hessia能干什么? hessian用来实现web服务. Hessia有 ...