手把手教你使用Java实现一个神经网络
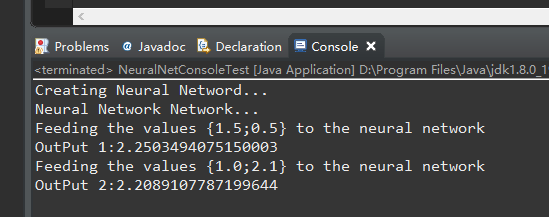
首先看一下运行效果:
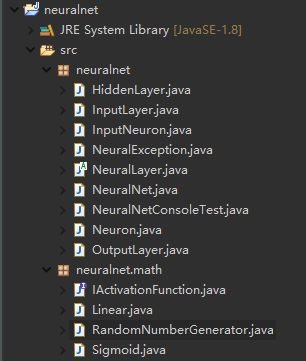
下面是项目整体目录:
0.实现神经网络总览
神经网络由层、神经元、权重、激活函数和偏置组成。每层都有一个或者多个神经元,每一个神经元都和神经输入/输出连接,这些连接就是权重。
需要重点强调一下,一个神经网络可能有很多隐含层,也可能一个没有,因为每层的神经元数目也可能不同。然而,输入输出层的神经元个数分别等于神经输入/输出的个数。
我们为了实现,需要定义以下的类:
- Neuron: 定义人工神经元
- NeuralLayer: 抽象类,定义一个神经元层。
- InputLayer: 定义神经输入层
- HiddenLayer:定义输入层和输出层之间的层
- OutputLayer: 定义神经输出层。
- InputNeuron: 定义神经网络输入中出现的神经元。
- NeuralNet:将前面定义的所有类组成一个ANN结构。
除了以上的类,我们还需要为激活函数定义一个IActivationFunction接口。这是必要的,因为激活函数与方法类似,需要作为神经元的一个属性进行分配。所以要为激活函数定义类,这些类需要实现IActivationFunction接口:
- Linear
- Sigmoid
- Step
- HyperTan
第一章的编码基本完成。除此之外,还需要定义俩个类。一个用于异常处理(NeuralException),另一个用于产生随机数(RandomNumberGenerator)。最后,将这些类分别放到俩个包。
1.神经元Neuron类
神经元类是本章代码的基础类。根据理论,人工神经元有如下属性
- 输入
- 权重
- 偏置
- 激活函数
- 输出
首先定义神经元的各种属性:
public class Neuron {

	//神经元相关的权重

    protected ArrayList<Double> weight;

    //神经元的输入

    private ArrayList<Double> input;

    //这个神经元的输出,由激活函数产生

    private Double output;

    //传递给激活函数的值

    private Double outputBeforeActivation;

    //输入的数量。如果为0,则表示神经元尚未初始化。

    private int numberOfInputs = 0;

    //神经元的偏差。除了第一层,其他都应该是1.0。

    protected Double bias = 1.0;

    //神经元的激活函数

    private IActivationFunction activationFunction;

}
当实例化神经元时,需要指定输入数据的个数以及激活函数。构造函数如下:
    public Neuron(int numberofinputs,IActivationFunction iaf){

        numberOfInputs=numberofinputs;

        weight=new ArrayList<>(numberofinputs+1);

        input=new ArrayList<>(numberofinputs);

        activationFunction=iaf;

    }
注意,为偏置定义另一个权重。一个重要的步骤是初始化神经元,也就是为权重赋初始值。这主要在init()方法中完成,通过随机数生成器静态类RandomNumberGenerator生成随机数,赋值权重。注意:设置权重值时需要防止权重数组越界。
public void init(){

        if(numberOfInputs>0){

            for(int i=0;i<=numberOfInputs;i++){

                double newWeight = RandomNumberGenerator.GenerateNext();

                try{

                    this.weight.set(i, newWeight);

                }

                catch(IndexOutOfBoundsException iobe){

                    this.weight.add(newWeight);

                }

            }

        }

    }
最后,在calc()方法中计算输出值:
public void calc(){

        outputBeforeActivation=0.0;

        if(numberOfInputs>0){

            if(input!=null && weight!=null){

                for(int i=0;i<=numberOfInputs;i++){

                    outputBeforeActivation+=(i==numberOfInputs?bias:input.get(i))*weight.get(i);

                }

            }

        }

        output=activationFunction.calc(outputBeforeActivation);

    }
首先需要对所有输入和权重的成绩进行求和(偏置乘最后一个权重,i==Number-OfInputs),然后将得出的结果保存在属性outputBeforeActivation中。激活函数用这个值计算神经元的输出。
总代码如下:
package neuralnet;

import java.util.ArrayList;

public class Neuron {

	//神经元相关的权重

    protected ArrayList<Double> weight;

    //神经元的输入

    private ArrayList<Double> input;

    //这个神经元的输出,由激活函数产生

    private Double output;

    //传递给激活函数的值

    private Double outputBeforeActivation;

    //输入的数量。如果为0,则表示神经元尚未初始化。

    private int numberOfInputs = 0;

    //神经元的偏差。除了第一层,其他都应该是1.0。

    protected Double bias = 1.0;

    //神经元的激活函数

    private IActivationFunction activationFunction;

    public Neuron(){

    }

    public Neuron(int numberofinputs){

        numberOfInputs=numberofinputs;

        weight=new ArrayList<>(numberofinputs+1);

        input=new ArrayList<>(numberofinputs);

    }

    public Neuron(int numberofinputs,IActivationFunction iaf){

        numberOfInputs=numberofinputs;

        weight=new ArrayList<>(numberofinputs+1);

        input=new ArrayList<>(numberofinputs);

        activationFunction=iaf;

    }

    public void init(){

        if(numberOfInputs>0){

            for(int i=0;i<=numberOfInputs;i++){

                double newWeight = RandomNumberGenerator.GenerateNext();

                try{

                    this.weight.set(i, newWeight);

                }

                catch(IndexOutOfBoundsException iobe){

                    this.weight.add(newWeight);

                }

            }

        }

    }

    public void setInputs(double [] values){

        if(values.length==numberOfInputs){

            for(int i=0;i<numberOfInputs;i++){

                try{

                    input.set(i, values[i]);

                }

                catch(IndexOutOfBoundsException iobe){

                    input.add(values[i]);

                }

            }

        }

    }

    public void setInputs(ArrayList<Double> values){

        if(values.size()==numberOfInputs){

            input=values;

        }

    }

    public ArrayList<Double> getArrayInputs(){

        return input;

    }

    public double[] getInputs(){

        double[] inputs = new double[numberOfInputs];

        for (int i=0;i<numberOfInputs;i++){

            inputs[i]=this.input.get(i);

        }

        return inputs;

    }

    public void setInput(int i,double value){

        if(i>=0 && i<numberOfInputs){

            try{

                input.set(i, value);

            }

            catch(IndexOutOfBoundsException iobe){

                input.add(value);

            }

        }

    }

    public double getInput(int i){

        return input.get(i);

    }

    public double[] getWeights(){

        double[] weights = new double[numberOfInputs+1];

        for(int i=0;i<=numberOfInputs;i++){

            weights[i]=weight.get(i);

        }

        return weights;

    }

    public ArrayList<Double> getArrayWeights(){

        return weight;

    }

    public void updateWeight(int i, double value){

        if(i>=0 && i<=numberOfInputs){

            weight.set(i, value);

        }

    }

    public int getNumberOfInputs(){

        return this.numberOfInputs;

    }

    public void setWeight(int i,double value) throws NeuralException{

        if(i>=0 && i<numberOfInputs){

            this.weight.set(i, value);

        }

        else{

            throw new NeuralException("Invalid weight index");

        }

    }

    public double getOutput(){

        return output;

    }

    public void calc(){

        outputBeforeActivation=0.0;

        if(numberOfInputs>0){

            if(input!=null && weight!=null){

                for(int i=0;i<=numberOfInputs;i++){

                    outputBeforeActivation+=(i==numberOfInputs?bias:input.get(i))*weight.get(i);

                }

            }

        }

        output=activationFunction.calc(outputBeforeActivation);

    }

    public void setActivationFunction(IActivationFunction iaf){

        this.activationFunction=iaf;

    }

    public double getOutputBeforeActivation(){

        return outputBeforeActivation;

    }

}
2.NeuralLayer类
在这个类中,将把在同一层中对齐的神经元分成一组。因为一层需要将值传递给另一层,也需要定义层与层之间的连接。类的属性定义如下:
//这一层的神经元数量

    protected int numberOfNeuronsInLayer;

    //这一层的神经元

    private ArrayList<Neuron> neuron;

    //激励函数

    protected IActivationFunction activationFnc;

    //将值提供给此层的前一层

    protected NeuralLayer previousLayer;

    protected NeuralLayer nextLayer;

    protected ArrayList<Double> input;

    protected ArrayList<Double> output;

    protected int numberOfInputs;
这个类是抽象的,整整可实例化的层类是InputLayer、HiddenLayer和Outp-utLayer。创建一个类是,必须使用另一个类的构造函数,这几个类具有相似的构造函数。
而层的初始化和计算都和神经元一样,他们也实现了init()方法和calc() 方法。生命欸protected类型,确保了只有子类可以调用或覆盖这些方法。
全部的代码如下:
package neuralnet;

import java.util.ArrayList;

public abstract class NeuralLayer {

    //这一层的神经元数量

    protected int numberOfNeuronsInLayer;

    //这一层的神经元

    private ArrayList<Neuron> neuron;

    //激励函数

    protected IActivationFunction activationFnc;

    //将值提供给此层的前一层

    protected NeuralLayer previousLayer;

    protected NeuralLayer nextLayer;

    protected ArrayList<Double> input;

    protected ArrayList<Double> output;

    protected int numberOfInputs;

    public NeuralLayer(int numberofneurons){

        this.numberOfNeuronsInLayer=numberofneurons;

        neuron = new ArrayList<>(numberofneurons);

        output = new ArrayList<>(numberofneurons);

    }

    public NeuralLayer(int numberofneurons,IActivationFunction iaf){

        this.numberOfNeuronsInLayer=numberofneurons;

        this.activationFnc=iaf;

        neuron = new ArrayList<>(numberofneurons);

        output = new ArrayList<>(numberofneurons);

    }

    public int getNumberOfNeuronsInLayer(){

        return numberOfNeuronsInLayer;

    }

    public ArrayList<Neuron> getListOfNeurons(){

        return neuron;

    }

    protected NeuralLayer getPreviousLayer(){

        return previousLayer;

    }

    protected NeuralLayer getNextLayer(){

        return nextLayer;

    }

    protected void setPreviousLayer(NeuralLayer layer){

        previousLayer=layer;

    }

    protected void setNextLayer(NeuralLayer layer){

        nextLayer=layer;

    }

    protected void init(){

        if(numberOfNeuronsInLayer>=0){

            for(int i=0;i<numberOfNeuronsInLayer;i++){

                try{

                    neuron.get(i).setActivationFunction(activationFnc);

                    neuron.get(i).init();

                }

                catch(IndexOutOfBoundsException iobe){

                    neuron.add(new Neuron(numberOfInputs,activationFnc));

                    neuron.get(i).init();

                }

            }

        }

    }

    protected void setInputs(ArrayList<Double> inputs){

        this.numberOfInputs=inputs.size();

        this.input=inputs;

    }

    protected void calc(){

        if(input!=null && neuron!=null){

            for(int i=0;i<numberOfNeuronsInLayer;i++){

                neuron.get(i).setInputs(this.input);

                neuron.get(i).calc();

                try{

                    output.set(i,neuron.get(i).getOutput());

                }

                catch(IndexOutOfBoundsException iobe){

                    output.add(neuron.get(i).getOutput());

                }

            }

        }

    }

    protected ArrayList<Double> getOutputs(){

        return output;

    }

    protected Neuron getNeuron(int i){

        return neuron.get(i);

    }

    protected void setNeuron(int i, Neuron _neuron){

        try{

            this.neuron.set(i, _neuron);

        }

        catch(IndexOutOfBoundsException iobe){

            this.neuron.add(_neuron);

        }

    }

}
3.ActivationFunction接口
在定义NeerualNetwork类之前,先看接口的Java代码示例:
public interface IActivationFunction {

    double calc(double x);

    public enum ActivationFunctionENUM {

        STEP, LINEAR, SIGMOID, HYPERTAN

    }

}
其中calc()方法属于实现IActivationFunction接口的特定的激活函数类,例如Sigmoid函数。
public class Sigmoid implements IActivationFunction {

    private double a=1.0;

    public Sigmoid(){

    }

    public Sigmoid(double value){

        this.setA(value);

    }

    public void setA(double value){

        this.a=value;

    }

    @Override

    public double calc(double x){

        return 1.0/(1.0+Math.exp(-a*x));

    }

}
这也是多态性的一个示例,即在相同的函数名下,类和方法呈现不同的行为,产生灵活的应用。
4.神经网络(NeuralNet)类
最后,定义神经网络类。到目前为止,我们已经知道,神经网络在神经层中组织神经元,且每个神经网络至少有俩层,一个用来接收收入,一个用来处理输出,还有一个数量可变的隐含层。因此,除了具有和神经元以及NeuralLary类相似的属性之外,Neural还将拥有这几个属性,如numberOfInputs,numberOfOutputs等。
 private InputLayer inputLayer;

    private ArrayList<HiddenLayer> hiddenLayer;

    private OutputLayer outputLayer;

    private int numberOfHiddenLayers;

    private int numberOfInputs;

    private int numberOfOutputs;

    private ArrayList<Double> input;

    private ArrayList<Double> output;
这个类的构造函数比前面类的参数更多:
 public NeuralNet(int numberofinputs,int numberofoutputs,

            int [] numberofhiddenneurons,IActivationFunction[] hiddenAcFnc,

            IActivationFunction outputAcFnc)
如果隐含层的数量是可变的,我们还应该考虑到可能有多个隐含层或0个隐含层,且对每个隐含层来说,隐藏神经元的数量也是可变的。处理这种可变性的最好方法就是把每个隐含层中的神经元数量表示为一个整数向量(参数 numberofhiddenlayers)。此外,需要为每个隐含层定义激活函数,包括输出层,完成这个目标所需要的参数分别为hiddenActivationFnc和outputAcFnc。
完整实现如下:
public NeuralNet(int numberofinputs,int numberofoutputs,

            int [] numberofhiddenneurons,IActivationFunction[] hiddenAcFnc,

            IActivationFunction outputAcFnc){

        numberOfHiddenLayers=numberofhiddenneurons.length;

        numberOfInputs=numberofinputs;

        numberOfOutputs=numberofoutputs;

        if(numberOfHiddenLayers==hiddenAcFnc.length){

            input=new ArrayList<>(numberofinputs);

            inputLayer=new InputLayer(numberofinputs);

            if(numberOfHiddenLayers>0){

                hiddenLayer=new ArrayList<>(numberOfHiddenLayers);

            }

            for(int i=0;i<numberOfHiddenLayers;i++){

                if(i==0){

                    try{

                        hiddenLayer.set(i,new HiddenLayer(numberofhiddenneurons[i],

                            hiddenAcFnc[i],

                            inputLayer.getNumberOfNeuronsInLayer()));

                    }

                    catch(IndexOutOfBoundsException iobe){

                        hiddenLayer.add(new HiddenLayer(numberofhiddenneurons[i],

                            hiddenAcFnc[i],

                            inputLayer.getNumberOfNeuronsInLayer()));

                    }

                    inputLayer.setNextLayer(hiddenLayer.get(i));

                }

                else{

                    try{

                        hiddenLayer.set(i, new HiddenLayer(numberofhiddenneurons[i],

                             hiddenAcFnc[i],hiddenLayer.get(i-1)

                            .getNumberOfNeuronsInLayer()

                            ));

                    }

                    catch(IndexOutOfBoundsException iobe){

                        hiddenLayer.add(new HiddenLayer(numberofhiddenneurons[i],

                             hiddenAcFnc[i],hiddenLayer.get(i-1)

                            .getNumberOfNeuronsInLayer()

                            ));

                    }

                    hiddenLayer.get(i-1).setNextLayer(hiddenLayer.get(i));

                }

            }

            if(numberOfHiddenLayers>0){

                outputLayer=new OutputLayer(numberofoutputs,outputAcFnc,

                        hiddenLayer.get(numberOfHiddenLayers-1)

                        .getNumberOfNeuronsInLayer()

                        );

                hiddenLayer.get(numberOfHiddenLayers-1).setNextLayer(outputLayer);

            }

            else{

                outputLayer=new OutputLayer(numberofinputs, outputAcFnc,

                        numberofoutputs);

                inputLayer.setNextLayer(outputLayer);

            }

        }

    }
5.运行程序
代码如下:
package neuralnet;

import neuralnet.math.IActivationFunction;

import neuralnet.math.Linear;

import neuralnet.math.RandomNumberGenerator;

import neuralnet.math.Sigmoid;

public class NeuralNetConsoleTest {

    public static void main(String[] args){

        RandomNumberGenerator.seed=0;

        int numberOfInputs=2;

        int numberOfOutputs=1;

        int[] numberOfHiddenNeurons= { 3 };

        IActivationFunction[] hiddenAcFnc = { new Sigmoid(1.0) } ;

        Linear outputAcFnc = new Linear(1.0);

        System.out.println("Creating Neural Netword...");

        NeuralNet nn = new NeuralNet(numberOfInputs,numberOfOutputs,

                numberOfHiddenNeurons,hiddenAcFnc,outputAcFnc);

        System.out.println("Neural Network Network...");

        double [] neuralInput = { 1.5 , 0.5 };

        System.out.println("Feeding the values {1.5;0.5} to the neural network");

        double [] neuralOutput;

        nn.setInputs(neuralInput);

        nn.calc();

        neuralOutput=nn.getOutputs();

        System.out.println("OutPut 1:" + neuralOutput[0]);

        neuralInput[0] = 1.0;

        neuralInput[1] = 2.1;

        System.out.println("Feeding the values {1.0;2.1} to the neural network");

        nn.setInputs(neuralInput);

        nn.calc();

        neuralOutput=nn.getOutputs();

        System.out.println("OutPut 2:" + neuralOutput[0]);

    }

}
到此就完成了我们神经网络的全部代码:下面是源代码压缩包。有需要的同学可以下载运行。
手把手教你使用Java实现一个神经网络的更多相关文章
- 手把手教你用redis实现一个简单的mq消息队列(java)
众所周知,消息队列是应用系统中重要的组件,主要解决应用解耦,异步消息,流量削锋等问题,实现高性能,高可用,可伸缩和最终一致性架构.目前使用较多的消息队列有 ActiveMQ,RabbitMQ,Zero ...
- 手把手教你使用FineUI开发一个b/s结构的取送货管理信息系统系列博文索引
近阶段接到一些b/s类型的软件项目,但是团队成员之前大部分没有这方面的开发经验,于是自己选择了一套目前网上比较容易上手的开发框架(FineUI),计划录制一套视频讲座,来讲解如何利用FineUI快速开 ...
- 手把手教你用vue-cli构建一个简单的路由应用
上一章说道:十分钟上手-搭建vue开发环境(新手教程)https://www.jianshu.com/p/0c6678671635 开发环境搭建好之后,那么开始新添加一些页面,构建最基本的vue项目, ...
- 手把手教你使用 js 实现一个 Canvas 编辑器
手把手教你使用 js 实现一个 Canvas 编辑器 拖拽 缩放,等比缩放 导出 image 模版 撤销,重做 OOP,封装,继承,多态 发布库 CI/CD (gitlab/github) ... h ...
- 手把手教你从零写一个简单的 VUE
本系列是一个教程,下面贴下目录~1.手把手教你从零写一个简单的 VUE2.手把手教你从零写一个简单的 VUE--模板篇 今天给大家带来的是实现一个简单的类似 VUE 一样的前端框架,VUE 框架现在应 ...
- 手把手教你从零写一个简单的 VUE--模板篇
教程目录1.手把手教你从零写一个简单的 VUE2.手把手教你从零写一个简单的 VUE--模板篇 Hello,我又回来了,上一次的文章教会了大家如何书写一个简单 VUE,里面实现了VUE 的数据驱动视图 ...
- 【良心保姆级教程】java手把手教你用swing写一个学生的增删改查模块
很多刚入门的同学,不清楚如何用java.swing去开发出一个系统? 不清楚如何使用java代码去操作数据库进行增删改查一些列操作,不清楚java代码和数据库(mysql.sqlserver)之间怎么 ...
- 手把手一步一步教你使用Java开发一个大型街机动作闯关类游戏01游戏窗口
项目源码 项目源码 游戏配置信息类 Config.java 没什么解释的. package config; public class Config { public final static Stri ...
- Kaggle系列1:手把手教你用tensorflow建立卷积神经网络实现猫狗图像分类
去年研一的时候想做kaggle上的一道题目:猫狗分类,但是苦于对卷积神经网络一直没有很好的认识,现在把这篇文章的内容补上去.(部分代码参考网上的,我改变了卷积神经网络的网络结构,其实主要部分我加了一层 ...
随机推荐
- .netcore持续集成测试篇之 .net core 2.1项目集成测试
系列目录 从.net到.net core以后,微软非常努力,以每年一到两个大版本的频率在演进.net core,去年相继发布了.net core 2.1和2.2,其中2.1是长期支持版,不断的快速更新 ...
- .net测试篇之Moq框架简单使用
系列目录 Moq库简介及安装 Moq简介 Moq是.net平台下的一个非常流行的模拟库,只要有一个接口它就可以动态生成一个对象,底层使用的是Castle的动态代理功能. 它的流行赖于依赖注入模式的兴起 ...
- js-DOM中基础选择器的整理
DOM中基础选择器的整理 注意:DOM中选择器返回是数组类型的都是伪数组,只能拥有数组的索引以及length,数组的其他方法是不可以使用的! 一:DOM中的选择器 1.getElementById(i ...
- Unity进阶:行为树 02 夺旗战搭建场景,AI脚本,旗子拿起
版权申明: 本文原创首发于以下网站: 博客园『优梦创客』的空间:https://www.cnblogs.com/raymondking123 优梦创客的官方博客:https://91make.top ...
- Python3 完美解决unittest框架下不生成测试报告
前提: 1.运行测试用例一切正常,只是没有测试报告显示 2.使用命令行pyhon 脚本名字.py 却可以生成测试报告 3.pycharm 在运行测试用例的时候 默认是以unittest 框架来运行的, ...
- 记录一下vue transition 过渡各状态()
.slide-fade-enter{ opacity: 0; transform: translateX(100px); /*从哪里开始过渡:在过渡之前我就把位置定义在100px的位置,并 ...
- python 23 继承
目录 继承--inheritance 1. 面向对象继承: 2. 单继承 2.1 类名执行父类的属性.方法 2.2 子类对象执行父类的属性.方法 2.3 执行顺序 2.4 既要执行子类的方法,又要执行 ...
- python 10 动态参数
目录 1. 函数的动态参数 1.1 动态位置参数(*arges) 1.2 动态关键字参数 (**kwargs) 1.3 万能传参: 2. 函数的注释 3. 名称空间 4. 函数嵌套 5. 函数变量修改 ...
- Condition控制线程通信
Condition控制线程通信 一.前言 java.util.concurrent.locks.Condition 接口描述了可能会与锁有关联的条件变量.这些变量在用法上与使用Object.wait ...
- python3 统计类的实例个数
python3 统计类的实例个数 有时候我们可能想统计下类所创建的实例个数,代码如下: class Dog: # 定义一个狗类 count = 0 # 用于统计类所创建的实例个数 def __init ...