Openvswitch手册(2): OpenFlow Controller
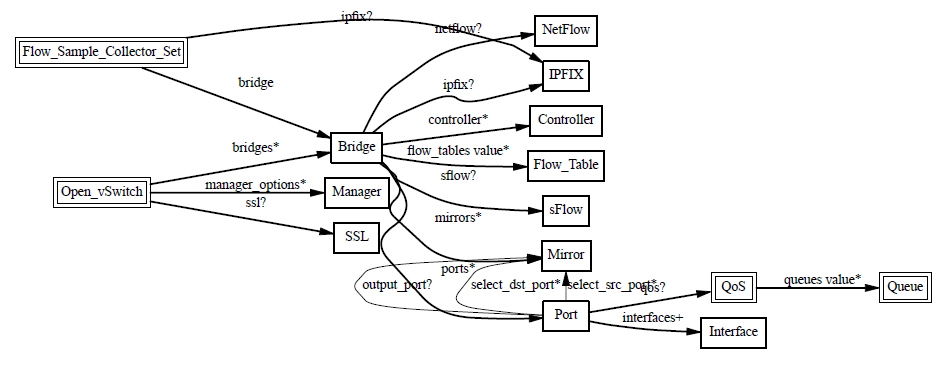
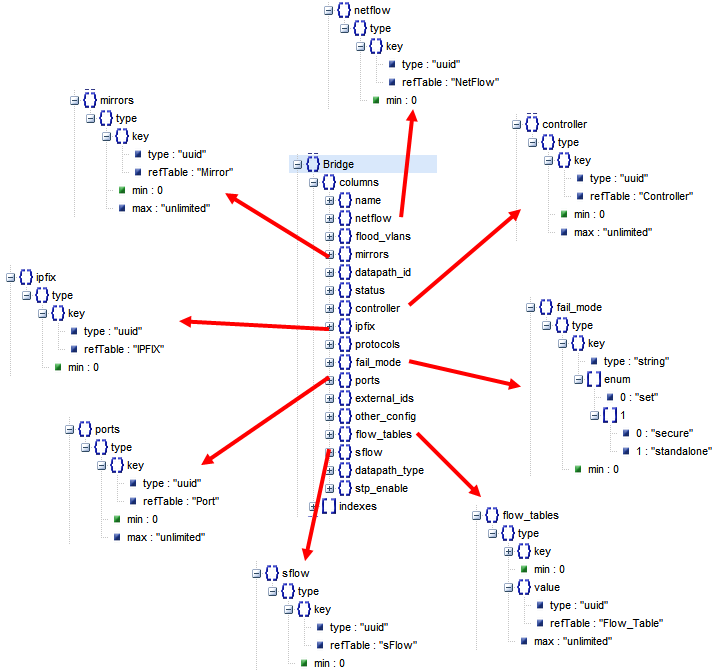
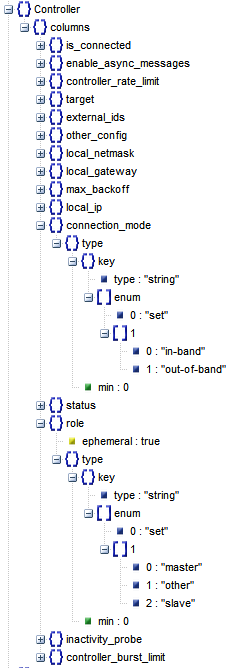
我们这一节主要来看Controller
Controller有两种:
- Primary Controller: 真正控制vswitch的flow table,vswitch会保持和controller的连接,如果失败,取决于bridge的fail mode。一个vswitch可以连接多个Controller,但是这些Controller之间的协作需要Controller自己来做。
- Service Controller:仅仅用于support,偶尔操作,maintain使用,如果connection断掉,bridge的fail mode不起作用。
使用floodlight作为controller

下面按照http://networkstatic.net/openflow-openvswitch-lab/
http://networkstatic.net/openflow-starter-tutorial-lab-1/
http://networkstatic.net/openflow-tutorial-lab-2/
http://networkstatic.net/openflow-tutorial-lab-3/
测试controller
创建一个image, qemu-img create -f qcow2 ./images/ubuntu-14.04.img 5G
按照ubuntu
sudo virt-install --virt-type kvm --name ubuntu-14.04 --ram 2048 --noreboot --disk path=/home/cliu8/images/ubuntu-14.04.img,format=qcow2,bus=virtio,device=disk --cdrom=/home/cliu8/images/ubuntu-14.04-server-amd64.iso --network network=default --graphics vnc,listen=0.0.0.0 –noautoconsole
$ ps aux | grep 0.0.0.0
libvirt+ 16500 0.5 0.4 4095256 319416 ? Sl Jun16 0:14 qemu-system-x86_64 -enable-kvm –name ubuntu-14.04 -S -machine pc-i440fx-trusty,accel=kvm,usb=off -m 2048 -realtime mlock=off -smp 1,sockets=1,cores=1,threads=1 -uuid 0f0806ab-531d-6134-5def-c5b495529285 -no-user-config -nodefaults -chardev socket,id=charmonitor,path=/var/lib/libvirt/qemu/Instance01.monitor,server,nowait -mon chardev=charmonitor,id=monitor,mode=control -rtc base=utc -no-shutdown -boot strict=on -device piix3-usb-uhci,id=usb,bus=pci.0,addr=0x1.0x2 -drive file=/home/cliu8/images/ubuntu-14.04.img,if=none,id=drive-virtio-disk0,format=qcow2 -device virtio-blk-pci,scsi=off,bus=pci.0,addr=0x4,drive=drive-virtio-disk0,id=virtio-disk0,bootindex=1 -netdev tap,fd=29,id=hostnet0,vhost=on,vhostfd=32 -device virtio-net-pci,netdev=hostnet0,id=net0,mac=52:54:00:9b:d5:bc,bus=pci.0,addr=0x3 -chardev pty,id=charserial0 -device isa-serial,chardev=charserial0,id=serial0 -vnc 0.0.0.0:7 -device cirrus-vga,id=video0,bus=pci.0,addr=0x2 -device virtio-balloon-pci,id=balloon0,bus=pci.0,addr=0x5
用VNC Client连接到机器,安装好ubuntu
$ sudo virsh dumpxml ubuntu-14.04
<domain type='kvm'>
<name>ubuntu-14.04</name>
<uuid>0f0806ab-531d-6134-5def-c5b495529284</uuid>
<memory unit='KiB'>2097152</memory>
<currentMemory unit='KiB'>2097152</currentMemory>
<vcpu placement='static'>1</vcpu>
<os>
<type arch='x86_64' machine='pc-i440fx-trusty'>hvm</type>
<boot dev='hd'/>
</os>
<features>
<acpi/>
<apic/>
<pae/>
</features>
<clock offset='utc'/>
<on_poweroff>destroy</on_poweroff>
<on_reboot>restart</on_reboot>
<on_crash>restart</on_crash>
<devices>
<emulator>/usr/bin/kvm-spice</emulator>
<disk type='file' device='disk'>
<driver name='qemu' type='qcow2'/>
<source file='/home/cliu8/images/ubuntu-14.04.img'/>
<target dev='vda' bus='virtio'/>
<address type='pci' domain='0x0000' bus='0x00' slot='0x04' function='0x0'/>
</disk>
<disk type='block' device='cdrom'>
<driver name='qemu' type='raw'/>
<target dev='hdc' bus='ide'/>
<readonly/>
<address type='drive' controller='0' bus='1' target='0' unit='0'/>
</disk>
<controller type='usb' index='0'>
<address type='pci' domain='0x0000' bus='0x00' slot='0x01' function='0x2'/>
</controller>
<controller type='pci' index='0' model='pci-root'/>
<controller type='ide' index='0'>
<address type='pci' domain='0x0000' bus='0x00' slot='0x01' function='0x1'/>
</controller>
<interface type='network'>
<mac address='52:54:00:9b:d5:bb'/>
<source network='default'/>
<model type='rtl8139'/>
<address type='pci' domain='0x0000' bus='0x00' slot='0x03' function='0x0'/>
</interface>
<serial type='pty'>
<target port='0'/>
</serial>
<console type='pty'>
<target type='serial' port='0'/>
</console>
<input type='mouse' bus='ps2'/>
<input type='keyboard' bus='ps2'/>
<graphics type='vnc' port='-1' autoport='yes' listen='0.0.0.0'>
<listen type='address' address='0.0.0.0'/>
</graphics>
<video>
<model type='cirrus' vram='9216' heads='1'/>
<address type='pci' domain='0x0000' bus='0x00' slot='0x02' function='0x0'/>
</video>
<memballoon model='virtio'>
<address type='pci' domain='0x0000' bus='0x00' slot='0x05' function='0x0'/>
</memballoon>
</devices>
</domain>
我们并不在这台机器上直接操作,因为我们要保存一个原生的ubuntu
创建三个instance:
qemu-img create -f qcow2 -o backing_file=./ubuntu-14.04.img ./instance01.img
$ cat images/instance01.xml
<domain type='kvm'>
<name>Instance01</name>
<uuid>0f0806ab-531d-6134-5def-c5b495529285</uuid>
<memory unit='KiB'>2097152</memory>
<currentMemory unit='KiB'>2097152</currentMemory>
<vcpu placement='static'>1</vcpu>
<os>
<type arch='x86_64' machine='pc-i440fx-trusty'>hvm</type>
<boot dev='hd'/>
</os>
<features>
<acpi/>
<apic/>
<pae/>
</features>
<clock offset='utc'/>
<on_poweroff>destroy</on_poweroff>
<on_reboot>restart</on_reboot>
<on_crash>restart</on_crash>
<devices>
<emulator>/usr/bin/kvm-spice</emulator>
<disk type='file' device='disk'>
<driver name='qemu' type='qcow2'/>
<source file='/home/cliu8/images/instance01.img'/>
<target dev='vda' bus='virtio'/>
<address type='pci' domain='0x0000' bus='0x00' slot='0x04' function='0x0'/>
</disk>
<controller type='usb' index='0'>
<address type='pci' domain='0x0000' bus='0x00' slot='0x01' function='0x2'/>
</controller>
<controller type='pci' index='0' model='pci-root'/>
<controller type='ide' index='0'>
<address type='pci' domain='0x0000' bus='0x00' slot='0x01' function='0x1'/>
</controller>
<interface type='bridge'>
<mac address='52:54:00:9b:d5:bc'/>
<source bridge='helloworld'/>
<virtualport type='openvswitch' />
<model type='virtio'/>
</interface>
<serial type='pty'>
<target port='0'/>
</serial>
<console type='pty'>
<target type='serial' port='0'/>
</console>
<input type='mouse' bus='ps2'/>
<input type='keyboard' bus='ps2'/>
<graphics type='vnc' port='-1' autoport='yes' listen='0.0.0.0'>
<listen type='address' address='0.0.0.0'/>
</graphics>
<video>
<model type='cirrus' vram='9216' heads='1'/>
<address type='pci' domain='0x0000' bus='0x00' slot='0x02' function='0x0'/>
</video>
<memballoon model='virtio'>
<address type='pci' domain='0x0000' bus='0x00' slot='0x05' function='0x0'/>
</memballoon>
</devices>
</domain>
创建一个bridge:
sudo ovs-vsctl add-br helloworld
在另外一台机器上16.158.165.102安装floodlight
apt-get install git
git clone git://github.com/floodlight/floodlight.git
如果有proxy
apt-get install socat
$ cat /usr/bin/gitproxy
#!/bin/bash
PROXY=web-proxy.corp.hp.com
PROXYPORT=8080
#PROXYAUTH=username:password
exec socat STDIO PROXY:$PROXY:$1:$2,proxyport=$PROXYPORT
chmod +x /usr/bin/gitproxy
git config --global core.gitproxy gitproxy
然后再git clone git://github.com/floodlight/floodlight.git
cd floodlight/
apt-get install ant
apt-get install openjdk-7-jdk
nohup java -jar target/floodlight.jar > floodlight.log 2>&1 &
将bridge连接到controller
sudo ovs-vsctl set-controller helloworld tcp:16.158.165.102:6633
$ sudo ovs-vsctl show
c24322e6-8453-402a-afaf-64757ef231e9
Bridge helloworld
Controller "tcp:16.158.165.102:6633"
is_connected: true
Port "vnet8"
Interface "vnet8"
Port "vnet10"
Interface "vnet10"
Port helloworld
Interface helloworld
type: internal
Port "vnet9"
Interface "vnet9"
ovs_version: "2.0.1"
登陆http://16.158.165.102:8080/ui/index.html
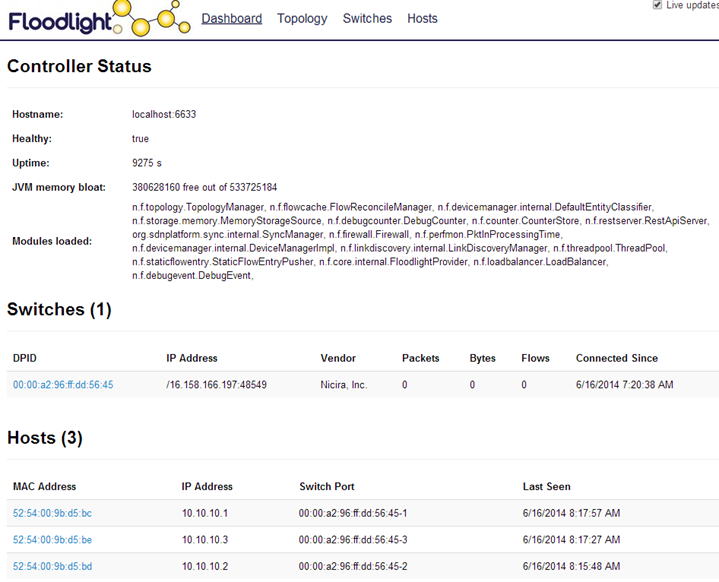
当前的拓扑结构如下:
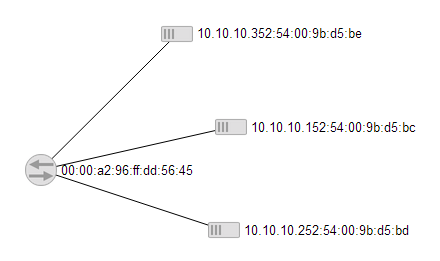
下面我们只允许10.10.10.1和10.10.10.3相互ping
$ curl -d '{"switch": "00:00:a2:96:ff:dd:56:45", "name":"static-flow1", "cookie":"0", "priority":"32768", "src-mac":"52:54:00:9b:d5:bc","active":"true", "actions":"output=3"}' http://16.158.165.102:8080/wm/staticflowentrypusher/json
{"status" : "Entry pushed"}
$ curl -d '{"switch": "00:00:a2:96:ff:dd:56:45", "name":"static-flow2", "cookie":"0", "priority":"32768", "src-mac":"52:54:00:9b:d5:be","active":"true", "actions":"output=1"}' http://16.158.165.102:8080/wm/staticflowentrypusher/json
{"status" : "Entry pushed"}
我们来验证效果
$ sudo ovs-ofctl dump-flows helloworld
NXST_FLOW reply (xid=0x4):
cookie=0xa00000d7014f7f, duration=873.78s, table=0, n_packets=57, n_bytes=10922, idle_age=170, hard_age=778, dl_src=52:54:00:9b:d5:bc actions=output:3
cookie=0xa00000d7014f80, duration=855.454s, table=0, n_packets=78, n_bytes=19004, idle_age=29, dl_src=52:54:00:9b:d5:be actions=output:1
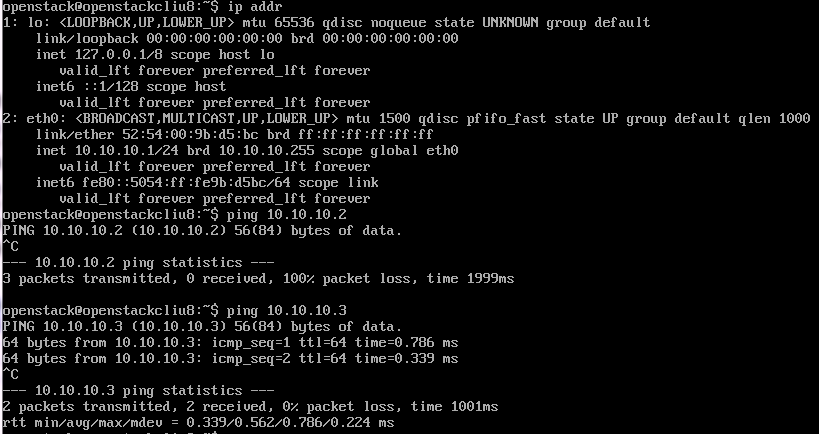
从10.10.10.1 ping其他机器
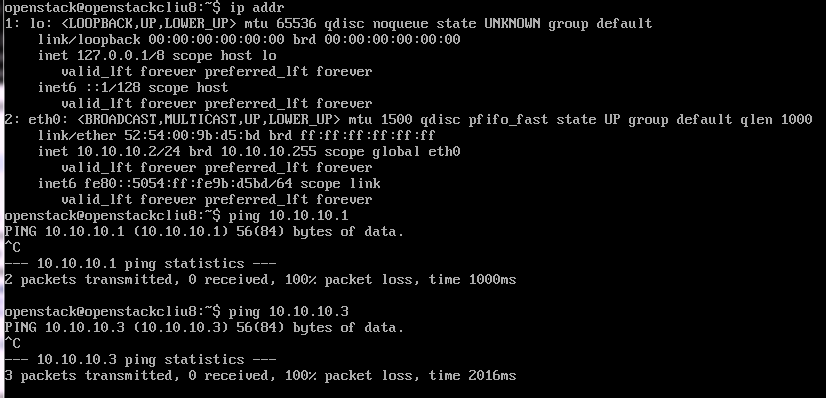
从10.10.10.2 ping其他机器
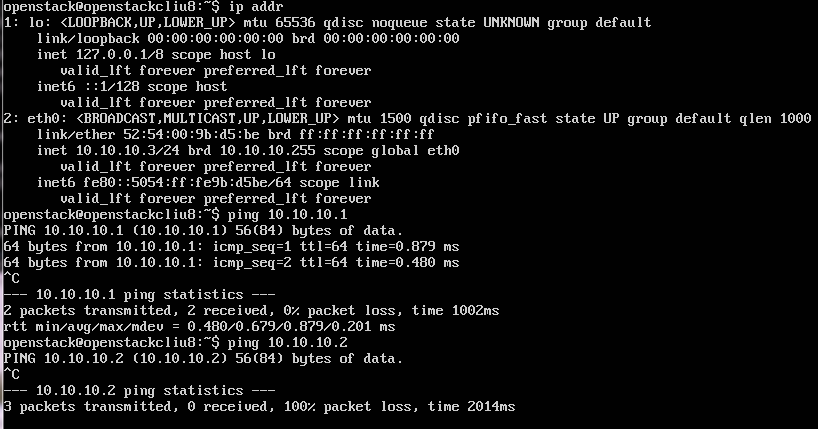
从10.10.10.3 ping其他机器
我们进行下一个实验
将flow table clear掉
curl http://16.158.165.102:8080/wm/staticflowentrypusher/clear/00:00:a2:96:ff:dd:56:45/json
然后我们讲正确的mac导向正确的port
curl -d '{"switch": "00:00:a2:96:ff:dd:56:45", "name":"static-flow1", "cookie":"0", "priority":"32768", "dst-mac":"52:54:00:9b:d5:bc","active":"true", "actions":"output=1"}' http://16.158.165.102:8080/wm/staticflowentrypusher/json
curl -d '{"switch": "00:00:a2:96:ff:dd:56:45", "name":"static-flow2", "cookie":"0", "priority":"32768", "dst-mac":"52:54:00:9b:d5:bd","active":"true", "actions":"output=2"}' http://16.158.165.102:8080/wm/staticflowentrypusher/json
curl -d '{"switch": "00:00:a2:96:ff:dd:56:45", "name":"static-flow3", "cookie":"0", "priority":"32768", "dst-mac":"52:54:00:9b:d5:be","active":"true", "actions":"output=3"}' http://16.158.165.102:8080/wm/staticflowentrypusher/json
这个时候互相的ping的通的
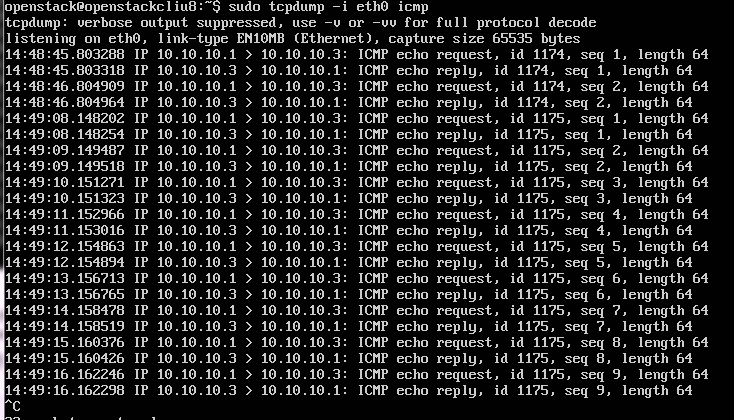
下面我们将导向port3的导向port2,并同时tcpdump在10.10.10.2和10.10.10.3两台机器上。
在机器10.10.10.1上ping 10.10.10.3
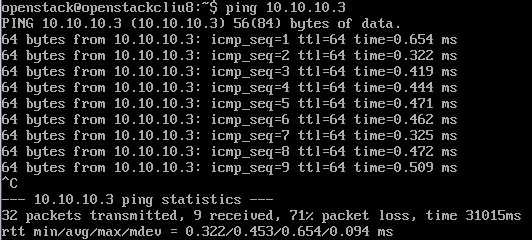
一开始10.10.10.3能收到并且恢复
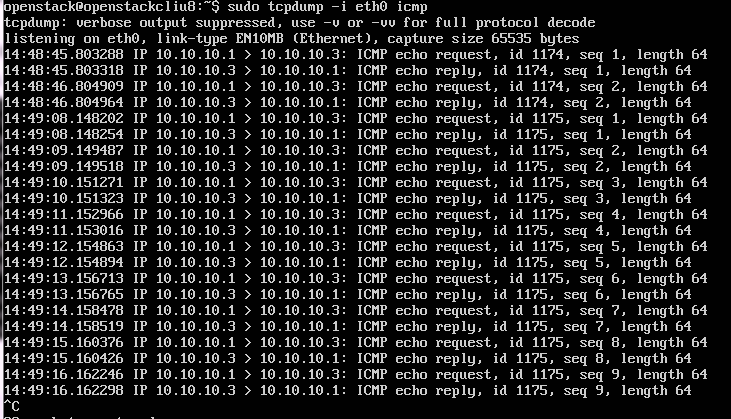
后来我们改变了规则
curl -d '{"switch": "00:00:a2:96:ff:dd:56:45", "name":"static-flow3", "cookie":"0", "priority":"32768", "dst-mac":"52:54:00:9b:d5:be","active":"true", "actions":"output=2"}' http://16.158.165.102:8080/wm/staticflowentrypusher/json
10.10.10.2开始能够收到ping,但是无法恢复
Openvswitch手册(2): OpenFlow Controller的更多相关文章
- Openvswitch手册(1): 架构,SSL, Manager, Bridge
Openvswitch是一个virutal swtich, 支持Open Flow协议,当然也有一些硬件Switch也支持Open Flow协议,他们都可以被统一的Controller管理,从而实现物 ...
- Openvswitch手册(9): Flow
这一节我们将flow table flow table主要由ovs-ofctl命令操作 ovs-ofctl可以走和openflow controller一样的协议: ssl:ip[:port]: Th ...
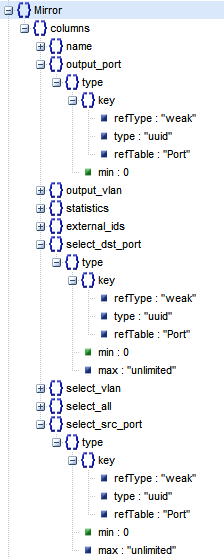
- Openvswitch手册(4): Mirror
这一节我们来分析Mirror Mirror就是配置一个bridge,将某些包发给指定的mirrored ports 对于包的选择: select_all,所有的包 select_dst_port se ...
- Openvswitch手册(6): QoS
这一节我们看QoS,Qos的设置往往是和flow中的policy一起使用的 Open vSwitch QoS capabilities 1 Interface rate limiting 2 Port ...
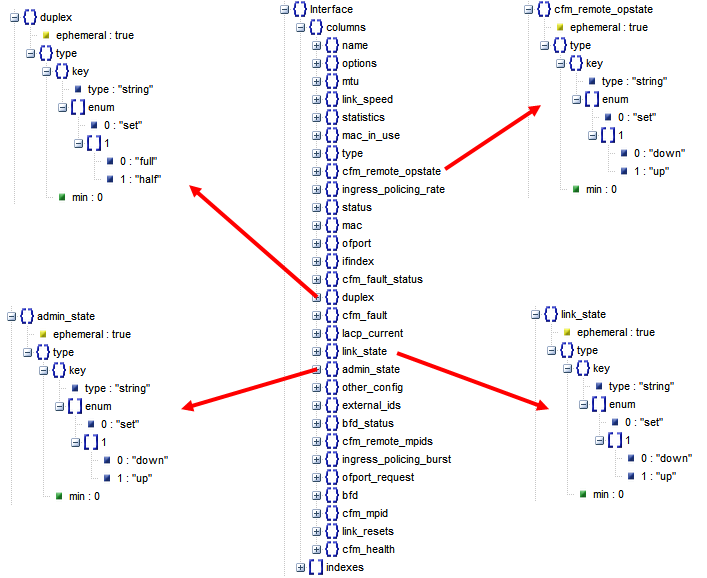
- Openvswitch手册(7): Interfaces
我们来看Interfaces ofport: OpenFlow port number for this interface. type: system: An ordinary network de ...
- Openvswitch手册(8): ovs-vsctl的DB的操作
ovs-vsctl的DB的操作 如果你在命令行里面找不到相应的命令创建和删除对象,则可以直接删除数据库 [−−if−exists] [−−columns=column[,column]...] lis ...
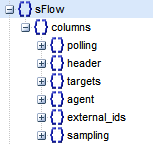
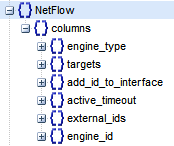
- Openvswitch手册(3): sFlow, netFlow
这一节,我们重点看sFlow 采样流sFlow(Sampled Flow)是一种基于报文采样的网络流量监控技术,主要用于对网络流量进行统计分析. sFlow系统包含一个嵌入在设备中的sFlow Age ...
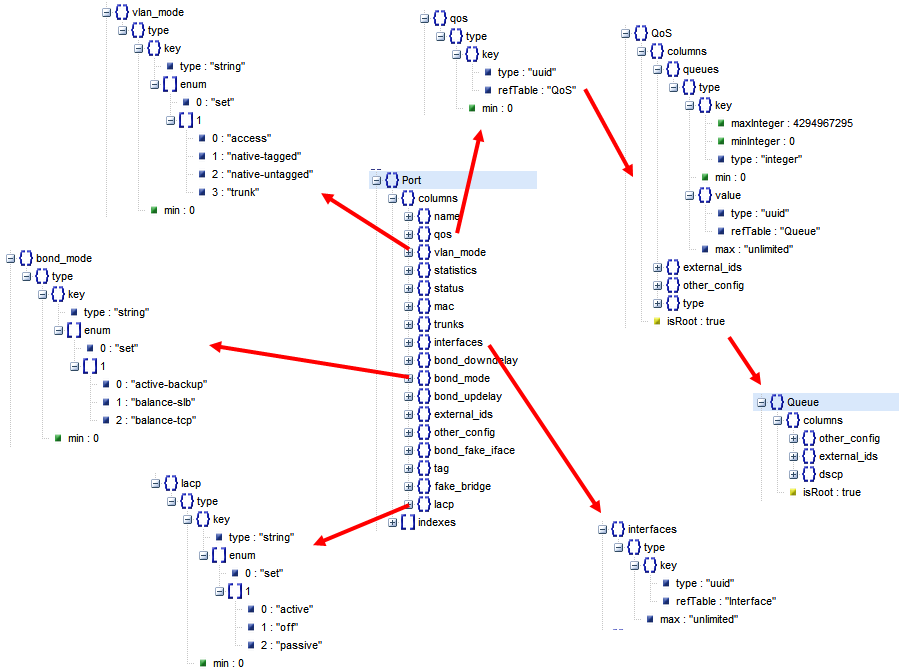
- Openvswitch手册(5): VLAN and Bonding
我们这一节来看Port 一般来说一个Port就是一个Interface,当然也有一个Port对应多个Interface的情况,成为Bond VLAN Configuration Port的一个重要的方 ...
- OpenvSwitch/OpenFlow 架构解析与实践案例
目录 文章目录 目录 前言 软件定义网络(SDN) 虚拟交换机(vSwitch) 为什么说云计算时代的 SDN 非常重要 OpenFlow 简介 Open vSwitch Open vSwitch 的 ...
随机推荐
- PRD是什么
产品需求文档(Product Requirement Document,PRD)的英文简称.是将商业需求文档(BRD)和市场需求文档(MRD)用更加专业的语言进行描述
- vscode 好用插件
1.查询文件路径../../有提示: Path Intellisense 2.require 时的包提示(最新版的vscode已经集成此功能) : Npm Intellisense 3.自动帮你完成 ...
- 在vscode中使用eslint
一.vs中安装eslint插件 二.npm 全局安装 eslint sudo npm i -g eslint 三.vs终端运行eslint --init 四.在vscode的setting中设置 ...
- spring-boot的Hello World案例,最简单的spring-boot项目
Spring Boot HelloWorld 一个功能: 浏览器发送hello请求,服务器接收请求并处理,响应Hello World字符串. 1.创建一个maven项目 2.导入依赖spring-bo ...
- 分布式ID方案有哪些以及各自的优劣势,我们当如何选择
作者介绍 段同海,就职于达达基础架构团队,主要参与达达分布式ID生成系统,日志采集系统等中间件研发工作. 背景 在分布式系统中,经常需要对大量的数据.消息.http请求等进行唯一标识,例如:在分布式系 ...
- centos-1 nginx
常用命令 su #切换用户mkdir flodr #创建目录rm -r flodr #删除文件/目录,有提示rm -rf flodr #删除文件/目录,无提示pwd #查看当前路径 防火墙设置 ht ...
- 干货 | 10分钟玩转PWA
关于PWA PWA(Progressive Web App), 即渐进式web应用.PWA本质上是web应用,目的是通过多项新技术,在安全.性能.体验等方面给用户原生应用的体验.而且无需像原生应用那样 ...
- zookeeper测试代码
package com.sjt.test; import java.util.List; import java.util.concurrent.CountDownLatch; import org. ...
- [ES]elasticsearch章5 ES的分词(二)
Elasticsearch 中文搜索时遇到几个问题: 当搜索关键词如:“人民币”时,如果分词将“人民币”分成“人”,“民”,“币”三个单字,那么搜索该关键词会匹配到很多包含该单字的无关内容,但是如果将 ...
- 《修炼之道:.NET开发要点精讲》读书笔记(二)
1.简述.NET中CTS.CLS以及CLR的含义与作用. A:CTS指公共类型系统,是.NET平台中各种语言必须遵守的类型规范:CLS指公共语言规范,是.NET平台中各种语言必须遵守的语言规范:CLR ...