Openvswitch手册(4): Mirror


这一节我们来分析Mirror
Mirror就是配置一个bridge,将某些包发给指定的mirrored ports
对于包的选择:
- select_all,所有的包
- select_dst_port
- select_src_port
- select_vlan
对于指定的目的:
- output_port (SPAN)
- output_vlan (RSPAN)
Port mirroring on a Cisco Systems switch is generally referred to as Switched Port ANalyzer (SPAN) or Remote Switched Port ANalyzer (RSPAN)
(1) Configure Mirroring
root@XorPlus# ovs-vsctl --db=tcp:10.10.50.215:6633 -- set bridge br0 mirrors=@m -- --id=@te-1/1/1 get Port te-1/1/1 -- --id=@te-1/1/2 get Port te-1/1/2 -- --id=@te-1/1/3 get Port te-1/1/3 -- --id=@m create Mirror name=mymirror select-dst-port=@te-1/1/1,@te-1/1/2 select-src-port=@te-1/1/1,@te-1/1/2 output-port=@te-1/1/3 root@XorPlus#
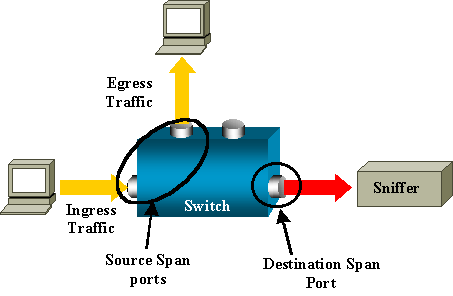
In above configuration, user configure the te-1/1/1, te-1/1/2 and te-1/1/3 in the mirroring, in which the source port are te-1/1/1 and te-1/1/2 (including the ingress and egress), the output port (monitor port) is te-1/1/3.
The “select-dst-port” means some packet (in switch chip) will go-out from the specified port (egress).
The “select-src-port” means some packet enter the specified port (ingress).
(2) Delete the Mirroring
root@XorPlus# ovs-vsctl --db=tcp:10.10.50.215:6633 -- remove bridge br0 mirrors mymirror
- Ingress traffic-Traffic that enters the switch.
- Egress traffic-Traffic that leaves the switch.
- Source (SPAN) port -A port that is monitored with use of the SPAN feature.
- Source (SPAN) VLAN -A VLAN whose traffic is monitored with use of the SPAN feature.
- Destination (SPAN) port -A port that monitors source ports, usually where a network analyzer is connected.
- Reflector Port -A port that copies packets onto an RSPAN VLAN.
- Local SPAN-The SPAN feature is local when the monitored ports are all located on the same switch as the destination port.
- Remote SPAN (RSPAN)-Some source ports are not located on the same switch as the destination port. RSPAN is an advanced feature that requires a special VLAN to carry the traffic that is monitored by SPAN between switches.
- Port-based SPAN (PSPAN)-The user specifies one or several source ports on the switch and one destination port.
- VLAN-based SPAN (VSPAN)-On a particular switch, the user can choose to monitor all the ports that belong to a particular VLAN in a single command.
RSPAN allows you to monitor source ports that are spread all over a switched network, not only locally on a switch with SPAN.
The functionality works exactly as a regular SPAN session. The traffic that is monitored by SPAN is not directly copied to the destination port, but flooded into a special RSPAN VLAN. The destination port can then be located anywhere in this RSPAN VLAN. There can even be several destination ports.
These are a few remarks on this design:
- S1 is called a source switch. Packets only enter the RSPAN VLAN in switches that are configured as RSPAN source. Currently, a switch can only be the source for one RSPAN session, which means that a source switch can only feed one RSPAN VLAN at a time.
- S2 and S3 are intermediate switches. They are not RSPAN sources and do not have destination ports. A switch can be intermediate for any number of RSPAN sessions.
- S4 and S5 are destination switches. Some of their ports are configured to be destination for an RSPAN session.
- You can see that RSPAN packets are flooded into the RSPAN VLAN. Even switches that are not on the path to a destination port, such as S2, receive the traffic for the RSPAN VLAN. You can find it useful to prune this VLAN on such S1-S2 links.
- In order to achieve the flooding, learning is disabled on the RSPAN VLAN.
- In order to prevent loops, the STP has been maintained on the RSPAN VLAN. Therefore, RSPAN cannot monitor Bridge Protocol Data Units (BPDUs).
我们先来测试SPAN
我们按照下面的拓扑结构创建vswitch

$ sudo ovs-vsctl add-port helloworld first_br
$ sudo ovs-vsctl add-port helloworld second_br -- set Port second_br tag=110
$ sudo ovs-vsctl add-br helloworld1
$ sudo ovs-vsctl add-port helloworld1 second_if -- set Port second_if tag=110
$ sudo ovs-vsctl add-port helloworld1 third_br -- set Port third_br tag=110
$ sudo ovs-vsctl show
c24322e6-8453-402a-afaf-64757ef231e9
Bridge helloworld
Controller "tcp:16.158.165.102:6633"
is_connected: true
Port "vnet8"
Interface "vnet8"
Port first_br
Interface first_br
Port second_br
tag: 110
Interface second_br
Port "vnet10"
Interface "vnet10"
Port helloworld
Interface helloworld
type: internal
Port "vnet9"
Interface "vnet9"
Bridge "helloworld1"
Port second_if
tag: 110
Interface second_if
Port "helloworld1"
Interface "helloworld1"
type: internal
Port third_br
tag: 110
Interface third_br
ovs_version: "2.0.1"
然后我们在first_br上面mirror所有进出vnet8的包
$ sudo ovs-vsctl -- set bridge helloworld mirrors=@m -- --id=@vnet8 get Port vnet8 -- --id=@first_br get Port first_br -- --id=@m create Mirror name=mirrorvnet8 select-dst-port=@vnet8 select-src-port=@vnet8 output-port=@first_br
19ed2f51-3245-4d5b-8e6c-67ccbb7c7ebd
这时候我们监听first_if,并且从instance01里面ping 10.10.10.3,可以看到下面的效果
$ sudo tcpdump -n -i first_if icmp
tcpdump: WARNING: first_if: no IPv4 address assigned
tcpdump: verbose output suppressed, use -v or -vv for full protocol decode
listening on first_if, link-type EN10MB (Ethernet), capture size 65535 bytes
23:58:02.310198 IP 10.10.10.1 > 10.10.10.3: ICMP echo request, id 3200, seq 1, length 64
23:58:02.312447 IP 10.10.10.1 > 10.10.10.3: ICMP echo request, id 3200, seq 1, length 64
23:58:02.314314 IP 10.10.10.3 > 10.10.10.1: ICMP echo reply, id 3200, seq 1, length 64
23:58:03.311894 IP 10.10.10.1 > 10.10.10.3: ICMP echo request, id 3200, seq 2, length 64
23:58:03.312266 IP 10.10.10.3 > 10.10.10.1: ICMP echo reply, id 3200, seq 2, length 64
23:58:04.313522 IP 10.10.10.1 > 10.10.10.3: ICMP echo request, id 3200, seq 3, length 64
23:58:04.313739 IP 10.10.10.3 > 10.10.10.1: ICMP echo reply, id 3200, seq 3, length 64
23:58:05.314827 IP 10.10.10.1 > 10.10.10.3: ICMP echo request, id 3200, seq 4, length 64
23:58:05.314979 IP 10.10.10.3 > 10.10.10.1: ICMP echo reply, id 3200, seq 4, length 64
23:58:06.316870 IP 10.10.10.1 > 10.10.10.3: ICMP echo request, id 3200, seq 5, length 64
23:58:06.317156 IP 10.10.10.3 > 10.10.10.1: ICMP echo reply, id 3200, seq 5, length 64
23:58:07.318242 IP 10.10.10.1 > 10.10.10.3: ICMP echo request, id 3200, seq 6, length 64
23:58:07.318481 IP 10.10.10.3 > 10.10.10.1: ICMP echo reply, id 3200, seq 6, length 64
23:58:08.319579 IP 10.10.10.1 > 10.10.10.3: ICMP echo request, id 3200, seq 7, length 64
23:58:08.319802 IP 10.10.10.3 > 10.10.10.1: ICMP echo reply, id 3200, seq 7, length 64
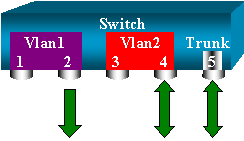
然后我们来配置RSPAN
我们对进入vnet9的所有进出包,然而ouput到一个vlan 110
$ sudo ovs-vsctl -- set bridge helloworld mirrors=@m -- --id=@vnet9 get Port vnet9 -- --id=@m create Mirror name=mirrorvnet9 select-dst-port=@vnet9 select-src-port=@vnet9 output-vlan=110
cb361fa2-914d-494b-94ef-c625d194247c
在helloworld1中也要配置从110来的,都output到vlan 110
$ sudo ovs-vsctl -- set bridge helloworld1 mirrors=@m -- --id=@m create Mirror name=mirrorvlan select-vlan=110 output-vlan=110
cef13445-c6ea-45e7-bb9d-1a267b24c91c
disable mac address learning for vlan 110
$ sudo ovs-vsctl set bridge helloworld flood-vlans=110
$ sudo ovs-vsctl set bridge helloworld1 flood-vlans=110
这时候我们监听third_if,并且从instance02里面ping 10.10.10.3,可以看到下面的效果
$ sudo tcpdump -n -i third_if icmp
tcpdump: WARNING: third_if: no IPv4 address assigned
tcpdump: verbose output suppressed, use -v or -vv for full protocol decode
listening on third_if, link-type EN10MB (Ethernet), capture size 65535 bytes
00:24:38.089192 IP 10.10.10.2 > 10.10.10.3: ICMP echo request, id 2999, seq 1, length 64
00:24:38.090844 IP 10.10.10.2 > 10.10.10.3: ICMP echo request, id 2999, seq 1, length 64
00:24:38.093228 IP 10.10.10.3 > 10.10.10.2: ICMP echo reply, id 2999, seq 1, length 64
00:24:39.090506 IP 10.10.10.2 > 10.10.10.3: ICMP echo request, id 2999, seq 2, length 64
00:24:39.091024 IP 10.10.10.3 > 10.10.10.2: ICMP echo reply, id 2999, seq 2, length 64
00:24:40.091945 IP 10.10.10.2 > 10.10.10.3: ICMP echo request, id 2999, seq 3, length 64
00:24:40.092202 IP 10.10.10.3 > 10.10.10.2: ICMP echo reply, id 2999, seq 3, length 64
00:24:41.093826 IP 10.10.10.2 > 10.10.10.3: ICMP echo request, id 2999, seq 4, length 64
00:24:41.093917 IP 10.10.10.3 > 10.10.10.2: ICMP echo reply, id 2999, seq 4, length 64
00:24:42.095681 IP 10.10.10.2 > 10.10.10.3: ICMP echo request, id 2999, seq 5, length 64
00:24:42.095915 IP 10.10.10.3 > 10.10.10.2: ICMP echo reply, id 2999, seq 5, length 64
00:24:43.097414 IP 10.10.10.2 > 10.10.10.3: ICMP echo request, id 2999, seq 6, length 64
00:24:43.097586 IP 10.10.10.3 > 10.10.10.2: ICMP echo reply, id 2999, seq 6, length 64
Openvswitch手册(4): Mirror的更多相关文章
- Openvswitch手册(1): 架构,SSL, Manager, Bridge
Openvswitch是一个virutal swtich, 支持Open Flow协议,当然也有一些硬件Switch也支持Open Flow协议,他们都可以被统一的Controller管理,从而实现物 ...
- Openvswitch手册(2): OpenFlow Controller
我们这一节主要来看Controller Controller有两种: Primary Controller: 真正控制vswitch的flow table,vswitch会保持和contro ...
- Openvswitch手册(5): VLAN and Bonding
我们这一节来看Port 一般来说一个Port就是一个Interface,当然也有一个Port对应多个Interface的情况,成为Bond VLAN Configuration Port的一个重要的方 ...
- Openvswitch手册(3): sFlow, netFlow
这一节,我们重点看sFlow 采样流sFlow(Sampled Flow)是一种基于报文采样的网络流量监控技术,主要用于对网络流量进行统计分析. sFlow系统包含一个嵌入在设备中的sFlow Age ...
- Openvswitch手册(6): QoS
这一节我们看QoS,Qos的设置往往是和flow中的policy一起使用的 Open vSwitch QoS capabilities 1 Interface rate limiting 2 Port ...
- Openvswitch手册(7): Interfaces
我们来看Interfaces ofport: OpenFlow port number for this interface. type: system: An ordinary network de ...
- Openvswitch手册(8): ovs-vsctl的DB的操作
ovs-vsctl的DB的操作 如果你在命令行里面找不到相应的命令创建和删除对象,则可以直接删除数据库 [−−if−exists] [−−columns=column[,column]...] lis ...
- Openvswitch手册(9): Flow
这一节我们将flow table flow table主要由ovs-ofctl命令操作 ovs-ofctl可以走和openflow controller一样的协议: ssl:ip[:port]: Th ...
- Ceph相关博客、网站(256篇OpenStack博客)
官网文档: http://docs.ceph.com/docs/master/cephfs/ http://docs.ceph.com/docs/master/cephfs/createfs/ ( ...
随机推荐
- 执行python文件报错SyntaxError: Non-ASCII character '\xe8' in file, but no encoding declared
在文件头部加上: # -*- coding: utf-8 -*
- python字符串之format格式化函数
学习中~ 觉得应该系统地学习一下python,今天学习了字符串,以下是自己的笔记. 首先说一下format函数,用{}和:代替了%,比如: >>>“{} {} {}”.format( ...
- IDEA cannot resolve symbol “xxxx”
有缓存 多试两次就可以了. 技术交流群:816227112
- 查找linux下进程占用CPU过高的原因,以php-fpm为例
很多时候,线上服务器的进程在某时间段内长时间占用CPU过高,为了优化,我们需要找出原因. 1.找出占用CPU最高的10个进程 ps aux | sort -k3nr | head -n 10 或查看占 ...
- MySQL 的几种进入方式
对于码农一族来说,新入手电脑后,工具安装,环境搭建是为必备功课.环境搭不好工具装不全,后续的工作开展那就会有相当多的痛点,也会耗去相当多的时间和精力.近日,博主在安装 Mysql 数据库的过程中,一番 ...
- JavaSE基础知识(5)—面向对象(5.4面向对象三大特征:封装、继承、多态)
面向对象编程具有三大特征: 封装 继承 多态 一.封装 1.好处 狭义的封装:也就是属性的封装,避免了任意赋值的危险,提高了数据的安全性! ①隐藏一个类中不需要对外提供的实现细节 ②使用者只能通过实现 ...
- server 打开失败
server:An unexpected exception was thrown. 当server服务器遇到这样遇到不能料想的错误导致打开失败的情况下,我们可以找到一个com.genuitec.ec ...
- Security.ssl-pinning
SSL Pinning 1. What's SSL Pinning? "SSL Pinning is making sure the client checks the server’s c ...
- OO课程第三次总结QWQ
调研,然后总结介绍规格化设计的大致发展历史和为什么得到了人们的重视 emmm为这个问题翻遍百度谷歌知乎也没有得到答案,那我就把自己认为最重要的两点简要说明一下吧,欢迎大家补充~ 1.便于完成代码的重用 ...
- SSL及使用openssl实现CA
TLS如何实现各种功能?数据如何加密在网络上传输? 网景(Netscape)公司在应用层和传输层加入了半层,把这个半层称之为SSL,SSL不是软件,可以理解是一个库,当http交给tcp层之前先通过s ...