Android基础控件TextClock和Chronometer的使用
1、简介
DigitalClock, TextClock,AnalogClock,Chronometer其中DigitalClock和AnalogClock废弃了!
TextClock是在Android 4.2(API 17)后推出的用来替代DigitalClock的一个控件!
android:format12Hour //设置12时制的格式

android:format24Hour //设置24时制的格式

android:timeZone    //设置时区
    <TextClock

        android:layout_width="wrap_content"

        android:layout_height="wrap_content"

        android:format12Hour="MM/dd/yy h:mmaa"/>

        android:format12Hour="MMM dd, yyyy h:mmaa"

        android:format12Hour="MMMM dd, yyyy h:mmaa"

        android:format12Hour="E, MMMM dd, yyyy h:mmaa"

        android:format12Hour="EEEE, MMMM dd, yyyy h:mmaa"

        android:format12Hour="Noteworthy day: M/d/yy"
Chronometer作为一个计时器。用来记录用户进行某项操作所消耗的时间!
   long getBase(); //返回基地的时间,

   String getFormat();//返回当前字符串格式

   void setBase(long base);//设置时间,计数定时器指定的值

   void setFormat(String format);//设置显示的内容
2、简单使用
布局的xml文件:
<LinearLayout xmlns:android="http://schemas.android.com/apk/res/android"
xmlns:tools="http://schemas.android.com/tools"
android:layout_width="match_parent"
android:layout_height="match_parent"
android:gravity="center"
android:orientation="vertical"
tools:context=".LoginActivity">
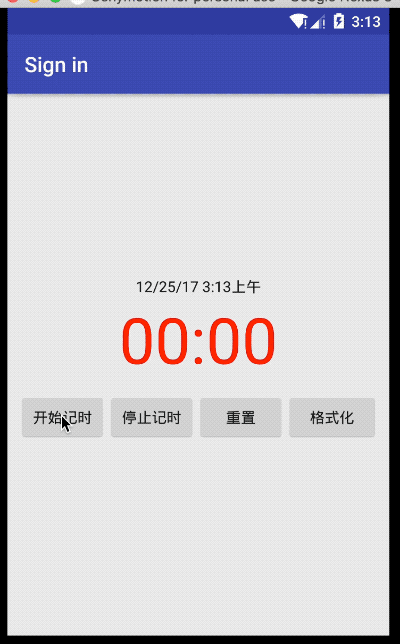
<TextClock
android:layout_width="wrap_content"
android:layout_height="wrap_content"
android:format12Hour="MM/dd/yy h:mmaa"/>
<Chronometer
android:layout_width="match_parent"
android:layout_height="wrap_content"
android:id="@+id/chronometer"
android:gravity="center"
android:textColor="@color/text_color_select"
android:textSize="60dip"/>
<LinearLayout
android:layout_width="match_parent"
android:layout_height="wrap_content"
android:layout_margin="10dip"
android:orientation="horizontal"> <Button
android:id="@+id/btnStart"
android:layout_width="match_parent"
android:layout_height="wrap_content"
android:layout_weight="1"
android:text="开始记时" /> <Button
android:id="@+id/btnStop"
android:layout_width="match_parent"
android:layout_height="wrap_content"
android:layout_weight="1"
android:text="停止记时" /> <Button
android:id="@+id/btnReset"
android:layout_width="match_parent"
android:layout_height="wrap_content"
android:layout_weight="1"
android:text="重置" /> <Button
android:id="@+id/btn_format"
android:layout_width="wrap_content"
android:layout_height="wrap_content"
android:text="格式化" />
</LinearLayout> </LinearLayout>
Java文件:
public class LoginActivity extends AppCompatActivity implements  View.OnClickListener,Chronometer.OnChronometerTickListener{

    private Chronometer chronometer;

    private Button btn_start,btn_stop,btn_base,btn_format;

    private long recordingTime = 0;

    @Override

    protected void onCreate(Bundle savedInstanceState) {

        super.onCreate(savedInstanceState);

        setContentView(R.layout.activity_login);

        initView();

    }

    private void initView() {

        chronometer = (Chronometer) findViewById(R.id.chronometer);

        btn_start = (Button) findViewById(R.id.btnStart);

        btn_stop = (Button) findViewById(R.id.btnStop);

        btn_base = (Button) findViewById(R.id.btnReset);

        btn_format = (Button) findViewById(R.id.btn_format);

        chronometer.setOnChronometerTickListener(this);

        btn_start.setOnClickListener(this);

        btn_stop.setOnClickListener(this);

        btn_base.setOnClickListener(this);

        btn_format.setOnClickListener(this);

    }

    @Override

    public void  onClick(View view){

        switch (view.getId()){

            case R.id.btnStart:

                onChronoStar();

                break;

            case R.id.btnStop:

                onChronoStop();

                break;

            case R.id.btnReset:

                onChronoRes();

                break;

            case R.id.btn_format:

                chronometer.setFormat("Time: %s");

                break;

        }

    }

    @Override//每秒调用一次

    public  void onChronometerTick(Chronometer chronometer){

        String time = chronometer.getText().toString();

        Log.d("time--", time);

    }

    public  void onChronoStar(){

        chronometer.setBase(SystemClock.elapsedRealtime()-recordingTime);// 跳过已经记录了的时间

        chronometer.start();

    }

    public  void onChronoStop(){

        chronometer.stop();

        recordingTime = SystemClock.elapsedRealtime()-chronometer.getBase();// 保存这次记录了的时间

    }

    public void onChronoRes(){

        recordingTime = 0;

        chronometer.setBase(SystemClock.elapsedRealtime());// 从当前时刻重新计时

    }

}
Android基础控件TextClock和Chronometer的使用的更多相关文章
- Android基础控件ListView基础操作
1.简介 基于Android基础控件ListView和自定义BaseAdapter适配器情况下,对ListView的数据删除和添加操作: public boolean add(E e) {//添加数据 ...
- android 基础控件(EditView、SeekBar等)的属性及使用方法
android提供了大量的UI控件,本文将介绍TextView.ImageView.Button.EditView.ProgressBar.SeekBar.ScrollView.WebView ...
- 矩阵, 矩阵 , Android基础控件之ImageView
天下文章大家抄,以下所有内容,有来自copy,有来自查询,亦有自己的总结(目的是总结出自己的东西),所以说原创,不合适,说是转载也不恰当,所以我称之为笔记,可惜没有此分类选项,姑且不要脸一点,选择为原 ...
- android 基础控件 EditText
EditText 简介: EditText 控件继承 TextView ,它有TextView的所有属性和方法,并且自身是可编辑的: extends TextView java.lang.Object ...
- Android 基础控件 TextView
一TextView介绍: TextView是UI最基本的组件,使用TextView可以显示丰富的文本信息.设置添加TextView最常见的方法就是在xml中添加TextView元素,并指定属性.Tex ...
- Android基础控件ProgressBar进度条的使用
1.简介 ProgressBar继承与View类,直接子类有AbsSeekBar和ContentLoadingProgressBar, 其中AbsSeekBar的子类有SeekBar和RatingBa ...
- Android基础控件单选按钮RadioButton和Checkbox复选按钮的使用
1.相关简介 RadioButton需要和RadioGroup结合使用,在RadioGroup设置布局方式! Checkbox是单独使用,本文为了方便放在了RadioGroup中! 2.简单使用 方法 ...
- Android基础控件Button的使用
1.相关属性 Android的按钮有Button和ImageButton(图像按钮),Button extends TextView, ImageButton extends ImageView! a ...
- Android基础控件EditText
1.常用属性 <!--selectAllOnFocus 获得焦点后全选组件内所有文本内容--> <!--inputType 限制输入方式--> <!--singleLin ...
随机推荐
- Linux ls 命令实现(简化版)
在学习linux系统编程的时候,实现了ls命令的简化版本号. 实现的功能例如以下: 1. 每种文件类型有自己的颜色 (- 普通文件, d 文件夹文件, l 链接文件. c 字符设备文件. b 快设备文 ...
- Django ORM 之F、Q查询与事务
返回ORM目录 Django ORM 内容目录 一.F.Q查询 二.事务 三.only与defer 一.F.Q查询 """ Product表中的数据: 1 橡皮 2 20 ...
- Hadoop Tez框架
- Task 暂停与继续
static void Main(string[] args) { CancellationTokenSource tokenSource = new CancellationTokenSource( ...
- AIO 详解
AIO(Asynchronous Input and Output) 异步IO则采用"订阅-通知"模式: 即应用程序向操作系统注册IO监听,然后继续做自己的事情. 当操作系统发生I ...
- curl 一个使用例子
#include <iostream> #define Main main #include <string> #include <assert.h> #inclu ...
- java反射快速入门
笔记记在了掘金,发现掘金的markdown编辑器比博客园样式要好看不少 https://juejin.im/post/5d4e575af265da03e4674e9f
- 单调栈——cf777E
傻逼单调栈啊我怎么想了半天dp #include <bits/stdc++.h> using namespace std; typedef long long LL; typedef st ...
- kubernetes配置(kubeconfig)对多集群的访问
配置对多集群的访问 本文展示如何使用配置文件来配置对多个集群的访问. 在将集群.用户和上下文定义在一个或多个配置文件中之后,用户可以使用 kubectl config use-context 命令快速 ...
- Kubernetes的包管理工具Helm的安装和使用
1.源码安装 [root@master ~]# wget https://storage.googleapis.com/kubernetes-helm/helm-v2.14.0-linux-amd64 ...