如何在 pyqt 中实现桌面歌词
前言
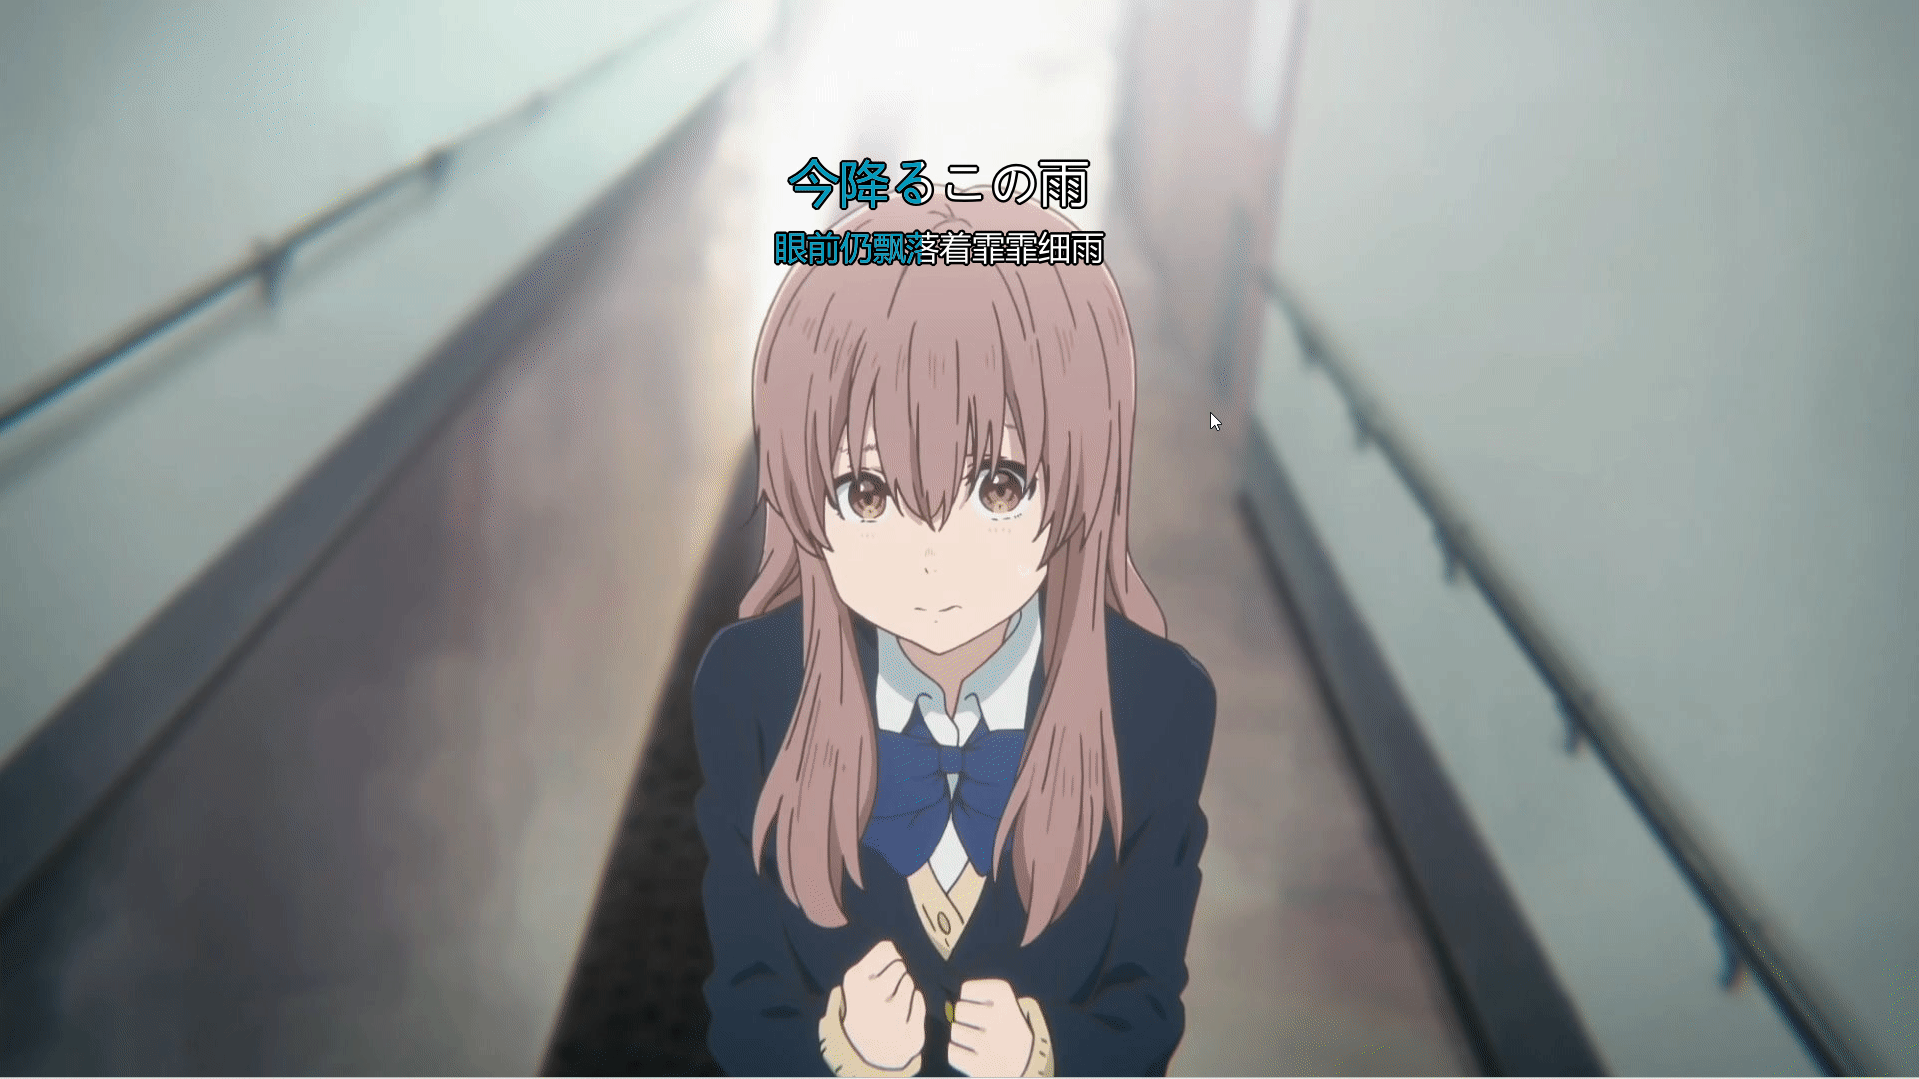
酷狗、网抑云和 QQ 音乐都有桌面歌词功能,这篇博客也将使用 pyqt 实现桌面歌词功能,效果如下图所示:
代码实现
桌面歌词部件 LyricWidget 在 paintEvent 中绘制歌词。我们可以直接使用 QPainter.drawText 来绘制文本,但是通过这种方式无法对歌词进行描边。所以这里更换为 QPainterPath 来实现,使用 QPainterPath.addText 将歌词添加到绘制路径中,接着使用 Qainter.strokePath 进行描边,Qainter.fillPath 绘制歌词,这里的绘制顺序不能调换。
对于歌词的高亮部分需要特殊处理,假设当前高亮部分的宽度为 w,我们需要对先前绘制歌词的 QPainterPath 进行裁剪,只留下宽度为 w 的部分,此处通过 QPainterPath.intersected 计算与宽度为 w 的矩形路径的交集来实现裁剪。
对于高亮部分的动画,我们既可以使用传统的 QTimer,也可以使用封装地更加彻底的 QPropertyAnimation 来实现(本文使用后者)。这里需要进行动画展示的是高亮部分,也就是说我们只需改变“高亮宽度”这个属性即可。PyQt 为我们提供了 pyqtProperty,类似于 python 自带的 property,使用 pyqtProperty 可以给部件注册一个属性,该属性可以搭配动画来食用。
除了高亮动画外,我们还在 LyricWidget 中注册了滚动动画,用于处理歌词长度大于视口宽度的情况。
# coding:utf-8

from PyQt5.QtCore import QPointF, QPropertyAnimation, Qt, pyqtProperty

from PyQt5.QtGui import (QColor, QFont, QFontMetrics, QPainter, QPainterPath,

                         QPen)

from PyQt5.QtWidgets import QWidget

config = {

    "lyric.font-color": [255, 255, 255],

    "lyric.highlight-color": [0, 153, 188],

    "lyric.font-size": 50,

    "lyric.stroke-size": 5,

    "lyric.stroke-color": [0, 0, 0],

    "lyric.font-family": "Microsoft YaHei",

    "lyric.alignment": "Center"

}

class LyricWidget(QWidget):

    """ Lyric widget """

    def __init__(self, parent=None):

        super().__init__(parent=parent)

        self.setAttribute(Qt.WA_TranslucentBackground)

        self.lyric = []

        self.duration = 0

        self.__originMaskWidth = 0

        self.__translationMaskWidth = 0

        self.__originTextX = 0

        self.__translationTextX = 0

        self.originMaskWidthAni = QPropertyAnimation(

            self, b'originMaskWidth', self)

        self.translationMaskWidthAni = QPropertyAnimation(

            self, b'translationMaskWidth', self)

        self.originTextXAni = QPropertyAnimation(

            self, b'originTextX', self)

        self.translationTextXAni = QPropertyAnimation(

            self, b'translationTextX', self)

    def paintEvent(self, e):

        if not self.lyric:

            return

        painter = QPainter(self)

        painter.setRenderHints(

            QPainter.Antialiasing | QPainter.TextAntialiasing)

        # draw original lyric

        self.__drawLyric(

            painter,

            self.originTextX,

            config["lyric.font-size"],

            self.originMaskWidth,

            self.originFont,

            self.lyric[0]

        )

        if not self.hasTranslation():

            return

        # draw translation lyric

        self.__drawLyric(

            painter,

            self.translationTextX,

            25 + config["lyric.font-size"]*5/3,

            self.translationMaskWidth,

            self.translationFont,

            self.lyric[1]

        )

    def __drawLyric(self, painter: QPainter, x, y, width, font: QFont, text: str):

        """ draw lyric """

        painter.setFont(font)

        # draw background text

        path = QPainterPath()

        path.addText(QPointF(x, y), font, text)

        painter.strokePath(path, QPen(

            QColor(*config["lyric.stroke-color"]), config["lyric.stroke-size"]))

        painter.fillPath(path, QColor(*config['lyric.font-color']))

        # draw foreground text

        painter.fillPath(

            self.__getMaskedLyricPath(path, width),

            QColor(*config['lyric.highlight-color'])

        )

    def __getMaskedLyricPath(self, path: QPainterPath, width: float):

        """ get the masked lyric path """

        subPath = QPainterPath()

        rect = path.boundingRect()

        rect.setWidth(width)

        subPath.addRect(rect)

        return path.intersected(subPath)

    def setLyric(self, lyric: list, duration: int, update=False):

        """ set lyric

        Parameters

        ----------

        lyric: list

            list contains original lyric and translation lyric

        duration: int

            lyric duration in milliseconds

        update: bool

            update immediately or not

        """

        self.lyric = lyric or [""]

        self.duration = max(duration, 1)

        self.__originMaskWidth = 0

        self.__translationMaskWidth = 0

        # stop running animations

        for ani in self.findChildren(QPropertyAnimation):

            if ani.state() == ani.Running:

                ani.stop()

        # start scroll animation if text is too long

        fontMetrics = QFontMetrics(self.originFont)

        w = fontMetrics.width(lyric[0])

        if w > self.width():

            x = self.width() - w

            self.__setAnimation(self.originTextXAni, 0, x)

        else:

            self.__originTextX = self.__getLyricX(w)

            self.originTextXAni.setEndValue(None)

        # start foreground color animation

        self.__setAnimation(self.originMaskWidthAni, 0, w)

        if self.hasTranslation():

            fontMetrics = QFontMetrics(self.translationFont)

            w = fontMetrics.width(lyric[1])

            if w > self.width():

                x = self.width() - w

                self.__setAnimation(self.translationTextXAni, 0, x)

            else:

                self.__translationTextX = self.__getLyricX(w)

                self.translationTextXAni.setEndValue(None)

            self.__setAnimation(self.translationMaskWidthAni, 0, w)

        if update:

            self.update()

    def __getLyricX(self, w: float):

        """ get the x coordinate of lyric """

        alignment = config["lyric.alignment"]

        if alignment == "Right":

            return self.width() - w

        elif alignment == "Left":

            return 0

        return self.width()/2 - w/2

    def getOriginMaskWidth(self):

        return self.__originMaskWidth

    def getTranslationMaskWidth(self):

        return self.__translationMaskWidth

    def getOriginTextX(self):

        return self.__originTextX

    def getTranslationTextX(self):

        return self.__translationTextX

    def setOriginMaskWidth(self, pos: int):

        self.__originMaskWidth = pos

        self.update()

    def setTranslationMaskWidth(self, pos: int):

        self.__translationMaskWidth = pos

        self.update()

    def setOriginTextX(self, pos: int):

        self.__originTextX = pos

        self.update()

    def setTranslationTextX(self, pos):

        self.__translationTextX = pos

        self.update()

    def __setAnimation(self, ani: QPropertyAnimation, start, end):

        if ani.state() == ani.Running:

            ani.stop()

        ani.setStartValue(start)

        ani.setEndValue(end)

        ani.setDuration(self.duration)

    def setPlay(self, isPlay: bool):

        """ set the play status of lyric """

        for ani in self.findChildren(QPropertyAnimation):

            if isPlay and ani.state() != ani.Running and ani.endValue() is not None:

                ani.start()

            elif not isPlay and ani.state() == ani.Running:

                ani.pause()

    def hasTranslation(self):

        return len(self.lyric) == 2

    def minimumHeight(self) -> int:

        size = config["lyric.font-size"]

        h = size/1.5+60 if self.hasTranslation() else 40

        return int(size+h)

    @property

    def originFont(self):

        font = QFont(config["lyric.font-family"])

        font.setPixelSize(config["lyric.font-size"])

        return font

    @property

    def translationFont(self):

        font = QFont(config["lyric.font-family"])

        font.setPixelSize(config["lyric.font-size"]//1.5)

        return font

    originMaskWidth = pyqtProperty(

        float, getOriginMaskWidth, setOriginMaskWidth)

    translationMaskWidth = pyqtProperty(

        float, getTranslationMaskWidth, setTranslationMaskWidth)

    originTextX = pyqtProperty(float, getOriginTextX, setOriginTextX)

    translationTextX = pyqtProperty(

        float, getTranslationTextX, setTranslationTextX)
上述代码对外提供了两个接口 setLyric(lyric, duration, update) 和 setPlay(isPlay),用于更新歌词和控制歌词动画的开始与暂停。下面是一个最小使用示例,里面使用 Qt.SubWindow 标志使得桌面歌词可以在主界面最小化后仍然显示在桌面上,同时不会多出一个应用图标(Windows 是这样,Linux 不一定):
class Demo(QWidget):

    def __init__(self):

        super().__init__(parent=None)

        # 创建桌面歌词

        self.desktopLyric = QWidget()

        self.lyricWidget = LyricWidget(self.desktopLyric)

        self.desktopLyric.setAttribute(Qt.WA_TranslucentBackground)

        self.desktopLyric.setWindowFlags(

            Qt.FramelessWindowHint | Qt.SubWindow | Qt.WindowStaysOnTopHint)

        self.desktopLyric.resize(800, 300)

        self.lyricWidget.resize(800, 300)

        # 必须有这一行才能显示桌面歌词界面

        self.desktopLyric.show()

        # 设置歌词

        self.lyricWidget.setLyric(["Test desktop lyric style", "测试桌面歌词样式"], 3000)

        self.lyricWidget.setPlay(True)

if __name__ == '__main__':

    app = QApplication(sys.argv)

    w = Demo()

    w.show()

    app.exec_()
后记
至此关于桌面歌词的实现方案已经介绍完毕,完整的播放器界面代码可参见:https://github.com/zhiyiYo/Groove,以上~~
如何在 pyqt 中实现桌面歌词的更多相关文章
- 如何在pyqt中自定义无边框窗口
前言 之前写过很多关于无边框窗口并给窗口添加特效的博客,按照时间线罗列如下: 如何在pyqt中实现窗口磨砂效果 如何在pyqt中实现win10亚克力效果 如何在pyqt中通过调用SetWindowCo ...
- 如何在pyqt中给无边框窗口添加DWM环绕阴影
前言 在之前的博客<如何在pyqt中通过调用SetWindowCompositionAttribute实现Win10亚克力效果>中,我们实现了窗口的亚克力效果,同时也用SetWindowC ...
- 如何在pyqt中实现窗口磨砂效果
磨砂效果的实现思路 这两周一直在思考怎么在pyqt上实现窗口磨砂效果,网上搜了一圈,全都是 C++ 的实现方法.正好今天查python的官方文档的时候看到了 ctypes 里面的 HWND,想想倒不如 ...
- 如何在pyqt中实现win10亚克力效果
亚克力效果的实现思路 上一篇博客<如何在pyqt中实现窗口磨砂效果> 中实现了win7中的Aero效果,但是和win10的亚克力效果相比,Aero还是差了点内味.所以今天早上又在网上搜了一 ...
- 如何在pyqt中通过调用 SetWindowCompositionAttribute 实现Win10亚克力效果
亚克力效果 在<如何在pyqt中实现窗口磨砂效果>和<如何在pyqt中实现win10亚克力效果>中,我们调用C++ dll来实现窗口效果,这种方法要求电脑上必须装有MSVC.V ...
- 如何在pyqt中在实现无边框窗口的同时保留Windows窗口动画效果(一)
无边框窗体的实现思路 在pyqt中只要 self.setWindowFlags(Qt.FramelessWindowHint) 就可以实现边框的去除,但是没了标题栏也意味着窗口大小无法改变.窗口无法拖 ...
- 如何在pyqt中实现带动画的动态QMenu
弹出菜单的视觉效果 QLineEdit 原生的菜单弹出效果十分生硬,而且样式很丑.所以照着Groove中单行输入框弹出菜单的样式和动画效果写了一个可以实现动态变化Item的弹出菜单,根据剪贴板的内容是 ...
- 如何在 pyqt 中捕获并处理 Alt+F4 快捷键
前言 如果在 Windows 系统的任意一个窗口中按下 Alt+F4,默认行为是关闭窗口(或者最小化到托盘).对于使用了亚克力效果的窗口,使用 Alt+F4 最小化到托盘,再次弹出窗口的时候可能出现亚 ...
- 如何在pyqt中使用 QGraphicsView 实现图片查看器
前言 在 PyQt 中可以使用很多方式实现照片查看器,最朴素的做法就是重写 QWidget 的 paintEvent().mouseMoveEvent 等事件,但是如果要在图像上多添加一些形状,那么在 ...
随机推荐
- 虚拟机(Vmvare)与配置,得到一台学习机
准备: 1.Vmvare 2.CentOS7.4镜像 安装与配置操作系统: 1.配置虚拟机上网 2.配置静态ip地址 开始安装 1. 2.直接下一步选择我们准备好的镜像,然后下一步 3.修改虚拟机的名 ...
- 一窥 AJAX
一窥 AJAX 本文写于 2020 年 6 月 7 日 AJAX 这个词非常常见,如果使初学者,说不定还会非常害怕这个名字看起来非常高端.非常难的技术. AJAX,全称 Async JavaScrip ...
- git 本地项目关联新repo
git initgit remote add origin repo-url git pull origin master --allow-unrelated-histories git add . ...
- 【NodeJS】替换模糊查询字符里包含的正则关键字
问题:正则匹配时字符串中包含了一些特殊字符,导致查询失败 例如,下面的字符包含了( 和 ),这在正则中属于特殊字符 (-)-magnocurarine 正则中的特殊字符如下图 思路: 1.映射查询字符 ...
- Dockerfile 使用 SSH
如果在书写 Dockerfile 时,有些命令需要使用到 SSH 连接,比如从私有仓库下载文件等,那么我们应该怎么做呢? Dockerfile 使用 SSH Dockerfile 文件配置 为了使得 ...
- 【可视化分析案例】用python分析B站Top100排行榜数据
一.数据源 之前,我分享过一期爬虫,用python爬取Top100排行榜: 最终数据结果,是这样的: 在此数据基础上,做python可视化分析. 二.数据读取 首先,读取数据源: # 读取csv数据 ...
- 【Java面试】JVM如何判断一个对象可以被回收
Hi, 我是Mic. 今天分享一道一线互联网公司必问的面试题. "JVM如何判断一个对象可以被回收" 关于这个问题,来看看普通人和高手的回答. 普通人: 嗯.......... 高 ...
- 学学dotnet core中的身份验证和授权-1-概念
前言 身份验证: Authentication 授权: Authorization net core 中的身份验证和授权这两个部分,是相辅相成的.当初我在学在部分的时候,是看的 net core 官网 ...
- Linux安装netstat命令
Linux安装netstat命令 1.查找netstat命令所属的依赖包 [root@localhost ~]# yum provides netstat netstat命令的安装包为net-tool ...
- 【主流技术】Mybatis Plus的理解与应用
前言 mybatis plus是一个mybatis的增强工具,在其基础上只做增强不做改变.作为开发中常见的第三方组件,学习并应用在项目中可以节省开发时间,提高开发效率. 官方文档地址:MyBatis- ...