springboot2.x整合redis实现缓存(附github链接)
本文代码已提交github: https://github.com/LCABC777/Springboot-redis(1)Springboot中使用redis操作的两种方式:lettuce和jedis,两者在进行操作时都需要序列化器来实现序列化
(推荐使用jackson2JsonRedisSerializer,相比于JDK提供的序列化器和String序列化器长度更短),
lettuce和redis都是 redis的客户端。
(2)Springboot 1.x整合Spring-data-redis底层用的是jedis,Springboot 2.x整合spring-data-redis用的是lettuce,
jedis在多线程环境下是非线程安全的,使用了jedis pool连接池,为每个Jedis实例增加物理连接。
Lettuce的连接是基于Netty的,连接实例(StatefulRedisConnection)可以在多个线程间并发访问。
本文的基本环境:
  springboot: 2.x
  redis版本:redis 3.0.0
  linux系统:centos 6.5
  jdk:1.8
 (1)添加maven依赖
<!--web依赖-->
<dependency>

    <groupId>org.springframework.boot</groupId>

    <artifactId>spring-boot-starter-web</artifactId>

</dependency>
<!--redis依赖-->

 <dependency>

        <groupId>org.springframework.boot</groupId>

        <artifactId>spring-boot-starter-data-redis</artifactId></dependency>

<!--junit依赖-->
<dependency>

        <groupId>junit</groupId>

        <artifactId>junit</artifactId>

       <version>4.12</version>

       <scope>test</scope>

</dependency>
<!--spring test测试依赖>

<dependency>

        <groupId>org.springframework.boot</groupId>

        <artifactId>spring-boot-starter-test</artifactId>
</dependency>
(2)application.properties中redis数据源及lettuce客户端配置
#redis

# 连接设置

spring.redis.database=0

spring.redis.host=192.168.18.128

spring.redis.port=6379

spring.redis.password=123456

spring.redis.timeout=10000ms

# 连接池设置

spring.redis.lettuce.pool.max-idle=8

spring.redis.lettuce.pool.max-wait=

spring.redis.lettuce.pool.min-idle=0

spring.redis.lettuce.pool.max-active=8
(3)redis模板(redisTemplate,提供对redis数据库的操作方法)及缓存管理器(cacheManager)配置
package com.lc.config;

import org.slf4j.Logger;

import org.slf4j.LoggerFactory;

import org.springframework.cache.interceptor.KeyGenerator;

import org.springframework.context.annotation.Bean;

import org.springframework.context.annotation.Configuration;

import org.springframework.data.redis.cache.RedisCacheConfiguration;

import org.springframework.data.redis.cache.RedisCacheManager;

import org.springframework.data.redis.connection.RedisConnectionFactory;

import org.springframework.data.redis.connection.lettuce.LettuceConnectionFactory;

import org.springframework.data.redis.core.RedisTemplate;

import org.springframework.data.redis.serializer.*;

import javax.annotation.Resource;

import java.time.Duration;

import java.util.HashMap;

import java.util.Map;

@Configuration

public class RedisConfig {


  //lettuce客户端连接工厂

    @Resource

    private LettuceConnectionFactory lettuceConnectionFactory;
  //日志

    private Logger logger=LoggerFactory.getLogger(RedisConfig.class);
  //json序列化器

    private Jackson2JsonRedisSerializer<Object> jackson2JsonRedisSerializer = new Jackson2JsonRedisSerializer(Object.class);

    //缓存生存时间

    private Duration timeToLive = Duration.ofDays(1);

    @Bean

    public RedisCacheManager cacheManager(RedisConnectionFactory connectionFactory) {
     //redis缓存配置

        RedisCacheConfiguration config = RedisCacheConfiguration.defaultCacheConfig()

       .entryTtl(this.timeToLive)

       .serializeKeysWith(RedisSerializationContext.SerializationPair.fromSerializer(keySerializer()))

       .serializeValuesWith(RedisSerializationContext.SerializationPair.fromSerializer(valueSerializer()))

       .disableCachingNullValues();
     //缓存配置map

        Map<String,RedisCacheConfiguration> cacheConfigurationMap=new HashMap<>();
     //自定义缓存名,后面使用的@Cacheable的CacheName

        cacheConfigurationMap.put("users",config);

        cacheConfigurationMap.put("default",config);
     //根据redis缓存配置和reid连接工厂生成redis缓存管理器

        RedisCacheManager redisCacheManager = RedisCacheManager.builder(connectionFactory)

        .cacheDefaults(config)

        .transactionAware()

        .withInitialCacheConfigurations(cacheConfigurationMap)

        .build();

        logger.debug("自定义RedisCacheManager加载完成");

        return redisCacheManager;

    }

  //redisTemplate模板提供给其他类对redis数据库进行操作

    @Bean(name = "redisTemplate")

    public RedisTemplate<String,Object> redisTemplate(RedisConnectionFactory redisConnectionFactory){

        RedisTemplate<String,Object> redisTemplate = new RedisTemplate<>();

        redisTemplate.setConnectionFactory(redisConnectionFactory);

        redisTemplate.setKeySerializer(keySerializer());

        redisTemplate.setHashKeySerializer(keySerializer());

        redisTemplate.setValueSerializer(valueSerializer());

        redisTemplate.setHashValueSerializer(valueSerializer());

        logger.debug("自定义RedisTemplate加载完成");

        return redisTemplate;

    }


  //redis键序列化使用StrngRedisSerializer

    private RedisSerializer<String> keySerializer() {

        return new StringRedisSerializer();

    }


  //redis值序列化使用json序列化器

    private RedisSerializer<Object> valueSerializer() {

        return new GenericJackson2JsonRedisSerializer();

    }


  //缓存键自动生成器

    @Bean

    public KeyGenerator myKeyGenerator() {

        return (target, method, params) -> {

            StringBuilder sb = new StringBuilder();

            sb.append(target.getClass().getName());

            sb.append(method.getName());

            for (Object obj : params) {

                sb.append(obj.toString());

            }

            return sb.toString();

        };

    }

}
(4)利用redisTemplate进行对redis数据库的操作
注入redisTemplate
 @Autowired

 private RedisTemplate redisTemplate;
(5)使用redis的hash来存储map,并做缓存处理,用来验证是否成功
//添加hash,需要hash名和存储的键值对Map
public void setHash(String hashName,Map<String,String> map) {

       redisTemplate.opsForHash().putAll(hashName,map);

  }


  //Springboot的启动器main方法上需要加上@EnableCaching开启缓存,使用了@Cacheable注解后,缓存的值将被存入redis数据库中
  //缓存名可以为RedisConfig中自定义的缓存名,键生成器为RedisConig中自定义的键生成器,也可以自己自定义缓存key名

  @Cacheable(cacheNames = "users",keyGenerator ="myKeyGenerator")
//从redis中获取map

  public Map<Object,Object> getHash(String hashName){

      if (redisTemplate.hasKey(hashName)) {

          System.out.println(redisTemplate.opsForHash().entries(hashName));

          return redisTemplate.opsForHash().entries(hashName);

      }else {

            return null;

      }

   }
(6)使用junit来测试缓存
import com.lc.Starter;

import com.lc.service.RedisService;

import org.junit.Test;

import org.junit.runner.RunWith;

import org.springframework.beans.factory.annotation.Autowired;

import org.springframework.boot.test.context.SpringBootTest;

import org.springframework.test.context.junit4.SpringJUnit4ClassRunner;

import java.util.HashMap;

import java.util.Map;

@RunWith(SpringJUnit4ClassRunner.class)

@SpringBootTest(classes = Starter.class)

public class MyTest {

    @Autowired

    private RedisService redisService;

    @Test

    public void hashTest(){

        Map<String,String> map=new HashMap<>();

        map.put("a879","1");

        map.put("2131","23");
     //redis中添加hash

        redisService.setHash("ccc",map);
     //多次获取hash

        Map hash=redisService.getHash("ccc");

        redisService.getHash("ccc");
     redisService.getHash("ccc")

        if (hash!=null){

            System.out.println(hash.toString());

        }

    }

}
(7)多次获取hash,测试结果只执行了两次打印方法,说明除了第一次都是从redis的缓存库中读取的缓存,而不是getHash中的redisTemplate.opsForHash().entries(hashName)
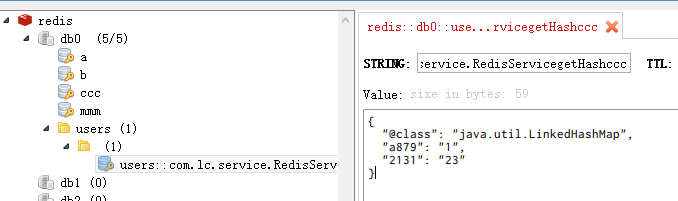
(8)从redisDesktop中可以清楚的看到redis的存储,setHash方法将ccc这个hash存入了redis库中,而getHash方法做缓存处理后,程序直接将包名+方法名+参数这个由keyGenertor自动生成的字符串作为key, Geneic json序列化器将要缓存类型在java中的包名和缓存的值组成json串作为value实现了缓存
本文代码已提交github: https://github.com/LCABC777/Springboot-redis
springboot2.x整合redis实现缓存(附github链接)的更多相关文章
- springboot2.0整合redis作为缓存以json格式存储对象
步骤1 <dependency> <groupId>org.springframework.boot</groupId> <artifactId>spr ...
- SpringBoot2.x整合Redis实战 4节课
1.分布式缓存Redis介绍 简介:讲解为什么要用缓存和介绍什么是Redis,新手练习工具 1.redis官网 https://redis.io/download 2.新手 ...
- 小D课堂 - 零基础入门SpringBoot2.X到实战_第9节 SpringBoot2.x整合Redis实战_39、SpringBoot2.x整合redis实战讲解
笔记 3.SpringBoot2.x整合redis实战讲解 简介:使用springboot-starter整合reids实战 1.官网:https://docs.spring.io/spring-bo ...
- SpringBoot2.x整合Prometheus+Grafana【附源码+视频】
图文并茂,新手入门教程,建议收藏 SpringBoot2.x整合Prometheus+Grafana[附源码+视频] 附源码+视频 目录 工程简介 简介 Prometheus grafana Spri ...
- Spring Boot 整合 Redis 实现缓存操作
摘要: 原创出处 www.bysocket.com 「泥瓦匠BYSocket 」欢迎转载,保留摘要,谢谢! 『 产品没有价值,开发团队再优秀也无济于事 – <启示录> 』 本文提纲 ...
- SpringBoot2.0 整合 Redis集群 ,实现消息队列场景
本文源码:GitHub·点这里 || GitEE·点这里 一.Redis集群简介 1.RedisCluster概念 Redis的分布式解决方案,在3.0版本后推出的方案,有效地解决了Redis分布式的 ...
- 从零搭建Spring Boot脚手架(6):整合Redis作为缓存
1. 前言 上一文我们整合了Mybatis Plus,今天我们会把缓存也集成进来.缓存是一个系统应用必备的一种功能,除了在减轻数据库的压力之外.还在存储一些短时效的数据场景中发挥着重大作用,比如存储用 ...
- Spring Boot 整合Redis 实现缓存
本文提纲 一.缓存的应用场景 二.更新缓存的策略 三.运行 springboot-mybatis-redis 工程案例 四.springboot-mybatis-redis 工程代码配置详解 ...
- Springboot2.0整合Redis(注解开发)
一. pom.xm文件引入对应jar包 <dependency> <groupId>org.springframework.boot</groupId> <a ...
随机推荐
- destoon公司账户增加销售区域等下拉列表配置
开始接触dt时不了解,其实直接用自定义字段即可.不过既然改过了,就记录一下. 在后台系统设置,模块管理,点击会员模块最后的设置图表 打开会员模块设置 如图 增加 主要销售区域 并在公司修改页面调用 1 ...
- 【netbeans】【ubuntu】ubuntu netbeans 抗锯齿化修复
每一个在ubuntu下用netbeans的,都会对它的字体怎么会显示的那么难看表示很不理解.我就是因此几乎没有用netbeans的. 不过今天终于解决问题了,虽然没有eclipse显示的那么漂亮, ...
- nordic芯片开发——烧写方法记录
在开发nordic芯片的时候,分为存外设开发和结合softdevice开发,另外还有结合mbr的开发(这个暂时没有深究)在裸机开发的时候,sdk里面称为blank,把芯片的程序erase之后,直接下载 ...
- SQL_1_简介
了解一门语言,还是应该从名字开始.SQL中的S即Structured(结构),L即Language(语言),Q即Query(查询),但不仅仅只是查询,还可以建立数据库,添加和删除数据,对数据作联合,当 ...
- Android兼容性测试CTS Verifier-环境搭建、测试执行、结果分析
CTS Verifier算是CTS的一部分,需要手动进行,主要用于测试那些自动测试系统无法测试的功能,比如相机.传感器等.由于硬件配置或其他原因,不同手机上部分测试项目被隐藏,也就是说CTS Veri ...
- poj2195 bfs+最小权匹配
题意:给个矩阵,矩阵里有一些人和房子(人数和房子数相等),一个人只进一个房子(可以路过房子而不进),每走一步花费1美金,求所有人都进入房子的最小花费,这是典型的二分图带权匹配问题. 这题就是建图有点麻 ...
- studio rendering problems
问题--------> Rendering Problems The following classes could not be instantiated: - android.support ...
- 模拟 - BZOJ 1510 [POI2006] Kra-The Disks
BZOJ 1510 [POI2006] Kra-The Disks 描述 Johnny 在生日时收到了一件特殊的礼物,这件礼物由一个奇形怪状的管子和一些盘子组成. 这个管子是由许多不同直径的圆筒(直径 ...
- Selenium WebDriver-通过ActionChains实现页面元素拖拽
#encoding=utf-8 import unittest import time import chardet from selenium import webdriver class Visi ...
- python + selenium - selenium简介
1. 产品简介 selenium 是 基于 web网页的UI自动化测试框架. 1)支持多浏览器操作:ie.chrome.firefox.edge.safaria等 2)跨平台:windows.linu ...